Digital Nerve Repair: Advanced Microsurgical Techniques and Protocols
Key Takeaway
Digital nerve repair requires meticulous microsurgical technique to restore hand sensibility and function. The procedure involves identifying the retracted nerve ends, resecting neuromas, and performing a tension-free epineurial neurorrhaphy using 8-0 or 9-0 nylon sutures. Proper alignment of fascicles and careful postoperative splinting are critical to optimize axonal regeneration and prevent joint contractures.
INTRODUCTION TO DIGITAL NERVE REPAIR
The restoration of sensibility following a digital nerve laceration is a paramount objective in hand surgery. Digital nerve injuries are among the most frequently encountered peripheral nerve lesions in orthopedic and plastic surgery trauma settings. Because the hand interacts with the environment primarily through tactile feedback, the loss of digital sensation severely compromises fine motor dexterity, grip strength regulation, and spatial awareness, while simultaneously exposing the insensate digit to unrecognized trauma, burns, and ulceration.
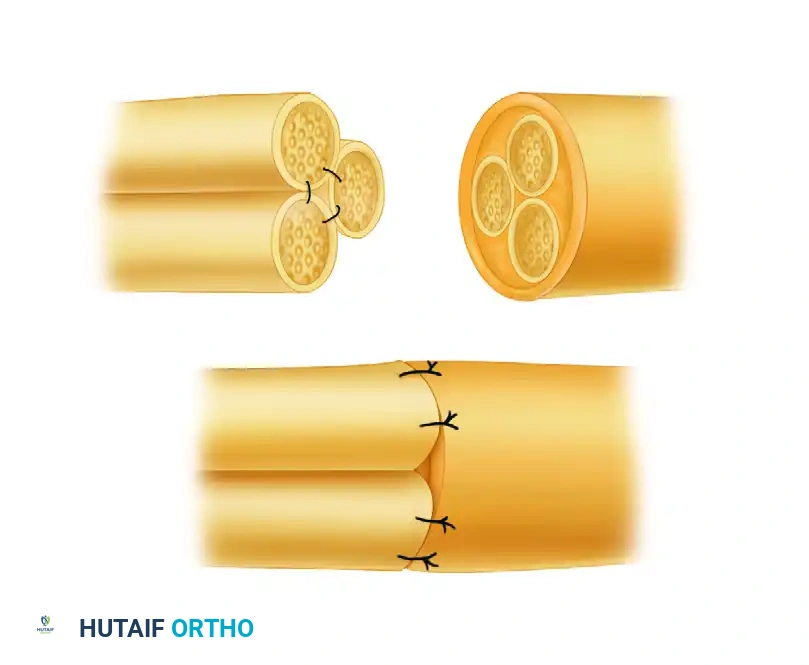
The primary goal of digital nerve suture (neurorrhaphy) is to coapt the severed nerve ends with minimal tension and optimal fascicular alignment, thereby providing an unobstructed conduit for regenerating axons. Achieving this requires a profound understanding of peripheral nerve microanatomy, meticulous handling of delicate neural tissues, and strict adherence to microsurgical principles. This comprehensive guide details the evidence-based protocols, anatomical considerations, and step-by-step surgical techniques required for optimal digital nerve repair.
SURGICAL ANATOMY AND MICROANATOMY
A thorough three-dimensional understanding of the digital nerve's course and its internal architecture is mandatory for successful identification, mobilization, and repair.
Macroscopic Anatomy
The proper digital nerves arise from the bifurcation of the common digital nerves in the distal palm. As they enter the digit, they lie on the radial and ulnar sides of the volar aspect of the finger, positioned volar to the digital arteries.
Throughout their course, the digital nerves are intimately associated with the fascial structures of the digit:
* Cleland’s Ligaments: These strong, fascial bands pass dorsal to the digital neurovascular bundle, tethering the skin to the phalanges and protecting the nerve during digital flexion and extension.
* Grayson’s Ligaments: These delicate, volar fascial bands pass volar to the neurovascular bundle.
During surgical exploration, the digital nerve can be reliably located between Grayson's and Cleland's ligaments.
Microscopic Anatomy of the Peripheral Nerve
The internal architecture of the digital nerve is highly organized. Successful neurorrhaphy relies on the precise realignment of these microanatomical structures.
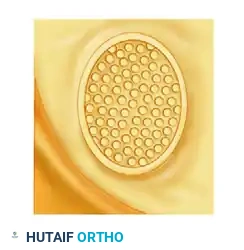
- Epineurium: The outermost layer of connective tissue surrounding the entire nerve trunk. It consists of an outer (adventitial) layer and an inner (interfascicular) layer. Epineurial repair is the gold standard for digital nerves.
- Perineurium: A dense, mechanically strong layer of connective tissue that surrounds individual fascicles (bundles of axons). It acts as the primary blood-nerve barrier.
- Endoneurium: The delicate connective tissue matrix that surrounds individual axons and their associated Schwann cells within a fascicle.
At the cellular level, the functional unit of the nerve is the axon, which is enveloped by the myelin sheath (in myelinated fibers) produced by Schwann cells. The basement membrane of the Schwann cell provides the critical scaffold for regenerating axons following Wallerian degeneration.

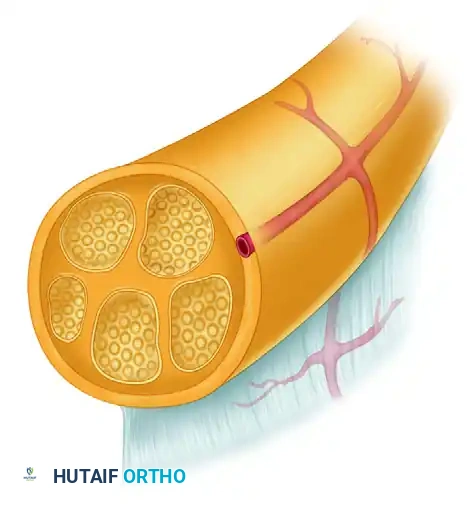
💡 Clinical Pearl: The Mesoneurium
The mesoneurium is the loose areolar tissue surrounding the epineurium that carries the segmental blood supply to the nerve. Aggressive stripping of the mesoneurium during dissection devascularizes the nerve ends, leading to ischemic scarring and poor axonal regeneration. Dissect only what is absolutely necessary to achieve a tension-free repair.
PREOPERATIVE PREPARATION AND EQUIPMENT
Patient Positioning and Anesthesia
The patient is positioned supine with the affected upper extremity extended on a radiolucent hand table. Regional anesthesia (axillary or supraclavicular brachial plexus block) is preferred, as it provides excellent intraoperative analgesia and postoperative sympathetic blockade, which enhances peripheral perfusion. A well-padded pneumatic tourniquet is applied to the upper arm to ensure a bloodless surgical field.
Microsurgical Instrumentation
Standard macroscopic instruments are inadequate for nerve repair. The surgeon must utilize:
* Magnification: High-quality surgical loupes (minimum 3.5x to 4.5x magnification) or an operating microscope.
* Instruments: Jeweler’s forceps (smooth, non-toothed), Castroviejo needle holders, and microscissors.
* Cutting Tools: A diamond knife or a fresh, sterile double-edged razor blade broken in half for precise, crush-free nerve end preparation.
SURGICAL APPROACH AND DISSECTION
Incision and Exposure
The digital nerves can be exposed through the same midradial or midulnar incisions used for the initial trauma evaluation, or via a volar Brunner (zigzag) incision.
1. Incision Design: If extending a transverse laceration, incorporate it into a Brunner-type zigzag incision to prevent volar flexion contractures. Never cross a flexion crease at a 90-degree angle.
2. Proximal Dissection: Begin the dissection proximally in a zone of uninjured, normal tissue. Identify the normal segment of the nerve and carefully dissect it from its investing fascia (including the volar aspect of the Cleland ligament).
3. Distal Progression: Once the healthy proximal nerve is identified and secured with a vessel loop, proceed distally toward the scar tissue or the site of injury.
4. Distal Dissection: Similarly, begin distal to the site of injury in healthy tissue, identify the distal nerve stump, and dissect proximally toward the scar.
⚠️ Surgical Warning: Order of Repair
Always suture divided flexor tendons before suturing any digital nerve. Tendon repair requires significant manipulation of the digit and the application of tension, which will inevitably disrupt a delicate microsurgical nerve repair if performed sequentially out of order.
Preparation of the Nerve Ends
Following a laceration, the nerve ends undergo localized trauma. The proximal end will form a neuroma (a disorganized tangle of regenerating axons and scar tissue), while the distal end will form a glioma (a scar composed of Schwann cells and connective tissue).
- Resection: With microscissors, a diamond knife, or a razor blade on a sterile wooden tongue depressor, resect the neuroma from the proximal end and the glioma from the distal end.
- Visual Inspection: Inspect the cut ends under high magnification. You must visualize healthy, pouting fascicles ("mushrooming" out of the epineurium) and a distinct lack of fibrotic scar tissue. If scar tissue is still present, resect an additional 1-2 mm until healthy fascicles are encountered.
MICROSURGICAL SUTURE TECHNIQUE
The fundamental principle of peripheral nerve repair is to approximate the nerve ends without tension while perfectly aligning the internal fascicular anatomy.
Tension and Gap Management
Approximate the nerve ends to assess tension. You may flex the finger joints minimally to facilitate approximation.
* Acceptable Tension: If the nerve ends can be held together with an 8-0 suture without the suture tearing through the epineurium, the tension is generally acceptable.
* Unacceptable Tension: If a large gap requires extreme digital flexion to close, the repair will fail due to ischemia and subsequent scarring. In this scenario, do not force a primary repair. Consider a nerve autograft (e.g., medial antebrachial cutaneous nerve, lateral antebrachial cutaneous nerve, or sural nerve) or a nerve conduit if the gap is less than 1.5 cm.
Suture Selection
- Standard Digital Nerves: Use an 8-0 or 9-0 monofilament nylon suture on an atraumatic, precision-point curved needle.
- Terminal Branches: For lacerations distal to the distal interphalangeal (DIP) joint, the nerve branches become exceedingly small. Use 10-0 or 11-0 monofilament nylon.
Step-by-Step Epineurial Repair
The goal is to align each small fascicle to match its opposing, mirror-image counterpart on the other side of the laceration.
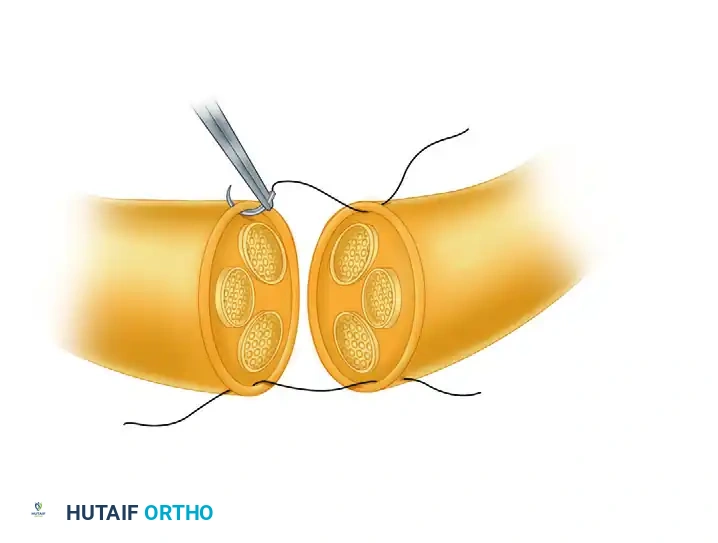
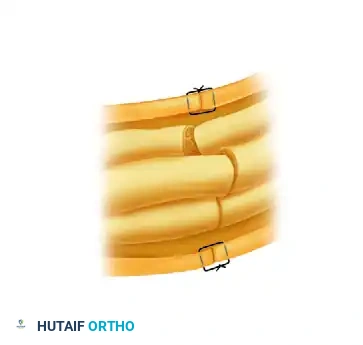
- Temporary Fixation (Optional): If necessary to overcome mild elastic retraction, the nerve ends can be held in place temporarily. Pass the smallest straight Bunnell needle transversely through the nerve ends and into the adjoining soft tissue. This acts as a temporary anchor, eliminating tension while the delicate epineurial sutures are placed and tied.
- First Suture Placement: Pass the needle through the epineurium of the proximal nerve stump approximately 1 mm from its cut edge. Proceed to pass the needle in a similar manner through the epineurium of the distal nerve stump.
- Knot Tying: Tie the knot carefully, utilizing at least five loops (throws) to prevent the monofilament nylon from slipping or untying. Leave the tails of this first suture long.
- Second Suture Placement: Place a second epineurial suture on the exact opposite side (180 degrees) of the nerve. Leave these tails long as well.
- The 180-Degree Rotation Technique: Use the long tails of the first two sutures as traction sutures. By pulling one volar and the other dorsal, you can rotate the nerve 180 degrees, making the deep (posterior) surface of the nerve accessible for suturing without crushing the nerve with forceps.
- Completion of the Repair: Place additional sutures to complete the coaptation. For a standard digital nerve, a total of four evenly spaced epineurial sutures is usually sufficient to prevent fascicular escape and ensure a watertight seal.
💡 Clinical Pearl: Fascicular Alignment
Look for longitudinal landmarks on the epineurium, such as longitudinal blood vessels (vasa nervorum), to ensure the nerve is not rotationally malaligned. Rotational mismatch is a primary cause of poor sensory recovery, as sensory axons may be misdirected into blind endoneurial tubes.
INTRAOPERATIVE ASSESSMENT AND CLOSURE
After the repair is complete, slowly extend the digital joints and carefully observe the suture line under magnification.
* Note the exact degree of joint extension at which tension begins to appear on the suture line.
* This angle represents the "optimal position" or the maximum safe extension limit.
* The digit must be splinted in a position slightly more flexed than this optimal position to guarantee zero tension on the healing neurorrhaphy during the initial inflammatory phase of healing.
Deflate the tourniquet, achieve meticulous hemostasis (avoiding electrocautery near the repaired nerve), and close the skin with non-absorbable sutures.
POSTOPERATIVE CARE AND REHABILITATION
The postoperative protocol must balance the need to protect the fragile nerve repair from mechanical disruption with the need to initiate early motion to prevent joint stiffness and peritendinous adhesions.
Immobilization vs. Early Protected Motion
Historically, nerve repairs were strictly immobilized for 3 to 4 weeks. However, contemporary evidence suggests that early protected motion is highly beneficial.
* Sensory Outcomes: The difference in sensibility recovery between patients who undergo strict immobilization and those allowed early protected motion has not been found to be statistically significant.
* Functional Outcomes: Likewise, no significant difference in clinical nerve recovery outcomes has been found between splinted and non-splinted cohorts. However, early motion prevents crippling joint stiffness.
Splinting Protocol
While major nerves are regenerating, the hand may assume an unnatural posture due to temporary muscle imbalance. Even when the nerve lesion is proximal to the wrist, the hand suffers most and may incur fixed contractures before nerve function returns. Proper splinting is absolutely necessary to prevent these contractures.
-
Immediate Postoperative Phase (Weeks 0-3):
- Apply a dorsal extension-block splint. The wrist is typically placed in neutral, the metacarpophalangeal (MCP) joints in 30-40 degrees of flexion, and the interphalangeal (IP) joints in slight flexion (based on the intraoperative tension assessment).
- Immediate active and passive flexion exercises may be allowed within the confines of the extension-block splint. The splint physically prevents the digit from extending past the safe zone, thereby preventing tension on the repair site.
- Active finger motion must be started as soon as possible to avoid stiffness and neural adhesions.
-
Intermediate Phase (Weeks 3-4):
- After 3 weeks, the tensile strength of the epineurial repair has increased sufficiently.
- The finger joints are allowed gradual, active extension beyond the optimal position noted at surgery. The splint is progressively modified to allow greater extension.
-
Management of Large Defects:
- If the defect in the nerve was large and the repair was performed under maximal acceptable tension, active extension cannot be permitted before 4 weeks.
- Warning: Prolonged flexion beyond 4 weeks makes a proximal interphalangeal (PIP) joint flexion contracture highly likely. In circumstances where a primary repair would require >4 weeks of severe flexion, it is definitively best to perform a nerve graft at the index operation. A tension-free nerve graft allows for early digital motion, preventing contractures.
Protection of the Insensate Digit
Axonal regeneration occurs at a rate of approximately 1 mm per day. Therefore, a digital nerve repaired at the base of the finger may take several months to reinnervate the fingertip. During this prolonged period, the skin remains completely anesthetic.
The patient must be explicitly warned and educated regarding the risks of an insensate digit:
* The anesthetic skin can become severely infected after even minor, unrecognized trauma.
* The digit can be easily burned, frostbitten, cut, or blistered by friction unless properly protected.
* Patient Instructions: Instruct the patient to visually inspect the insensitive areas routinely (multiple times a day) for signs of erythema, swelling, or breakdown. They must consciously avoid friction, repetitive stress, and extremes of heat and cold until protective sensibility returns.
Sensory Re-education
Once advancing Tinel's sign reaches the fingertip and protective sensation (perception of 30-Hz vibration or deep pressure) begins to return, a formal sensory re-education program should be initiated with a specialized hand therapist. This involves cortical remapping exercises, utilizing varying textures and visual feedback to help the brain interpret the altered neural signals arriving from the regenerating nerve, ultimately maximizing the functional outcome of the digital nerve repair.
📚 Medical References
You Might Also Like