Proximal Interphalangeal Joint Volar Plate Interposition Arthroplasty: A Comprehensive Surgical Guide
Key Takeaway
Proximal interphalangeal (PIP) joint volar plate interposition arthroplasty is a biological resurfacing technique indicated primarily for post-traumatic arthritis. The procedure involves a volar approach, detachment of the volar plate from the middle phalanx, debridement of the proximal phalanx head, and interposition of the volar plate into the joint space. It provides excellent pain relief while preserving joint stability, making it a viable alternative to silicone implant arthroplasty or arthrodesis in carefully selected patients.
Introduction and Rationale
The proximal interphalangeal (PIP) joint is the primary functional hinge of the human digit, accounting for approximately 85% of total finger flexion. Consequently, degenerative changes, whether secondary to inflammatory arthropathies or post-traumatic osteoarthritis, can severely compromise hand function, grip strength, and overall quality of life.
While silicone implant arthroplasty and joint arthrodesis have historically been the mainstays of surgical management, Proximal Interphalangeal Joint Volar Plate Interposition Arthroplasty has emerged as a highly effective biological alternative. By utilizing the patient's native volar plate as an autologous interpositional spacer, surgeons can eliminate painful bone-on-bone contact while preserving the critical soft-tissue restraints necessary for joint stability. This technique is particularly valuable in the management of post-traumatic arthritis, where the surrounding soft-tissue envelope remains relatively robust compared to the severely attenuated tissues seen in rheumatoid arthritis.
Indications and Patient Selection
Careful patient selection is the cornerstone of successful PIP joint arthroplasty. The decision to proceed with a volar plate interposition, a flexible silicone implant, a surface replacement, or an arthrodesis depends heavily on the etiology of the arthritis, the specific digit involved, and the patient's functional demands.
Finger-Specific Considerations
The biomechanical demands placed on each digit dictate the optimal surgical intervention:
* Index Finger: The index finger PIP joint is subjected to significant lateral and shear forces during key pinch and tip-to-tip pinch. Because arthroplasty (both biological and implant-based) often fails to provide adequate lateral stability against these forces, PIP joint arthrodesis is generally the procedure of choice for the index finger.
* Middle, Ring, and Little Fingers: These ulnar digits are primarily responsible for power grasp, which requires a functional arc of flexion. Therefore, PIP joint arthroplasty (including volar plate interposition) is highly indicated for these digits to preserve motion and facilitate a functional grip.
💡 Clinical Pearl: The "Pinch and Grasp" Strategy
In patients with multi-digit involvement, a hybrid approach is often optimal: perform an index finger PIP joint arthrodesis to provide a stable post for pinch, combined with middle and ring finger PIP joint arthroplasties to permit functional flexion for grasp.
Etiology: Traumatic vs. Rheumatoid Arthritis
Volar plate interposition arthroplasty and silicone spacer arthroplasty generally produce superior functional results in patients with traumatic arthritis compared to those with rheumatoid arthritis (RA). In RA, the systemic destruction of the capsuloligamentous structures compromises the stability required for a successful interpositional or surface replacement arthroplasty. In such cases, flexible silicone implants are often favored, as they act as a dynamic spacer while relying on postoperative encapsulation for stability.
Preoperative Patient Counseling
Managing patient expectations is arguably the most critical preoperative step.
🚨 Surgical Warning: Managing Expectations
Patients must be explicitly informed that all PIP arthroplasty procedures are performed primarily for pain reduction or elimination, not for the improvement of motion or strength.
In many cases, joint motion may actually decrease following the procedure. Some patients, particularly those with dominant hand ring finger involvement, may elect to endure mild to moderate pain rather than risk a loss of motion that could significantly alter fine motor activities such as handwriting. Furthermore, if the preoperative joint contracture is so severe that extensive bone resection would be required for satisfactory implant or interposition placement, arthrodesis should be strongly considered.
Surgical Anatomy and Biomechanics
A profound understanding of the PIP joint's volar anatomy is essential for executing this procedure without compromising digital vascularity or flexor tendon function.
- The Volar Plate: This thick, fibrocartilaginous structure prevents PIP joint hyperextension. It is firmly attached distally to the volar base of the middle phalanx. Proximally, it transitions into the checkrein ligaments, which attach to the periosteum of the proximal phalanx. In this procedure, the distal attachment is released, allowing the robust fibrocartilaginous pad to be mobilized dorsally into the joint space.
- Collateral Ligaments: The proper and accessory collateral ligaments provide lateral stability. The accessory collateral ligaments insert directly into the margins of the volar plate. These must be carefully managed during the approach to mobilize the volar plate while preserving overall joint stability.
- Neurovascular Bundles: The digital arteries and nerves run volarly and laterally, secured by Cleland’s (dorsal to the bundle) and Grayson’s (volar to the bundle) ligaments. These must be meticulously protected during the volar exposure.
Surgical Technique: Step-by-Step
The following technique details the biological resurfacing of the PIP joint using the native volar plate.
1. Positioning and Exposure
- Place the patient supine with the operative arm extended on a radiolucent hand table.
- Apply a well-padded upper arm tourniquet to ensure a bloodless surgical field.
- Utilize loupe magnification (typically 2.5x to 3.5x) for precise identification of neurovascular structures.
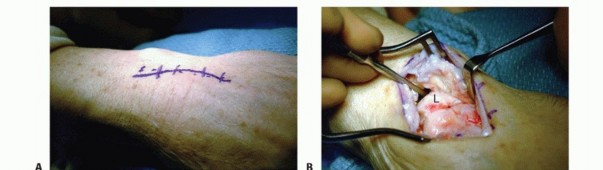
- Approach the PIP joint through a volar Bruner (zigzag) incision centered over the joint, with the apices of the flaps extending to the mid-axial lines.
- Elevate the skin flaps, taking care to identify and retract the neurovascular bundles bilaterally.
- Expose the flexor tendon sheath. Incise the sheath between the A2 and A4 pulleys (typically opening the C1, A3, and C2 pulleys) and retract the flexor digitorum superficialis (FDS) and flexor digitorum profundus (FDP) tendons laterally to expose the volar plate.
2. Volar Plate Detachment and Joint Preparation
- Identify the distal insertion of the volar plate on the volar lip of the middle phalanx base.
- Using a sharp scalpel (e.g., a #15 blade), carefully detach the volar plate from the middle phalanx base. Release the accessory collateral ligament attachments from the lateral margins of the volar plate to allow adequate mobilization.
- Reflect the volar plate proximally to expose the articular surfaces of the PIP joint.
- Assess the proximal phalanx head. Using a micro-sagittal saw, rongeur, or high-speed burr, débride the irregular, arthritic surfaces of the proximal phalanx head.
- Contour the bone to create a smooth, rounded surface, ensuring enough joint space is created to accommodate the thickness of the interposed volar plate without causing excessive tension.
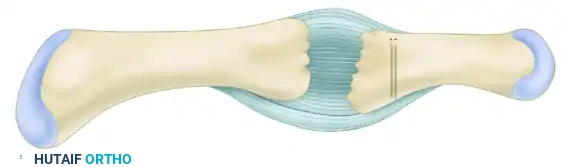
Figure A: Through a proximal interphalangeal joint volar approach, the volar plate is detached from the middle phalanx base. The irregular bone of the proximal phalanx head is resected. Two holes are drilled perpendicular to the middle phalangeal base for passing sutures.
3. Bone Tunnel Preparation
- Utilize a 1.2-mm Kirschner wire (K-wire) on a power driver to create bone tunnels in the middle phalanx.
- Drill two parallel 1.2-mm holes perpendicular to the middle phalanx base. These tunnels should originate at the dorsal articular margin and exit volarly at the site of the original volar plate footprint.
- Ensure the bone bridge between the two tunnels is wide enough (at least 3-4 mm) to prevent iatrogenic fracture during suture tying.
4. Suture Placement and Volar Plate Interposition
- Prepare the mobilized volar plate. If the tissue is excessively hypertrophic, it may be carefully thinned, though its structural integrity must be maintained.
- Attach strong, nonabsorbable sutures (e.g., 2-0 or 3-0 braided polyester or polyethylene) to the free distal end of the volar plate using a locking Krackow or whipstitch technique to ensure a secure hold.
- Using fine suture-passing needles or a wire loop, draw the suture limbs from dorsal to volar through the previously drilled bone tunnels in the middle phalanx.
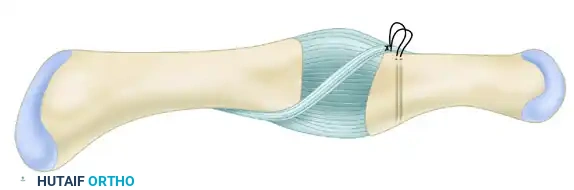
Figure B: Sutures are attached to the free distal end of the volar plate, drawn dorsal to volar through the bone tunnels, and tied securely on the volar side of the middle phalangeal base, interposing the plate into the joint space.
5. Fixation and Closure
- Apply traction to the sutures to draw the volar plate deep into the joint space, effectively capping the contoured head of the proximal phalanx.
- Tie the sutures securely over the volar bone bridge of the middle phalanx base.
- Assess the joint for stability and smooth interposition. The volar plate should now act as a biological spacer between the proximal and middle phalanges.
- To protect the repair and maintain the joint space during initial healing, use a 1-mm (0.039-inch) Kirschner wire to transfix the PIP joint in 20 degrees of flexion.
- Deflate the tourniquet, obtain meticulous hemostasis, and close the skin with interrupted nonabsorbable sutures.
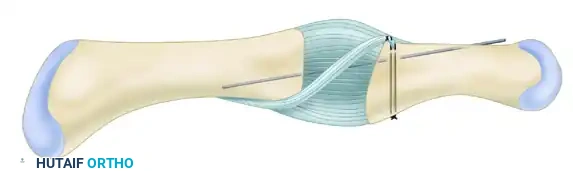
Figure C: A 1-mm Kirschner wire is driven across the joint to fix the proximal interphalangeal joint in 20 degrees of flexion, protecting the interposition during the initial healing phase.
Alternative Options: Implant Arthroplasty Considerations
While volar plate interposition is an excellent biological option, surgeons must be well-versed in implant arthroplasty alternatives.
Flexible Silicone Implants
Silicone arthroplasty remains a viable option, particularly for traumatic arthritis with adhesions appropriate for concurrent tenolysis. It allows for the resumption of active motion postoperatively and provides reliable pain relief. However, surgeons must be aware of the biomechanical limitations:
* High Fracture Rates: There is a well-documented high fracture rate associated with PIP joint silicone spacers. Interestingly, despite radiographic evidence of implant fracture, clinical outcomes and pain relief often remain reasonable due to the fibrous encapsulation that forms around the implant.
* Motion Outcomes: Silicone arthroplasty provides excellent pain relief but rarely results in a significant improvement in the arc of motion.
Surface Replacement Arthroplasty
Metacarpophalangeal (MCP) joint surface replacement devices have shown significant promise, yielding improvements in both strength and motion without the high fracture concerns associated with PIP silicone implants. While PIP surface replacements (utilizing pyrocarbon or metal-polyethylene articulations) are available, they require meticulous preservation of the joint's soft tissue restraints (especially the collateral ligaments) to prevent postoperative angular and rotational instability.
📉 Pitfall: Joint Instability in Resection Arthroplasty
Joint stiffness, alongside angular and rotational instability, can severely compromise outcomes when resection-interposition arthroplasty is performed. If the collateral ligaments are irreparably damaged or if excessive bone is resected, the joint will fail. In such scenarios, arthrodesis is the definitive salvage procedure.
Postoperative Care and Rehabilitation Protocol
The success of a volar plate interposition arthroplasty relies as much on the postoperative rehabilitation as it does on the surgical execution. A delicate balance must be struck between protecting the biological interposition and preventing debilitating joint stiffness.
Phase 1: Immobilization (Weeks 0–2)
- Immediately postoperatively, the digit is immobilized in a well-molded dorsal splint with the PIP joint pinned at 20 degrees of flexion.
- The MCP joints are left free to encourage early motion and prevent extensor mechanism adherence.
- Strict elevation and edema control are instituted.
Phase 2: Pin Removal and Early Motion (Weeks 2–4)
- At the 2-week postoperative mark, the initial dorsal splint and skin sutures are removed.
- The transarticular 1-mm K-wire is typically removed at this stage (or up to 3-4 weeks depending on surgeon preference and intraoperative stability) to allow for the initiation of movement.
- A PIP joint extension block splint is applied. This splint prevents terminal extension (protecting the volar plate repair from excessive tension) while allowing active flexion.
- Progressive active range of motion (ROM) exercises are begun under the strict guidance of a certified hand therapist. Interval splinting is utilized between exercise sessions.
Phase 3: Strengthening and Weaning (Weeks 4–8)
- The extension block is gradually reduced, allowing for a greater arc of motion.
- Gentle passive ROM and dynamic splinting may be introduced if stiffness persists, provided the joint remains stable.
- Light strengthening exercises (e.g., sponge squeezing, putty exercises) are initiated around week 6.
- Patients are advised that maximal medical improvement and final functional outcomes may take up to 6 to 12 months to fully realize.
Conclusion
Proximal interphalangeal joint volar plate interposition arthroplasty is a highly effective, biologically sound technique for the treatment of debilitating post-traumatic PIP joint arthritis. By meticulously detaching, mobilizing, and interposing the native volar plate, orthopaedic surgeons can provide patients with significant pain relief while avoiding the complications associated with synthetic implants. Strict adherence to surgical indications, precise intraoperative tissue handling, and a rigorous, therapist-guided postoperative protocol are essential to achieving optimal clinical outcomes.
You Might Also Like