Microvascular Anastomosis and Free Tissue Transfer: The Pocket Technique
Key Takeaway
The pocket technique for microvascular anastomosis is an advanced surgical method utilized during free tissue transfer to protect delicate vascular repairs. This technique is indicated when traditional pedicle flaps are insufficient for complex orthopaedic reconstructions. By securing the anastomotic site within a healthy soft tissue envelope, surgeons can prevent vessel desiccation, minimize kinking, and optimize flap survival in cases of extensive soft tissue loss or chronic osteomyelitis.
INTRODUCTION TO MICROVASCULAR RECONSTRUCTION
The evolution of orthopaedic microsurgery has fundamentally shifted the paradigm of complex limb salvage. The transition from the traditional "reconstructive ladder" to the "reconstructive elevator" dictates that the most appropriate tissue should be utilized immediately to optimize functional and aesthetic outcomes, rather than exhausting simpler, potentially inadequate local options. At the core of this philosophy is free tissue transfer, a procedure heavily reliant on the flawless execution of microvascular anastomosis.
The "Pocket Technique" for microvascular anastomosis represents a refined surgical strategy designed to protect the delicate vascular pedicle and the anastomotic site. By creating a dedicated, well-vascularized soft tissue recess (the "pocket"), the surgeon shields the microvascular repair from external compression, desiccation, and mechanical shear forces, thereby maximizing the probability of flap survival. Before mastering the nuances of the pocket technique, the reconstructive microsurgeon must possess a profound understanding of the indications, biomechanics, and physiological demands of free tissue transfer.
INDICATIONS AND ADVANTAGES OF FREE TISSUE TRANSFER
The traditional indications for pedicle flaps share similarities with those for free flaps; however, the unparalleled versatility of free tissue transfer exponentially increases the spectrum of complex orthopaedic problems that can be successfully managed. Each clinical scenario demands individualized consideration. In contemporary practice, the selection of a free flap generally implies that the utilization of a more traditional random or axial pattern flap would be anatomically impossible, biomechanically inappropriate, or functionally inferior.
Current indications for free flaps in orthopaedic reconstruction include, but are strictly not limited to, the following critical scenarios:
1. Coverage of Essential Structures
Secondary and, in highly selected situations, primary coverage of extensive skin and soft tissue loss where essential anatomical structures are exposed. This includes the exposure of major blood vessels, peripheral nerves, denuded tendons without paratenon, cortical bone devoid of periosteum, and open joint capsules. Free flaps provide immediate, robust, and well-vascularized coverage that prevents desiccation and subsequent necrosis of these vital structures.
2. Eradication of Unsatisfactory Soft Tissue Beds
Coverage of a soft tissue bed that is fundamentally unsatisfactory for subsequent reconstructive procedures. Pathologic beds—such as dense fibrotic scar tissue, chronic draining ulcers, and areas of chronic osteomyelitis—prevent the successful integration of tendon grafts, tendon transfers, nerve repairs, nerve grafts, bone stabilization hardware, and bone grafting. A free flap introduces a rich, independent blood supply that alters the local biological environment, delivering systemic antibiotics, oxygen, and immune cells to eradicate infection and support future skeletal reconstruction.
3. Replacement of Unstable Scars
The replacement of unstable, recurrently breaking down area scars resulting from severe thermal burns, therapeutic irradiation, radical oncologic resection, and severe scar contractures. Irradiated tissue, in particular, suffers from progressive endarteritis obliterans, making local tissue transfer highly prone to failure. Free tissue transfer bypasses this zone of injury entirely.
4. Absence of Local Reconstructive Options
Coverage situations for which a suitable random or axial pattern flap is anatomically unavailable. This is frequently encountered in the distal third of the tibia and the foot, where local soft tissue redundancy is minimal, and the vascular territories of potential local flaps may be compromised by the primary trauma.
5. Avoidance of Prolonged and Awkward Immobilization
Coverage situations in which the immobilization of the extremities for prolonged periods in awkward positions is undesirable or physiologically impossible. Historically, cross-leg flaps or staged distant pedicle flaps required weeks of rigid, uncomfortable external fixation or casting, leading to severe joint stiffness, deep vein thrombosis, and significant patient morbidity. Free flaps offer a single-stage solution that permits early mobilization and rehabilitation.
6. Restoration of Specific Tissue for Functional Needs
The restoration of specific, specialized tissue to satisfy a distinct functional requirement. Examples include:
* Sensory Restoration: Innervated flaps for protective sensation in the hand or the weight-bearing plantar surface of the foot.
* Digital Reconstruction: Toe-to-hand transfers for thumb or multi-digit amputations.
* Dynamic Motor Reconstruction: Functioning free muscle transfers (e.g., gracilis transfer) for the replacement of major skeletal muscle loss in the forearm or for facial reanimation.
* Skeletal Reconstruction: Vascularized bone grafts (e.g., free fibula flap) for the replacement of massive intercalary bone defects resulting from trauma or tumor resection.
Clinical Pearl: When evaluating a defect, always assess the "zone of injury." The recipient vessels for a free flap must be selected well outside this zone to ensure healthy intima. Anastomosing to traumatized vessels is the leading cause of early microvascular thrombosis.
BIOMECHANICS AND HEMODYNAMICS OF MICROVASCULAR ANASTOMOSIS
The success of a microvascular anastomosis is governed by the principles of fluid dynamics, specifically Poiseuille’s Law, which states that flow is directly proportional to the fourth power of the vessel radius and inversely proportional to the length of the vessel and the viscosity of the blood.
The Role of the Pocket Technique in Hemodynamics
The pocket technique is specifically designed to optimize these hemodynamic variables:
* Prevention of Kinking (Radius Maintenance): By housing the pedicle in a customized soft tissue pocket, the vessels are supported in a gentle, sweeping curve. This prevents acute angulation or kinking, which would exponentially decrease the vessel radius and drastically reduce flow.
* Protection from Compression: External compression from tight skin closures, hematoma, or postoperative edema increases resistance. The pocket provides a tension-free, dead-space-controlled environment.
* Thermal Regulation: Vasospasm is a primary enemy of microvascular flow. The soft tissue pocket maintains the pedicle at core body temperature, preventing cold-induced vasospasm that frequently occurs if vessels are left exposed just beneath a thin skin graft.
PREOPERATIVE PLANNING AND PATIENT POSITIONING
Meticulous preoperative planning is the cornerstone of successful microvascular surgery.
Vascular Imaging
Preoperative vascular imaging (CT Angiography or MR Angiography) is mandatory in cases of high-energy trauma, peripheral vascular disease, or previous surgical interventions. The surgeon must map the arterial inflow and venous outflow, identifying anatomical variants (e.g., high bifurcation of the popliteal artery, hypoplastic vessels) and confirming the patency of the chosen recipient vessels.
Ergonomics and Positioning
Microvascular anastomosis demands extreme precision, which is impossible to achieve if the surgeon is fatigued or uncomfortable.
* The patient must be positioned to allow simultaneous two-team surgery (flap harvest and recipient site preparation) whenever possible.
* The operating microscope must be draped and balanced prior to the critical ischemic time.
* The surgeon’s forearms and wrists must be fully supported on the operative field. Tremor is amplified under 10x to 40x magnification; ergonomic stability is non-negotiable.
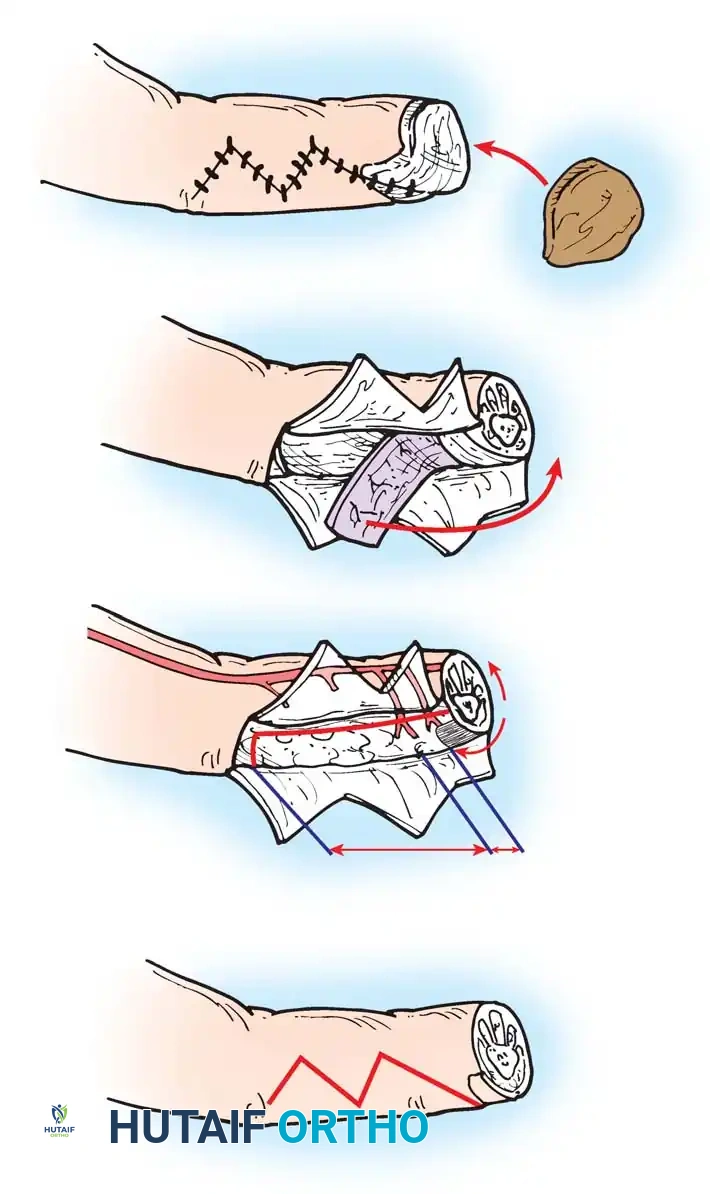
SURGICAL APPROACH: THE POCKET TECHNIQUE STEP-BY-STEP
The execution of the pocket technique requires meticulous tissue handling, precise dissection, and flawless microsurgical coaptation.
Step 1: Preparation of the Recipient Bed
The recipient bed must undergo radical debridement. All necrotic, infected, or devitalized tissue must be excised until healthy, bleeding margins are achieved. "When in doubt, cut it out." The success of the free flap relies entirely on the eradication of the underlying pathology.
Step 2: Recipient Vessel Dissection
- Identify the recipient artery and vein(s) well outside the zone of injury.
- Dissect the vessels under loupe magnification, preserving the perivascular adventitia until the exact site of anastomosis is chosen.
- Ligate and divide small side branches using micro-clips or bipolar electrocautery to mobilize a sufficient length of the recipient vessels.
Step 3: Creation of the Anastomotic Pocket
The "pocket" is a surgically created plane adjacent to the recipient vessels, designed to house the redundant pedicle and the anastomotic site.
1. Site Selection: The pocket should be created in healthy, well-vascularized muscle or deep subcutaneous fat, away from the primary defect and away from areas of direct external pressure (e.g., avoiding the posterior heel or direct anterior tibia).
2. Dissection: Using blunt and sharp dissection, elevate a subfascial or intramuscular plane. The pocket must be large enough to accommodate the pedicle without crowding, but small enough to prevent a massive dead space where a hematoma could accumulate.
3. Hemostasis: Absolute hemostasis within the pocket is critical. A postoperative hematoma within the pocket will compress the anastomosis and lead to flap failure.
Surgical Warning: Never use monopolar electrocautery near the recipient vessels or within the immediate vicinity of the created pocket, as thermal injury can cause delayed intimal damage and catastrophic late thrombosis. Rely strictly on precise bipolar coagulation.
Step 4: Vessel Preparation and Anastomosis
- Adventitial Stripping: Under the operating microscope, carefully strip the adventitia 2 to 3 mm from the cut ends of both the donor and recipient vessels. Failure to do so may result in adventitial tissue being dragged into the lumen, acting as a highly thrombogenic nidus.
- Dilation: Gently dilate the vessel ends using micro-vessel dilators to overcome mechanically induced vasospasm.
- Coaptation: Perform the anastomosis using 8-0 to 10-0 nylon sutures. The technique (end-to-end vs. end-to-side) depends on vessel size mismatch and the necessity of preserving distal flow in the recipient artery.
- Place the initial stay sutures at 180 degrees or 120 degrees (triangulation technique).
- Ensure perfect intimal-to-intimal coaptation.
- Flush the lumen with heparinized saline before placing the final sutures to expel any micro-thrombi or air.
Step 5: Pedicle Inset and Pocketing
This is the defining step of the technique.
1. Once the clamps are released and patency is confirmed (via direct visualization of expansile pulsation, the Acland strip test, or intraoperative Doppler), observe the pedicle for 10 to 15 minutes.
2. Gently manipulate the pedicle into the pre-formed soft tissue pocket.
3. Ensure the vessels lie in a smooth, gentle curve. There must be no twisting, kinking, or tension.
4. If the pedicle is too long, the redundancy must be carefully distributed within the pocket to avoid acute angulation.
5. Secure the flap to the surrounding skin, ensuring that the closure over the pocket is completely tension-free. If necessary, a split-thickness skin graft can be placed over a portion of the flap muscle to avoid tight skin closure over the pedicle.
Pitfall: A common error is creating a pocket that is too superficial. If the anastomosis is placed directly beneath a tight skin closure, postoperative edema will inevitably compress the vein, leading to venous congestion and flap demise. Always aim for a deep, subfascial pocket.
POSTOPERATIVE PROTOCOLS AND FLAP MONITORING
The postoperative management of a free flap is as critical as the surgical execution. The primary goal is to maintain optimal hemodynamics and rapidly identify any signs of vascular compromise.
Systemic Management
- Hemodynamics: Maintain normovolemia and normotension. Avoid vasopressors if possible, as they induce peripheral vasoconstriction and compromise flap perfusion. If blood pressure support is required, discuss flap-friendly options with the critical care team.
- Temperature Control: The patient's room must be kept warm (typically > 75°F / 24°C) to prevent cold-induced vasospasm. Core body temperature must be strictly maintained.
- Anticoagulation: Protocols vary by institution. A common regimen includes daily low-dose aspirin (81 mg) and prophylactic subcutaneous heparin to prevent deep vein thrombosis. Dextran is largely historical due to its side effect profile, though some surgeons utilize low-dose intravenous heparin infusions for high-risk anastomoses.
Flap Monitoring Techniques
Early detection of vascular compromise is the only way to salvage a failing flap. The highest risk of thrombosis occurs within the first 48 to 72 hours.
1. Clinical Assessment: The gold standard. Assess flap color, capillary refill time (normal is 1-3 seconds), tissue turgor, and temperature.
* Arterial Insufficiency: Flap becomes pale, cool, and empty, with absent capillary refill.
* Venous Congestion: Flap becomes swollen, violaceous/blue, with brisk (almost instantaneous) capillary refill and dark bleeding upon pinprick.
2. Handheld Acoustic Doppler: Used to map and monitor the arterial signal over a marked point on the flap.
3. Implantable Doppler (e.g., Cook-Swartz): A micro-probe is wrapped directly around the anastomosed vein (and sometimes artery) and connected to an external monitor. Loss of the auditory signal provides an immediate, objective warning of thrombosis, often preceding clinical signs.
4. Tissue Oximetry (NIRS): Non-invasive monitoring of tissue oxygen saturation provides continuous, real-time data regarding flap perfusion.
Management of the Compromised Flap
If vascular compromise is suspected, it is a surgical emergency.
1. Immediately release any tight sutures or dressings over the flap and the pocket.
2. If perfusion does not instantly improve, the patient must be returned to the operating room for emergent exploration.
3. The pocket is opened, the anastomosis is inspected, and the thrombus is excised. The anastomosis must be revised, often requiring a vein graft if the vessels must be resected back to healthy tissue.
CONCLUSION
The pocket technique for microvascular anastomosis is an indispensable strategy in the armamentarium of the reconstructive orthopaedic microsurgeon. By understanding the profound indications for free tissue transfer—ranging from the coverage of vital structures to the eradication of chronic osteomyelitis—the surgeon can appropriately select patients for these complex procedures. Meticulous execution of the pocket technique ensures that the delicate microvascular repair is shielded from mechanical and environmental stressors, thereby optimizing hemodynamics and ensuring the long-term success of the reconstructive effort. Mastery of this technique requires not only technical dexterity but a deep, evidence-based understanding of vascular physiology and rigorous postoperative care.
You Might Also Like