Mastering Open Reduction and Internal Fixation in Hand Trauma: Screws, Plates, and Wiring Techniques
Key Takeaway
Open reduction and internal fixation of metacarpal and phalangeal fractures requires meticulous surgical technique to restore anatomy and permit early mobilization. This guide details the biomechanical principles of interfragmentary lag screw fixation, the indications for minicondylar plating in periarticular injuries, and advanced wiring techniques. Strict adherence to soft tissue preservation, precise implant selection, and rigid fixation constructs is paramount for optimizing functional outcomes in hand trauma.
INTRODUCTION TO METACARPAL AND PHALANGEAL OSTEOSYNTHESIS
The primary objective in the operative management of metacarpal and phalangeal fractures is the restoration of precise anatomical alignment while achieving absolute or relative stability. This biomechanical foundation is requisite for initiating early active mobilization, thereby mitigating the ubiquitous complications of tendon adhesion and joint contracture. Open reduction and internal fixation (ORIF) encompasses a versatile armamentarium, including interfragmentary screw fixation, minicondylar plating, and advanced wiring techniques.
The selection of the optimal fixation construct is dictated by fracture morphology, bone quality, associated soft tissue trauma, and the specific biomechanical demands of the injured digit. This comprehensive guide delineates the indications, biomechanical principles, and step-by-step surgical execution of these advanced osteosynthesis techniques.
OPEN REDUCTION AND SCREW FIXATION
Interfragmentary screw fixation, when utilized as an isolated modality, is a highly effective technique for specific fracture patterns. It relies on the principle of interfragmentary compression (the "lag" effect) to provide absolute stability, facilitating primary bone healing without callus formation.
Indications and Preoperative Planning
Screw fixation alone is primarily indicated for:
* Long Oblique or Spiral Fractures: The fracture length must be at least twice the diameter of the bone at the level of the injury to accommodate a minimum of two screws.
* Displaced Intraarticular Fractures: To restore articular congruity and prevent post-traumatic arthrosis.
* Avulsion Fractures: Where the fragment is of sufficient size to accept a screw without comminution.
💡 Clinical Pearl: Implant Selection
The screw size and number must be meticulously tailored to the fracture pattern. While 2.0-mm screws are highly efficacious for metacarpal shaft fractures, 2.7-mm screws are often superior for metaphyseal regions where cancellous bone predominates. However, not all metacarpal shafts can accommodate 2.0-mm screws; in smaller patients or specific phalangeal fractures, 1.5-mm or 1.3-mm screws may be required to prevent iatrogenic comminution.
Biomechanics of Screw Orientation
The orientation of the lag screw relative to the fracture plane and the long axis of the bone dictates its biomechanical efficacy. Understanding these vector forces is critical for preventing fracture displacement under physiological loading.
- Resistance to Compressive Forces: To counteract axial loading (which acts to deform and shorten the metacarpal), the optimal screw trajectory is 90 degrees to the long axis of the bone.
- Resistance to Torsional Forces: To counteract rotational stress, the optimal screw trajectory is 90 degrees to the fracture plane.
- The Optimal Compromise: Because physiological loading involves both axial and torsional forces, the most biomechanically sound trajectory for a single lag screw is one that bisects the angle between a line drawn 90 degrees to the fracture and a line drawn 90 degrees to the bone’s long axis.
⚠️ Surgical Warning: The "Rule of Two"
A single screw acts as a pivot point and cannot resist rotational forces. Therefore, diaphyseal and metaphyseal fractures require a minimum of two screws for stable fixation. The exception is select intraarticular metacarpal head fractures, where a single screw may suffice if supported by the surrounding articular geometry and capsular ligaments.
Surgical Approach and Soft Tissue Management
Meticulous handling of the soft tissue envelope is paramount. The periosteum provides the critical vascular supply to the healing fracture; aggressive stripping will inevitably lead to delayed union or nonunion.
- Exposure: Utilize standard dorsal or mid-axial approaches depending on the digit and fracture location. Protect the extensor mechanism and neurovascular bundles.
- Hematoma Evacuation: Perform a localized, meticulous débridement of the fracture hematoma and interposed soft tissues to visualize the fracture interdigitations clearly.
- Periosteal Preservation: Limit periosteal stripping to a maximum of 1 to 2 mm from the fracture edges—only enough to verify anatomical reduction.
Step-by-Step Surgical Technique: Interfragmentary Lag Screw
The lag screw technique converts torsional load applied to the screw head into axial compression across the fracture interface.
- Anatomical Reduction: Reduce the fracture anatomically. Use pointed reduction forceps or small Kirschner wires (K-wires) placed outside the planned trajectory of the screws for temporary provisional fixation.
- Gliding Hole Preparation: Drill the near (cis) cortex with a drill bit matching the outer thread diameter of the screw (e.g., 2.0-mm drill for a 2.0-mm screw). This creates the gliding hole, ensuring the threads do not purchase the near cortex.
- Drill Sleeve Insertion: Insert the appropriate drill sleeve into the gliding hole until it seats firmly against the far (trans) cortex.
- Thread Hole Preparation: Drill the far cortex with a drill bit matching the core diameter of the screw (e.g., 1.5-mm drill for a 2.0-mm screw).
- Countersinking: Use a countersink on the near cortex. This is a critical step that increases the contact area between the screw head and the bone, allowing for better load distribution and preventing stress risers that could cause cortical splitting. It also minimizes hardware prominence beneath the extensor tendons.
- Measurement: Measure the depth using a depth gauge. Ensure the hook catches the far cortex accurately. Add 1 to 2 mm to the measurement to ensure the screw tip fully engages the far cortex (bicortical purchase).
- Tapping (if non-self-tapping): Tap the far cortex to cut the thread profile, reducing insertion torque and the risk of microfractures.
- Screw Insertion: Insert the screw. As the head engages the countersunk near cortex, the threads in the far cortex will draw the fragments together, generating robust interfragmentary compression.
- Verification: Check that screw placement near the fracture spikes is accurate and verify bicortical purchase both visually and fluoroscopically.
MINICONDYLAR PLATE FIXATION
Minicondylar plates (typically available in 1.5-mm and 2.0-mm systems) are specialized implants designed for complex periarticular injuries of the metacarpals and phalanges. They feature a blade or specialized screw configuration at one end to capture small juxta-articular fragments while providing a plate extension for diaphyseal fixation.
Indications for Minicondylar Plating
The utilization of minicondylar plates is highly specific and reserved for scenarios where standard screw or straight plate fixation is biomechanically insufficient:
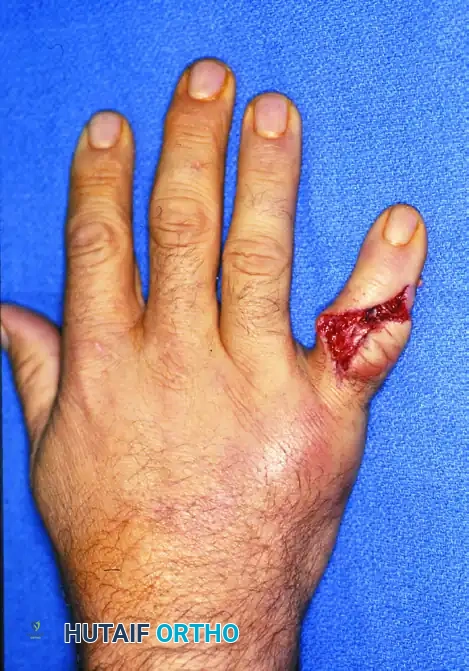
- Complex Periarticular Trauma with Soft Tissue Injury:
- Acute fractures associated with partial or complete flexor tendon disruptions treated with primary tenorrhaphy, where early active motion is mandatory to prevent adhesions.
- Partial or complete extensor tendon injuries that are functionally competent or repaired, requiring early tensile loading.
- Severe periarticular injuries where the risk of joint stiffness is exceptionally high due to the severity and location of the soft tissue crush.
- Digit Replantation: Provides immediate, rigid skeletal stability necessary to protect delicate microvascular anastomoses and nerve repairs.
- Metaphyseal Osteotomies: Highly effective for securing corrective osteotomies of the phalanges or metacarpals, especially when performed in conjunction with capsulotomy or tenolysis, which demand immediate postoperative mobilization.
- Complex Digit Reconstruction: Essential for providing stable skeletal fixation during osteoplastic reconstructions, pedicle grafting, or free composite tissue transfers.
- Arthrodesis: Useful for small joint fusions (e.g., PIP or DIP joints) where the condylar blade can be driven into the adjacent phalanx to provide rotational control and compression.
Contraindications
Surgeons must strictly observe the following contraindications to prevent catastrophic implant failure or iatrogenic joint destruction:
- Open Physes: The condylar blade or screws will cause physeal arrest. Use smooth K-wires in pediatric populations.
- Insufficient Fragment Size: The joint fragment must be wide enough to accommodate the implant without shattering. The absolute minimum fragment width is 6 mm for a 2.0-mm plate and 5 mm for a 1.5-mm plate.
- Intraarticular Hardware Penetration: Condylar blades and screws must never breach the articular cartilage. The sole exception is the dorsal recess of the metacarpal head, which is non-articulating and can safely accept hardware.
💡 Clinical Pearl: The Dorsal Recess
When applying a minicondylar plate to the metacarpal head, the blade must be inserted into the dorsal recess. This anatomical safe zone lies proximal to the articular cartilage but distal to the collateral ligament origins. Precise fluoroscopic imaging in true lateral and AP planes is mandatory during insertion.
WIRING TECHNIQUES APPLICABLE TO LONG BONE FRACTURES
While rigid plate and screw osteosynthesis represents the gold standard for many hand fractures, advanced wiring techniques remain indispensable in the orthopedic surgeon's repertoire, particularly for comminuted, osteopenic, or specific avulsion fractures.
Cerclage Wiring
Cerclage wiring involves passing a wire circumferentially around the bone to compress oblique or spiral fractures.
- Biomechanical Limitations: Cerclage wires provide poor resistance to axial loading and bending forces. Furthermore, they theoretically strangulate the periosteal blood supply, increasing the risk of localized osteonecrosis and delayed union.
- Current Role: Due to these limitations, isolated cerclage wiring is rarely indicated. However, it remains highly useful as a supplementary fixation method to hold highly comminuted butterfly fragments in place while a bridging plate is applied, or in conjunction with intramedullary K-wires.
Tension Band Wiring
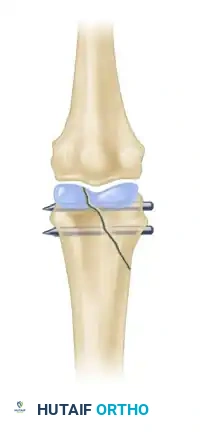
The tension band principle is one of the most elegant biomechanical concepts in orthopedics. It involves applying a wire loop to the tension side of a fractured bone. When the bone is subjected to physiological loading, the wire resists the tensile forces and converts them into dynamic compressive forces at the opposite (articular or volar) cortex.
- Indications: Ideal for intraarticular avulsion fractures (e.g., dorsal base of the middle phalanx in a pilon fracture, or the olecranon in the upper extremity).
- Technique: Two parallel K-wires are driven across the fracture to provide rotational stability. A figure-of-eight stainless steel wire (typically 24- or 26-gauge in the hand) is passed through a transverse drill hole distal to the fracture and looped around the proximal ends of the K-wires. As the joint flexes, the dorsal tension is converted to articular compression.
90/90 Intraosseous Wiring
The 90/90 wiring technique provides multiplanar stability and is particularly useful for transverse fractures of the phalanges or metacarpals, or for securing arthrodeses.
- Technique: Two intraosseous wires are placed perpendicular to each other (one in the dorsal-volar plane, one in the radio-ulnar plane).
- Advantages: This construct significantly increases the surgeon’s choices for managing unstable fractures where plate coverage is impossible due to soft tissue constraints, or where the bone is too osteopenic to hold screws. It provides excellent resistance to bending and torsional forces when executed correctly.
⚠️ Surgical Warning: Wire Tensioning
When tightening intraosseous or tension band wires, the surgeon must pull the wire away from the bone while twisting. Twisting without pulling merely winds the wire upon itself, creating a weak, prominent knot without generating true compression across the fracture site.
POSTOPERATIVE PROTOCOL AND REHABILITATION
The ultimate success of open reduction and internal fixation in the hand is inextricably linked to the postoperative rehabilitation protocol. The primary rationale for utilizing rigid internal fixation (screws and plates) is to permit early active motion.
- Immediate Postoperative Phase (Days 1-5): The hand is immobilized in a bulky, compressive dressing with a volar orthosis. The wrist is positioned in 20-30 degrees of extension, metacarpophalangeal (MCP) joints in 70-90 degrees of flexion, and interphalangeal (IP) joints in full extension (the "intrinsic-plus" or "safe" position). Elevation is critical to minimize edema.
- Early Mobilization (Days 5-14): Provided rigid fixation was achieved, the bulky dressing is removed, and a custom thermoplastic splint is fabricated. Active range of motion (AROM) exercises are initiated under the guidance of a certified hand therapist. Passive range of motion (PROM) is generally avoided early to prevent excessive stress on the fixation construct.
- Strengthening (Weeks 6-8): Once clinical and radiographic evidence of union is observed, progressive strengthening and dynamic splinting (if contractures are present) are initiated.
CONCLUSION
Mastery of open reduction and internal fixation in metacarpal and phalangeal fractures requires a profound understanding of hand biomechanics, meticulous soft tissue handling, and precise execution of osteosynthesis principles. Whether utilizing the interfragmentary lag screw technique for spiral fractures, deploying minicondylar plates for complex periarticular trauma, or applying tension band wiring for avulsion injuries, the surgeon's goal remains constant: rigid anatomical restoration to facilitate the early mobilization that is vital for optimal functional recovery. Strict adherence to the indications, contraindications, and technical nuances outlined in this guide will minimize complications and maximize patient outcomes in the challenging arena of hand trauma.
You Might Also Like