Open Reduction and Internal Fixation of Scaphoid Fractures: The Dorsal Approach
Key Takeaway
The dorsal approach for open reduction and internal fixation (ORIF) of the scaphoid is the gold standard for proximal pole fractures. This technique provides direct access to the proximal fragment while preserving the critical volar blood supply. Key steps include a transverse dorsal incision, a radially based capsular flap, joystick reduction, and central axis headless compression screw fixation under fluoroscopic guidance to optimize biomechanical stability and union rates.
Introduction to Scaphoid Fracture Management
Fractures of the scaphoid are the most common carpal bone fractures, frequently resulting from a fall onto an outstretched hand (FOOSH) with the wrist in hyperextension and radial deviation. The management of acute displaced scaphoid fractures, particularly those involving the proximal pole, demands meticulous surgical technique due to the unique and tenuous vascular anatomy of the bone.
Open Reduction and Internal Fixation (ORIF) via a dorsal approach is the gold standard for noncomminuted fractures located in the proximal pole of the scaphoid. Unlike waist or distal pole fractures—which are often approached volarly to preserve the dorsal blood supply and correct humpback deformities—proximal pole fractures require a dorsal approach. This trajectory allows for direct visualization of the proximal articular surface, facilitates the placement of a central-axis headless compression screw, and minimizes iatrogenic injury to the remaining vascular contributions.
Surgical Anatomy and Biomechanics
A profound understanding of scaphoid anatomy is non-negotiable for the operating surgeon. The scaphoid functions as a critical mechanical link between the proximal and distal carpal rows.
Vascular Anatomy
The scaphoid receives 70% to 80% of its intraosseous blood supply from the dorsal carpal branch of the radial artery. These vessels enter the scaphoid at the dorsal ridge (at the level of the waist) and perfuse the bone in a retrograde fashion. Consequently, fractures at the proximal pole completely sever the blood supply to the proximal fragment, leading to a high risk of avascular necrosis (AVN) and nonunion. The dorsal approach is strategically utilized for proximal pole fractures because the vascularity to this segment is already compromised; thus, a dorsal capsulotomy does not further devascularize the proximal fragment, while a volar approach would be technically prohibitive for achieving the correct screw trajectory.
Biomechanical Principles of Fixation
The primary goal of internal fixation is to achieve absolute stability, allowing for primary bone healing. Biomechanical studies have unequivocally demonstrated that placing a headless compression screw down the central axis of the scaphoid provides superior biomechanical stiffness and load-to-failure rates compared to eccentric placement. The dorsal approach provides an optimal, in-line trajectory for central axis screw placement into the proximal pole.
Clinical Pearl: The longest possible screw placed in the central third of the scaphoid (both in the anteroposterior and lateral planes) maximizes thread purchase in the dense subchondral bone of the proximal and distal poles, significantly increasing the compression generated across the fracture site.
Indications and Contraindications
Indications
- Acute displaced fractures of the proximal pole of the scaphoid.
- Noncomminuted proximal pole fractures requiring rigid internal fixation.
- Delayed presentations or nonunions of the proximal pole (often requiring structural bone grafting).
- Scaphoid fractures associated with perilunate dislocations (where a dorsal approach is already utilized for ligamentous repair).
Contraindications
- Fractures with significant volar comminution (which typically require a volar approach and structural grafting to correct a humpback deformity).
- Distal pole fractures.
- Active localized infection over the dorsal wrist.
- Severe radiocarpal osteoarthritis (may require salvage procedures rather than ORIF).
Preoperative Planning
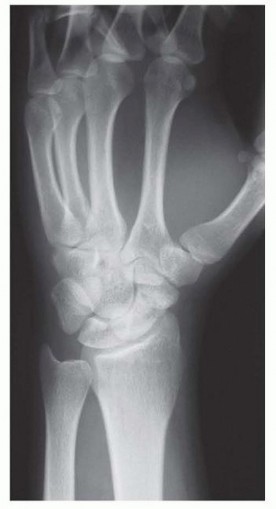
Optimal preoperative planning relies on high-quality imaging. Standard posteroanterior (PA), true lateral, and specific scaphoid views (PA with the wrist in ulnar deviation and extension) are mandatory.
A fine-cut computed tomography (CT) scan formatted along the long axis of the scaphoid (parasagittal and paracoronal planes) is highly recommended. CT imaging allows the surgeon to accurately assess the degree of displacement, the presence of comminution, the exact location of the fracture line, and the size of the proximal pole fragment, which dictates the appropriate screw length and diameter.
Patient Positioning and Anesthesia
- Anesthesia: The procedure is typically performed under regional anesthesia (supraclavicular or axillary brachial plexus block) or general anesthesia, depending on patient preference and comorbidities.
- Positioning: The patient is positioned supine with the operative arm extended on a radiolucent hand table.
- Tourniquet: A well-padded pneumatic tourniquet is applied to the proximal arm. The arm is exsanguinated with an Esmarch bandage, and the tourniquet is inflated (typically to 250 mm Hg) to ensure a bloodless surgical field.
- Fluoroscopy: A mini C-arm fluoroscopy unit is positioned perpendicular to the hand table, allowing for seamless transition between PA and lateral views without compromising the sterile field.
Surgical Technique: The Dorsal Approach (Step-by-Step)
1. Incision and Superficial Dissection
- Identify Lister’s tubercle, the radiocarpal joint line, and the extensor tendons.
- Make a dorsal transverse incision approximately 5 to 10 mm distal to the radiocarpal joint. Alternatively, a longitudinal incision centered over Lister's tubercle can be utilized depending on surgeon preference and the need for extensile exposure.
- Carefully dissect through the subcutaneous tissues. Surgical Warning: Meticulously protect the sensory branches of the radial nerve (superficial radial nerve) radially, and the dorsal sensory branch of the ulnar nerve (DSBUN) ulnarly.
- Preserve, cauterize, or ligate and divide the dorsal venous network as necessary to maintain a clear field. Extend the skin incision from the radial styloid to the ulnar styloid to ensure adequate mobilization of the skin flaps.
2. Retinacular Release and Tendon Management
- Identify the extensor retinaculum. Make parallel incisions in the extensor retinaculum on each side of the extensor digitorum communis (EDC) tendons (the fourth dorsal compartment).
- Identify and protect the extensor pollicis longus (EPL) tendon as it exits the third dorsal retinacular compartment and angles radially around Lister's tubercle.
- Connect the parallel incisions proximally to create a retinacular flap, which allows unimpeded access to the underlying dorsal wrist capsule.
- Pass a loop of a Penrose drain around the EDC tendons and retract them medially (ulnarly). The EPL tendon can be retracted radially.
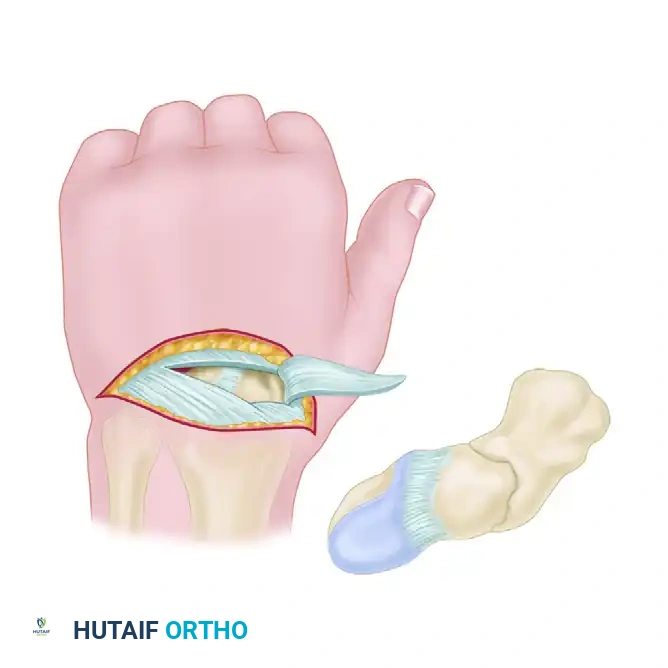
3. Capsulotomy and Joint Exposure
- Expose the dorsal wrist capsule. Open the dorsal capsule by creating a radially based flap.
- This is achieved by incising along the dorsal intercarpal ligament and the dorsal radiotriquetral ligament. This specific capsulotomy (often referred to as a modified Berger flap) preserves the critical dorsal ligamentous stabilizers while providing excellent exposure of the radiocarpal and midcarpal joints.
- Retract the capsular flap radially to expose the proximal pole of the scaphoid, the scapholunate interval, and the fracture site.
4. Fracture Debridement and Reduction
- Gently irrigate the fracture site. Use a dental pick or a small curette to clear any hematoma or interposed soft tissue from the fracture edges. Avoid aggressive curettage that could further devascularize the fragments or remove critical cancellous bone.
- Joystick Technique: Insert a 0.045-inch (1.14 mm) Kirschner wire (K-wire) into the proximal fragment, parallel to the central axis of the scaphoid. Insert a second K-wire into the distal fragment.
- Use these wires as toggle levers ("joysticks") to manipulate the proximal and distal fragments into an anatomically reduced position. Correct any flexion (humpback) or translation.
- Once anatomic reduction is achieved and visually confirmed, pass the first K-wire (or a separate dedicated stabilization wire) across the fracture site for temporary interfragmentary fixation.
- Insert an additional K-wire if the fracture configuration permits, to prevent rotational displacement during drilling and screw insertion.
Pitfall: Failure to achieve anatomic reduction prior to guidewire insertion will result in malunion. The scaphoid must be reduced perfectly; even 1 mm of step-off or translation significantly alters carpal kinematics and accelerates radiocarpal arthrosis.
5. Guidewire Placement
- If a cannulated headless compression screw system is used (which is the modern standard of care), the placement of the central guidewire is the most critical step of the operation.
- The entry point for the dorsal approach is at the proximal articular tip of the scaphoid, immediately adjacent to the insertion of the scapholunate interosseous ligament.
- Hyperflex the wrist over a rolled towel to expose the proximal pole fully.
- Advance the guidewire from proximal to distal. Center the guidewire in the proximal and distal poles.
- Fluoroscopic Verification: Monitor this placement meticulously with C-arm fluoroscopy. Obtain a PA view, a true lateral view (where the pisiform overlies the distal pole of the scaphoid), and a pronated oblique view. The guidewire must be perfectly centered in all planes (the "target sign" on a down-the-barrel view).
6. Drilling, Tapping, and Screw Insertion
- Once central guidewire placement is confirmed, use the depth gauge to determine the appropriate length of the screw.
- Measurement Pearl: Subtract 2 to 4 mm from the measured length to ensure the screw is fully countersunk beneath the articular cartilage at both the proximal and distal poles. A protruding screw head will rapidly destroy the articular cartilage of the radius.
- Drill the scaphoid over the guidewire using the cannulated drill bit. If the bone is particularly dense (sclerotic), tapping the near cortex may be necessary according to the specific device's surgical technique.
- Insert the headless compression screw of the appropriate length over the guidewire.
- Ensure that the screw generates adequate compression across the fracture site. Confirm via fluoroscopy that the fracture gap has closed and that the screw threads are fully buried within the bone.
- Remove the guidewire and any supplemental K-wires. Alternatively, if rotational instability is a concern, a supplemental K-wire can be cut flush with the bone and left in place, though this is rarely necessary with modern compression screws.
7. Closure
- Thoroughly irrigate the radiocarpal joint to remove any bone debris.
- Repair the dorsal capsular flap meticulously using 3-0 or 4-0 non-absorbable or slowly absorbable sutures. A watertight closure of the dorsal radiotriquetral and dorsal intercarpal ligaments is essential to restore dorsal carpal stability.
- Allow the extensor tendons to fall back into their anatomic positions. Repair the extensor retinaculum, ensuring the EPL is left transposed subcutaneously or returned to its compartment without tension.
- Close the subcutaneous tissue and skin in a standard layered fashion.
- Apply a sterile dressing and a volar thumb spica splint.
Postoperative Protocol and Rehabilitation
The postoperative rehabilitation protocol must balance the need for fracture immobilization with the prevention of wrist stiffness.
- Phase I (0-2 Weeks): The patient remains in the postoperative thumb spica splint. Elevation and active finger range of motion (ROM) are encouraged immediately to reduce edema and prevent tendon adhesions.
- Phase II (2-6 Weeks): At the 2-week follow-up, sutures are removed. Depending on the rigidity of the fixation and the patient's compliance, the patient is transitioned to a short-arm thumb spica cast or a custom-molded thermoplastic splint. If a splint is used, gentle active wrist ROM exercises may be initiated under the guidance of a certified hand therapist.
- Phase III (6-12 Weeks): Clinical and radiographic evaluation is performed at 6 weeks. If bridging trabeculae are visible on radiographs (or confirmed via CT scan if plain films are equivocal), the splint is discontinued. Progressive strengthening and passive ROM exercises are initiated.
- Return to Activity: Heavy lifting, contact sports, and manual labor are typically restricted until definitive radiographic union is confirmed, which usually occurs between 10 to 14 weeks postoperatively for proximal pole fractures.
Complications and Management
Despite meticulous surgical technique, complications can arise, largely due to the unforgiving biology of the scaphoid.
- Avascular Necrosis (AVN): Proximal pole fractures carry a high risk of AVN. If AVN develops and the fracture goes on to nonunion, salvage procedures such as vascularized bone grafting (e.g., 1,2-Intercompartmental Supraretinacular Artery [1,2-ICSRA] graft) or proximal row carpectomy may be required.
- Nonunion: Failure of the fracture to heal after 6 months. This is often due to inadequate reduction, eccentric screw placement, or unrecognized comminution. Revision ORIF with structural bone grafting is indicated.
- Hardware Prominence: The most common technical error in the dorsal approach is failing to countersink the proximal aspect of the headless screw. A protruding screw will cause severe, rapid chondrolysis of the scaphoid fossa of the distal radius. If identified postoperatively, immediate revision and screw advancement or exchange is mandatory.
- Nerve Injury: Neuroma formation of the superficial radial nerve or DSBUN due to aggressive retraction during the superficial dissection. Careful handling and minimal retraction are the best preventative measures.
You Might Also Like