Masterclass in Muscle and Musculocutaneous Free Flaps: Principles and Techniques
Key Takeaway
Muscle and musculocutaneous free flaps are foundational in orthopedic microsurgery, providing robust soft-tissue coverage for complex extremity defects and restoring dynamic function through neuromuscular transfer. This guide details the vascular anatomy, biomechanics, and step-by-step surgical harvesting techniques for the latissimus dorsi, serratus anterior, pectoralis major, and other vital flaps, ensuring optimal outcomes in reconstructive microsurgery.
PRINCIPLES OF MUSCLE AND MUSCULOCUTANEOUS FREE FLAPS
Muscle and musculocutaneous free flaps are indispensable tools in the armamentarium of the reconstructive orthopedic surgeon. They serve two primary, highly specialized functions. First, they are widely applied for the robust coverage of complex soft-tissue defects in the upper and lower extremities, as well as for contour reconstruction in the head, neck, and trunk. Their rich vascularity makes them ideal for obliterating dead space, covering exposed bone or hardware, and delivering a robust blood supply to avascular or infected beds (e.g., chronic osteomyelitis).
Second, their major area of utility lies in the transfer of functioning neuromuscular units. Functioning free muscle transfers (FFMT) are utilized to replace paralyzed or irreparably traumatized muscular units in the extremities and face, restoring dynamic motor function.
Clinical Pearl: When selecting a muscle for free tissue transfer, the surgeon must evaluate the Mathes and Nahai vascular classification, the required pedicle length, the donor site morbidity, and, in the case of FFMT, the excursion and cross-sectional area of the muscle to match the biomechanical demands of the recipient site.
The Lateral Arm Flap: A Septocutaneous Adjunct
While muscle flaps provide bulk, septocutaneous flaps like the lateral arm flap are often utilized when thinner, pliable coverage is required. Centered over the lateral intermuscular septum, this flap relies on the posterior radial collateral artery (PRCA).
The dissection involves an initial posterior incision, elevating the flap deep to the triceps fascia to capture the cutaneous branches of the PRCA. The vascular pedicle is traced proximally to the profunda brachii artery, allowing the flap to be elevated with the posterior cutaneous nerves of the arm and forearm for sensate reconstruction.
THE LATISSIMUS DORSI FLAP
The latissimus dorsi is a workhorse flap in reconstructive microsurgery, classified as a Mathes and Nahai Type V muscle (one dominant pedicle and secondary segmental pedicles). It offers a massive surface area, a long and reliable vascular pedicle, and minimal donor site morbidity.
Vascular Anatomy and Biomechanics
Arising from the thoracolumbar fascia, the iliac crest, and the lower three ribs, the latissimus dorsi muscle covers most of the lower portion of the posterior trunk and passes laterally to insert on the inferior portion of the bicipital groove of the humerus.
The principal vascular supply is the thoracodorsal branch of the subscapular artery, accompanied by its venae comitantes. The thoracodorsal artery courses just deep to the anterior margin of the muscle, entering the deep surface 8 to 12 cm from the humeral insertion. If harvested proximal to the circumflex scapular branch, the arterial diameter ranges from 1.5 to 3.0 mm, ideal for microvascular anastomosis.
Secondary vascular pedicles enter medially from perforating branches of the lumbar and posterior intercostal arteries. The thoracodorsal nerve, containing two to three fascicles (approximate diameter 2 mm), strictly follows the arterial pedicle. The entire muscle, along with a large overlying skin paddle, can be transferred on this single neurovascular bundle.
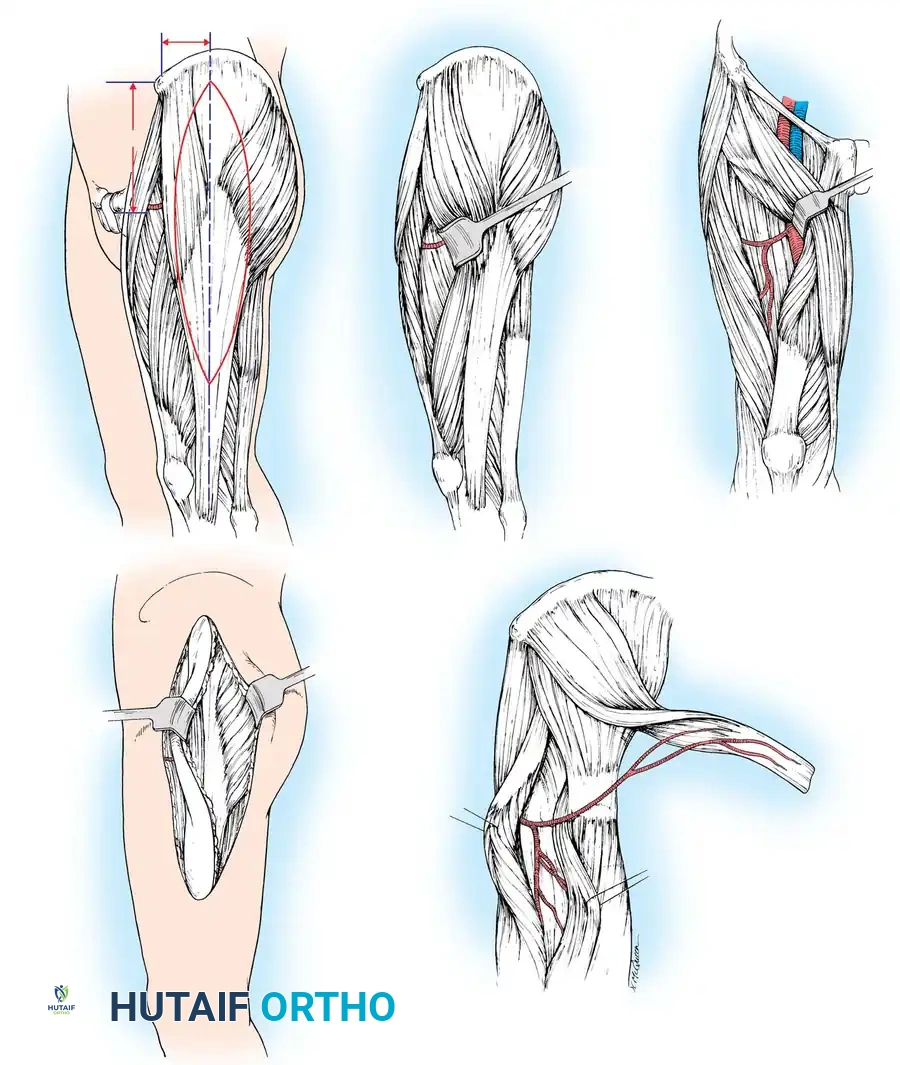
Dissection Technique (Technique 60-17)
Positioning and Preparation:
* Place the patient in the lateral decubitus position. Maintain stability with sandbags, a beanbag, and kidney rests.
* Prepare and drape the patient to leave the entire shoulder, axilla, and hemithorax exposed. Drape the ipsilateral upper extremity free to allow full manipulation during axillary dissection.
Incision and Flap Design:
* Draw a line along the anterior margin of the latissimus dorsi from the posterior axillary fold to the midportion of the iliac crest.
* If a musculocutaneous flap is required, design the skin island over the anteroinferior aspect of the muscle to facilitate direct primary closure of the donor site.
- Make a curved incision extending from the axilla, following the anterior margin, and circumscribing the skin flap.
- If only a muscle flap is harvested, place the incision 3 cm posterior to the anterior margin of the muscle.
Muscle Elevation:
* Identify the dorsal surface of the latissimus dorsi. Separate the muscle anteriorly from the serratus anterior.
* Release the anterior margin from the posterior iliac crest distal to the skin island. Retract the muscle posteriorly and dissect deep to the muscle belly, moving medially toward the spine.
* Ligate or use bipolar electrocautery on the secondary perforating vessels entering the muscle medially.
Pedicle Dissection:
* With the distal and medial attachments mobilized, reflect the muscle to expose the neurovascular pedicle near the insertion, 1 to 2 cm from the anterior margin.
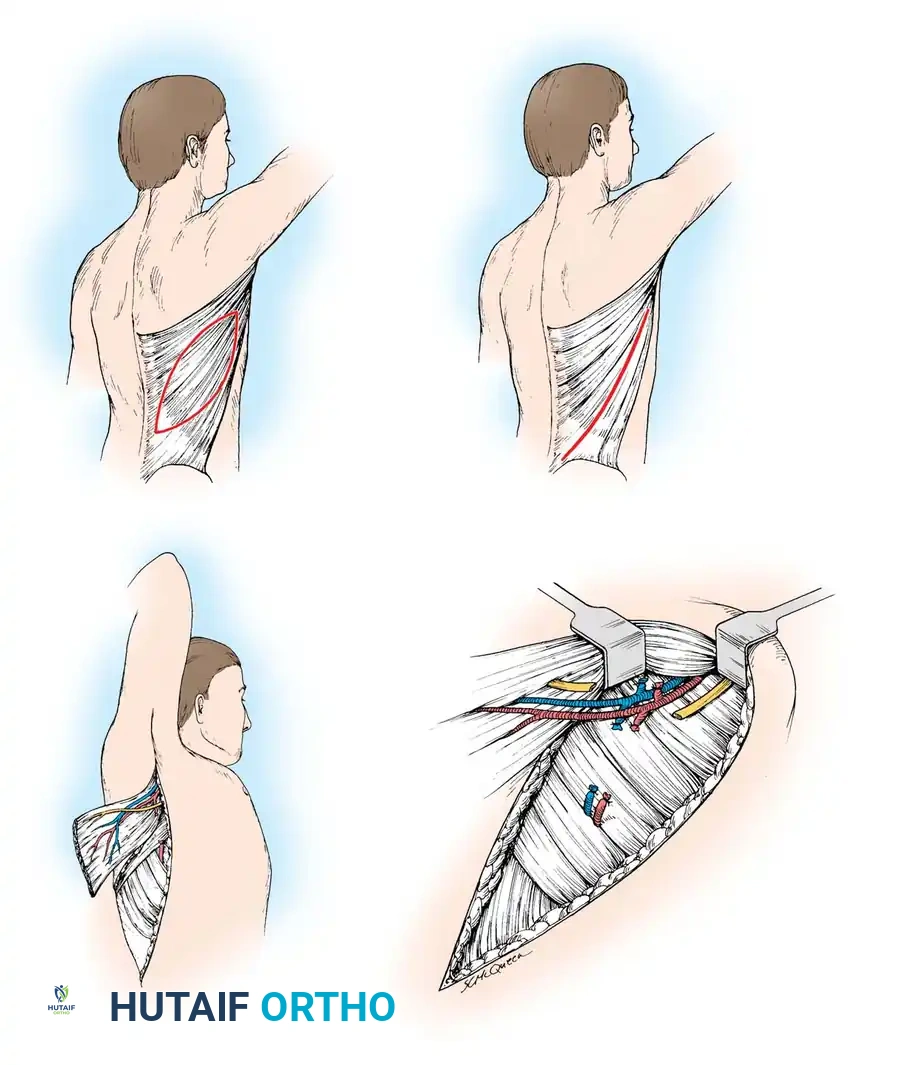
- Carefully dissect the thoracodorsal artery, vein, and nerve.
- CRITICAL STEP: Identify and preserve the long thoracic nerve, which innervates the serratus anterior. It lies deep and anterior to the thoracodorsal pedicle against the chest wall.
- If maximal pedicle length is required, dissect proximally, ligating and dividing the circumflex scapular branch, allowing harvest of the entire subscapular artery directly from the axillary artery.
- Divide the anterior branch to the serratus anterior unless a chimeric flap is planned.
Harvest and Transfer:
* Release the proximal humeral insertion. Do not section the neurovascular pedicle until the recipient site vessels are fully prepared and ready for immediate anastomosis.
- Transfer the muscle to the recipient site. Suture the margins of the skin flap dermis to the underlying muscle fascia to prevent shearing forces that could avulse delicate musculocutaneous perforators.
- Close the donor site over closed-suction drains to prevent seroma formation.
Surgical Warning: Seroma formation at the latissimus donor site is the most common postoperative complication, occurring in up to 30% of cases. Meticulous quilting sutures and prolonged closed-suction drainage are highly recommended.
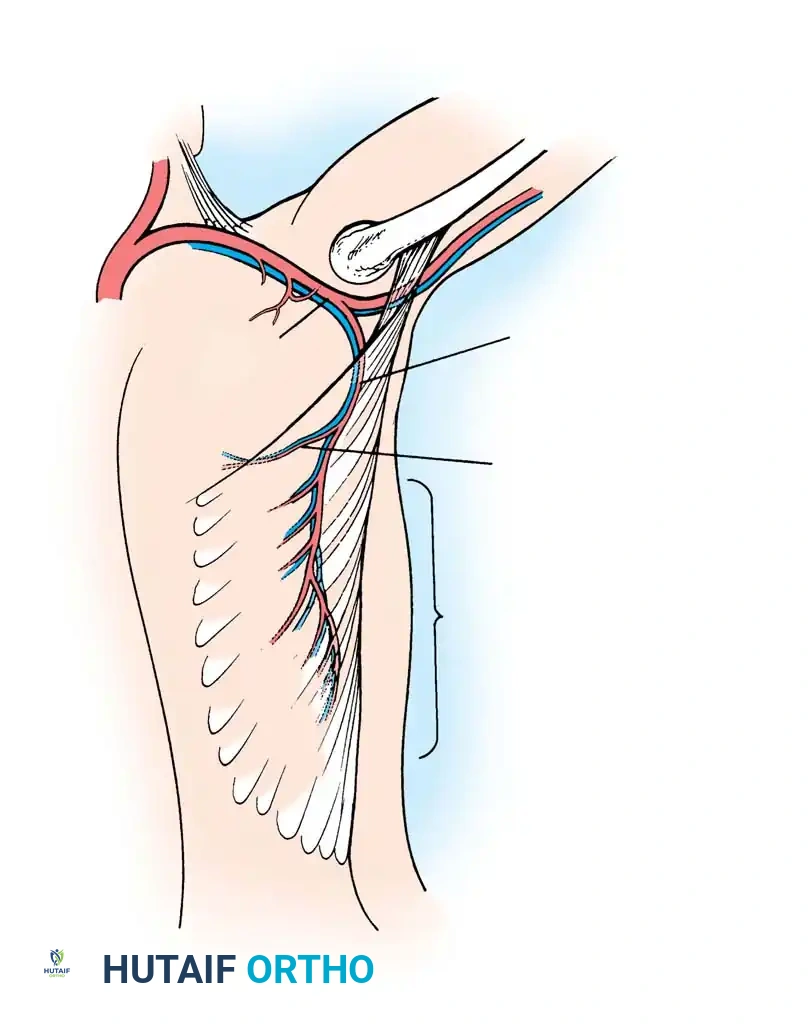
THE SERRATUS ANTERIOR FLAP
First popularized in the early 1980s, the serratus anterior free flap utilizes the lower three to four muscular digitations. It is highly valued for its low donor site morbidity, thin profile, and the unique ability to divide the separate muscular slips to contour complex, multi-dimensional defects (e.g., dorsal and palmar hand wounds).
Vascular Anatomy
The serratus anterior originates from the first nine ribs and inserts on the medial border of the scapula. It is a Mathes and Nahai Type III muscle. The upper six digitations are supplied by the lateral thoracic artery, while the lower three to four digitations are vascularized by a constant anterior branch of the thoracodorsal artery.
The long thoracic nerve courses superficially along the muscle fascia, providing innervation to all digitations. By preserving the subscapular artery, a vascular pedicle of up to 15 cm can be achieved.
Dissection Technique (Technique 60-18)
- Position the patient in the lateral decubitus position. Prepare the entire upper extremity and hemithorax.
- Make a linear incision along the midaxillary line centered over the 6th through 10th ribs. Deepen the incision anterior to the leading edge of the latissimus dorsi.
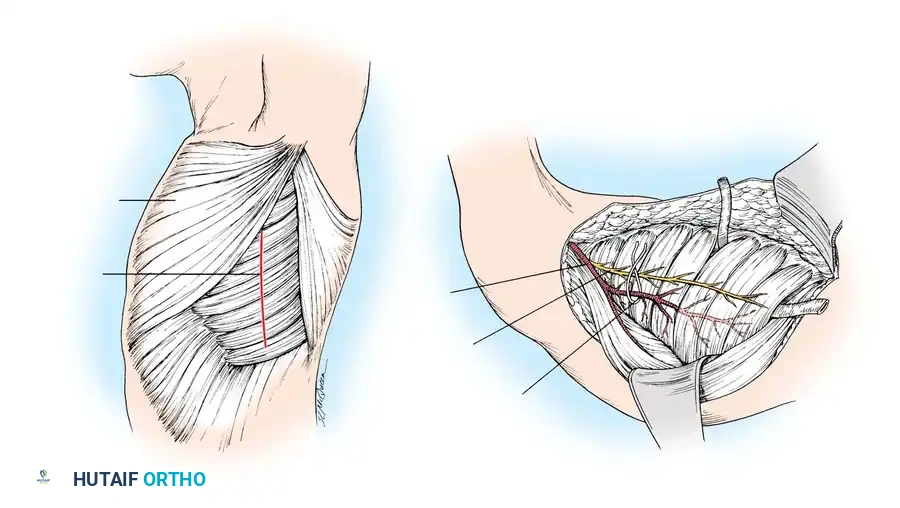
- Abduct the arm widely. Using blunt dissection, identify the thoracodorsal artery beneath the latissimus dorsi and locate its anterior branch to the serratus anterior.
- Ligate and divide the thoracodorsal artery just distal to the takeoff of this anterior branch (if the latissimus is not being harvested).
- Identify the thoracodorsal nerve and carefully separate it from the vascular pedicle to preserve latissimus function.
- Trace the anterior vascular branch distally into the lower three to four digitations.
- CRITICAL STEP: Identify the long thoracic nerve. Carefully separate the fascicles innervating the lower digitations while strictly preserving the proximal nerve to prevent scapular winging.
- Elevate the lower digitations off the ribs and section their scapular insertions. Divide the pedicle once recipient vessels are prepared.
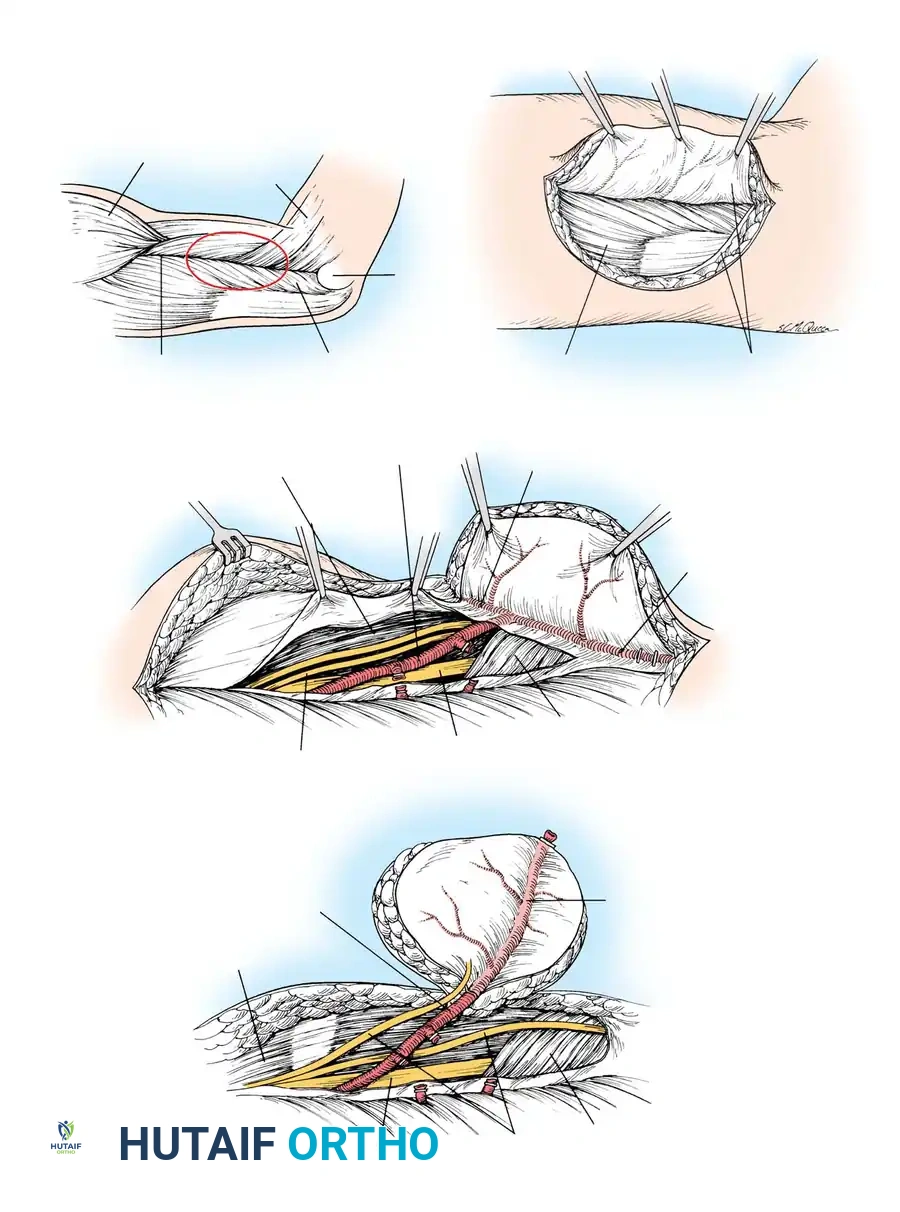
THE PECTORALIS MAJOR TRANSFER
While less commonly used as a free flap due to its shorter pedicle and visible donor site morbidity, the pectoralis major remains a vital option for pedicled head/neck reconstruction and functional transfer for elbow or finger flexion.
Vascular Anatomy
The pectoralis major consists of a superior (clavicular) head and an inferior (sternocostal) head. It is a Mathes and Nahai Type V muscle.
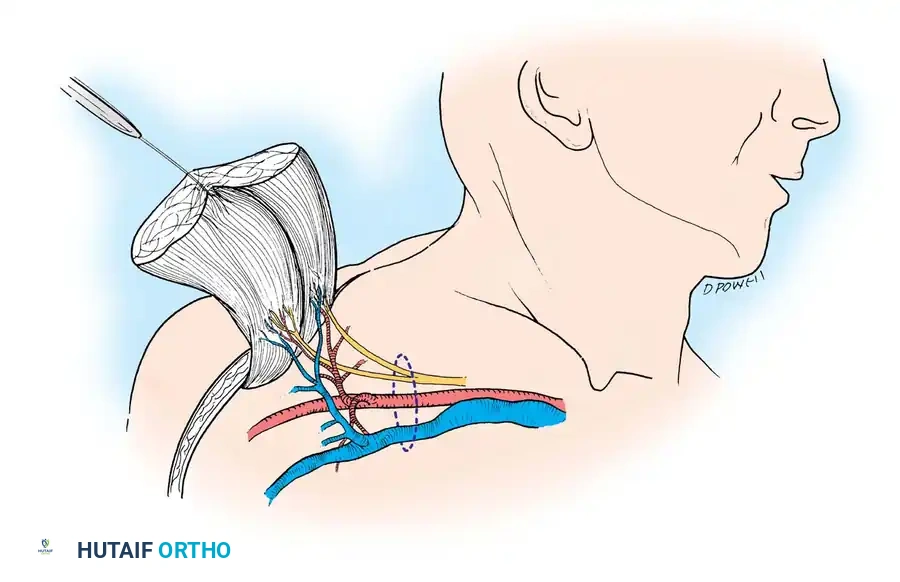
The dominant blood supply is the pectoral branch of the thoracoacromial artery, which bifurcates into a superior branch (clavicular head) and an inferior branch (sternal head). The inferior branch serves as the vascular pedicle for the transfer of the sternal head, providing a pedicle length of approximately 4 cm and a diameter of 2.5 mm. Innervation to the sternocostal portion is provided by five to six monofascicular branches from the medial and lateral pectoral nerves.
Dissection Technique (Technique 60-19)
- Prepare and drape the anterior chest wall and the ipsilateral arm.
- Outline the required skin paddle over the sternocostal head if a musculocutaneous flap is planned.
- Incisional approach involves elevating the deltopectoral groove to identify the cephalic vein and the thoracoacromial axis.
- Isolate the pectoral branch of the thoracoacromial artery and the accompanying pectoral nerves.
- Detach the sternal origin of the muscle, elevating it laterally toward the humeral insertion.
- Release the humeral insertion, taking care to protect the short neurovascular pedicle before transfer.
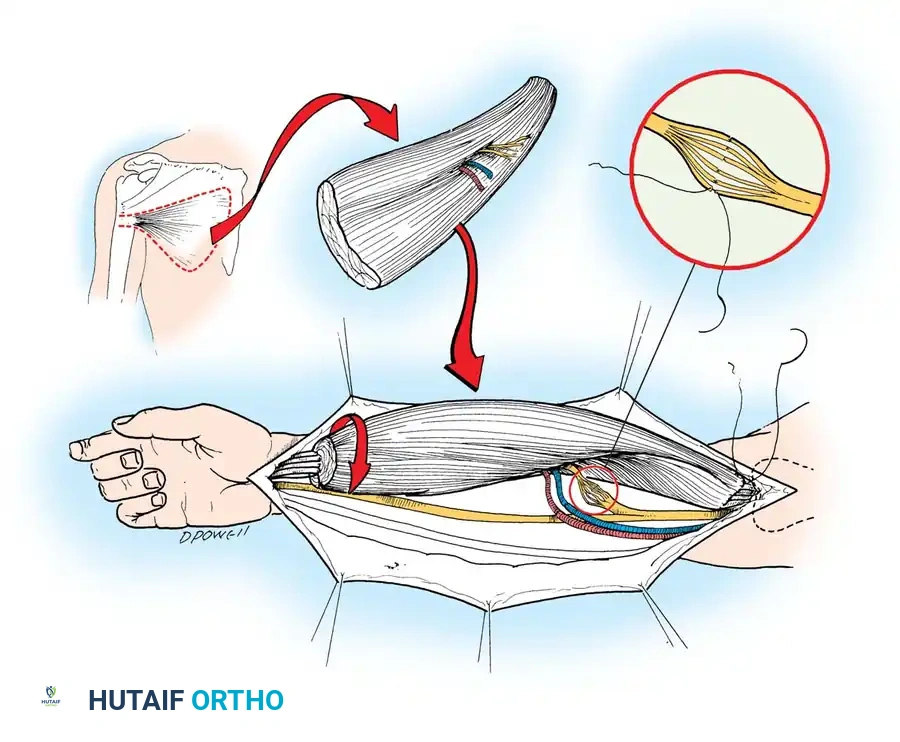
THE GRACILIS FREE FLAP: THE GOLD STANDARD FOR FFMT
For functioning free muscle transfer (FFMT)—particularly in facial reanimation or brachial plexus reconstruction—the gracilis muscle is the undisputed gold standard. It offers reliable anatomy, excellent excursion, and negligible donor site morbidity.
Positioning and Incision
The patient is placed supine with the hip abducted and externally rotated, and the knee slightly flexed.
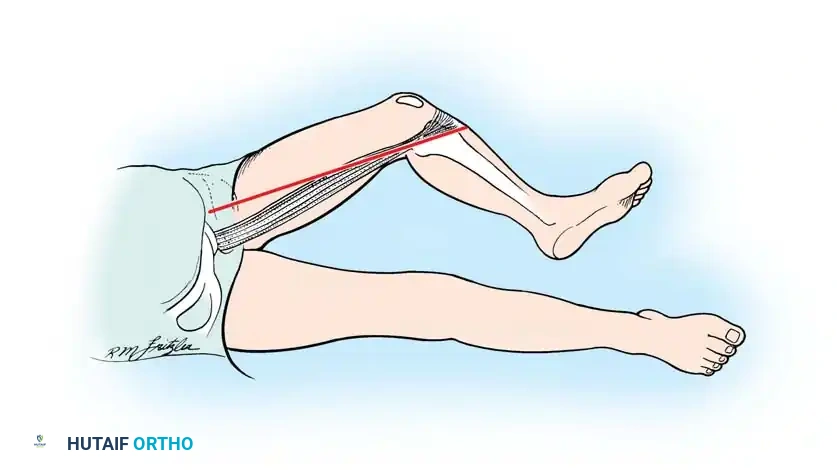
A linear incision is made along the medial thigh, drawn from the pubic tubercle to the medial epicondyle of the femur, directly over the palpable belly of the gracilis.
Vascular Anatomy and Dissection
The gracilis is a Mathes and Nahai Type II muscle. Its dominant pedicle is the ascending branch of the medial circumflex femoral artery (MCFA), which enters the deep surface of the muscle approximately 8 to 10 cm distal to the pubic tubercle.
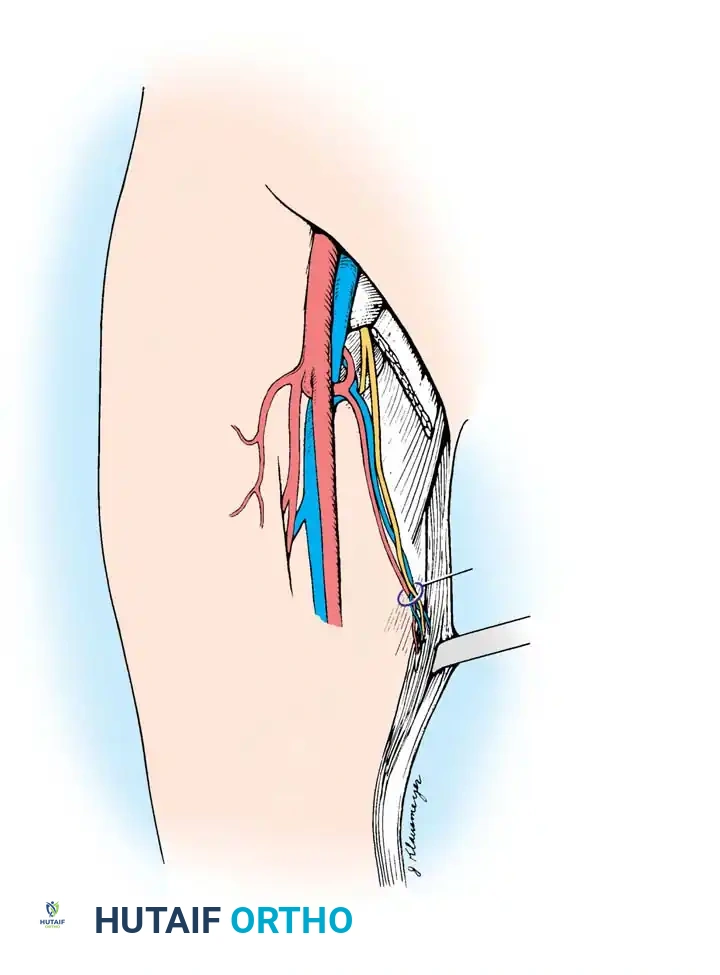
- Incise the skin and deep fascia. Retract the adductor longus anteriorly to expose the neurovascular hilum of the gracilis.
- Identify the dominant vascular pedicle (MCFA branch) and the anterior branch of the obturator nerve.
- The nerve is dissected proximally to obtain adequate length for neurorrhaphy.
- The muscle is freed from its fascial attachments, and the distal tendon is transected near the pes anserinus.
- Resting length must be marked with sutures prior to detachment to ensure appropriate tensioning at the recipient site.
Clinical Pearl: In FFMT, establishing the correct resting tension of the transferred muscle is paramount. A muscle sutured too tightly will suffer from ischemia and contracture, while one sutured too loosely will fail to generate effective contractile force.
THE RECTUS ABDOMINIS FLAP
The rectus abdominis muscle, or its musculocutaneous variations (such as the VRAM or TRAM flap), provides massive soft-tissue bulk for the reconstruction of large, deep defects.
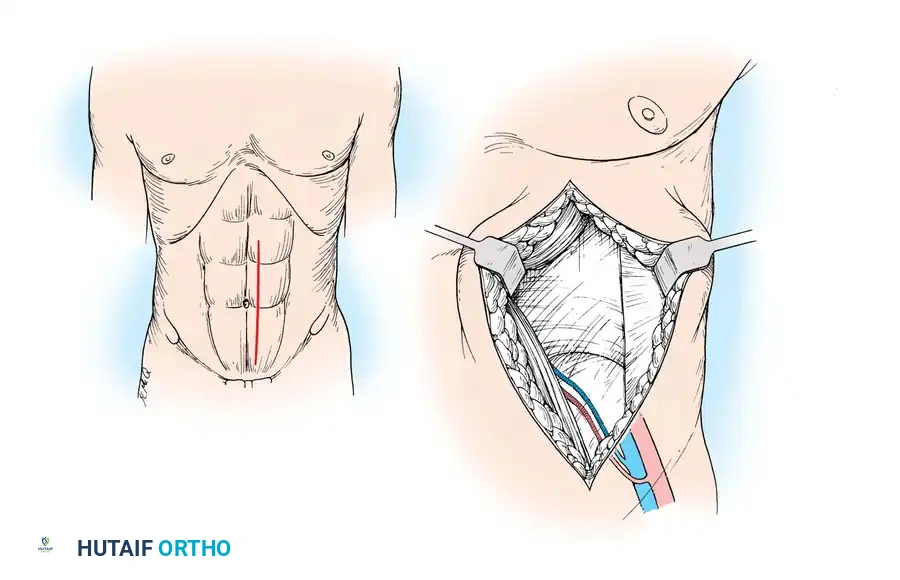
Anatomy and Harvest
Classified as a Mathes and Nahai Type III muscle, it has two dominant pedicles: the superior epigastric artery and the deep inferior epigastric artery (DIEA). For free tissue transfer, the DIEA is universally preferred due to its larger caliber (2.5 - 3.0 mm) and longer pedicle length.
- A paramedian or midline incision is utilized. The anterior rectus sheath is incised, and the muscle is mobilized.
- The DIEA is identified on the posterior surface of the muscle below the arcuate line.
- The muscle is divided superiorly, and the pedicle is traced down to its origin at the external iliac vessels.
- Meticulous closure of the anterior rectus sheath is mandatory to prevent postoperative ventral hernias.
POSTOPERATIVE PROTOCOLS AND FLAP MONITORING
The success of muscle and musculocutaneous free flaps relies heavily on rigorous postoperative care.
- Hemodynamic Stability: Maintain normovolemia and a warm ambient room temperature to prevent peripheral vasoconstriction.
- Flap Monitoring: Clinical assessment of skin paddle color, capillary refill, and turgor is the gold standard. This is supplemented by implantable venous Doppler probes or handheld acoustic Doppler monitoring of the arterial pedicle every hour for the first 48 hours.
- Positioning: The recipient extremity must be elevated to promote venous drainage, with strict avoidance of any pressure or tight dressings over the pedicle geometry.
- Anticoagulation: While protocols vary, most microsurgeons utilize a prophylactic regimen of subcutaneous heparin or low-molecular-weight heparin, occasionally supplemented with daily aspirin (81 mg) to prevent microvascular thrombosis.
- Rehabilitation: For coverage flaps, immobilization of the recipient joint is maintained for 2 to 3 weeks to allow neovascularization. For functioning free muscle transfers, passive range of motion begins early, but active contraction is delayed until signs of reinnervation (Tinel's sign progression and EMG activity) are evident, typically at 3 to 6 months postoperatively.
You Might Also Like
