Mastering Tendon Repair: Modified Kessler-Tajima and Pulvertaft Weave Techniques
Key Takeaway
The Modified Kessler-Tajima suture, augmented by the Strickland technique, provides a robust four-strand core repair essential for early active mobilization in flexor tendon injuries. Combined with a running-lock epitendinous stitch, it optimizes biomechanical strength and glide. For tendon transfers involving size mismatches, the Pulvertaft weave remains the gold standard, ensuring superior tensile strength through interlacing tendon integration.
Introduction to Advanced Tendon Repair Biomechanics
The primary objective of flexor tendon repair is to achieve a coaptation that is biomechanically robust enough to withstand the forces of early active motion (EAM) while maintaining a low-profile configuration that permits unhindered excursion through the fibro-osseous digital sheath. The evolution of tendon repair has shifted away from simple two-strand techniques, which frequently fail under the physiological loads of active flexion, toward multi-strand configurations.
The Modified Kessler-Tajima Suture, particularly with the Strickland modification (1995), represents a paradigm shift in Zone II flexor tendon repairs. By converting a standard two-strand core into a four-strand construct and supplementing it with a running-lock epitendinous suture, surgeons can achieve a repair strength exceeding 40 to 50 Newtons—the critical threshold required for safe early active mobilization.
Conversely, when addressing tendon transfers, tendon grafting, or scenarios involving significant diameter mismatches, end-to-end repairs are biomechanically insufficient. In these instances, the Pulvertaft Weave remains the undisputed gold standard, providing massive surface area integration and unparalleled tensile strength.
Clinical Pearl: The "work of flexion" increases significantly in the presence of edema, sheath disruption, or bulky suture knots. A meticulously executed epitendinous suture not only increases the ultimate tensile strength of the repair by up to 50% but also smooths the repair site, reducing gliding resistance and preventing gap formation.
Surgical Technique: The Modified Kessler-Tajima Suture (Strickland Modification)
The Strickland modification of the Kessler-Tajima technique is a highly reliable four-strand repair. It utilizes a core suture configuration supplemented by a horizontal mattress suture, all enveloped by a continuous running-lock epitendinous stitch.
Preoperative Preparation and Positioning
- Anesthesia: Regional block (axillary or supraclavicular) or general anesthesia. Wide-awake local anesthesia no tourniquet (WALANT) is increasingly preferred to allow intraoperative active movement testing.
- Positioning: Supine with the arm extended on a radiolucent hand table.
- Tourniquet: Applied to the upper arm (if WALANT is not utilized), inflated to 250 mm Hg after exsanguination.
- Instrumentation: Fine plastic surgery instruments, tenotomy scissors, non-toothed forceps, and appropriate suture materials (typically 3-0 or 4-0 braided polyester or looped Supramid for the core; 5-0 or 6-0 monofilament nylon or Prolene for the epitendinous repair).
Step-by-Step Surgical Execution
1. Core Suture Placement (Tajima Configuration)
The procedure begins with the placement of the Tajima core sutures. The Tajima modification of the Kessler stitch involves passing the suture from the cut surface of the tendon, exiting laterally, traversing the epitenon, and re-entering to exit through the cut surface. This ensures the knots are buried within the repair site.
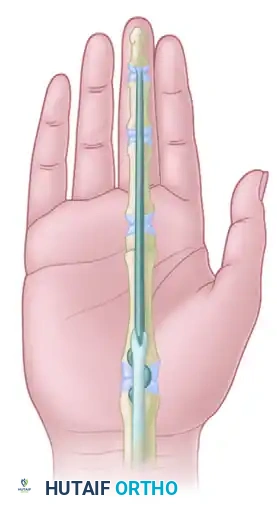
FIGURE 66-21 A: Tajima core sutures in place. The back wall (dorsal) running-lock peripheral epitendinous stitch is in progress.
2. Dorsal Epitendinous Suture (Back Wall)
Before tying the core sutures, it is biomechanically advantageous to repair the dorsal aspect (back wall) of the tendon.
- Utilize a 5-0 or 6-0 monofilament nylon.
- Perform a running-lock (Silfverskiöld) peripheral epitendinous suture.
- This step is critical as accessing the dorsal wall becomes exceedingly difficult once the core sutures are tied and the tendon ends are approximated.
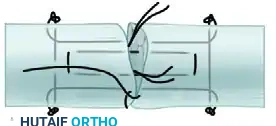
FIGURE 66-21 B: Back wall suturing completed. The dorsal running-lock stitch provides a smooth gliding surface against the dorsal aspect of the flexor sheath.
3. Addition of the Horizontal Mattress Suture
To upgrade the repair from a two-strand to a four-strand construct (the Strickland modification), a horizontal mattress suture is introduced into the core configuration.
- Use a 4-0 braided polyester suture.
- Place the mattress suture in the palmar (volar) tendon gap, ensuring it grasps adequate tendon volume (at least 7-10 mm from the cut edge) to prevent pull-out.
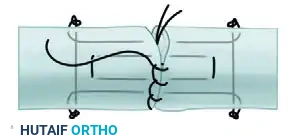
FIGURE 66-21 C: Mattress core suture added in the palmar tendon gap, effectively doubling the core strands crossing the repair site.
4. Tying the Core Sutures
With all core strands in place, the tendon ends are carefully approximated.
- Tension must be meticulously balanced. Over-tensioning causes bunching and increases the work of flexion; under-tensioning leads to gap formation.
- Tie all knots of the core sutures, ensuring they are buried deeply within the tendon substance to prevent catching on the A2 or A4 pulleys.
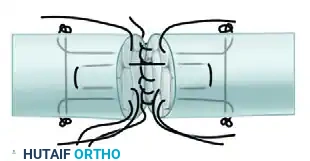
FIGURE 66-21 D: All core sutures tied. The tendon ends are now flush, with no visible gapping.
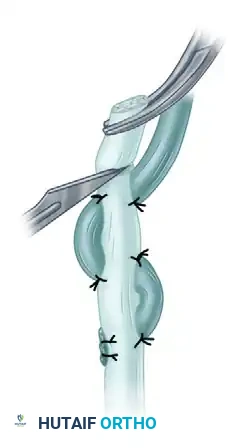
5. Completion of the Volar Epitendinous Suture
The final step of the repair involves completing the peripheral envelope.
- Continue the 5-0 or 6-0 nylon running-lock stitch around the palmar (volar) aspect of the tendon.
- The needle should purchase approximately 1-2 mm of epitenon and superficial endotenon.
- This running-lock configuration not only neatens the repair but actively resists gap formation under load.
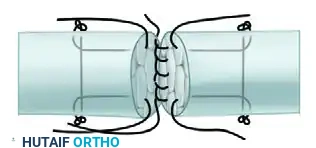
FIGURE 66-21 E: Completion of the running-lock peripheral epitendinous suture on the palmar aspect.
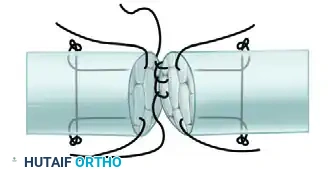
FIGURE 66-21 F: Repair completed. The final construct is a simplified four-strand repair in which the basic two-strand core suture is supplemented by a horizontal mattress suture and a running-lock stitch.
Surgical Warning: Gap formation greater than 3 mm is a clinical failure. It disrupts the smooth gliding surface, invites dense adhesion formation, and significantly increases the risk of secondary rupture. The running-lock epitendinous stitch is your primary defense against gapping.
Alternative Core Configurations
While the Modified Kessler-Tajima is highly effective, surgeons must be familiar with alternative core grasping techniques, especially when dealing with frayed or degenerative tendon ends.
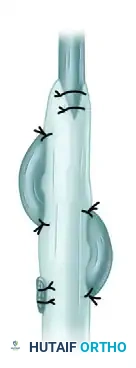
FIGURE 66-22: Double right-angle suture with a single monofilament or multifilament wire suture threaded on a curved needle. This configuration provides excellent grip in softer tendon tissue.
Surgical Technique: The Pulvertaft Weave
When performing tendon transfers (e.g., EIP to EPL) or utilizing tendon grafts (e.g., palmaris longus for a two-stage flexor tendon reconstruction), surgeons frequently encounter tendons of disparate diameters. End-to-end repair in these scenarios is prone to rupture. The Pulvertaft weave technique solves this by interlacing the smaller tendon through the substance of the larger tendon, creating a massive surface area for biological healing and immediate mechanical strength.
Indications for Pulvertaft Weave
- Tendon transfers.
- Intercalary tendon grafts.
- Ruptures with massive substance loss precluding primary repair.
- Size mismatch between donor and recipient tendons.
Step-by-Step Surgical Execution
1. Preparation of the Tendons
Ensure both the donor (smaller) and recipient (larger) tendons are mobilized adequately to allow for excursion. The larger tendon should be cleared of paratenon only at the exact site of the weave to preserve its vascular supply.
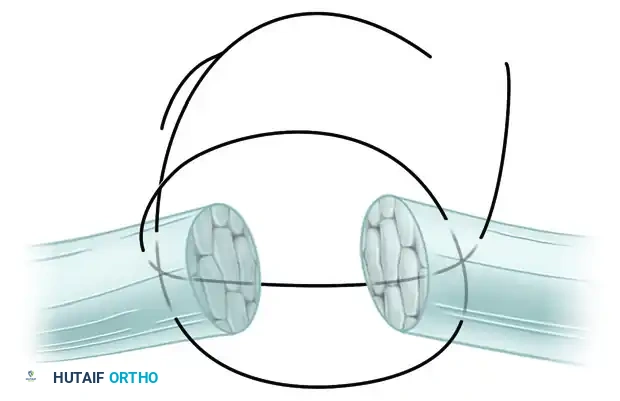
FIGURE 66-23: Pulvertaft technique of suturing a tendon of small diameter to one of larger diameter. This composite illustrates the sequential weaving and anchoring process.
2. The First Pass
- Pierce the recipient (larger) tendon through its center with a No. 11 Bard-Parker knife blade.
- Grasp the blade on the opposite side with a straight hemostat. As the blade is withdrawn, advance the hemostat through the slit.
- Grasp the tip of the smaller tendon with the hemostat and pull it through the larger tendon.
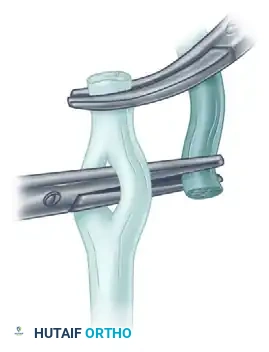
FIGURE 66-23 A: The smaller tendon is brought through the larger tendon. Tension is meticulously adjusted before anchoring with one or two sutures.
3. Tensioning and First Anchor
- Adjust the resting tension of the transfer. This is a critical step; the cascade of the hand must be evaluated to ensure physiological tension.
- Once tension is set, anchor the smaller tendon to the larger tendon using 3-0 or 4-0 non-absorbable braided sutures (e.g., Ticron or Ethibond) placed in a mattress fashion.
4. Subsequent Passes
- Create a second slit in the larger tendon, approximately 5 to 10 mm proximal to the first slit.
- Crucial Biomechanical Step: This second slit must be oriented at a 90-degree angle (perpendicular) to the first slit. This alternating orientation prevents the larger tendon from splitting longitudinally under tension.
- Pull the smaller tendon through this second hole.
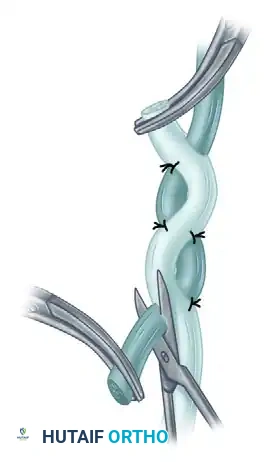
FIGURE 66-23 B: The tendon is brought through a more proximal hole and is anchored again with one or two sutures after tension is verified.
Alternative view demonstrating the perpendicular passes of the smaller tendon through the larger recipient tendon, maximizing contact area.
5. Trimming and "Fish-Mouth" Closure
- After 3 to 4 passes (depending on available tendon length), the excess of the smaller tendon is cut flush with the larger tendon. The exit hole is closed over it with one or two fine sutures.
- To ensure a smooth glide and prevent a bulky stump, the excess of the larger tendon is trimmed into a "V" shape.
- This creates a "fish mouth" that is wrapped around the central location of the smaller tendon and sutured closed, tapering the repair site.
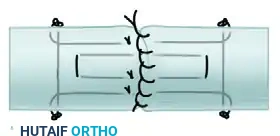
FIGURE 66-23 C & D: After the excess is cut flush, the exit hole is closed. The excess of the larger tendon is trimmed to permit central location of the smaller tendon. This so-called fish mouth is closed with sutures to streamline the repair.
Pitfall: Failing to bury the cut ends of the tendon or leaving bulky knots exposed in a Pulvertaft weave will lead to severe adhesions to surrounding fascial planes, completely negating the excursion gained by the tendon transfer. Always taper the repair.
Postoperative Protocols and Rehabilitation
The success of both the Modified Kessler-Tajima repair and the Pulvertaft weave relies heavily on the postoperative rehabilitation protocol. The mechanical strength of the repair drops during the inflammatory phase (days 5-21) before increasing during the fibroblastic and remodeling phases.
Flexor Tendon Repair (Modified Kessler-Tajima) Protocol
Because the Strickland modification provides a robust 4-strand repair, patients are excellent candidates for Early Active Motion (EAM) protocols (e.g., Manchester or Belfast protocols).
1. Splinting (Days 1-3): Dorsal blocking splint applied in the operating room. Wrist at 20-30° flexion, MCP joints at 70° flexion, IP joints fully extended.
2. Phase I (Weeks 1-4): Passive flexion and active extension within the splint. Controlled early active flexion (place-and-hold exercises) is initiated under the strict supervision of a certified hand therapist.
3. Phase II (Weeks 4-6): The dorsal blocking splint is transitioned to a wristband. Active composite flexion and extension exercises are progressed.
4. Phase III (Weeks 6-8): Discontinue splinting. Begin gentle blocking exercises and light resistance.
5. Phase IV (Weeks 8-12): Progressive strengthening. Return to heavy manual labor or sports is typically restricted until 10-12 weeks postoperatively.
Tendon Transfer (Pulvertaft Weave) Protocol
Tendon transfers require a different approach, as the brain must "re-learn" the function of the transferred muscle, and the weave must integrate biologically.
1. Immobilization (Weeks 1-3): The limb is immobilized in a cast or rigid splint with the transferred tendon in a relaxed, tension-free position (e.g., wrist extension and finger extension for an EIP to EPL transfer).
2. Activation (Weeks 3-4): Splint is removed for therapy. Active motion is initiated. Biofeedback and mirror therapy are highly effective in helping the patient recruit the transferred muscle for its new action.
3. Strengthening (Weeks 6-8): Progressive resistance exercises begin once biological healing of the weave is confirmed clinically.
Conclusion
The mastery of tendon repair requires a deep understanding of biomechanics, meticulous tissue handling, and precise suture placement. The Modified Kessler-Tajima suture, enhanced by the Strickland 4-strand technique and a running-lock epitendinous stitch, provides the optimal balance of tensile strength and low-profile gliding necessary for modern early active motion protocols in flexor tendon injuries.
Simultaneously, the Pulvertaft weave remains an indispensable technique for tendon transfers, utilizing geometric interlacing to overcome size mismatches and provide immediate, robust fixation. By adhering strictly to these evidence-based surgical techniques and pairing them with rigorous postoperative hand therapy, orthopedic surgeons can consistently achieve excellent functional outcomes, minimizing the risks of rupture, adhesion, and joint contracture.
You Might Also Like
