Mastering Microvascular End-to-Side Anastomosis and Vein Grafting
Key Takeaway
Microvascular end-to-side anastomosis and interpositional vein grafting are indispensable techniques in complex orthopaedic reconstruction, replantation, and free tissue transfer. These procedures ensure tension-free vascular repairs while preserving distal perfusion in critical recipient vessels. This comprehensive guide details the biomechanical principles, precise step-by-step surgical execution, and postoperative management required to achieve optimal patency rates and prevent catastrophic microvascular thrombosis.
Introduction to Advanced Microvascular Reconstruction
Microvascular surgery represents the pinnacle of reconstructive orthopaedics, enabling limb salvage, complex replantation, and free tissue transfer. While end-to-end anastomosis remains the standard for vessels of equal caliber, microvascular end-to-side anastomosis and interpositional vein grafting are essential techniques when primary end-to-end repair is contraindicated by excessive tension, severe vessel size mismatch, or the absolute necessity to preserve distal flow in a major recipient axis.
This comprehensive academic guide elucidates the critical hemodynamics, preoperative planning, and step-by-step surgical execution required to master these advanced microvascular techniques.
Hemodynamics and Biomechanical Principles
The success of any microvascular anastomosis is predicated on optimizing blood flow and minimizing thrombogenic turbulence, governed largely by Poiseuille’s Law and Virchow’s Triad.
Flow Dynamics in End-to-Side Anastomosis
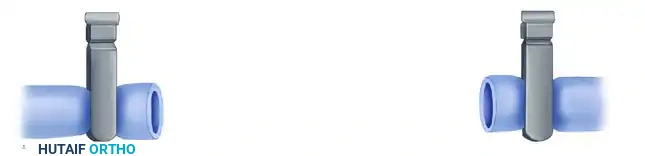
In an end-to-side configuration, the angle of incidence between the donor and recipient vessels profoundly affects laminar flow.
* Oblique Anastomosis (45 to 60 degrees): This is the preferred configuration. An oblique angle minimizes flow separation and boundary layer turbulence, thereby reducing the risk of platelet aggregation and subsequent thrombosis at the anastomotic site.
* Orthogonal Anastomosis (90 degrees): While a 90-degree anastomosis can be performed by trimming the vessel transversely, it inherently creates greater turbulence and a "water hammer" effect on the posterior wall of the recipient vessel. It is generally reserved for situations where anatomical constraints prevent an oblique approach.
The Principle of Tension-Free Repair
Tension is the enemy of microvascular patency. Longitudinal tension narrows the vessel lumen, disrupts the intimal layer, and exposes subendothelial collagen, rapidly initiating the coagulation cascade. When an end-to-end anastomosis cannot be performed without tension, the surgeon must choose between bone shortening (often utilized in digital replantation) or interpositional vein grafting (preferred when preserving skeletal length is paramount).
💡 Clinical Pearl: Virchow's Triad in Microsurgery
Always evaluate your anastomosis against Virchow's Triad:
1. Endothelial Injury: Minimize crush injury by using only smooth-tipped jeweler's forceps.
2. Stasis/Turbulence: Ensure perfect intimal coaptation and avoid size mismatch without proper geometric compensation (e.g., fish-mouthing).
3. Hypercoagulability: Maintain systemic hydration and utilize localized heparinized irrigation.
Preoperative Planning and Patient Positioning
Equipment and Instrumentation
- Operating Microscope: High-quality optics with dual viewing heads and foot-pedal zoom/focus controls.
- Micro-instruments: Non-toothed jeweler's forceps, Castroviejo needle holders, micro-adventitial scissors, and a vessel dilator.
- Suture Material: 8-0 to 10-0 monofilament nylon with a spatulated or taper-point micro-needle, depending on vessel wall thickness.
- Microvascular Clips: Approximator clamps with adjustable sliding bars to eliminate tension during suturing.
Patient Optimization
The patient must be normothermic, well-hydrated, and hemodynamically stable. Peripheral vasoconstriction secondary to hypothermia or hypovolemia will severely compromise microvascular flow, rendering even a technically perfect anastomosis prone to failure.
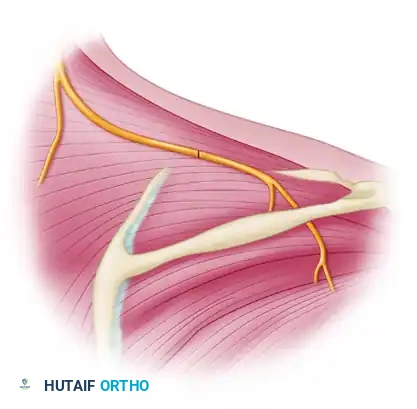
Surgical Technique: Microvascular End-to-Side Anastomosis
The end-to-side anastomosis is technically demanding, requiring meticulous preparation of the recipient arteriotomy (or venotomy) and precise suture placement to prevent back-walling.
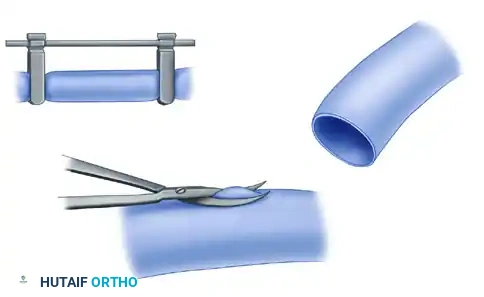
Step 1: Vessel Preparation and Arteriotomy
After isolating the recipient vessel and achieving proximal and distal control with microvascular clips, the adventitia is meticulously stripped from the planned anastomotic site.
Using sharp microvascular scissors, a small, precise ellipse of the vessel wall is excised. It is critical that this excision is a true ellipse rather than a simple slit, as a slit will gape irregularly and compromise the geometry of the anastomosis.
Concurrently, the donor (recipient) vessel is prepared. A suitable fit is achieved by making an oblique cut on the donor vessel to perfectly match the elliptical defect created in the recipient vessel wall. Alternatively, if anatomical constraints dictate, the vessel can be trimmed transversely to provide a 90-degree anastomosis.
Step 2: Placement of Anchor Sutures (Heel and Toe)
The suture line begins by placing anchor sutures at the extreme apices of the opening—commonly referred to as the "heel" and "toe" of the anastomosis.
These initial sutures are critical for establishing the geometry of the repair. The suture ends are temporarily left long to serve as traction stays. This traction elevates the anterior wall, separating it from the posterior wall to prevent inadvertent capture of the back wall during subsequent suturing.
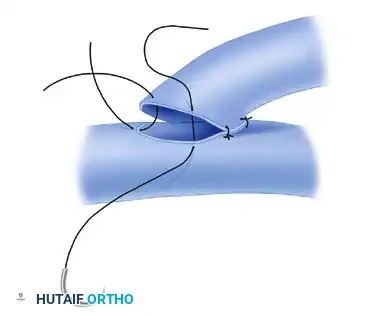
Step 3: Suturing the Anterior and Posterior Walls
With the heel and toe sutures providing gentle traction, the suture line continues. Interrupted stitches are placed sequentially around the anastomosis.
The surgeon must ensure full-thickness bites that perfectly coapt the intimal surfaces. The needle should enter the donor vessel at a 90-degree angle to the tissue and exit the recipient vessel similarly. After completing the anterior wall, the vessel is gently rotated (if mobility allows) or the microscope angle is adjusted to visualize and suture the posterior wall.
⚠️ Surgical Warning: Back-Walling
The most common catastrophic error in end-to-side anastomosis is "back-walling"—inadvertently catching the posterior intimal wall with a suture intended for the anterior wall. Always visualize the lumen clearly before passing the needle, and utilize a micro-vessel dilator to gently probe the lumen if visualization is obscured.
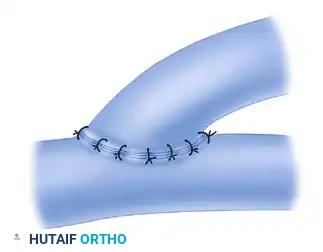
Step 4: Completion and Flow Verification
Once all interrupted sutures are placed and tied with appropriate tension (tight enough to coapt, loose enough to prevent tissue necrosis), the anastomosis is complete.

The distal microvascular clip on the recipient vessel is released first to check for retrograde flow and minor leaks, followed by the proximal clip. Gentle pressure with a cottonoid pledget can manage minor needle-hole bleeding. A patent anastomosis will demonstrate immediate, pulsatile expansion of the donor vessel.
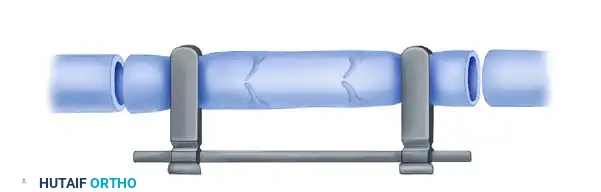
Surgical Technique 63-3: Microvascular Vein Grafting
When an end-to-end vessel anastomosis cannot be performed without undue tension, and bone shortening is either contraindicated or insufficient, interpositional vein grafting becomes necessary.
Step 1: Defect Evaluation
The first step is to debride the injured vessel back to healthy, unbruised intima. The resulting gap is then measured with the limb in its anatomical resting position.
Step 2: Donor Site Selection and Harvest
Many sizes of veins are available to roughly approximate the diameter of the recipient vessel, which is vital to avoid thrombosis resulting from flow turbulence. Common donor sites include:
* Dorsum of the Hand: Excellent for digital vessel reconstruction.
* Volar and Dorsal Forearm: Provides medium-caliber grafts suitable for radial/ulnar artery reconstruction.
* Dorsum of the Foot: The saphenous venous system provides robust, longer grafts for major extremity reconstruction.
Harvesting Technique:
The vein must be handled with extreme care. Grasp only the adventitia. When mobilizing the vein, small side branches must be managed meticulously. Cauterize these small side branches with bipolar forceps well away from the main vein wall.
⚠️ Surgical Warning: Thermal Necrosis
Bipolar cautery applied too close to the main trunk of the vein graft will cause lateral thermal spread, leading to focal intimal necrosis. This creates a highly thrombogenic nidus that will inevitably lead to graft failure. Always leave a small stump of the branch before cauterizing, or use micro-ligaclips for larger branches.
Step 3: Graft Preparation and Reversal
Once the graft is harvested, its orientation must be strictly managed.
* For Arterial Reconstruction: The vein graft must be reversed end-for-end. Veins contain unidirectional valves; if not reversed, these valves will snap shut against the arterial pressure, completely obstructing blood flow.
* For Venous Reconstruction: Reversal is unnecessary and contraindicated, as the valves must remain oriented to facilitate normal venous return.
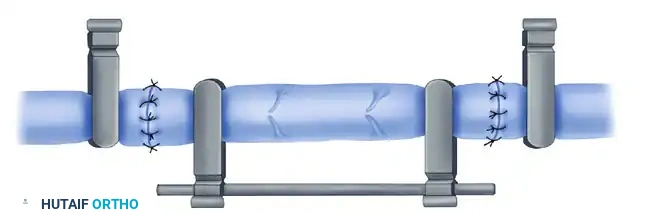
Step 4: The Anastomotic Sequence
The technique for suture anastomosis of a vein graft is fundamentally similar to that described for standard end-to-end repair, but sequence matters.
- Preparation: Gently perfuse the vein graft with heparinized Ringer's solution (typically 100 units/mL) to dilate the vessel, check for unligated side branches (leaks), and clear any micro-thrombi.
- Proximal Anastomosis: Perform the proximal anastomosis first.
- Flow Confirmation: Release the occluding vascular clamps to confirm robust, pulsatile flow through the graft. This step also forcefully dilates the vein, revealing its true pressurized length and preventing kinking.
- Distal Anastomosis: Reapply the clamps, trim the graft to the exact required length (avoiding redundancy which causes kinking), and perform the distal anastomosis.
- Final Release: Release the clamps again to demonstrate flow across both anastomoses.
Step 5: Managing Diameter Discrepancies
Vein grafts rarely match the recipient artery perfectly. To accommodate discrepancies in diameter and prevent turbulent step-off, the surgeon must alter the geometry of the vessel ends.
* Oblique Cutting: Cutting the smaller vessel at an angle increases its cross-sectional anastomotic area.
* Fish-Mouth Configuration: A small longitudinal slit is made in the smaller vessel, effectively flaring its opening to match the larger vessel.
Postoperative Protocol and Monitoring
The success of microvascular surgery extends well beyond the operating room. A rigorous postoperative protocol is mandatory.
Systemic Management
- Hydration: Maintain hyperdynamic circulation. Avoid hypovolemia at all costs.
- Temperature Control: The patient's room should be kept warm (ambient temperature > 75°F / 24°C) to prevent peripheral vasospasm.
- Anticoagulation: Protocols vary by institution, but commonly include intravenous Dextran 40, subcutaneous heparin, or daily aspirin (81 mg to 325 mg) to inhibit platelet aggregation.
Flap and Limb Monitoring
Monitoring should occur hourly for the first 24 to 48 hours, as the majority of microvascular thromboses occur within this window.
* Clinical Assessment: Evaluate color, capillary refill, and tissue turgor.
* Arterial Insufficiency: Pale, cool, empty capillary refill.
* Venous Congestion: Blue/purple, swollen, brisk but dark capillary refill.
* Technological Adjuncts: Implantable venous Doppler probes, surface handheld Dopplers, and near-infrared spectroscopy (NIRS) provide objective, continuous data regarding anastomotic patency.
Management of Complications
If thrombosis is suspected, immediate return to the operating room is imperative. Time is tissue. The anastomosis must be taken down, the thrombus evacuated (often utilizing a Fogarty micro-catheter or local tPA administration), and the anastomosis revised. If the vessel wall is damaged, a new interpositional vein graft must be harvested to bypass the zone of injury entirely.
Conclusion
Microvascular end-to-side anastomosis and vein grafting are highly technical, unforgiving procedures that demand a profound understanding of vascular hemodynamics, meticulous tissue handling, and rigorous microsurgical technique. By adhering to the principles of tension-free repair, precise intimal coaptation, and strict postoperative monitoring, the orthopaedic microsurgeon can achieve exceptional patency rates, ensuring the survival of complex replants and free tissue transfers.
You Might Also Like