Meniscal Allograft Transplantation: The Double Bone Plug Technique
Key Takeaway
Meniscal allograft transplantation using the double bone plug technique restores knee biomechanics in symptomatic, post-meniscectomy patients. This advanced procedure involves precise sizing, preparation of 7-mm cylindrical bone plugs at the meniscal horns, and anatomic tibial tunnel placement. Secure fixation and a strict, phased postoperative rehabilitation protocol are critical to ensuring graft incorporation, restoring joint congruity, and delaying the progression of unicompartmental osteoarthritis.
INTRODUCTION AND BIOMECHANICAL RATIONALE
Meniscal allograft transplantation (MAT) is a complex, joint-preserving procedure designed to restore the biomechanical function of the knee in patients who have undergone a subtotal or total meniscectomy and subsequently developed unicompartmental pain. The menisci are critical secondary stabilizers of the knee, responsible for load transmission, shock absorption, joint lubrication, and proprioception. Loss of meniscal tissue exponentially increases articular contact stresses, inevitably leading to early-onset osteoarthritis.
The Double Bone Plug Technique is widely considered the gold standard for meniscal replacement, particularly for the medial meniscus, due to its ability to securely anchor the anterior and posterior horns to their anatomic footprints. This rigid osseous fixation restores the native "hoop stresses" of the meniscus, allowing the graft to effectively convert axial loads into circumferential tension.
💡 Clinical Pearl: Patient Selection
MAT is strictly indicated for symptomatic, meniscus-deficient patients (typically under 50 years of age) with stable ligaments and normal mechanical alignment. Any concurrent anterior cruciate ligament (ACL) deficiency or malalignment must be addressed either staged or concomitantly (e.g., High Tibial Osteotomy or ACL Reconstruction) to prevent premature graft failure.
PREOPERATIVE PLANNING AND GRAFT SIZING
Accurate sizing of the meniscal allograft is paramount. An oversized graft will extrude and fail to distribute loads, while an undersized graft will experience excessive tension and risk catastrophic tearing.
- Obtain a true lateral and anteroposterior (AP) radiograph of the involved knee.
- Utilize a radiopaque marker of known dimension to calculate the magnification factor.
- Measure the anteroposterior diameter of the appropriate tibial plateau. The coronal width and sagittal length of the native meniscus footprint dictate the required dimensions of the fresh-frozen allograft.
SURGICAL TECHNIQUE: THE DOUBLE BONE PLUG METHOD
Patient Positioning and Diagnostic Arthroscopy
- Position the patient supine on the operating table with a lateral post and foot roll, or in a leg holder, allowing for a full range of motion and the application of valgus/varus stress.
- Apply a well-padded high-thigh tourniquet.
- Perform a comprehensive diagnostic arthroscopy to confirm the absence of high-grade (Outerbridge III/IV) bipolar chondral disease, which is a contraindication for MAT.
- Prepare the meniscal bed by meticulously débriding the residual meniscal rim to a bleeding vascular bed (the red-red zone) to stimulate a healing response, leaving a 1- to 2-mm peripheral rim to aid in suture fixation.
Graft Preparation
The preparation of the allograft must be performed meticulously on the back table while the diagnostic arthroscopy and bed preparation are underway.
-
Thawing Protocol: Thaw the fresh-frozen meniscal allograft in sterile saline at a temperature of strictly less than 40°F (4.4°C).
⚠️ Surgical Warning: Thawing the graft at higher temperatures or using warm saline can cause irreversible denaturation of the collagen matrix, severely compromising the biomechanical integrity of the graft.
-
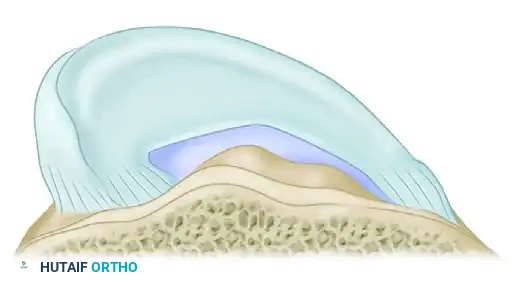
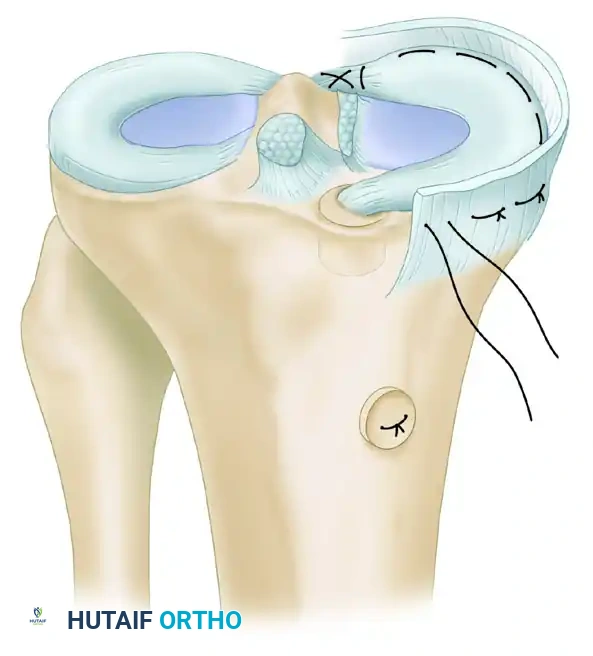
Bone Plug Coring: Prepare each meniscal horn bony insertion site into cylindrical 7-mm bone plugs. The use of a diamond coring reamer ensures smooth, uniform bone blocks.
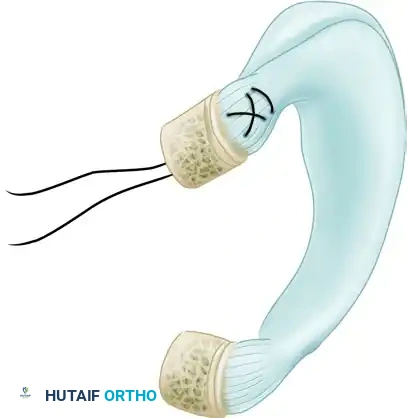
- Suture Passage: Place heavy, nonabsorbable sutures (e.g., #2 or #5) through the roots of each meniscal horn and their respective bone plugs. These sutures are critical for the insertion, passage, and ultimate fixation of the graft into the osseous tibial tunnels.
- Demarcation: Demarcate the meniscus-bone interface with a sterile surgical marking pen. This provides a visual depth gauge for the accurate arthroscopic assessment of complete graft seating to the level of the bone-meniscal tunnel junction.
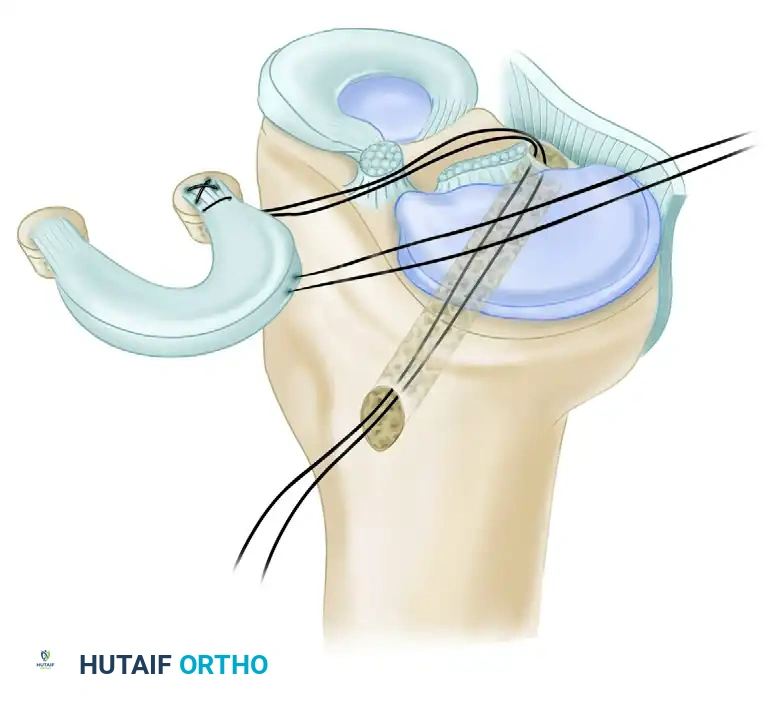
Tibial Tunnel Placement
Anatomic placement of the tibial tunnels is the most critical step in restoring normal meniscal kinematics.
- Portal Placement: Place the arthroscope and arthroscopic guide in the anterolateral and anteromedial portals to provide optimal exposure for lateral meniscal bony insertion sites. For the medial meniscus, the anterior and posterior horn insertion sites are best visualized with the arthroscope in the anteromedial and posteromedial portals. Placement of the arthroscopic guide in the contralateral anterior portal is optimal for targeting each medial meniscal horn insertion site.
-
Extraarticular Targeting: After determining that the intraarticular placement of the arthroscopic guide is anatomically correct at the horn footprints, place the extraarticular exit over the contralateral portion of the tibial metaphysis. This should be at the level of the fibular head, midway between the tibial tubercle and the posteromedial (or posterolateral) border of the tibia.
💡 Clinical Pearl: Tunnel Divergence
The primary advantage of drilling tunnels from the contralateral metaphysis is the maximization of tunnel divergence. This geometry provides a substantially larger bony bridge (minimum 1-cm) between the two tunnels, drastically reducing the risk of tunnel convergence or "blowout."
-
Incision and Exposure: Make a 3-cm longitudinal incision in the skin over the targeted metaphyseal exit site. Elevate the periosteal flaps to expose the bone. Ensure adequate exposure for the parallel placement of two 7-mm osseous tunnels separated by a 1-cm bone bridge.
- Guide Pin Insertion: Insert a tibial drill guide through the appropriate anterior portal, seating the tip precisely in the "footprint" of the meniscal horn. Drill a guidewire through the tibial jig.
- Verification: Remove the guide and confirm the intraarticular position of the guidewire before reaming.
- Reaming: Overdrill the tibial guide pin with a 7-mm cannulated reamer.
- Tunnel Preparation: Débride the intraarticular aperture of the tibial tunnel of all soft tissue. Meticulously chamfer and smooth the tunnel edges with an arthroscopic rasp.
⚠️ Surgical Warning: Failure to chamfer the intraarticular tunnel aperture creates a "killer turn" that can easily abrade or amputate the graft sutures or the meniscal root itself during insertion.
Graft Insertion
Graft insertion requires a coordinated, two-step process to protect the delicate bone plugs from iatrogenic fracture.
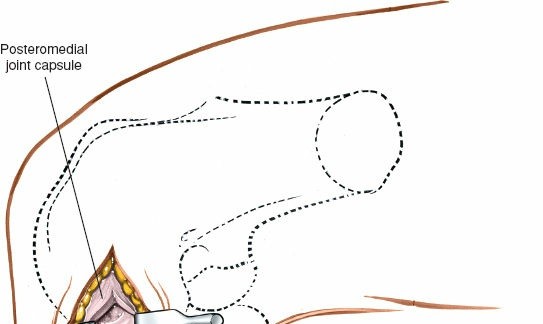
- Posterior Exposure: Make an accessory 3-cm incision at the posteromedial or posterolateral corner, identical to the approach used for an inside-out meniscal repair.
- Dissection: With careful blunt dissection, expose the posterior border of the lateral collateral ligament (LCL) laterally, or the junction of the posterior border of the medial collateral ligament (MCL) and the posterior oblique ligament (POL) medially. Retract the neurovascular structures safely.
- Arthrotomy: Make a 1.5-cm arthrotomy at the posterior border of the LCL (for lateral) or MCL (for medial) to facilitate allograft insertion.
- Wire Passage: Using the arthroscope, pass a looped 18-gauge malleable wire retrograde through the posterior tibial tunnel, directing it outside the knee through the vertical capsular incision located at the posterolateral or posteromedial border.
- Posterior Plug Seating: Pull the traction sutures that were placed in the posterior horn and bone plug of the meniscal allograft through the posterior tibial tunnel using the looped wire. Apply steady, inline tension through these sutures to seat the posterior bone plug into its tunnel.
- Anterior Plug Passage (Two-Step Process): To avoid potential fracture of the anterior bone plug during passage, introduce the looped 18-gauge wire through the ipsilateral anterior portal and bring it outside the knee through the posterior capsular incision.
- Pull the sutures anchoring the anterior portion of the allograft out the ipsilateral anterior portal. This guides the anterior bone plug into the front half of the knee via the medial or lateral gutter.
- Carefully pass the anterior bone block along the gutter, using a probe to guide it and taking extreme care to avoid fracturing the bone plug against the femoral condyle.

- Anterior Plug Seating: Pass the malleable wire retrograde through the anterior tibial tunnel into the knee, bringing it out of the ipsilateral anterior portal to accompany the sutures anchored to the anterior bone plug. Pass the sutures through the looped wire and guide them through the anterior tibial tunnel out the front of the knee.
- Reduce the anterior bone plug into its respective osseous tunnel under direct arthroscopic visualization. The meniscal allograft is now seated in its anatomical position with both the anterior and posterior bone plugs resting in their respective osseous tunnels.
Graft Fixation
Once the bone plugs are seated, the peripheral meniscal rim must be secured to the capsule to ensure biologic incorporation and prevent extrusion.
- Peripheral Suturing: Place 2-0 Ethibond (Ethicon, Inc., Somerville, NJ) or equivalent nonabsorbable sutures in a vertical or horizontal mattress fashion using an inside-out technique.
- Insert the sutures from both the superior and inferior meniscal surfaces to completely approximate the meniscus to the vascularized capsule.
- Kinematic Assessment: When all peripheral sutures have been passed, but before tying them, apply tension to the peripheral sutures, the meniscal root sutures, and the bone plug-anchoring sutures. Move the knee through a complete range of motion (0 to 90 degrees).
- Closely observe the meniscal kinematics under arthroscopy while probing the graft to assess stability, reduction, and the absence of impingement or extrusion during flexion and extension.
- Final Tying: Once kinematics are confirmed, tie the peripheral sutures over the capsule through the posterior accessory incision.
- Tie the heavy sutures anchoring the tibial bone plugs securely over the 1-cm cortical bone bridge separating the two metaphyseal tunnels.
- Closure: Perform a standard, meticulous layered closure for each incision, ensuring the arthrotomies and subcutaneous tissues are securely approximated.
POSTOPERATIVE CARE AND REHABILITATION
The postoperative rehabilitation protocol following meniscal allograft transplantation is stringent and designed to protect the healing bone plugs and peripheral capsular sutures while preventing arthrofibrosis.
Phase I: Maximum Protection (Weeks 0 to 6)
- Bracing: The operated extremity is immediately placed in a long-leg hinged knee brace.
- Weight Bearing: The patient is permitted crutch-assisted partial weight bearing (toe-touch) with the brace locked in full extension for the first 6 weeks. This prevents axial loading combined with shear forces that could displace the graft.
- Range of Motion (ROM): Knee ROM from 0 to 90 degrees is begun immediately postoperatively. Passive and active-assisted motion is encouraged to nourish the articular cartilage and prevent stiffness, but flexion beyond 90 degrees is strictly prohibited to protect the posterior horn fixation.
Phase II: Moderate Protection and Strengthening (Weeks 6 to 6 Months)
- Bracing and Weight Bearing: At 6 weeks, the hinged brace is discontinued, and the patient is progressively transitioned to full weight bearing as tolerated.
- Physical Therapy: Closed kinetic chain exercises (e.g., leg presses, wall slides) are emphasized to rebuild quadriceps and hamstring strength without placing excessive shear stress on the joint.
- ROM Restrictions: Deep flexion (greater than 90-100 degrees) under load is avoided for the first 6 months to prevent posterior extrusion of the allograft.
- Low-Impact Activity: Bicycling, swimming (flutter kick only), and straight-ahead jogging at half speed are permitted between 3 to 6 months, contingent upon the return of adequate quadriceps control and the absence of effusion.
Phase III: Return to Activity (6 to 12 Months)
- Advanced Strengthening: Hard running, agility maneuvers, cutting, pivoting, and full squats are strictly prohibited until after the 6-month mark.
- Return to Play: Competitive sports and heavy manual labor are prohibited until 9 to 12 months postoperatively. Clearance for these activities requires symmetric muscle strength, full pain-free ROM, and radiographic evidence of bone plug incorporation.
💡 Clinical Pearl: Long-Term Expectations
Patients must be counseled that meniscal allograft transplantation is a salvage procedure designed to reduce pain and delay arthroplasty, not to create a "normal" knee. Adherence to the prolonged rehabilitation protocol is the single most critical patient-controlled factor in achieving a successful, long-lasting outcome.
📚 Medical References
- Meniscal allograft transplantation, Sports Med Arthrosc Rev 7:51, 1999.
- Carter TR, Edinger S: Meniscal allograft transplantation. Paper presented at the American Orthopaedic Society for Sports Medicine, June 1997.
- Chatain F, Robinson AH, Adeleine P, et al: The natural history of the knee following arthroscopic medial meniscectomy, Knee Sports Traumatol Arthrosc 9:15, 2001.
- Clark CR, Ogden JA: Development of the menisci of the human knee joint: morphological changes and their potential role in childhood meniscal injury, J Bone Joint Surg 65A:538, 1983.
- Cole BJ, Carter TR, Rodeo SA: Allograft meniscal transplantation: background, techniques, and results, Instr Course Lect 52:383, 2003.
- Cole BJ, Dennis MG, Lee SJ, et al: Prospective evaluation of allograft meniscus transplantation: a minimum 2-year followup, Am J Sports Med 34:919, 2006.
- Cox JS, Nye CE, Schaefer WW, et al: The degenerative effects of partial and total resection of the medial meniscus in dog’s knee, Clin Orthop Relat Res 109:178, 1975.
- Dandy DJ: The arthroscopic anatomy of symptomatic meniscal lesions, J Bone Joint Surg 72B:628, 1990.
- DeBoer HH, Koudstaal J: The fate of meniscus cartilage after transplantation of cryopreserved nontissue-antigen-matched allograft: a case report, Clin Orthop Relat Res 266:145, 1991.
- DeFalco RA, Ricci AR, Balduini FC:
You Might Also Like