Management of Specific Nerve Injuries: Surgical Techniques
Key Takeaway
The surgical management of specific nerve injuries in the hand and wrist requires meticulous microsurgical technique and a profound understanding of fascicular anatomy. This comprehensive guide details the indications, surgical approaches, and postoperative protocols for repairing digital, ulnar, and median nerve lacerations. Emphasizing tension-free coaptation and precise rotational alignment, these evidence-based protocols aim to optimize sensory recovery and restore intrinsic motor function in complex upper extremity trauma.
INTRODUCTION TO PERIPHERAL NERVE REPAIR IN THE UPPER EXTREMITY
The management of specific nerve injuries in the upper extremity demands a profound understanding of microanatomy, biomechanics, and the physiological processes of Wallerian degeneration and axonal regeneration. Injuries to the digital, ulnar, and median nerves present unique reconstructive challenges due to their distinct fascicular topographies and the critical functional roles they play in hand dexterity, grip strength, and protective sensation.
Successful outcomes in peripheral nerve surgery hinge upon meticulous tissue handling, tension-free coaptation, and precise rotational alignment of fascicles. This masterclass delineates the evidence-based surgical techniques and postoperative protocols required to manage these complex injuries effectively.
BASIC ANATOMY AND PRINCIPLES OF NERVE REPAIR
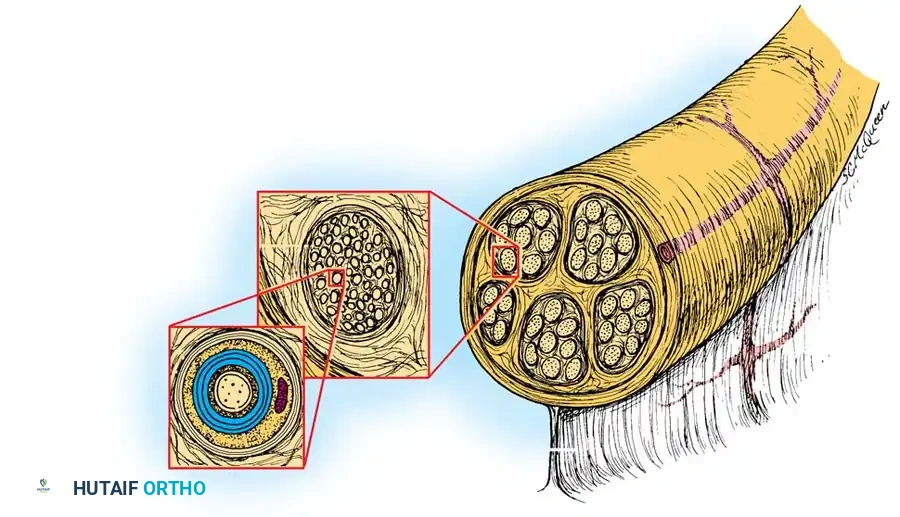
Before undertaking any nerve repair, the surgeon must be intimately familiar with the internal architecture of peripheral nerves. A peripheral nerve is a complex, multi-layered structure designed to protect delicate axons while allowing for longitudinal excursion during joint movement.
Fig. 1: Basic anatomy of peripheral nerves, illustrating the epineurium, perineurium, and endoneurium.
Microanatomical Layers
- Epineurium: The outermost layer of connective tissue. It consists of an external epineurium that surrounds the entire nerve trunk and an internal epineurium that cushions individual fascicles.
- Perineurium: A dense, mechanically strong layer enclosing each fascicle. It acts as the primary blood-nerve barrier and provides the nerve with its tensile strength.
- Endoneurium: The delicate connective tissue matrix surrounding individual axons and their Schwann cells within a fascicle.
Surgical Pearl: The perineurium is the strongest layer of the nerve. In group fascicular repairs, incorporating the perineurium in the suture bite ensures a robust and anatomically precise coaptation.
Principles of Tension-Free Coaptation
Tension across a nerve repair site is the primary enemy of axonal regeneration. Excessive tension compromises the intraneural microcirculation, leading to ischemia, fibroblast proliferation, and subsequent scarring that blocks axonal crossing.
When a gap exists due to primary tissue loss or the necessary excision of a neuroma/glioma, the surgeon must employ strategies to bridge the defect without tension. While minor gaps can sometimes be overcome by gentle mobilization of the nerve trunk or minimal joint flexion, larger defects necessitate the use of nerve grafts (e.g., the sural nerve) or specialized step-cut techniques.
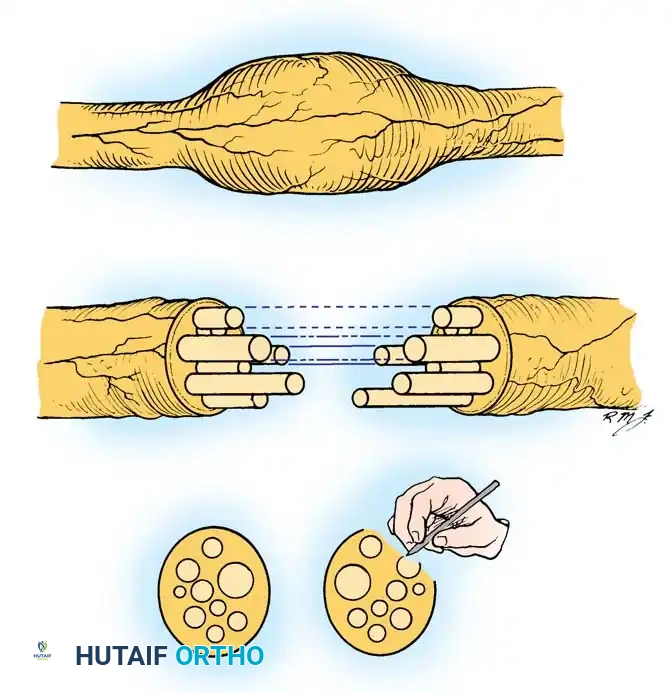
Fig. 2: The step-cut technique of Millesi, utilized to manage nerve gaps by creating interlocking fascicular interfaces.
MANAGEMENT OF DIGITAL NERVE INJURIES
Distal to the wrist, the digital nerves are the most frequently severed neural structures. Restoration of protective and tactile sensation in the digits is paramount for hand function.
Indications and Priorities
It is imperative to repair all digital nerve lacerations when feasible. However, absolute priority must be given to the following critical sensory territories:
* The ulnar digital nerve of the thumb: Essential for key pinch.
* The radial digital nerves of the index, long, and ring fingers: Critical for fine pinch and manipulation.
* The ulnar digital nerve of the little finger: Vital for protective sensation along the ulnar border of the hand.
Knowledge of the anatomy of the cutaneous sensory branches on the dorsum of the hand allows for the repair of these nerves as well, preventing painful neuromas and restoring dorsal sensation. Digital nerves can be successfully repaired distal to the distal volar flexion crease of the fingers, even in the region of their terminal branches, provided adequate magnification is utilized.
Preoperative Assessment for Secondary Repair
If digital nerves are to be repaired secondarily (delayed repair), the surgical bed must be well-vascularized and free of dense scar tissue.
Clinical Evaluation Tip: Before secondary repair, the proximal end of the severed nerve can often be located clinically by passing a firm object, such as a paper clip, gently distally along the anatomical course of the nerve. Upon reaching the terminal neuroma, the patient will indicate exquisite, localized tenderness (Tinel's sign).
Surgical Technique: Suture of Digital Nerves
The following technique outlines the standard approach for primary or secondary digital nerve repair.
- Exposure: The digital nerves lie to the radial and ulnar sides of the volar aspect of the finger. They can be exposed through a midradial or midulnar midaxial incision. Bruner (zigzag) incisions may also be utilized depending on the location of the traumatic wound.
- Proximal Dissection: Begin proximally in uninjured tissue. Dissect a normal segment of the nerve from its investing fascia (part of Cleland's ligament) and proceed distally toward the scar or zone of injury.
- Distal Dissection: Similarly, begin distal to the site of injury and dissect proximally to the scar.
- Preparation of Nerve Ends: Utilizing loupe magnification (minimum 3.5x to 4.5x) or an operating microscope, use microscissors or a diamond knife to sharply resect the damaged tissue. Remove the neuroma from the proximal end and the glioma from the distal end until healthy fascicles pouting from the perineurium are visualized.
- Tendon Repair First: Always suture divided flexor tendons before suturing any nerve to avoid disrupting the delicate neural repair during the vigorous manipulation required for tendon coaptation.
- Coaptation: Approximate the nerve ends without tension. Minimal flexion of the finger joints is acceptable, but extreme flexion should be avoided. If a large gap requires extreme flexion, a nerve graft must be considered.
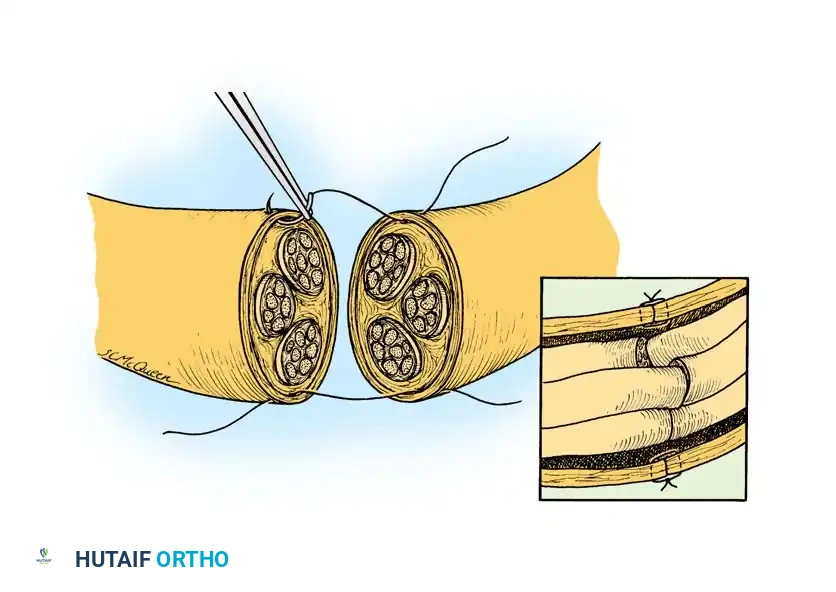
Fig. 3: Basic suture technique for laceration of peripheral nerves. The repair should result in no tension at the suture line, with each small fascicle aligned to match its opposing mirror image.
Microsurgical Suture Placement
- Utilize an 8-0 or 9-0 monofilament nylon suture on an atraumatic curved needle for the main digital nerve trunk.
- For terminal branches distal to the distal interphalangeal (DIP) joint, use 10-0 or 11-0 nylon.
- Pass the first suture through the epineurium about 1 mm from the edge, and similarly through the opposing epineurium. Tie the knot with at least five loops to prevent slipping.
- Place a second suture exactly 180 degrees opposite the first. Leave these first two sutures long to act as traction sutures, allowing rotation of the nerve to access all surfaces.
- Place a total of four to six epineurial sutures to ensure a circumferential seal without bunching the fascicles.
Nerve Grafting in the Digit
If a great deal of nerve tissue has been lost, the sural nerve is the gold standard donor.
* Harvest the graft and place it between the proximal and distal stumps.
* Suture the graft with 10-0 monofilament nylon through the epineurium of the graft and the perineurium of the digital nerve fascicles.
* Ensure the graft is slightly longer than the defect to prevent tension during digital extension.
Postoperative Protocol for Digital Nerves
The extremity is immobilized in a padded dorsal blocking splint in a safe, anatomical position.
- Early Phase (0-3 Weeks): Historically, the part was immobilized for 10 to 21 days. However, modern evidence (such as studies by Yu et al.) demonstrates that early protected motion—often necessitated by concomitant flexor tendon repairs—does not statistically compromise sensory recovery. Active finger motion within the constraints of the dorsal block splint should be initiated to prevent joint stiffness and neural adhesions.
- Late Phase (3+ Weeks): After 3 weeks, the finger joints are allowed gradual active extension beyond the optimal position noted at surgery. If a large defect was grafted, active extension may be delayed until 4 weeks to protect the graft integration.
- Patient Education: The patient must be explicitly warned that until sensation returns, the anesthetic skin is highly susceptible to unrecognized injury. They must inspect the insensitive areas routinely and avoid friction, extreme heat, and extreme cold.
MANAGEMENT OF ULNAR NERVE INJURIES AT THE WRIST
Lacerations at the volar wrist crease frequently involve the ulnar nerve, the ulnar artery, and the tendon of the flexor carpi ulnaris (FCU). At this level, the ulnar nerve is a mixed nerve, containing both motor fascicles (destined for the intrinsic muscles) and sensory fascicles.
Surgical Warning: Proper rotational alignment of the ulnar nerve at the wrist is absolutely critical. Misalignment will direct regenerating motor axons into sensory pathways and vice versa, resulting in profound intrinsic muscle atrophy and poor sensory recovery.
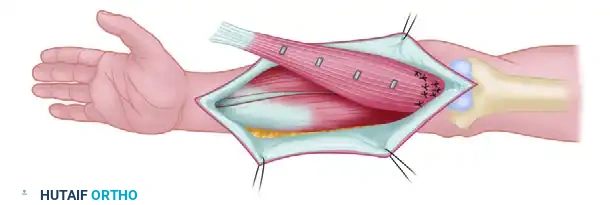
Surgical Technique: Repair of the Main Ulnar Trunk
- Exposure: With a pneumatic tourniquet inflated, make proximal and distal extensile skin incisions. Expose the proximal and distal segments of the nerve, but do not immediately extract them from their normal beds.
- Marking Alignment: Before mobilizing the nerve, place a marking suture (e.g., 6-0 Prolene) through the most anterior aspect of the epineurium on both the proximal and distal segments, well away from the zone of injury. This preserves the native rotational orientation.
- Preparation: Free each segment from surrounding soft tissues. Use the operating microscope to make clean transverse cuts, excising the neuroma and glioma.
- Fascicular Matching: Inspect each cut end for the distinct pattern of large and small fascicular bundles. Match these patterns in conjunction with the anterior epineurial marking sutures.
- Mobilization: If length is needed, dissect the nerve proximally into the forearm. Careful intraneural dissection of muscular branches may allow further advancement. Avoid excessive elbow flexion to gain length; if tension remains high, consider anterior transposition of the ulnar nerve at the elbow or interposition nerve grafting.
- Suturing: Use the operating microscope to align major groups of fascicles. Close the nerve "like a book," starting with the deep surface. Use a combination of 8-0 or 9-0 nylon for epiperineurial repair and 10-0 nylon for internal perineurial (fascicular) alignment.
MANAGEMENT OF THE DEEP MOTOR BRANCH OF THE ULNAR NERVE
The deep branch of the ulnar nerve is arguably one of the most important motor nerves in the upper extremity. It supplies the intrinsic muscles not innervated by the median nerve: the medial two lumbricals, all dorsal and volar interossei, the hypothenar muscles, and the adductor pollicis. These muscles are responsible for the fine, skillful, and coordinated movements of the fingers.
While tendon transfers can salvage some function, direct microsurgical repair of the deep branch is highly desirable and yields superior functional outcomes if performed accurately.
Surgical Technique: Boyes Modification for Deep Branch Repair
The Boyes technique provides an elegant anatomical approach to expose and repair the deep motor branch deep within the palm.
- Incision: Expose the nerve from its origin at the wrist to its midpalmar course. Make a curved incision distal and parallel to the thenar crease, extending it over the hook of the hamate to the flexion crease of the wrist. Proceed proximally and medially, crossing the crease obliquely to the ulnar aspect of the distal forearm.
- Superficial Dissection: Reflect the skin flaps. Divide the palmaris brevis muscle at its insertion and reflect it ulnarward, carefully preserving its nerve supply.
- Deep Exposure: Retract the ulnar vessels radially (toward the thumb). Divide the origins of the abductor digiti quinti, flexor digiti quinti, and opponens digiti quinti muscles. Retract the flexor digitorum tendons radially.
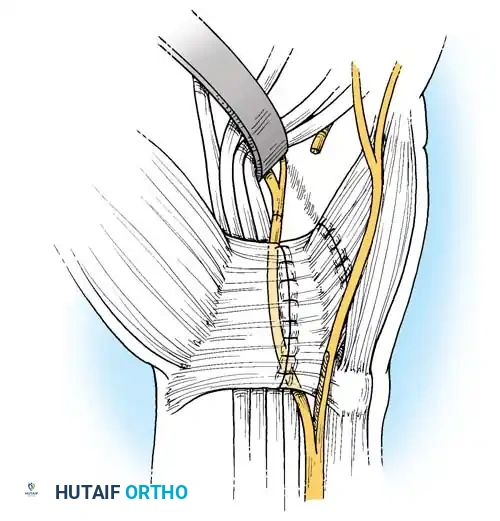
Fig. 4: Boyes technique (A). The main trunk and deep branch of the ulnar nerve have been exposed, and the volar carpal ligament has been divided.
- Nerve Identification: The course of the nerve is now exposed from the pisiform to the midpalm. If necessary, extend the exposure distally to the index metacarpal by retracting the flexor tendons and lumbricals. The nerve can be followed as it passes through the transverse fibers of the adductor pollicis.
- Preparation of Ends: Gently free the divided nerve proximally and distally. Use microscissors to freshen the ends until healthy fascicular tissue is visible.
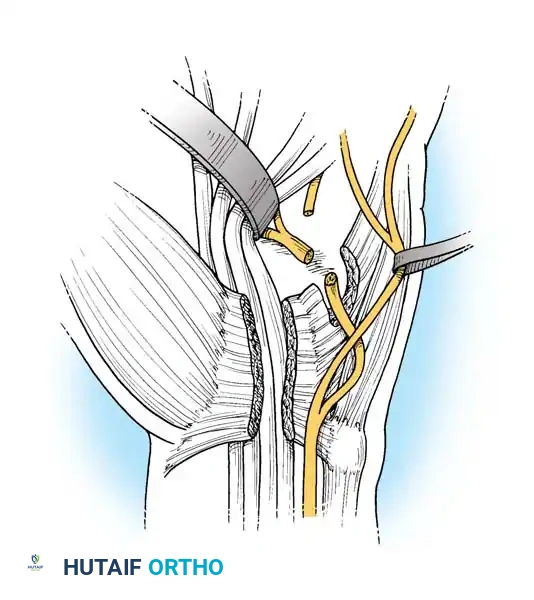
Fig. 5: Boyes technique (B). The scarred ends of the deep motor branch have been sharply freshened.
- Managing Gaps (The Rerouting Maneuver): If a gap exists (common in gunshot wounds or crush injuries), the nerve must be rerouted to gain length. Dissect the motor component intraneurally from the main trunk well into the distal forearm.
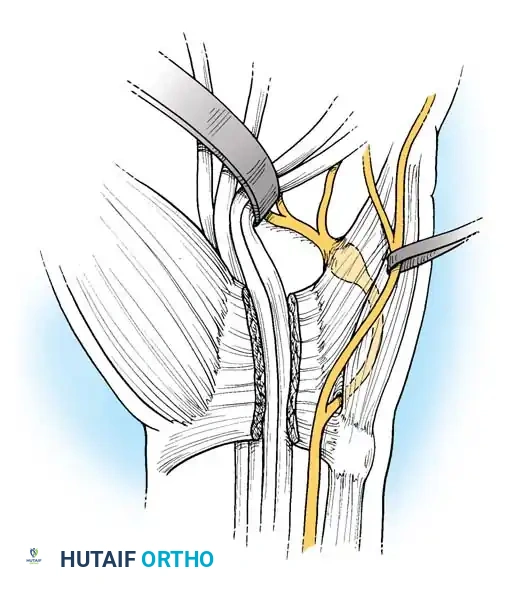
Fig. 6: Boyes technique (C). The deep branch has been split intraneurally into the distal forearm to allow for mobilization.
- Transposition: Divide the volar carpal ligament. Free the ulnar bursa from the ulnar side of the carpus. Displace the proximal end of the mobilized deep branch into the carpal tunnel. Bring the proximal end to the midpalm by flexing the wrist. This rerouting significantly reduces the distance the nerve must traverse.
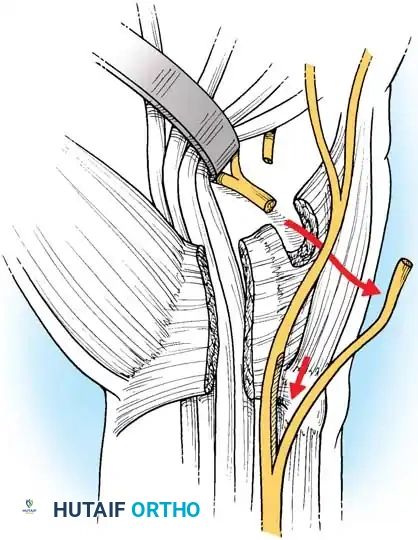
Fig. 7: Boyes technique (D). The deep branch has been rerouted through the carpal tunnel, allowing tension-free coaptation of its ends.
- Coaptation: Repair the nerve using an epiperineurial or combined epiperineurial/perineurial technique with 8-0 or 9-0 nylon externally and 10-0 nylon internally.
- Closure: Suture the volar carpal ligament (if not left open for decompression), replace the insertion of the palmaris brevis, and close the skin.
Clinical Pearl: According to Boyes, the functional results of this repair are directly proportional to the accuracy of the fascicular approximation and inversely proportional to the amount of postoperative scarring. Recovery is monitored by testing the voluntary activity of the first dorsal interosseous muscle, which is the most distal muscle innervated by this branch.
Dorsal Branch of the Ulnar Nerve
The dorsal sensory branch of the ulnar nerve, which branches off the main trunk approximately 5 cm proximal to the wrist crease, is large enough to be repaired using techniques identical to those described for digital nerves. Repair is highly recommended to prevent the formation of a debilitating neuroma over the ulnar styloid and to restore dorsal ulnar sensation.
MANAGEMENT OF MEDIAN NERVE INJURIES IN THE PALM
Injuries to the median nerve in the palm often involve its division into multiple common digital nerves and the critical recurrent motor branch.
Bundle Suture Technique for Segmental Gaps
If the median nerve is divided exactly where it arborizes in the palm, and a segmental gap exists, standard end-to-end repair may be impossible due to the size mismatch between the single proximal trunk and the multiple distal branches. In such cases, a "bundle suture" technique or cable grafting is employed.
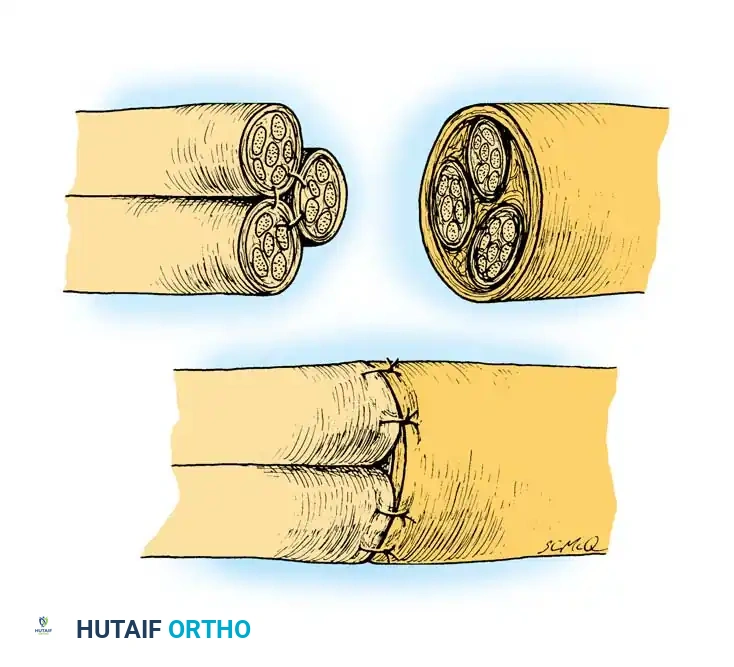
Fig. 8: Bundle suture technique for a segmental gap. This technique gathers the several distal branches of the nerve into a single unified trunk so that it can be coapted to the proximal segment of the main nerve.
The Recurrent Motor Branch
Every surgical effort must be made to identify and repair the recurrent motor branch of the median nerve (often termed the "million-dollar nerve" due to its critical role in thumb opposition).
- Identification: It may be difficult to locate due to surrounding thenar fascia, hematoma, and scar tissue. However, it can be readily identified by its distinct yellowish fibers running transversely toward the base of the thumb (abductor pollicis brevis, opponens pollicis, and superficial head of the flexor pollicis brevis).
- Repair: Once identified, it should be repaired using 10-0 or 11-0 nylon under high-power microscopic magnification. If the branch is avulsed directly from the main trunk, it can be reimplanted into the motor fascicular group of the median nerve using an end-to-side or precise end-to-end fascicular repair.
CONCLUSION
The management of specific nerve injuries in the upper extremity is a technically demanding endeavor that requires patience, precision, and a deep respect for microanatomy. Whether addressing a digital nerve laceration, navigating the complex topography of the ulnar nerve at the wrist, or executing a Boyes rerouting for the deep motor branch, the principles remain constant: achieve a tension-free, anatomically aligned, and biologically sound coaptation. Adherence to these rigorous surgical standards, coupled with appropriate postoperative rehabilitation, provides the patient with the highest probability of meaningful sensory and motor recovery.
You Might Also Like