Arthroscopic Instruments and Equipment: A Comprehensive Surgical Guide
Key Takeaway
Arthroscopic surgery relies on a sophisticated array of optical and mechanical instruments. Mastery of the arthroscope's optical properties, including the angle of inclination and field of view, is essential for spatial orientation. Furthermore, proficiency with tactile probes, manual resection tools like basket forceps, motorized shavers, and radiofrequency devices dictates surgical efficiency and patient safety. This guide details the biomechanics, indications, and operative techniques for essential arthroscopic equipment.
INSTRUMENTS AND EQUIPMENT IN OPERATIVE ARTHROSCOPY
The evolution of arthroscopic surgery is inextricably linked to advancements in optical engineering, materials science, and digital imaging. For the orthopaedic surgeon, mastery of arthroscopic instruments is not merely a matter of technical familiarity; it is a fundamental prerequisite for safe, efficient, and reproducible surgical outcomes. This comprehensive guide details the biomechanics, optical properties, and operative applications of the modern arthroscopic armamentarium.
THE ARTHROSCOPE: OPTICAL PRINCIPLES AND BIOMECHANICS
An arthroscope is a highly sophisticated optical instrument designed to transmit light into a joint cavity and return a magnified, high-resolution image to the surgeon. Historically, three basic optical systems have been utilized in rigid arthroscopes:
1. The Classic Thin Lens System: The earliest iteration, limited by poor light transmission and a narrow field of view.
2. The Rod-Lens System: Designed by Professor Harold Hopkins of Reading, England, this system replaced small, thin lenses with longer glass rods separated by narrow air spaces. This innovation dramatically improved light transmission, image brightness, and the field of view.
3. The Graded Index (GRIN) Lens System: Utilizes variations in the refractive index of the glass to bend light, allowing for extremely thin scopes used in small-joint arthroscopy.
Modern arthroscopes integrate fiberoptic technology for illumination, magnifying lenses for detail, and high-definition digital monitors. Newer iterations offer an increased field of view despite smaller outer diameters, superior depth of field, and optimized fluid flow dynamics through the surrounding sheath.
Key Optical Characteristics
The clinical utility of an arthroscope is dictated by three primary features: diameter, angle of inclination, and field of view.
Angle of Inclination:
This is the angle between the longitudinal axis of the arthroscope and a line perpendicular to the surface of the objective lens. It typically varies from 0 to 120 degrees.
* 25- and 30-Degree Arthroscopes: These are the workhorses of routine arthroscopy. They provide an excellent forward-oblique view, allowing the surgeon to scan a large area of the joint simply by rotating the light cord.
* 70- and 90-Degree Arthroscopes: These are specialized scopes designed for "seeing around corners." They are indispensable for visualizing the posterior compartments of the knee through the intercondylar notch or assessing the inferior glenohumeral recess. However, they carry the distinct disadvantage of making spatial orientation significantly more difficult for the observer.
Clinical Pearl: When utilizing a 70-degree arthroscope, the surgeon must rely heavily on the orientation of the light post. The visual field is directed exactly opposite to the light post. Loss of this spatial awareness can lead to iatrogenic chondral injury during instrument insertion.
Field of View:
This refers to the viewing angle encompassed by the lens. Wider viewing angles facilitate easier orientation.
* A 1.9-mm scope typically has a 65-degree field of view.
* A 2.7-mm scope provides a 90-degree field of view.
* A standard 4.0-mm scope offers a 115-degree field of view.
Rotation of forward-oblique viewing arthroscopes (25- and 30-degree) allows a substantially larger area of the joint to be observed through a scanning effect.
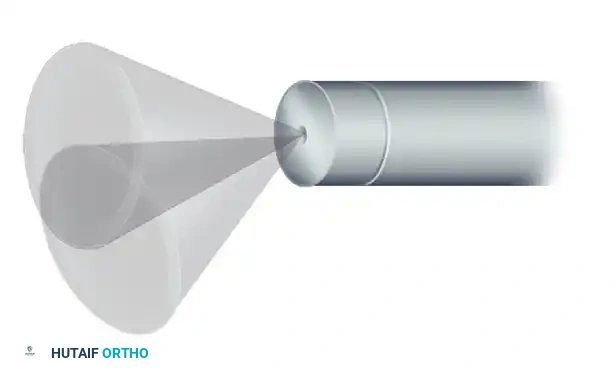
FIGURE 49-1: Rotation of an arthroscope with a 30-degree angle of inclination causes a scanning effect that increases the field of view by approximately three times. The dotted circle demonstrates the expanded field of view compared to the small circle representing a 0-degree arthroscope.
Conversely, rotation of a 70-degree arthroscope produces an extremely large peripheral field of view but creates a central "blind area" directly in front of the scope's longitudinal axis.

FIGURE 49-2: Rotation of an arthroscope with a 70-degree angle of inclination. This scans a massive peripheral circle but creates a central blind area directly ahead of the instrument in which nothing can be seen.
TELEVISION CAMERAS AND DIGITAL IMAGING
McGinty and Johnson pioneered the integration of television cameras into arthroscopic systems, a paradigm shift that transformed the discipline. The advantages are multifold:
* Ergonomics: Allows a comfortable, upright operating position for the surgeon, reducing cervical and lumbar strain.
* Sterility: Prevents contamination of the operative field by distancing the surgeon’s face from the sterile drapes.
* Education and Teamwork: Involves the surgical assistant, anesthesiologist, and scrub nurse in the procedure, anticipating the surgeon's needs.
Early cameras were cumbersome, but modern systems utilize small, solid-state, high-definition (HD) and 4K digital sensors connected directly to the arthroscope eyepiece. Three-chip technology separates light into red, green, and blue wavelengths, allowing for unparalleled color resolution and tissue differentiation. Cableless arthroscopic systems, which transmit video signals wirelessly and contain miniature LED light sources, are also emerging, further reducing clutter in the sterile field.
ACCESSORY INSTRUMENTS AND TRIANGULATION
The foundation of operative arthroscopy is the principle of triangulation—the ability to bring an instrument and the arthroscope together at a focal point within the joint.
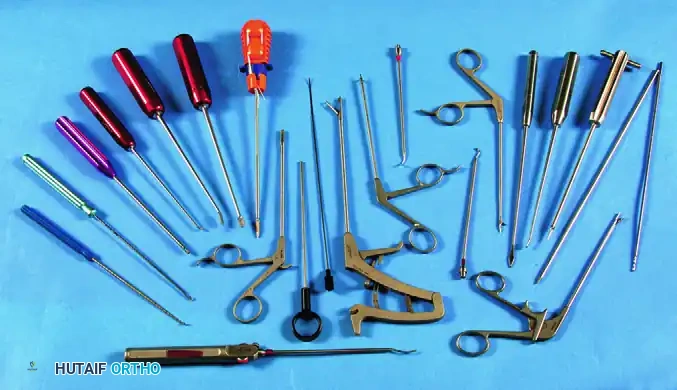
A comprehensive array of standard arthroscopic instruments, including probes, graspers, punches, and scissors, essential for joint pathology management.
The basic instrument kit consists of 30- and 70-degree arthroscopes, probes, scissors, basket forceps, grasping forceps, knives, motorized shavers, and energy devices. Procedure-specific instrumentation has evolved rapidly, particularly for advanced shoulder procedures (e.g., rotator cuff and labral repairs), cruciate ligament reconstruction, and osteochondral transplantation.
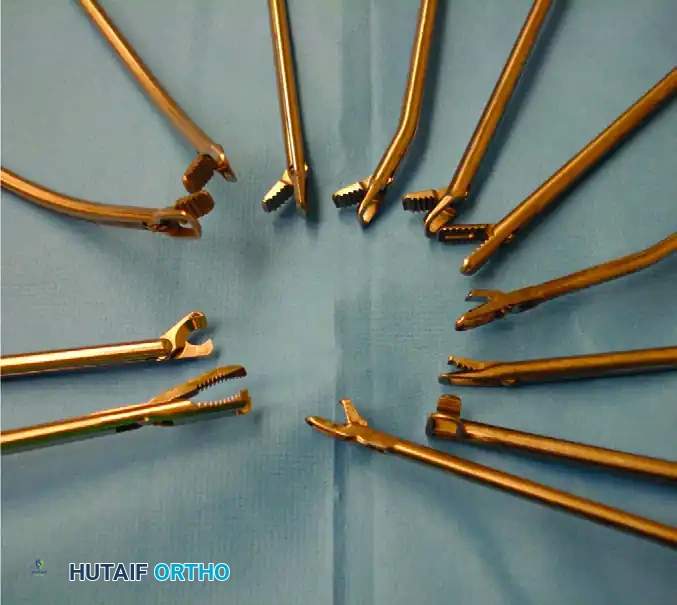
FIGURE 49-3: Specialized arthroscopic instruments designed for advanced shoulder procedures, including suture passers, retrievers, and knot pushers.
The Arthroscopic Probe
The probe is universally recognized as the most critical diagnostic instrument after the arthroscope itself. Often referred to as "the extension of the arthroscopist’s finger," it provides vital tactile feedback that visual inspection alone cannot offer.
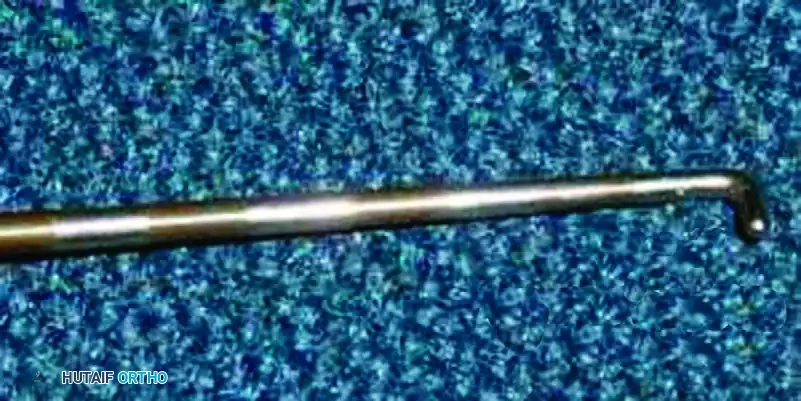
FIGURE 49-4: The arthroscopic probe, featuring a rounded, blunt tip, used for exploring intraarticular structures and executing triangulation techniques.
Indications and Techniques:
* Palpation: Used to assess the consistency of articular cartilage (detecting early chondromalacia before visual fraying occurs).
* Measurement: Most probes feature a right-angled tip measuring exactly 3 to 4 mm. This known dimension acts as an intraarticular ruler to measure osteochondral defects or meniscal tears.
* Tensioning: Essential for hooking the anterior cruciate ligament (ACL) to assess tension and structural integrity.
* Retraction: Used to elevate the meniscus to view its undersurface or to probe hidden recesses like the popliteal hiatus.
Surgical Warning: Because the arthroscope magnifies structures, depth perception can be distorted. Novice surgeons must avoid using the sharp "toe" of the probe aggressively. Palpation should frequently be performed with the "elbow" (the convex bend) of the probe to prevent iatrogenic cartilage scoring.
Arthroscopic Scissors
Arthroscopic scissors, typically 3 to 4 mm in diameter, are available in straight or hooked configurations.
* Hooked Scissors: Generally preferred because the jaw configuration actively hooks the tissue and pulls it into the cutting edges.
* Straight Scissors: Prone to pushing slippery tissue (like synovium or meniscal fragments) away from the jaws during closure.
* Curved vs. Angled: Curved scissors feature a gently sweeping shank to accommodate right or left positioning around condyles. Angled scissors feature a rotating jaw mechanism that cuts at an angle to the shaft, ideal for detaching difficult-to-reach anterior horn meniscal fragments.
Basket Forceps (Punches)
The basket forceps, or punch biopsy forceps, is the workhorse of manual tissue resection.
Design and Biomechanics:
The standard basket forceps features an open base (open-floor design). This critical feature allows each bitten fragment of tissue to drop free into the joint, eliminating the need to remove the instrument for cleaning after every bite. The free-floating fragments are subsequently evacuated via fluid irrigation or a motorized shaver.
Variations:
* Profile: Wide, low-profile baskets are excellent for navigating tight joint spaces, particularly the posterior horns of the menisci.
* Angles: Available in 30-, 45-, and 90-degree angles for trimming the anterior meniscus.
* Curves: 15-degree up-biting and down-biting curves facilitate navigation around the femoral condyles.
Surgical Pitfall: The most common cause of basket forceps breakage is taking excessively large bites of dense tissue (e.g., a calcified meniscus). The proper technique dictates taking multiple, small, sequential bites to avoid excessive stress on the instrument's hinge pins. A broken jaw within the joint necessitates an immediate, often difficult, retrieval process.
Hinged, jawed suction punches are also available. These cleanly bite tissue and immediately suction it through a channel in the shaft, preventing fragments from floating away. However, their bulkier shaft design often precludes access to tight posterior compartments.
Grasping Forceps
Grasping forceps are deployed to retrieve loose bodies, extract excised tissue, or apply tension to meniscal flaps while cutting with a secondary instrument.
* Mechanism: Most feature a ratchet closure on the handle to lock the jaws securely onto the tissue.
* Jaw Design: Single-action (one moving jaw) or double-action (both jaws move).
* Clinical Application: Double-action graspers are vastly superior for securing osteocartilaginous loose bodies. Single-action graspers tend to push the loose body away as the single jaw closes, causing the slippery fragment to escape.
Knife Blades
Modern arthroscopic knives are almost exclusively disposable, single-use instruments to ensure maximum sharpness. Designs include retrograde (hooked) blades, straight down-cutting blades, and Smillie-type end-cutting blades.
Safety Protocol:
Knives must never be introduced blindly through the soft tissue portals. They must be inserted through a protective cannula sheath or utilize a retractable sheath mechanism. The cutting edge should only be exposed once the tip is clearly visualized within the arthroscopic field to prevent inadvertent laceration of the articular cartilage, neurovascular structures, or portal tracts.
POWERED INSTRUMENTATION: MOTORIZED SHAVING SYSTEMS
Motorized shaving systems revolutionized the speed and efficiency of arthroscopic debridement. The system consists of an outer hollow sheath and an inner hollow rotating cannula equipped with a cutting window.
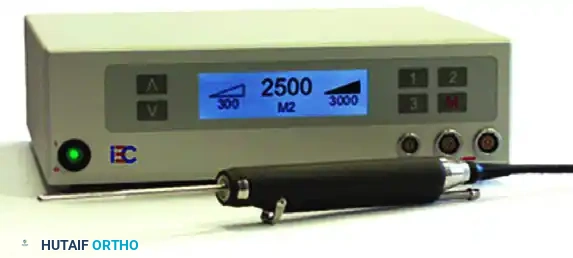
FIGURE 49-6: A standard motorized shaver system handpiece, demonstrating the ergonomic grip and suction control valve.
Mechanism of Action:
The inner cannula functions as a cylindrical blade that spins or oscillates within the outer tube. Suction applied through the handpiece draws soft tissue into the window. As the inner blade rotates, it amputates the tissue, which is then evacuated through the hollow shaft into a collection trap.
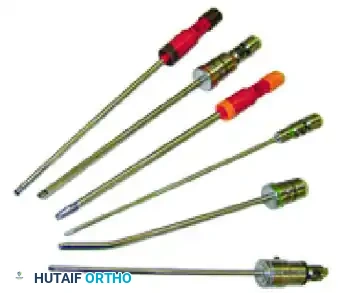
Various motorized shaver and burr tips. The diameter and window configuration are selected based on the target tissue (e.g., aggressive full-radius resectors for synovium, shielded burrs for acromioplasty).
Operational Techniques:
* Tip Selection: Diameters range from 2.0 mm (small joints) to 5.5 mm (large joints). Specialized blades exist for meniscal trimming, synovial resection, and cartilage debridement.
* Rotation: Most systems utilize a foot pedal to control speed and direction. Oscillating modes (reversing rotation intermittently) significantly improve cutting efficiency and prevent tissue clogging.
* Fluid Dynamics: When activating the shaver, the outflow from the arthroscope should be closed. This prevents "oversucking" (collapsing the joint space) and minimizes the risk of drawing contaminated fluid backward into the joint.
Surgical Warning: The cutting window of the shaver must always be in direct visual focus before activation. Blind activation of a shaver can rapidly destroy normal articular cartilage or inadvertently resect the anterior cruciate ligament.
ADVANCED ENERGY MODALITIES: ELECTROSURGERY AND RADIOFREQUENCY
Energy devices are critical for hemostasis, tissue ablation, and capsular shrinkage.
Electrocautery:
Traditional electrocautery is frequently used for hemostasis following arthroscopic synovectomy or subacromial decompression, and for cutting during a lateral retinacular release.
Radiofrequency (RF) Instruments:
RF systems generate heat energy to ablate tissue or induce collagen denaturation (shrinkage). They have largely replaced lasers due to superior cost-effectiveness and safety profiles.
* Monopolar RF: Uses a grounding pad on the patient; energy travels from the probe, through the patient's body, to the pad.
* Bipolar RF: Energy is transferred directly between two electrodes located on the tip of the instrument, limiting the depth of thermal spread and negating the need for a grounding pad.
Controversies and Complications:
The use of RF energy is not without risk. Current controversies center on the depth of tissue penetration, the extent of adjacent cell death, and the precision of temperature control.
* Complications: Documented complications of aggressive RF use include iatrogenic articular cartilage damage, subchondral osteonecrosis, and thermal damage to surrounding tissues if the irrigant fluid reaches boiling temperatures.
* Mitigation: Surgeons must maintain continuous fluid flow to dissipate heat and utilize a "hovering" or "paintbrush" technique rather than burying the RF probe into the tissue.
ARTHROSCOPIC IMPLANTS AND FIXATION
The final component of the arthroscopic armamentarium involves implantable devices. A vast array of metallic, polyetheretherketone (PEEK), and bioabsorbable implants have been developed.
Suture Anchors:
These devices revolutionized soft tissue repair (e.g., Bankart repair, rotator cuff repair) by allowing surgeons to secure ligaments and tendons directly to bone without drilling transosseous tunnels. The anchor is impacted or screwed into the bone, and pre-loaded high-strength sutures passed through an eyelet are used to tie the soft tissue down to the decorticated bony bed.
Meniscal Repair Devices:
All-inside meniscal repair systems utilize specialized delivery guns to deploy PEEK anchors and sliding suture knots across meniscal tears, avoiding the need for accessory posterior incisions.
CONCLUSION AND POSTOPERATIVE INSTRUMENT CARE
The successful execution of operative arthroscopy demands a profound understanding of the instruments deployed. From the optical physics of the Hopkins rod-lens to the thermal dynamics of bipolar radiofrequency, the surgeon must respect the capabilities and limitations of each tool. Furthermore, meticulous postoperative handling, enzymatic cleaning, and appropriate sterilization of these delicate instruments are mandatory to maintain their precision, ensure optical clarity, and prevent cross-contamination, thereby upholding the highest standards of patient safety.
===```
You Might Also Like