Mastering Knee Arthroscopy: Principles, Positioning, and Portal Anatomy
Key Takeaway
Knee arthroscopy requires meticulous patient positioning, optimal fluid management, and precise portal placement to ensure comprehensive joint visualization and minimize iatrogenic injury. This guide details the biomechanical principles of joint stressing, standard and optional portal anatomy, and step-by-step surgical setups. Mastery of these foundational techniques is essential for orthopedic surgeons performing both diagnostic evaluations and complex intra-articular reconstructions.
ARTHROSCOPY OF THE LOWER EXTREMITY: BASIC DIAGNOSTIC AND OPERATIVE TECHNIQUES
Knee arthroscopy remains one of the most frequently performed orthopedic procedures worldwide. However, the transition from a basic diagnostic evaluation to complex intra-articular reconstruction requires a profound understanding of joint biomechanics, fluid dynamics, and precise spatial anatomy. Mastery of patient positioning, joint stressing, and portal placement is the foundation upon which successful arthroscopic surgery is built.
GENERAL PRINCIPLES OF KNEE ARTHROSCOPY
The success of any arthroscopic intervention hinges on three critical elements: adequate illumination, optimal joint distention, and precise localization of entry portals. Deficiencies in any of these areas will compromise visualization, increase the risk of iatrogenic cartilage injury, and prolong operative time.
Fluid Management and Hemostasis
Adequate joint distention is paramount. Without it, the infrapatellar fat pad, hyperplastic synovium, and capsular folds will obliterate the optical cavity.
Modern arthroscopy relies on automated arthroscopic pumps that provide continuous inflow through the arthroscope sheath or a dedicated inflow cannula. These pumps maintain a constant intra-articular hydrostatic pressure, which not only distends the joint but also provides a tamponade effect against capillary bleeding.
Surgical Pearl: Maintaining a low intra-articular hydrostatic pressure (typically 30–40 mm Hg) is often sufficient for visualization while minimizing the risk of fluid extravasation into the surrounding soft tissues, which can lead to compartment syndrome of the thigh or calf in prolonged cases.
While a pneumatic tourniquet is routinely placed around the proximal thigh, it should not be inflated during a standard diagnostic arthroscopy unless troublesome bleeding obscures the visual field.
* Vascular Assessment: Inflation of the tourniquet blanches the synovium and other vascularized tissues, making the diagnostic evaluation of meniscal vascularity (the red-red and red-white zones) and healing potential significantly more difficult.
* Tourniquet Time Limits: If inflated for acute traumatic hemarthrosis or complex reconstructions, tourniquet time must be strictly monitored. Routine procedures should not exceed 90 minutes to mitigate the risk of deep vein thrombosis (DVT) and ischemic reperfusion injury. For major, multi-ligamentous procedures, a maximum of 120 minutes is permissible, after which the tourniquet must be deflated to prevent irreversible ischemic neurovascular changes.
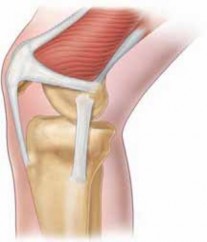
Biomechanics of Joint Stressing
To thoroughly evaluate the medial and lateral compartments, the surgeon must apply specific biomechanical stresses to open the joint spaces. This can be achieved via an assistant, a padded lateral post, or a commercial leg-holding device.
- Manual Assistant: Relying solely on an assistant is generally the least efficient method due to human fatigue and inconsistent force application.
- Lateral Post: A padded lateral post attached to the operating table is highly effective for applying valgus stress in or near full extension to open the medial compartment. However, it provides limited control over tibial rotation.
- Commercial Leg Holders: Thigh holders provide the most rigid fixation, allowing the surgeon to apply precise valgus, varus, and rotational forces independently.
Surgical Warning: When using rigid leg holders, the surgeon must be acutely aware of the fulcrum effect. In elderly patients or those with severe osteopenia, excessive valgus or varus stress applied against a rigid thigh holder can result in an iatrogenic fracture of the distal femur or proximal tibia. Furthermore, these devices can create a localized tourniquet effect and may obstruct superior portals during patellofemoral procedures.
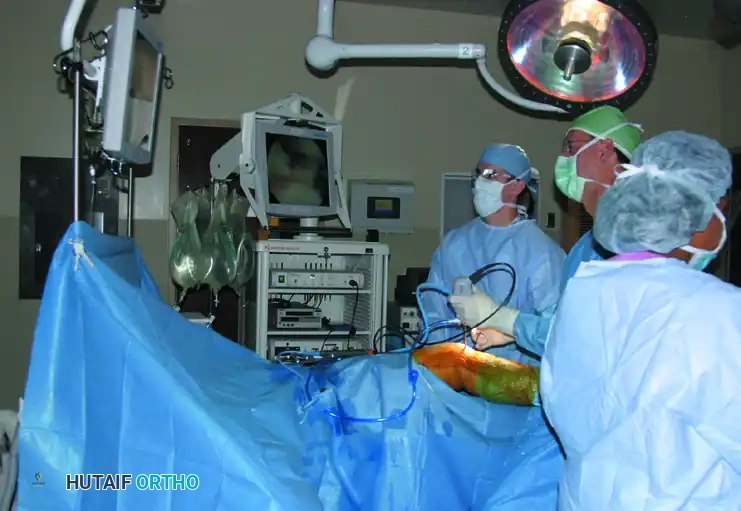
PATIENT POSITIONING AND OPERATING ROOM SETUP
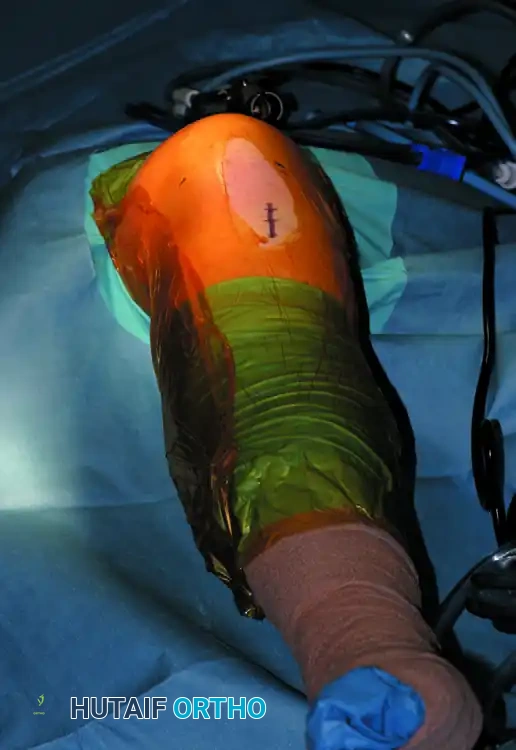
Proper patient positioning dictates the fluidity of the entire procedure. Once the patient is anesthetized, the operative limb is meticulously scrubbed and prepped from the ankle to the tourniquet.
Waterproof isolation is critical. Excellent commercial arthroscopy draping systems are utilized to isolate the unsterile proximal thigh and tourniquet from the sterile field.
The Standard Supine (Dropped-Leg) Position
The patient is placed supine with the knee joint positioned slightly distal to the break point of the operating table. The end of the table is dropped, allowing the operative limb to dangle at 90 degrees of flexion.
* Contralateral Limb Care: The opposite limb must be meticulously padded and supported in a well-leg holder to prevent pressure necrosis, peroneal nerve palsy, and venostasis. The use of thromboembolic deterrent (TED) hose or sequential compression devices (SCDs) on the unoperated leg is mandatory.
* Lumbar Spine Protection: Flexing the middle of the table and placing a padded bolster under the hips reduces tension on the femoral nerve and flattens the lumbar lordosis, preventing postoperative back pain.
The Table-Flat Position
Alternatively, the table-flat position can be utilized, particularly when the surgeon and assistant prefer to stand at the side of the table. This setup is highly effective for basic diagnostic scopes and simple meniscectomies.
The Lateral Post Technique
When using a lateral post, the patient is positioned supine with the prepped limb angled off the lateral aspect of the table. The surgeon stands on the inside of the abducted leg, resting the patient’s foot and ankle against the surgeon’s iliac crest.
* This ergonomic position frees both of the surgeon’s hands.
* By simply leaning against the leg, the surgeon utilizes their core body weight to apply a sustained valgus stress, opening the medial compartment for instrumentation.
* Examination of the lateral compartment is achieved by placing the limb in a "figure-four" position (hip flexed, abducted, and externally rotated with the knee flexed).

PRINCIPLES OF PORTAL PLACEMENT
Precise portal placement is the most critical step in knee arthroscopy. Poorly placed portals lead to instrument crowding, inability to reach posterior structures, and iatrogenic damage to the articular cartilage (scuffing) or menisci.
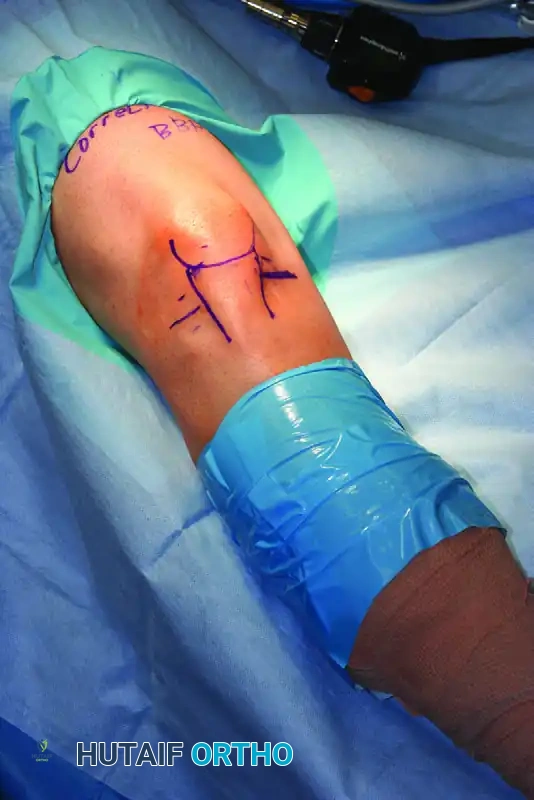
Clinical Pearl: Always draw your anatomical landmarks with a surgical skin marker before distending the joint. Once the knee is filled with 60–100 mL of saline, the soft tissue landmarks become distorted and obliterated.
Standard markings should include:
1. The superior, inferior, medial, and lateral borders of the patella.
2. The medial and lateral borders of the patellar tendon.
3. The medial and lateral joint lines (palpated with the knee flexed at 90 degrees).
4. The posterior contours of the medial and lateral femoral condyles.
Inflow and Outflow Dynamics
For extensive procedures (e.g., Anterior Cruciate Ligament reconstruction) where significant hemarthrosis or debris is expected, a dedicated outflow cannula may be placed superomedially or superolaterally.
However, for standard meniscectomies, a two-portal technique is preferred. Inflow is delivered through the arthroscope sheath, and outflow is managed dynamically via the motorized arthroscopic shaver. Avoiding a third superior portal through the vastus medialis obliquus (VMO) has been shown to significantly accelerate postoperative quadriceps rehabilitation and reduce pain.
Arthroscope Insertion and Triangulation
Once the portals are established, instruments are introduced using the principle of triangulation. The arthroscope and the working instrument (e.g., probe, punch, or shaver) converge at the target pathology, forming an apex.
STANDARD ARTHROSCOPIC PORTALS
1. Anterolateral Portal (The Workhorse)
If restricted to a single portal for diagnostic evaluation, the anterolateral portal is the universal choice. Utilizing a 4-mm, 30-degree arthroscope, nearly the entire joint can be visualized.
* Location: Approximately 1 cm superior to the lateral joint line and 1 cm lateral to the lateral margin of the patellar tendon.
* Pitfalls:
* Too High: The scope enters the intercondylar notch, restricting access to the posterior horns of the menisci.
* Too Low: The trocar will lacerate the anterior horn of the lateral meniscus or pass beneath it, tethering the scope and preventing maneuverability.
* Too Medial: Penetration of the central patellar tendon or the hypertrophic infrapatellar fat pad, severely obscuring vision.
2. Anteromedial Portal
This is the primary working portal for instrumentation of the medial compartment, intercondylar notch, and lateral compartment.
* Location: Approximately 1 cm superior to the medial joint line and 1 cm medial to the medial margin of the patellar tendon.
* Establishment: It is best established under direct intra-articular visualization. A spinal needle is inserted first to ensure the trajectory allows access to the posterior horn of the medial meniscus without damaging the medial femoral condyle.
3. Posteromedial Portal
Essential for repairing posterior horn meniscal tears, addressing posterior ramp lesions, and extracting loose bodies residing in the posteromedial recess.
* Prerequisites: The knee must be flexed to exactly 90 degrees, and the joint must be maximally distended. This causes the posteromedial capsule to balloon outward, displacing the saphenous nerve and vein posteriorly.
* Location: Approximately 1 cm superior to the posteromedial joint line and 1 cm posterior to the posteromedial margin of the medial femoral condyle.
* Technique: Transillumination with the arthroscope from the intercondylar notch can highlight the superficial venous structures, allowing the surgeon to make a safe skin incision.
4. Superolateral Portal
The optimal portal for dynamic evaluation of the patellofemoral joint and for the excision of symptomatic medial synovial plicae.
* Location: Just lateral to the quadriceps tendon, approximately 2.5 cm superior to the superolateral corner of the patella.
* Utility: Allows the surgeon to observe patellar tracking, tilt, and congruity as the knee is taken through a full range of motion from extension to deep flexion.
OPTIONAL AND ACCESSORY PORTALS
Posterolateral Portal
Used for complex lateral meniscal repairs, posterior cruciate ligament (PCL) reconstructions, and addressing posterolateral corner pathology.
* Location: With the knee at 90 degrees and maximally distended, the portal is placed at the intersection of a line drawn along the posterior margin of the femoral shaft and a line along the posterior aspect of the fibula. This is roughly 2 cm superior to the posterolateral joint line.
* Anatomy: The incision is made anterior to the biceps femoris tendon and posterior to the iliotibial (IT) band.
* Surgical Warning: The common peroneal nerve lies in close proximity. The capsule must be penetrated carefully with a blunt trocar, directing the sheath slightly inferiorly and parallel to the posterior femoral condyle to avoid plunging into the popliteal neurovascular bundle.
Proximal Midpatellar (Medial and Lateral) Portals
Described by Patel, these portals are located at the level of the mid-patella, adjacent to the medial and lateral patellar borders.
* Indications: They provide an excellent "bird's-eye" view of the anterior compartment and are particularly useful in tight knees where the infrapatellar fat pad obscures standard inferior portals. They minimize instrument crowding during complex multi-portal procedures.
POSTOPERATIVE PROTOCOLS AND COMPLICATION AVOIDANCE
Following knee arthroscopy, the joint is thoroughly irrigated to remove all cartilaginous debris and hemarthrosis, which can act as chemical irritants and promote postoperative arthrofibrosis.
- Wound Closure: Portals are typically closed with simple interrupted non-absorbable sutures or adhesive strips.
- Rehabilitation: For simple diagnostic procedures or partial meniscectomies, immediate weight-bearing as tolerated is encouraged. Early active range of motion (ROM) exercises are initiated in the post-anesthesia care unit (PACU) to prevent stiffness and promote synovial fluid circulation.
- Complication Management: While rare, complications such as iatrogenic articular cartilage scuffing, infrapatellar branch of the saphenous nerve (IPBSN) neuroma, and deep space infections must be mitigated through meticulous surgical technique, strict adherence to anatomic landmarks, and prophylactic antibiotic administration when indicated.
You Might Also Like