Total Ankle Arthroplasty: Advanced Surgical Techniques and Complication Management
Key Takeaway
Total ankle arthroplasty requires meticulous surgical technique to restore biomechanics and prevent complications. This comprehensive guide details the step-by-step operative approach, from joint preparation and precise bony cuts to component implantation and soft-tissue balancing. Furthermore, it provides an evidence-based framework for identifying and managing critical intraoperative and postoperative complications, including malalignment, malleolar fractures, syndesmotic nonunion, and component subsidence, ensuring optimal patient outcomes.
INTRODUCTION TO TOTAL ANKLE ARTHROPLASTY
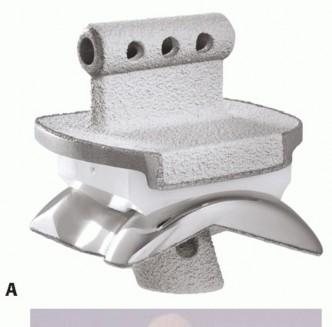
Total Ankle Arthroplasty (TAA) has evolved significantly over the past three decades, transitioning from highly constrained, cemented first-generation implants to modern, unconstrained or semi-constrained, cementless mobile-bearing and fixed-bearing designs. Designed to alleviate pain while preserving sagittal and coronal plane motion in patients with end-stage ankle osteoarthritis, rheumatoid arthritis, or post-traumatic arthritis, TAA offers a functional advantage over traditional ankle arthrodesis.
However, the ankle joint presents a unique biomechanical environment. It is subjected to immense forces—up to five times body weight during normal gait—concentrated over a relatively small articular surface area. Furthermore, the ankle is enveloped by a tenuous soft-tissue envelope with a precarious vascular supply. Consequently, successful TAA demands an exacting surgical technique, profound anatomic knowledge, and a rigorous understanding of potential intraoperative and postoperative complications.
This masterclass delineates the comprehensive operative technique for total ankle arthroplasty, integrating critical biomechanical principles, step-by-step surgical execution, and advanced complication management protocols.
PREOPERATIVE PLANNING AND BIOMECHANICS
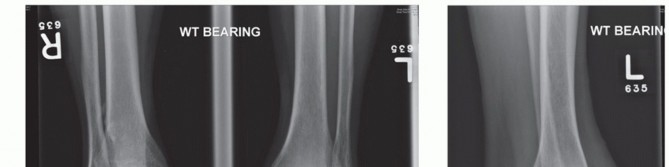
The primary goal of TAA is the restoration of the native joint line and the instantaneous center of rotation (ICOR). The ICOR of the ankle is not a fixed point but rather a dynamic axis that shifts during the arc of motion. Preoperative weight-bearing radiographs (anteroposterior, mortise, and lateral views) are mandatory to assess bone stock, deformity, and the presence of osteophytes. Advanced imaging, such as computed tomography (CT), is increasingly utilized for 3D preoperative templating and the creation of patient-specific instrumentation (PSI).
Clinical Pearl: Coronal plane deformities exceeding 10 to 15 degrees must be addressed concurrently with TAA, either through periarticular osteotomies, ligamentous reconstruction, or both. Failure to balance the ankle will inevitably lead to edge-loading, accelerated polyethylene wear, and premature catastrophic failure of the prosthesis.
SURGICAL TECHNIQUE: STEP-BY-STEP
Patient Positioning and Setup
The patient is positioned supine on the operating table with a bump placed under the ipsilateral hip to internally rotate the leg until the patella and the foot point directly toward the ceiling. This neutralizes the natural external tibial torsion and provides a true anteroposterior (AP) view of the ankle mortise. A well-padded thigh tourniquet is applied. Fluoroscopy must be positioned to allow unimpeded AP, mortise, and lateral views throughout the procedure.
Surgical Approach and Exposure
The standard anterior approach is utilized for the vast majority of modern TAA systems.
- Incision: A longitudinal incision is made directly over the anterior ankle, typically between the tibialis anterior (TA) and the extensor hallucis longus (EHL) tendons.
- Deep Dissection: The extensor retinaculum is incised in line with the skin incision. The EHL and the neurovascular bundle (deep peroneal nerve and anterior tibial artery) are retracted laterally, while the TA is retracted medially.
- Capsulotomy: A longitudinal anterior capsulotomy is performed, exposing the tibiotalar joint.
Surgical Warning: The anterior incision is located directly within the angiosome of the anterior tibial artery, rather than in a watershed area between angiosomes. This anatomic reality makes the incision inherently risky. Meticulous soft-tissue handling, avoiding excessive self-retaining retraction, and maintaining full-thickness flaps are paramount to preventing postoperative wound necrosis.
Joint Preparation and Debridement
A joint spreader may be placed just proximal to the syndesmosis articulation to facilitate exposure.
* Aggressively debride the articular surfaces and excise all anterior tibial and talar osteophytes using a hand-held burr, rongeur, or osteotome.
* Thorough debridement is critical; retained anterior osteophytes will impinge during dorsiflexion, artificially limiting the range of motion and potentially leading to component malpositioning.
Cutting Guide Placement and Alignment
The precision of the bony cuts dictates the survivorship of the implant.
- Sizing and Placement: Size the cutting guide and place it over the distal tibia and talus. Use fluoroscopy extensively to fine-tune the position.
- External Fixation (System Dependent): For systems requiring the use of an external fixator (e.g., Agility), apply the fixator frame and lock the ankle in neutral. Prophylactic screws may be placed medially or laterally to protect the medial and lateral malleoli before making the tibial cut. Alternatively, a fibular plate and screws may be used to reinforce the lateral malleolus.
- Alignment Verification: Align the cutting guide in neutral and verify that it is perfectly symmetrical in the coronal plane. This ensures that equal amounts of bone are excised medially and laterally, preserving sufficient remaining bone stock in the malleoli to support the prosthesis.
- Vertical Balancing: The cutting guide must be balanced in the vertical plane to preserve the dense subchondral bone of the distal tibia and to strictly avoid violating the subtalar joint posteriorly.
- Sizing Discrepancies: If the patient’s anatomy falls "between sizes" of prostheses, always opt for the smaller component. This maximizes motion and avoids overstuffing the joint, which can lead to stiffness and intractable pain. Verify alignment under direct vision and fluoroscopically before proceeding.
Execution of Bony Cuts
Secure the cutting guide to the distal tibia. Alternatively, depending on the system, the guide may be secured to the limb proximally. A small lap sponge or towel can be placed beneath the proximal arm of the guide to maintain alignment.
Confirm the alignment of the cutting guide one final time before making the bony cuts.
Pitfall: Extreme care must be taken while completing the posterior aspect of the cuts. Over-penetration of the saw blade will cause devastating iatrogenic injury to the peroneal tendons laterally, the flexor hallucis longus (FHL) centrally, and the posterior tibial tendon medially.
When the cuts are made, free the excess bone with osteotomes and remove it en bloc if possible. Excise the remainder of the posterior ankle capsule to maximize dorsiflexion, while meticulously preserving the tendon sheaths of the aforementioned posterior tendons.
For two-piece arthroplasty systems, make supplemental cuts with a reciprocating blade in the medial and lateral gutters off the residual talus. This facilitates sagittal plane motion and prevents bony impingement against the tibial prosthesis.
Trialing and Soft-Tissue Balancing
Irrigate the joint thoroughly with pulsatile lavage to facilitate the removal of any bony or soft-tissue debris before the placement of the trial components.
- Place the trial components and assess the joint under direct vision and using fluoroscopy.
- Take the limb through a full range of motion. Generally, a motion arc of at least 30 degrees should be obtained intraoperatively, including a minimum of 10 degrees of dorsiflexion.
- Evaluate the ankle for proper ligamentous balance and adequate tension.
Managing Insufficient Motion:
Insufficient ankle motion is a critical intraoperative finding. It may be caused by overstuffing the joint; in this scenario, a smaller talar component should be used, or a thinner polyethylene tibial spacer may be beneficial in improving ankle motion. Alternatively, an Achilles tendon contracture may inhibit dorsiflexion. If an Achilles lengthening procedure (TAL) or gastrocnemius recession was not performed previously, it should be executed at this stage to achieve the required 10 degrees of dorsiflexion.
Final Component Implantation
Once trialing is satisfactory, select and place the final components.
For arthroplasty systems requiring an external fixator, unlock the hinge to facilitate the placement of the prosthesis. Impact the tibial and talar components into place. Ensure that the anterior edge of the tibial component is impacted flush with the anterior cortex of the distal tibia to prevent anterior soft-tissue impingement. Assess the final placement of the components under direct vision and under orthogonal fluoroscopy.
Syndesmotic Arthrodesis (System-Specific)
For arthroplasty systems requiring arthrodesis of the distal syndesmosis (such as the Agility prosthesis), specific steps must be taken:
1. Place bone autograft, harvested from the excised portions of the distal tibia and talus, into the previously prepared syndesmotic bed. Place additional allograft material as needed.
2. Place syndesmosis screws in a lag fashion just proximal to the autograft to compress the arthrodesis site.
3. Osteotomize the fibula proximal to the screws to decompress the arthrodesis and allow for dynamic compression. Alternatively, the screws may be placed through a supplemental buttress plate on the fibula for enhanced stability.
Closure and Postoperative Protocol
Irrigate the wound copiously. Place a deep closed-suction drain to decompress the soft-tissue flaps of any hematoma, which could otherwise compromise the tenuous skin viability.
Remove the external fixator if utilized. Close the wound in meticulous layers. It is imperative to close the extensor retinaculum and ankle capsule to afford deep soft-tissue coverage over the prosthetic components and to prevent bowstringing of the anterior tibial and extensor tendons. Approximate the subcutaneous layer with absorbable sutures to decrease tension on the skin edges. Close the epidermal layer with nonabsorbable, monofilament sutures using a modified Donati or Allgöwer-Donati technique to preserve dermal blood supply.
Apply sterile dressings, a bulky Jones dressing, and a plaster splint, holding the ankle in strictly neutral alignment.
COMPLICATIONS AND MANAGEMENT
The success of TAA is heavily dependent on the surgeon's ability to anticipate, recognize, and manage complications. These can be broadly categorized into intraoperative and postoperative challenges.
Intraoperative Complications
Malalignment
Precise restoration of the joint line and axial alignment is non-negotiable.
* Raised Joint Line: If the joint line is raised by an excessive tibial cut, the tibial component rests on softer, more porous metaphyseal bone. This significantly increases the risk of catastrophic component subsidence and gutter impingement.
* Lowered Joint Line: Conversely, lowering the joint line leads to relative tightness of the gastrocnemius-soleus complex, resulting in severe postoperative stiffness of the joint and restricted dorsiflexion.
* Coronal Plane Deformity: Coronal plane deformity must be corrected to less than 4 degrees. Residual deformity greater than 4 degrees leads to asymmetric loading. Varus malpositioning can lead to medial impingement, stiffness, excessive lateral foot pressure, and rapid edge wear of the polyethylene. Valgus malalignment may result in lateral impingement, medial arch pain from deltoid overstretching, and lateral edge wear.
* Translation: Medial translation of the tibial component causes a higher risk of iatrogenic medial malleolar fracture due to stress risers. Lateral translation places excessive tension on the deltoid ligament, which paradoxically tips the talus into varus.
Iatrogenic Fractures
Medial and lateral malleolar fractures can occur intraoperatively from overzealous saw cuts, malpositioning of the cutting jig, or aggressive impaction of the components.
Clinical Pearl: Any intraoperative fracture must be recognized and rigidly fixed immediately (typically with lag screws or a small fragment plate). Failure to address these fractures will result in malposition of the component, poor implant fixation, subsequent aseptic loosening, and early failure.
Tendon and Neurovascular Injury
The posterior tibial tendon medially and the peroneal tendons laterally are at extreme risk if saw blades penetrate too far posteriorly during the tibial or talar cuts. The flexor hallucis longus and the neurovascular bundle are also at risk directly posterior to the joint. Use of retractor plates and meticulous depth control of the oscillating saw are mandatory.
Postoperative Complications
Wound Healing Problems
Wound healing problems are the most common early complication following TAA. This is due to the exceptionally thin soft-tissue envelope around the ankle, in stark contrast to the robust musculature surrounding the hip and knee. Furthermore, the standard anterior incision is located directly in the middle of an angiosome (supplied by the anterior tibial artery), making it inherently riskier than an incision placed between angiosomes.
These complications can be minimized with proper soft-tissue handling techniques, including making the incision long enough to minimize excessive tension during retraction, avoiding over-distraction with external fixators, and delaying the removal of sutures until at least 3 weeks postoperatively. Superficial necrosis can often be managed with local wound care, but full-thickness necrosis exposing the implant requires immediate aggressive debridement and potentially local or free flap coverage.
Syndesmotic Nonunion
Nonunion of the syndesmosis is a complication unique to prostheses that require a syndesmosis fusion to provide support to the tibial component (e.g., the Agility prosthesis). Nonunion at this site may lead to a lack of lateral support, resulting in loosening of the tibial component, angular change, or subsidence. Biomechanical studies indicate that the use of a single syndesmotic screw results in a longer time to union and a higher nonunion rate compared to the use of two screws.
Infection
Periprosthetic joint infection (PJI) in TAA is a devastating complication. Superficial infections must be treated aggressively with culture-directed oral or intravenous antibiotics. Deep infections require a formal protocol similar to other joint arthroplasties.
A deep PJI should be treated with aggressive surgical debridement, removal of all prosthetic components, placement of an antibiotic-impregnated cement spacer, and a prolonged course of intravenous antibiotics. Once the infection is eradicated, the patient may be considered for a delayed complex tibiotalocalcaneal (TTC) fusion using a retrograde intramedullary nail or a bulky structural allograft, as revision TAA in the setting of prior infection carries an exceptionally high failure rate.
Component Instability, Subsidence, and Osteolysis
Long-term survivorship of the implant is threatened by aseptic loosening and osteolysis. Radiographic monitoring is essential. Migration of the implant by 5 mm or more, or an angular change of 5 degrees or more on serial radiographs, is highly correlated with a poor clinical outcome and impending failure.
The talar component subsides more frequently than the tibial component, often due to avascular necrosis of the residual talar dome or insufficient initial bone stock. Progressive osteolysis, presenting as circumferential radiolucency around the pegs or stems of the implant, is typically driven by polyethylene wear debris. Early recognition of osteolysis may allow for isolated polyethylene exchange and bone grafting, whereas advanced subsidence requires complex revision arthroplasty or conversion to an arthrodesis.
You Might Also Like