Silicone Wrist Arthroplasty: Comprehensive Surgical Technique and Outcomes
Key Takeaway
Silicone wrist arthroplasty, pioneered by Swanson, remains a viable reconstructive option for low-demand patients with severe rheumatoid arthritis. This procedure provides reliable pain relief while preserving functional, albeit limited, wrist motion. Success depends on meticulous soft tissue balancing, precise bone resection, and proper implant sizing. This guide details the step-by-step surgical technique, including dorsal approach, carpal resection, medullary preparation, and postoperative rehabilitation protocols essential for optimizing clinical outcomes and implant longevity.
INTRODUCTION TO SILICONE WRIST ARTHROPLASTY
The rheumatoid wrist presents a complex reconstructive challenge characterized by progressive articular destruction, ligamentous attenuation, and predictable patterns of deformity, including carpal supination, ulnar translation, and volar subluxation. While total wrist arthrodesis remains the gold standard for achieving a stable, pain-free wrist in high-demand patients, it sacrifices all radiocarpal and midcarpal motion. For the low-demand patient—particularly those with polyarticular rheumatoid arthritis (RA) requiring bilateral upper extremity mobility for activities of daily living and personal hygiene—motion-preserving alternatives are highly desirable.
Silicone wrist arthroplasty, originally developed and popularized by Alfred B. Swanson, utilizes a flexible, double-stemmed silicone elastomer hinge. This implant acts as a dynamic spacer rather than a rigid structural joint replacement. By maintaining joint space and alignment while the surrounding encapsulated scar tissue matures, the Swanson prosthesis provides a stable, functional arc of motion. When combined with meticulous soft-tissue rebalancing and distal ulnar resection, silicone wrist arthroplasty yields a 95% rate of significant pain relief and a functional arc of motion averaging 60 degrees.
INDICATIONS AND PATIENT SELECTION
Proper patient selection is the most critical determinant of long-term survivorship in silicone wrist arthroplasty. The procedure is highly specific to a distinct patient demographic.
Primary Indications
- Advanced Rheumatoid Arthritis: Patients with severe pan-carpal destruction (Larsen grade IV or V) who require preservation of wrist motion for personal independence.
- Low-Demand Lifestyle: Elderly or sedentary patients who do not subject their wrists to heavy lifting, repetitive impact, or high-torque activities.
- Bilateral Wrist Involvement: Patients with a fused contralateral wrist or those facing bilateral wrist reconstruction, where bilateral arthrodesis would severely compromise perineal care and feeding.
- Severe Pain with Preserved Extensor Function: Intractable radiocarpal and midcarpal pain in the presence of functioning (or reconstructable) wrist extensors.
Contraindications
- High-Demand Patients: Manual laborers, young patients, or those relying on assistive walking devices (e.g., platform crutches or standard walkers) that transmit high axial loads across the wrist.
- Inadequate Bone Stock: Severe osteopenia or cystic destruction of the distal radius or third metacarpal that precludes stable seating of the implant stems.
- Irreparable Tendon Loss: Absence of functional wrist extensors (ECRL, ECRB) that cannot be reconstructed via tendon transfer.
- Active Infection: Any history of recent or active intra-articular infection.
- Severe Uncorrectable Deformity: Fixed, rigid deformities that cannot be passively corrected following extensive soft-tissue release and bone resection.
💡 Clinical Pearl: The "Spacer" Concept
It is imperative to understand—and to educate the patient—that the Swanson implant is a spacer, not a true joint replacement. It does not bear weight. Its primary biomechanical function is to maintain alignment and distract the resected bone ends while a robust, fibrous pseudocapsule forms. The ultimate stability of the wrist relies entirely on this biological encapsulation and the surgical rebalancing of the surrounding tendons.
PREOPERATIVE PLANNING AND BIOMECHANICS
Biomechanical Considerations
The Swanson silicone implant features a flexible central hinge and two intramedullary stems. The proximal stem is seated within the medullary canal of the distal radius, while the distal stem is seated within the third metacarpal.
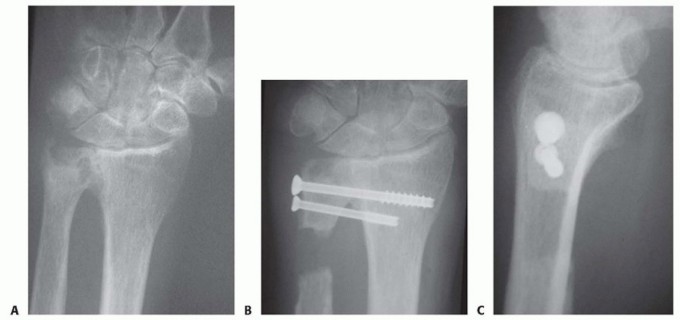
A critical biomechanical failure mode of early silicone implants was shear fracture at the hinge-stem junction, caused by the sharp cortical edges of the resected radius and capitate. To mitigate this, titanium grommets were introduced. These thin metal sleeves are press-fit into the resected bone ends, shielding the silicone hinge from abrasive cortical bone and significantly reducing the incidence of implant fracture.
Preoperative Templating
Standard posteroanterior (PA) and lateral radiographs of the wrist are required. Templating should focus on:
1. Medullary Canal Diameter: The size of the third metacarpal medullary canal dictates the maximum size of the distal stem, which in turn determines the overall size of the prosthesis.
2. Bone Resection Levels: Planning the transverse resection of the distal radius (orthogonal to its long axis) and the proximal carpal row.
3. Distal Radioulnar Joint (DRUJ): Assessing the degree of caput ulnae syndrome to plan for a concurrent Darrach procedure (distal ulna resection) or Sauvé-Kapandji procedure.
SURGICAL TECHNIQUE: STEP-BY-STEP
1. Patient Positioning and Anesthesia
The patient is placed supine with the operative arm extended on a radiolucent hand table. Regional anesthesia (supraclavicular or axillary brachial plexus block) is preferred, supplemented with intravenous sedation. A well-padded pneumatic tourniquet is applied to the proximal arm and inflated to 250 mm Hg after exsanguination with an Esmarch bandage.
2. Incision and Superficial Dissection
- Make a slightly curved, dorsal longitudinal incision centered over the radiocarpal joint, extending from the distal third of the radius to the mid-shaft of the third metacarpal.
- Surgical Warning: Strictly avoid an S-shaped or zig-zag incision in the rheumatoid patient. The dorsal skin is often thin, fragile, and compromised by chronic corticosteroid use. Complex incisions significantly increase the risk of apex tip necrosis and subsequent wound breakdown.
- Carefully dissect through the subcutaneous tissues, meticulously preserving the dorsal sensory branches of the ulnar nerve (DSBUN) and the superficial radial nerve (SRN). Preserve the dorsal venous network to minimize postoperative edema.
3. Retinacular Flap and Tendon Management
- Identify the extensor retinaculum. Split the retinaculum longitudinally over the third extensor compartment (extensor pollicis longus) or between the third and fourth compartments (common extensor tendons).
- Reflect the retinaculum radially as a continuous, robust flap.
- Crucial Step: Protect this retinacular flap meticulously. It will be utilized later to reinforce the dorsal capsule and provide a smooth, gliding floor for the extensor tendons, isolating them from the underlying joint capsule and hardware.
- Inspect the extensor tendons for tenosynovitis or attritional ruptures. Perform a thorough tenosynovectomy. If tendon ruptures are identified (e.g., Vaughan-Jackson syndrome), tag them for later repair or transfer.
4. Capsular Exposure and Ligament Release
- Identify the dorsal radiocarpal capsule. Detach the capsule from its proximal insertion on the distal radius.
- Reflect the capsule distally as a broad, widely based flap, maintaining its distal attachments to the carpus.
- Identify and detach the radial collateral ligament from the radial styloid. During this release, carefully retract and protect the tendons of the first extensor compartment (abductor pollicis longus [APL] and extensor pollicis brevis [EPB]).
5. Joint Dislocation and Bone Resection
- Hyperflex the radiocarpal joint to deliver the proximal carpal row and expose the articular surface of the distal radius.
- Carpal Resection: Perform a targeted proximal row carpectomy. Remove the lunate entirely. Resect the proximal half of the scaphoid and the radial aspect of the triquetrum. This creates a transverse, flattened bed to receive the distal hinge of the prosthesis.
- Radial Resection: Using an oscillating saw, resect the radial styloid and the articular surface of the distal radius. The cut must be exactly 90 degrees to the long axis of the radius.
- Preserve Cortical Bone: Resect only as much bone as necessary to accommodate the implant hinge. Preserving the metaphyseal cortical rim is vital to provide structural support for the grommets and prevent implant subsidence. If the joint is severely dislocated or contracted, additional radial resection may be required to achieve soft-tissue balance.
6. Medullary Canal Preparation
- Align the wrist in a neutral position. Prepare the base of the capitate and the base of the third metacarpal to receive the distal stem.
- To ensure precise anatomical alignment, insert a Kirschner wire (K-wire) centrally down the medullary canal of the third metacarpal. Confirm its trajectory with intraoperative fluoroscopy.
- Once the trajectory is confirmed, use a sharp awl, hand broach, or a low-speed power reamer to open the canal.
- Pitfall: Do not perforate the volar or dorsal metacarpal shaft. The rheumatoid metacarpal is often osteopenic, and eccentric reaming can easily breach the cortex, leading to stem toggle and early failure.
- Sizing: The diameter of the third metacarpal shaft dictates the maximum size of the prosthesis. Once the distal canal is prepared and sized, ream the medullary canal of the radius to accommodate the corresponding proximal stem of the chosen implant size.
7. Bone Smoothing and Grommet Insertion
- Meticulously smooth the resected bony surfaces of the radius and the capitate/carpus using a rongeur and a high-speed burr. Eliminate any sharp cortical spikes or irregular edges.
- If utilizing titanium grommets (highly recommended to prevent silicone shear fracture), press-fit the appropriate size grommets into the prepared medullary canals of the radius and the third metacarpal. Ensure the grommets sit flush with the resected bone surfaces.
8. Trialing and Soft Tissue Balancing
- Insert the trial prosthesis. Seat the stems fully against the radius and capitate.
- Evaluate the implant for any tendency to buckle or piston during motion. Buckling indicates that the bone resection is insufficient or the soft tissues remain too tight.
- Align the hand on the wrist. Assess for any residual ulnar deviation or fixed flexion contracture.
- Range of Motion Check: Passively flex and extend the wrist. The goal is approximately 30 degrees of flexion and 30 degrees of extension without impingement or blockage.
- If the wrist cannot achieve 30 degrees of extension, the volar capsule is contracted. Carefully strip and release the volar radiocarpal capsule from the anterior radius until the contracture is resolved.
9. Distal Ulna Resection (Darrach Procedure)
- In almost all rheumatoid patients undergoing this procedure, the distal radioulnar joint is destroyed, and the ulnar head is dorsally prominent (caput ulnae).
- Resect the distal 1.5 to 2 cm of the ulna (Darrach procedure) through the same dorsal incision. Be careful to preserve the ulnar styloid and the triangular fibrocartilage complex (TFCC) attachments if possible, though in severe RA, these are often obliterated. Smooth the resected ulnar stump to prevent impingement.
10. Final Implantation and Closure
- Irrigate the wound copiously to remove all bone debris.
- Insert the final silicone prosthesis (using a no-touch technique to minimize static charge and particulate attraction). Ensure it is perfectly seated within the grommets.
- Capsular Repair: Drill small osseous holes along the dorsal cortex of the distal radius. Pass non-absorbable sutures through these holes and securely reattach the distally based dorsal capsular flap. A robust capsular closure is imperative to prevent dorsal subluxation of the implant.
- Reattach the radial collateral ligament to the radial metaphysis to restore radial-sided stability.
- Retinacular Realignment: Bring the previously preserved extensor retinaculum flap under the extensor tendons. Suture it to the carpus and radius to provide a smooth gliding floor for the tendons and an additional layer of coverage over the joint capsule.
11. Extensor Carpi Ulnaris (ECU) Stabilization
- In the rheumatoid wrist, the ECU tendon frequently subluxates volarly, transforming from a wrist extensor into a wrist flexor and a deforming force for ulnar deviation.
- Relocate the ECU tendon to its anatomic dorsal position.
- Create a soft-tissue pulley using a slip of the extensor retinaculum to tether the ECU dorsally over the distal ulna stump, ensuring it functions purely as an ulnar deviator and extensor.
12. Final Tendon Repair and Wound Closure
- Perform any necessary extensor tendon repairs or transfers (e.g., EIP to EPL transfer for a ruptured EPL).
- Deflate the tourniquet and achieve meticulous hemostasis. Hematoma formation is a primary cause of postoperative stiffness and wound breakdown.
- Insert a closed suction drain.
- Close the skin loosely with interrupted non-absorbable sutures. Avoid excessive tension on the fragile rheumatoid skin.
- Apply a sterile, non-adherent dressing followed by a bulky, well-padded short-arm plaster splint, immobilizing the wrist in neutral alignment.
🔪 Surgical Technique 73-39 Summary
- Dorsal longitudinal incision.
- Retinacular flap reflection (save for floor).
- Distally based capsular flap.
- Proximal row carpectomy (lunate, proximal scaphoid, radial triquetrum).
- Orthogonal radial styloid/articular resection.
- Medullary preparation (3rd MC dictates size).
- Grommet insertion and trial balancing (target 30° flex/ext).
- Distal ulna resection.
- Capsular closure via radial drill holes.
- ECU dorsal relocation and retinacular floor reconstruction.
POSTOPERATIVE CARE AND REHABILITATION
The postoperative protocol is designed to protect the fragile soft-tissue repairs while encouraging the formation of a functional, flexible pseudocapsule around the silicone spacer.
Phase I: Immobilization (Weeks 0 to 3)
- The initial bulky plaster splint remains in place for 10 to 14 days.
- At the first postoperative visit, the splint and sutures are removed.
- A custom-molded thermoplastic volar splint is fabricated, holding the wrist in neutral. This splint is worn continuously, removed only for hygiene and supervised therapy.
- Digital range of motion (MCP, PIP, DIP joints) is encouraged immediately to prevent tendon adhesions and reduce edema.
Phase II: Early Motion (Weeks 3 to 6)
- At 3 weeks, limited, supervised active and active-assisted wrist range of motion exercises are initiated.
- Therapy focuses on achieving the intraoperative arc of motion (typically 30 degrees of flexion and 30 degrees of extension).
- The thermoplastic splint is worn between exercise sessions and at night.
Phase III: Strengthening and Weaning (Weeks 6 to 12)
- At 6 weeks, the daytime splint is gradually weaned. Night splinting may continue for up to 12 weeks to prevent flexion contractures.
- Gentle strengthening exercises are introduced. Heavy lifting and forceful gripping are permanently restricted to protect the implant from shear forces.
- Clinical Benchmark: A total motion arc of 60 degrees (e.g., 30° flexion, 30° extension) is considered a highly satisfactory and functional outcome.
COMPLICATIONS AND MANAGEMENT
While silicone wrist arthroplasty provides excellent pain relief, surgeons must be vigilant regarding specific long-term complications inherent to flexible elastomer implants.
1. Implant Fracture
Historically, implant fracture occurred in up to 30-40% of cases prior to the introduction of titanium grommets. Fractures typically occur at the hinge-stem junction due to shear forces against sharp bone.
* Management: Interestingly, a fractured silicone implant often continues to function adequately as a spacer, and many patients remain asymptomatic. Revision surgery is only indicated if the fracture is accompanied by recurrent pain, severe loss of motion, or progressive deformity.
2. Silicone Synovitis
Microparticulate abrasion of the silicone elastomer can trigger a foreign-body macrophage response, leading to silicone synovitis. This presents as painful, boggy swelling of the wrist, often accompanied by cystic osteolysis visible on radiographs.
* Management: Mild cases may respond to splinting and NSAIDs. Severe, progressive osteolysis requires implant removal, thorough synovectomy, curettage of bone cysts, and conversion to a total wrist arthrodesis using iliac crest bone graft.
3. Recurrent Deformity and Subsidence
Failure to adequately release the volar capsule or properly relocate the ECU tendon can lead to recurrent ulnar deviation and volar subluxation. Furthermore, if the cortical rim of the radius is over-resected, the proximal stem may subside into the metaphyseal cancellous bone, leading to loss of spacer height and impingement.
* Prevention: Meticulous intraoperative balancing, preservation of the radial cortical shell, and secure capsular closure are paramount.
OUTCOMES AND EVIDENCE-BASED REVIEW
Extensive long-term follow-up studies of the Swanson silicone wrist arthroplasty in the rheumatoid population demonstrate highly predictable and satisfactory results when patient selection criteria are strictly met.
Literature confirms that approximately 95% of patients obtain significant or complete pain relief. While the arc of motion is not fully restored to anatomical norms, the average postoperative arc of 60 degrees (combined flexion and extension) is highly functional, allowing patients to perform essential activities of daily living, including feeding and perineal care, which are often impossible with bilateral wrist fusions.
The addition of titanium grommets has significantly altered the survivorship curve, drastically reducing the incidence of early implant fracture. Consequently, for the low-demand patient with end-stage rheumatoid pan-carpal arthritis, silicone wrist arthroplasty remains a durable, reliable, and profoundly life-enhancing surgical intervention.
You Might Also Like