Diagnostic Radiocarpal Arthroscopy: A Comprehensive Surgical Guide
Key Takeaway
Radiocarpal arthroscopy is the gold standard for evaluating intra-articular wrist pathology. This systematic examination requires precise portal placement, an understanding of distal radial biomechanics, and meticulous fluid management. By navigating the 3-4 and 4-5 portals, surgeons can comprehensively assess the articular surfaces, scapholunate articulation, and intrinsic palmar ligaments. Strict adherence to a reproducible diagnostic sweep minimizes iatrogenic injury and ensures accurate diagnosis of carpal instability and chondral defects.
Introduction to Radiocarpal Arthroscopy
Radiocarpal arthroscopy has evolved from a purely diagnostic modality into the gold standard for the evaluation and management of complex intra-articular wrist pathology. For the orthopaedic surgeon, mastering the radiocarpal examination is foundational. It provides unparalleled visualization of the articular surfaces, the intrinsic and extrinsic carpal ligaments, and the triangular fibrocartilage complex (TFCC).
Unlike open arthrotomy, arthroscopy preserves the critical secondary dynamic stabilizers of the wrist, allowing for dynamic assessment of carpal instability while minimizing postoperative morbidity. This comprehensive guide details the rigorous, step-by-step methodology required to perform a safe, systematic, and exhaustive radiocarpal examination.
Indications and Clinical Utility
The decision to proceed with radiocarpal arthroscopy should be strictly evidence-based, typically following an exhaustive clinical examination and advanced imaging (MRI or MR arthrography).
Primary indications include:
* Unexplained Chronic Wrist Pain: Evaluation of suspected occult pathology not definitively identified on MRI.
* Carpal Instability: Dynamic assessment of scapholunate (SL) or lunotriquetral (LT) ligament tears (e.g., utilizing the Geissler classification).
* Chondral Lesions: Staging and debridement of osteochondral defects or early radiocarpal arthrosis.
* TFCC Pathology: Identification and classification of Palmer type 1 (traumatic) or type 2 (degenerative) lesions.
* Intra-articular Fractures: Arthroscopically assisted reduction and internal fixation (ARIF) of distal radius or scaphoid fractures to ensure anatomic articular congruity.
* Synovial Disease: Biopsy and synovectomy for inflammatory arthropathies.
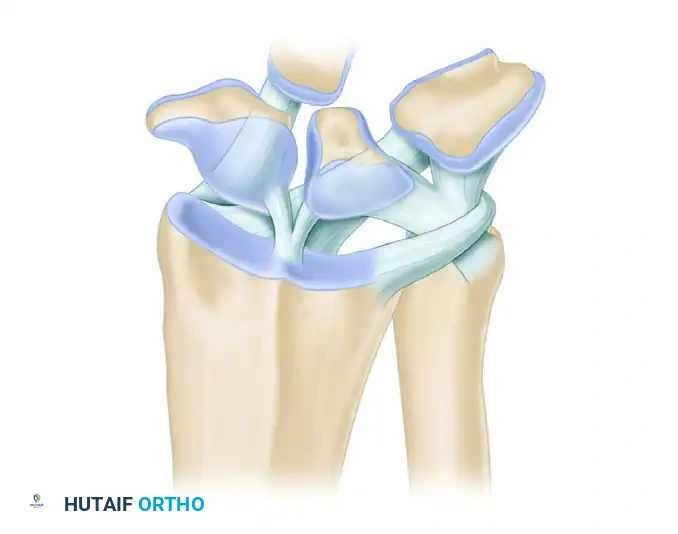
Applied Anatomy and Biomechanics
A profound understanding of radiocarpal anatomy is non-negotiable for safe portal placement and accurate intra-articular navigation.
Osseous Architecture and Biomechanics
The distal radius articulates with the scaphoid and lunate via two distinct elliptical concavities: the scaphoid fossa and the lunate fossa, separated by the interfossal ridge. Crucially, the articular surface of the distal radius is not orthogonal to its longitudinal axis. It possesses a palmar tilt (volar inclination) of 11 to 12 degrees and a radial inclination of 22 to 24 degrees.
Surgical Warning: Failure to respect the 11 to 12-degree palmar tilt during trocar insertion is the leading cause of iatrogenic scaphoid or lunate chondral scoring. Instruments must always be introduced with a proximal-to-palmar trajectory.
The Extensor Compartments and Portals
Arthroscopic portals are anatomically defined by their relationship to the six dorsal extensor compartments.
* 3-4 Portal: The primary viewing portal. Located between the 3rd compartment (Extensor Pollicis Longus - EPL) and the 4th compartment (Extensor Digitorum Communis - EDC), just distal to Lister's tubercle.
* 4-5 Portal: The primary working portal. Located between the 4th compartment (EDC) and the 5th compartment (Extensor Digiti Minimi - EDM).
* 6R Portal: Located immediately radial to the Extensor Carpi Ulnaris (ECU) tendon.
* 6U Portal: Located immediately ulnar to the ECU tendon.
Clinical Pearl: When utilizing the 6U portal, extreme caution must be exercised to avoid the Dorsal Sensory Branch of the Ulnar Nerve (DSBUN), which courses in close proximity to the ulnar border of the ECU.
Ligamentous Anatomy
The palmar extrinsic ligaments are critical stabilizers of the radiocarpal joint and are clearly visible during the arthroscopic sweep. They appear as thick, capsular thickenings.
* Radioscaphocapitate (RSC) Ligament: The most radial palmar ligament, acting as a fulcrum for the scaphoid.
* Long Radiolunate (LRL) Ligament: Adjacent to the RSC, providing vital support to the lunate.
* Radioscapholunate (RSL) Ligament (Ligament of Testut): A neurovascular conduit rather than a true mechanical ligament, located between the LRL and the Short Radiolunate (SRL) ligament.
Preoperative Setup and Patient Positioning
Optimal visualization requires meticulous patient positioning and joint distraction.
- Anesthesia and Tourniquet: The procedure is typically performed under regional anesthesia (supraclavicular or axillary block) or general anesthesia. A well-padded proximal pneumatic tourniquet is applied and inflated to 250 mm Hg after exsanguination.
- Positioning: The patient is placed supine with the operative arm extended on a radiolucent hand table.
- Traction: The hand is suspended using sterile finger traps applied to the index and middle fingers. A traction tower is utilized to apply 10 to 15 pounds of longitudinal traction. The elbow is flexed to 90 degrees to relax the flexor and extensor musculature, maximizing joint distraction.
- Equipment: A 2.7-mm or 1.9-mm arthroscope with a 30-degree angle of inclination is standard for radiocarpal examination.
Step-by-Step Surgical Technique: The Radiocarpal Examination
Step 1: Surface Anatomy and Joint Distention
Before any incision is made, precise surface mapping is mandatory.
- Marking: Identify and mark the skin at the sites of the planned arthroscopic portals. Palpate and mark the distal radial joint margin and the exact location of Lister's tubercle. The 3-4 portal lies in the palpable "soft spot" just distal to Lister's tubercle, between the EPL and EDC.
- Needle Placement: Locate the 3-4 portal. Insert an 18-gauge needle into this space.
- Trajectory: To follow the normal distal radial joint palmar tilt, incline the needle from dorsal-distal to palmar-proximal at an angle of 12 to 15 degrees.
- Distention: Once intra-articular placement is confirmed (often felt as a distinct "pop" through the capsule), distend the joint with 5 to 10 mL of normal saline. Proper distention pushes the dorsal capsule away from the articular surface, creating a safe space for trocar insertion.
Step 2: Establishing Portals and Fluid Management
- Incision and Dissection: Remove the 18-gauge needle. Incise only the epidermis over the 3-4 portal using a No. 11 blade.
- Blunt Dissection: Use a small hemostat to dissect gently down to and through the capsule. Spread the subcutaneous soft tissues longitudinally to retract the EPL tendon to the radial side and the EDC to the ulnar side. This blunt dissection technique is critical to avoid iatrogenic injury to the extensor tendons or terminal branches of the superficial radial nerve.
- Cannula Insertion: Insert the arthroscopic cannula equipped with a blunt obturator through the capsulotomy. Maintain the 12 to 15-degree palmar-proximal inclination.
- Fluid Management: Establish inflow irrigation through the arthroscope.
- Alternative Inflow: A continuous inflow system can be established through the ulnocarpal joint via the 6U portal (ulnar to the ECU). If utilizing this, strictly avoid the DSBUN.
- Outflow: Outflow can occur through the arthroscope sheath or via gravity drainage through a dedicated tube in the 4-5 or 6R portal. An irrigation pump that maintains constant pressure and flow is highly beneficial for maintaining visibility.
Surgical Warning: Monitor the forearm closely throughout the procedure. Avoid excessive pump pressures to prevent fluid extravasation, which can lead to compartment syndrome of the forearm or hand.
Step 3: Arthroscope Insertion and Initial Orientation
- Insertion: Introduce the 2.7-mm arthroscope into the radiocarpal joint through the established 3-4 portal cannula.
- Bubble Clearance: Immediately upon entering the joint, incline the arthroscope so that the proximal end (the camera head) is pointed toward the ceiling. This maneuver allows trapped air bubbles to escape through the outflow system, instantly clearing the visual field.
- Initial Orientation: Identify the palmar capsule of the wrist (appearing as a thick, white, ligamentous curtain) and the distal radial articular concavity inferiorly.
Step 4: The Systematic Diagnostic Sweep
A rigorous, organized pattern of identifying structures is essential to ensure no pathology is missed.
- Establishing the Working Portal: Insert an 18-gauge needle into the 4-5 portal (between EDC and EDM) under direct intra-articular visualization. Once the trajectory is confirmed, make a skin incision, bluntly dissect, and introduce a blunt probe. This portal can alternate as an inflow/outflow portal or as a working portal.
- Radial Sweep: Direct the arthroscope toward the distal end of the radius. Follow the articular surface along the scaphoid and lunate fossae, noting the integrity of the interfossal ridge.
- Scaphoid and Scapholunate Interval: Move the arthroscope in the radial direction to identify the proximal margin of the scaphoid. Carefully evaluate the scapholunate (SL) articulation. The normal SL joint appears as a small, tight crease between the scaphoid and lunate, with intimate blending of the interosseous ligament with the adjacent articular cartilage.
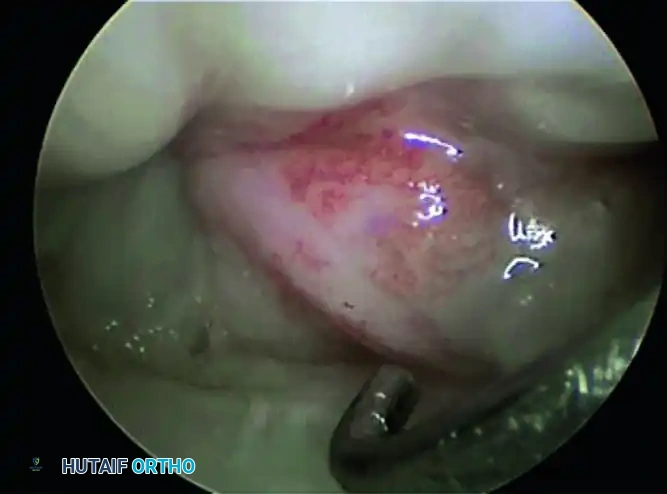
- Dynamic Assessment: Use the probe from the 4-5 portal to palpate the SL ligament. Twist the probe to assess for abnormal widening or step-off, which would indicate a Geissler grade tear.
- Palmar Ligament Evaluation: Extend the wrist slightly (by adjusting the traction tower or manually) to expose the dorsal surfaces of the scaphoid and lunate. Flex the wrist to examine the palmar surfaces.
- Identifying Extrinsic Ligaments: Direct the 30-degree optic palmarly. Identify the stout palmar carpal ligaments. Moving from radial to ulnar, you will visualize the Radioscaphocapitate (RSC) ligament, the Long Radiolunate (LRL) ligament, and the vascular tuft of the Radioscapholunate (RSL) ligament. Use the probe to stress these ligaments and evaluate their structural integrity.

Step 5: Ulnar Evaluation and the TFCC
Once the radial and central compartments are thoroughly evaluated, attention is turned to the ulnar aspect of the joint.
- Portal Exchange: Move the arthroscope to the 4-5 or 6R portal. Exchange the inflow or outflow cannula to the 3-4 portal. This provides a superior vantage point for the ulnar structures.
- TFCC Assessment: Evaluate the articular disc of the Triangular Fibrocartilage Complex (TFCC). The normal TFCC should be smooth, taut, and resilient. Use the probe to perform the "trampoline test"—pressing on the center of the disc. A normal TFCC will bounce back firmly. A soft or ballotable TFCC suggests a peripheral tear or detachment.
- Lunotriquetral Interval: Assess the lunotriquetral (LT) ligament for tears or step-offs, utilizing the probe to test for dynamic instability.
Postoperative Protocol and Rehabilitation
The postoperative protocol is dictated by the specific pathology addressed during the arthroscopy. For a purely diagnostic examination or simple debridement:
- Immediate Postoperative Care: The portals are closed with simple interrupted non-absorbable sutures (e.g., 4-0 nylon) or sterile adhesive strips. A bulky, soft compressive dressing is applied to minimize swelling. A volar resting splint may be applied for comfort for 3 to 5 days.
- Early Rehabilitation (Days 1-7): Immediate active range of motion (ROM) of the digits, elbow, and shoulder is encouraged to prevent stiffness and promote venous return.
- Progressive Rehabilitation (Weeks 1-4): Once the splint and sutures are removed (typically at 7-10 days), active and active-assisted wrist ROM exercises are initiated. Edema control and scar massage are instituted.
- Return to Activity: Strengthening exercises begin at 3 to 4 weeks. Most patients can return to unrestricted activities by 6 weeks, provided they have regained full, pain-free strength and mobility.
Complications and Avoidance
While radiocarpal arthroscopy is minimally invasive, it carries specific risks that the meticulous surgeon must actively mitigate.
- Iatrogenic Cartilage Damage: The most common complication. Prevented by adequate joint distention (5-10 mL saline), strict adherence to the 12 to 15-degree palmar tilt during trocar insertion, and the use of blunt obturators.
- Nerve Injury: The superficial radial nerve (SRN) is at risk during 1-2 and 3-4 portal placement. The DSBUN is at high risk during 6U portal placement. Prevention relies on making superficial skin incisions only and utilizing blunt hemostat dissection down to the capsule.
- Tendon Laceration: Extensor tendons (EPL, EDC, ECU) can be injured if sharp trocars or scalpel blades are plunged blindly into the joint.
- Fluid Extravasation: Can lead to compartment syndrome. Prevented by using dedicated outflow portals, monitoring pump pressures, and minimizing surgical time. If massive extravasation occurs, the procedure must be aborted, and the compartments evaluated immediately.
By adhering to these rigorous anatomical principles and systematic techniques, the orthopaedic surgeon can safely and effectively utilize radiocarpal arthroscopy to diagnose and treat a wide spectrum of complex wrist pathologies.
You Might Also Like

