Full-Thickness Excision of Hand Burns: A Comprehensive Surgical Guide
Key Takeaway
Full-thickness excision of hand burns involves the meticulous removal of necrotic tissue down to viable planes, specifically superficial to the dorsal veins and extensor tenosynovium, or the palmar flexor tenosynovium and neurovascular bundles. This technique is critical for deep third-degree burns to prevent infection and prepare a vascularized bed for immediate or delayed split-thickness skin grafting, ensuring optimal functional recovery of the hand.
Introduction to Full-Thickness Excision in Hand Burns
The management of deep partial-thickness and full-thickness burns of the hand represents a formidable challenge in orthopedic and reconstructive surgery. The primary objective is the rapid removal of non-viable tissue (eschar) to prevent invasive burn wound sepsis, followed by the immediate or delayed restoration of the cutaneous envelope. Full-thickness excision is a definitive surgical intervention that involves the complete en bloc resection of the entire layer of necrotic tissue down to a viable, well-vascularized bed capable of supporting a skin graft.
Unlike tangential excision, which shaves the burn wound sequentially until punctate bleeding is encountered, full-thickness excision is performed directly down to specific anatomical planes. Dorsally, this plane lies superficial to the dorsal venous network and the extensor tenosynovium. On the palmar surface, the dissection plane is established superficial to the flexor tenosynovium and the digital neurovascular bundles. Mastery of this technique requires a profound understanding of hand anatomy, meticulous tissue handling, and rigorous postoperative rehabilitation to prevent devastating contractures and preserve hand mechanics.
Surgical Anatomy and Dissection Planes
A thorough understanding of the distinct anatomical differences between the dorsal and palmar aspects of the hand is critical for safe and effective full-thickness excision.
The Dorsal Hand
The skin of the dorsal hand is thin, pliable, and highly mobile, allowing for the extreme excursion required during metacarpophalangeal (MCP) and interphalangeal (IP) joint flexion. The subcutaneous tissue is sparse, meaning deep burns rapidly compromise the underlying structures.
* Dorsal Venous Network: Located in the superficial fascia, these veins must be preserved if viable, as their destruction exacerbates postoperative edema.
* Extensor Tenosynovium and Paratenon: The extensor tendons lack a true synovial sheath over the metacarpals, relying instead on the paratenon for vascular supply. Excision must remain strictly superficial to this layer. A denuded tendon devoid of paratenon will not support a split-thickness skin graft (STSG) and will require flap coverage.
The Palmar Hand
The palmar skin is thick, glabrous, and firmly anchored to the underlying palmar aponeurosis by robust fascial septa, providing stability for grip.
* Flexor Tenosynovium: The flexor tendons are enclosed in synovial sheaths. Excision must preserve these sheaths to maintain tendon gliding and graft viability.
* Digital Neurovascular Bundles: Located volarly and laterally along the digits, these structures are highly susceptible to iatrogenic injury during deep palmar excisions. Dissection must proceed with extreme caution, utilizing loupe magnification if necessary.
Surgical Warning: Inadvertent violation of the extensor paratenon or flexor tenosynovium during excision transforms a straightforward skin grafting procedure into a complex reconstructive dilemma, often necessitating local or regional flap coverage to prevent tendon necrosis and rupture.
Preoperative Planning and Patient Positioning
Optimal outcomes begin with meticulous preoperative planning and precise patient positioning. The procedure is typically performed under general anesthesia or a regional brachial plexus block, depending on the extent of the burn and the patient's overall physiological status.
Positioning and Preparation
- Patient Positioning: The patient is positioned supine with the affected upper extremity extended on a radiolucent hand table.
- Skin Preparation: The entire limb, including the nail beds, is meticulously cleansed with an antiseptic soap (e.g., chlorhexidine gluconate or povidone-iodine). Care must be taken to gently debride loose, grossly contaminated epidermis without inducing bleeding.
- Tourniquet Application: A pneumatic tourniquet is applied to the proximal arm. It is crucial to inflate the tourniquet just before the excision begins and deflate it immediately upon completion of the resection to minimize ischemic time and accurately assess hemostasis.
Marking the Excision Boundaries
Accurate marking of the excision boundaries is a critical step that dictates the functional and aesthetic outcome of the reconstruction.
* Conformity to Skin Creases: The boundaries of the burn excision must be marked with a sterile skin marker, creating a pattern that strictly conforms to the natural skin creases (e.g., the distal palmar crease, digital flexion creases).
* Avoiding Tension Lines: Incisions must be designed to avoid creating straight lines across joints, which inevitably lead to linear scar contractures. Darting or zigzag patterns may be necessary at the graft-host junctions.
* Web Space Considerations: The excision pattern must be deliberately extended into the finger web spaces and the thumb-index web space. Failure to adequately excise and graft these areas is the leading cause of postoperative finger scar syndactyly and adduction contracture of the thumb.
Clinical Pearl: When marking the thumb-index web space, ensure the excision extends sufficiently dorsal and palmar to allow for a generous graft that will accommodate full palmar abduction and opposition of the thumb.
Surgical Technique: Step-by-Step Execution
1. Exsanguination and Tourniquet Inflation
- Exsanguinate the limb using an elastic wrap (Esmarch bandage). In cases of severe infection or easily disrupted eschar, exsanguination by elevation for 3 to 5 minutes is preferred to prevent systemic bacteremia or tissue embolization.
- Inflate the pneumatic tourniquet to 250 mm Hg (or 100 mm Hg above the patient's systolic blood pressure).
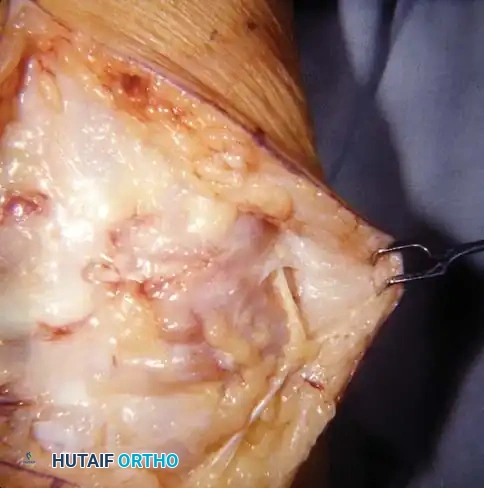
2. Incision and Excision of Eschar
- Incise through the marked borders of the burn wound directly into the subcutaneous tissues using a scalpel (No. 15 or No. 10 blade).
- Identify the edematous plane that separates the necrotic eschar from the viable underlying tissue.
- Dorsal Dissection: Apply traction to the eschar and dissect sharply in the plane superficial to the dorsal veins and the extensor tenosynovium.
- Palmar Dissection: Dissect superficial to the flexor tenosynovium and the digital neurovascular bundles. Use blunt-tipped scissors (e.g., Metzenbaum or tenotomy scissors) for finer dissection near the neurovascular bundles to prevent inadvertent transection.
3. Achieving Meticulous Hemostasis
Hemostasis is arguably the most critical factor in ensuring skin graft survival. Hematoma formation under the graft will physically separate it from the vascular bed, leading to focal or total graft loss.
* Once all necrotic skin is removed en bloc, apply topical thrombin to the wound bed.
* Wrap the hand tightly in warm, saline-moistened gauze sponges.
* Tourniquet Deflation: Deflate the tourniquet and completely remove it from the arm to eliminate any venous tourniquet effect, which could exacerbate bleeding.
* Maintain the hand under strict elevation and manual compression for 10 to 15 minutes. This allows the natural coagulation cascade to address microvascular bleeding.
* Remove the compressive wrap and systematically obtain hemostasis using bipolar electrocautery. Monopolar cautery should be used sparingly, if at all, to avoid deep thermal injury to the delicate paratenon or neurovascular structures.
Pitfall: Rushing the hemostasis phase is a common error. Dedicate ample time to compression and precise bipolar coagulation. A dry wound bed is an absolute prerequisite for immediate grafting.
4. Joint Positioning and Skeletal Stabilization
Proper joint positioning during grafting prevents the most common burn contractures: MCP joint extension contractures and IP joint flexion contractures.
* Dorsal Burns: Position the MCP joints in 70 to 90 degrees of flexion. If the patient is heavily sedated or if maintaining this position is difficult, insert transarticular Kirschner wires (K-wires) (0.045 or 0.062 inch) across the MCP joints to rigidly hold them in flexion. The IP joints should be maintained in full extension.
* Palmar Burns: The MCP and IP joints must be splinted in full extension to prevent severe flexion contractures.
5. Skin Grafting and Fixation
- Graft Selection: A split-thickness skin graft (STSG) harvested at 0.012 to 0.015 inches is typically utilized.
- Meshing: The graft may be meshed at a ratio of 1:1 or 1:1.5. Meshing allows for the egress of serum and blood, preventing hematoma/seroma formation. However, for the dorsum of the hand, applying the meshed graft unexpanded (unopened) yields a superior cosmetic result while still allowing for fluid drainage.
- Application and Securing: Apply the graft to the wound bed. Secure the margins using interrupted 5-0 chromic gut sutures, 5-0 fast-absorbing plain gut, or small surgical skin staples. Ensure the graft is under appropriate physiological tension—neither too loose (which causes wrinkling and poor take) nor too tight (which causes ischemia).
6. Dressing Application and Splinting
- Apply a non-adherent contact layer (e.g., Adaptic, Xeroform, or Mepitel) directly over the graft.
- Cover this with a soft, bulky compression bandage made of synthetic material (e.g., Acrilan or fluffed gauze) to provide uniform, gentle pressure across the grafted area, eliminating dead space.
- Immobilization: Support the hand with a rigid plaster or fiberglass splint. Alternatively, a previously fabricated thermoplastic splint can be used.
- The "Intrinsic Plus" (James) Position: For dorsal burns, the wrist is extended 20 to 30 degrees, the MCP joints are flexed 70 to 90 degrees, the IP joints are fully extended, and the thumb is placed in wide palmar abduction.
7. Management of the Uncontrollable Bleeding Bed
If, after tourniquet deflation and compression, diffuse microvascular bleeding cannot be satisfactorily controlled, do not proceed with immediate grafting.
* Wrap the wound with a saline-moistened dressing or apply a biological dressing (e.g., Biobrane, heterograft, or allograft).
* Return the patient to the operating room in 24 to 48 hours for a delayed grafting procedure once the wound bed has stabilized.
Postoperative Care and Rehabilitation
The surgical procedure is only the first phase of treatment; rigorous postoperative care and specialized hand therapy are paramount to achieving a satisfactory functional end point.
Immediate Postoperative Phase (Days 0 to 5)
- Elevation: The extremity must be strictly elevated above the level of the heart for the first 3 to 5 days to minimize edema, which can compromise graft perfusion and exacerbate joint stiffness.
- First Dressing Change: In 2 to 3 days, the outer bandage is carefully removed. For extensive grafts, this is best performed in the operating room under sedation or anesthesia. The graft is inspected for hematomas or seromas. Any fluid collections must be meticulously evacuated by rolling a sterile cotton swab over the graft toward a meshed interstice or by making a small nick in the graft with a No. 11 blade.
Subacute Phase (Days 5 to 14)
- Dressing Maintenance: While the graft can theoretically be left open once adherent, it is highly recommended to maintain a light bandage of non-adhering gauze covered with a soft wrap to protect the fragile new epithelium from accidental bumping, shearing, and abrasion.
- Hardware Removal: Skin staples and transarticular K-wires are typically removed between 10 and 14 days postoperatively, provided graft take is secure.
Long-Term Rehabilitation and Scar Management (Day 7 and Beyond)
- Initiation of Therapy: After 7 days, or as soon as the graft exhibits satisfactory adherence and vascularization (inosculation), a formal hand therapy program is initiated.
- Hygiene: Gentle washing of the hand with mild soap and water is encouraged to remove crusts and reduce bacterial load.
- Mobilization: Active and active-assisted range of motion (ROM) exercises are commenced. Passive ROM should be performed cautiously to avoid shearing the newly adherent graft.
- Splinting: A transition is made from static immobilization to dynamic and static-progressive splinting to combat the inevitable forces of scar contracture.
- Compression Therapy: Custom-fitted elastic compression garments (e.g., Jobst gloves) are essential to manage edema and promote scar maturation, reducing the risk of hypertrophic scarring.
Complications and Salvage Strategies
Despite meticulous technique, complications can arise, requiring prompt recognition and intervention.
- Graft Necrosis and Loss: Large areas of graft failure, often due to hematoma, infection, or shearing, require surgical debridement and regrafting. Small, localized areas of necrosis (<1-2 cm) can often be managed conservatively with topical antimicrobials (e.g., silver sulfadiazine, mafenide acetate) and non-adherent dressings until healing occurs via secondary intention and epithelialization from the wound margins.
- Burn Scar Contracture: The most frequent long-term complication. Prevention through early splinting and therapy is key. Established contractures may require surgical release (Z-plasties, local flaps) and supplemental grafting months or years after the initial injury.
- Web Space Syndactyly: Failure to adequately graft the web spaces leads to dorsal migration of the web commissure. This restricts finger abduction and requires complex reconstructive procedures, such as jumping Z-plasties or regional flap advancement, to restore normal hand span.
Clinical Pearl: The rehabilitation phase following full-thickness excision and grafting of the hand requires immense patient compliance. Splinting and therapy demand many months of dedication to reach a satisfactory functional end point. The surgeon must set realistic expectations with the patient from the outset.
You Might Also Like