Correction of Uniplanar Hallux Varus: Surgical Guide
Key Takeaway
Uniplanar hallux varus is a challenging iatrogenic deformity often following overzealous bunion correction. While mild cases respond to conservative taping, symptomatic static deformities require meticulous surgical intervention. This guide details the step-by-step soft tissue release, medial capsulotomy, and the Hawkins abductor hallucis transfer technique. Proper restoration of the flexor hallucis brevis moment arm and precise sesamoid reduction are critical for achieving durable, functional realignment of the first metatarsophalangeal joint.
INTRODUCTION TO UNIPLANAR (STATIC) HALLUX VARUS
Uniplanar (static) hallux varus is a complex, predominantly iatrogenic deformity of the first metatarsophalangeal (MTP) joint, most commonly arising as a complication following surgical correction of hallux valgus. Characterized by medial deviation of the hallux relative to the first metatarsal, this condition represents a profound disruption of the delicate dynamic and static stabilizing structures of the forefoot.
While not all patients with acquired hallux varus require operative intervention, the biomechanical consequences of a progressive deformity can be severely debilitating. A mild varus deformity of 5 to 6 degrees is generally considered a benign radiographic finding rather than a clinical failure. However, as the deformity progresses, the mechanical axis of the first ray is altered, leading to a cascade of functional deficits.
Clinical Presentation and Indications for Treatment
Patients presenting with symptomatic uniplanar hallux varus typically report a combination of aesthetic dissatisfaction and functional impairment. The primary clinical complaints include:
* Difficulty with Shoe Wear: The medial drift of the hallux creates friction against the medial toe box, leading to painful bursa formation and hyperkeratotic lesions.
* Pain and Instability: Disruption of the collateral ligaments and intrinsic musculature leads to a feeling of instability during the propulsive phase of gait.
* Weakness with Push-Off: Loss of the windlass mechanism and altered tension on the flexor hallucis longus (FHL) and flexor hallucis brevis (FHB) significantly diminish plantarflexion power.
* Transfer Metatarsalgia: As the first ray loses its weight-bearing capacity, load is transferred laterally to the lesser metatarsal heads, causing intractable plantar keratoses and second MTP joint overload.
Clinical Pearl: The success or failure of any hallux varus correction rests almost entirely on restoring the anatomical position and the mechanical moment of the flexor hallucis brevis. If the sesamoid apparatus cannot be centralized, soft tissue balancing will inevitably fail.
CONSERVATIVE MANAGEMENT PROTOCOLS
A conservative program of modified shoe wear and dynamic taping of the hallux must be attempted in all patients before surgical revision is contemplated. The timing of conservative intervention is critical to its success.
Early Postoperative Intervention
If uniplanar hallux varus develops acutely after a soft tissue procedure (e.g., a modified McBride bunionectomy) and is recognized before fixed contractures develop, aggressive conservative management can be curative.
* Taping Protocol: Weekly dressings and tapings of the hallux in a valgus posture of 10 to 15 degrees should be initiated.
* Timing: This treatment is most effective if begun within the first 4 to 6 weeks postoperatively.
* Duration: Taping must continue uninterrupted for 8 to 12 weeks.
* Maintenance: Following the taping phase, the patient must transition to a night splint that holds the hallux in slight valgus for an additional 3 months to allow the medial capsule to stretch and the lateral structures to scar in a lengthened position.
PREOPERATIVE PLANNING FOR SURGICAL CORRECTION
If the deformity goes unnoticed for 2 months or longer after the index surgery, or if it remains symptomatic despite exhaustive conservative measures, surgical correction is required.
Surgical Warning: Revision surgery should be strictly delayed until the soft tissue envelope shows absolutely no evidence of acute inflammation, edema, or induration from the first procedure. Operating through inflamed, hyperemic tissue dramatically increases the risk of arthrofibrosis, infection, and recurrent deformity.
Assessing Passive Correctability
The surgical approach is dictated by the flexibility of the MTP joint. A medial capsulotomy in the sagittal plane, combined with relocation of the medially subluxed sesamoids, may be sufficient if the deformity is passively correctable and 10 to 15 degrees of valgus is easily achievable intraoperatively.
SURGICAL TECHNIQUE: SOFT TISSUE CORRECTION
The surgical treatment of flexible, uniplanar hallux varus is straightforward when executed with meticulous attention to soft tissue handling. The goal is to release the contracted medial structures, centralize the sesamoid apparatus, and temporarily stabilize the joint to allow for balanced soft tissue healing.
1. Incision and Exposure
- Make a longitudinal incision on the medial side of the hallux, precisely at the midline in the internervous plane.
- Extend the incision from the midportion of the diaphysis of the proximal phalanx to 4 to 5 cm proximal to the MTP joint.
- Carefully raise a dorsal skin flap (leaving the underlying capsule intact) by 4 to 5 mm, and a plantar flap by 2 to 3 mm.
- Nerve Protection: It is imperative to identify and protect the dorsal sensory nerve branches (medial dorsal cutaneous nerve) near the junction of the former medial eminence and the first metatarsal. Injury here leads to painful neuromas that can overshadow a successful mechanical correction.
2. Medial Capsulotomy
- Make a straight, midline capsular incision medially.
- Elevate the dorsal and plantar capsular flaps sharply off the bone. Continue this elevation until the dorsomedial corner of the first metatarsal and the plantar aspect of the tibial sesamoid are clearly visualized and exposed.
3. Joint Release and Mobilization
- Adduct the hallux to the midline, then forcefully flex and extend the first MTP joint to break up intra-articular adhesions.
- Carry the soft tissue release dorsally and plantarward until the hallux can be effortlessly placed into 10 to 15 degrees of valgus on the first metatarsal head.
- Verify the release by flexing and extending the hallux, ensuring it can be passively dorsiflexed 40 to 50 degrees while maintained in this valgus position.
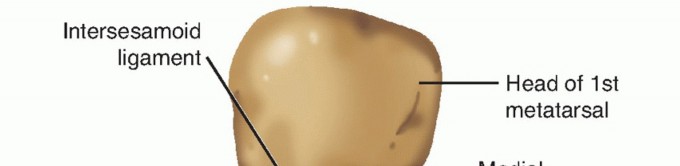
4. Sesamoid Reduction (The Critical Step)
- Place a small osteotome or a Freer periosteal elevator between the articular surface of the tibial sesamoid and the first metatarsal head.
- Gently lever and push the tibial sesamoid laterally.
- Prognostic Indicator: If the tibial sesamoid slides back into its anatomical facet on the metatarsal head with passive valgus of the hallux, or requires only gentle levering to reduce and maintain it, the soft tissue correction will be long-lasting.
Surgical Pitfall: If the tibial sesamoid is rigidly fixed medially and cannot be reduced and maintained in its facet, isolated soft tissue balancing and realignment will definitively fail. In these rigid cases, the surgeon must immediately pivot to a salvage procedure—either a first MTP joint arthrodesis or a hemiresection arthroplasty (Keller procedure) to decompress the joint and loosen the soft tissue envelope.
5. Kirschner Wire Fixation
- Position the hallux in the optimal alignment: 15 degrees of valgus, 10 degrees of extension, and neutral rotation.
- Drive a 0.062-inch Kirschner wire (K-wire) obliquely across the joint. Start from the distal-medial aspect of the proximal phalanx (at the metaphyseal-diaphyseal flare) and aim toward the proximal-lateral aspect of the first metatarsal.
- Pin Management: Cut the K-wire beneath the skin so that it can be removed in the office under local anesthesia. Leaving the pin protruding externally significantly increases the risk of pin tract infections and premature removal due to soft tissue irritation or accidental snagging.
6. Closure
- Release the tourniquet and obtain meticulous hemostasis. Hematoma formation is a primary driver of postoperative stiffness.
- Do not close the capsule. Leaving the medial capsule open prevents re-tightening of the medial structures that caused the varus deformity.
- Close the skin with permanent 4-0 monofilament nylon sutures in a single layer.
- Use simple, interrupted stitches placed near the wound margins. Because the skin is under tension from the valgus repositioning, mattress sutures should be avoided as they may strangulate the dermal capillary beds and compromise the blood supply to the skin margins.
- Place more stitches than usual (closer together) to avoid gaps. Gaps in the incision can lead to synovial fistulas or deep space infections, especially since deep capsular and subcutaneous sutures are omitted.
THE HAWKINS TECHNIQUE FOR DYNAMIC HALLUX VARUS
In cases where the hallux varus is driven by a profound dynamic muscle imbalance—specifically, an overactive abductor hallucis unopposed by a released or absent adductor hallucis—a simple static release is insufficient. The Hawkins technique provides a dynamic tendon transfer to restore the transverse plane balance of the MTP joint.
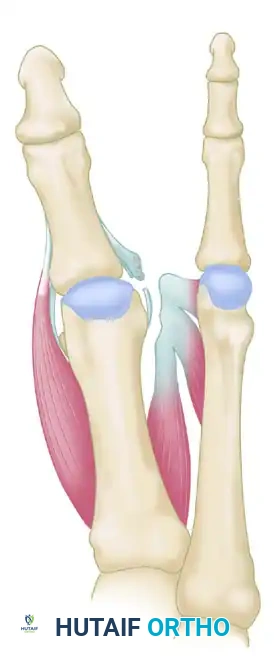
FIGURE 81-81A: Hallux varus secondary to severe intrinsic muscle imbalance. The abductor hallucis pulls the proximal phalanx medially due to the absence of lateral counter-forces.
Biomechanical Rationale
The Hawkins procedure neutralizes the deforming medial force by detaching the abductor hallucis and transferring it to act as a lateral stabilizer. Concurrently, the remnants of the lateral structures are advanced to restore the lateral moment arm.
Surgical Steps of the Hawkins Transfer
- Lateral Release: The lateral structures (lateral capsule, lateral collateral ligament) are meticulously released to mobilize the joint.
- Tendon Harvesting and Routing: The muscle-tendon unit of the abductor hallucis is identified medially, detached from its insertion, and mobilized. It is then transferred to the base of the proximal phalanx.
- Plantar Routing: Crucially, the tendon must be routed plantar to the transverse intermetatarsal ligament. It is passed through a created long bone tunnel in the proximal phalanx.
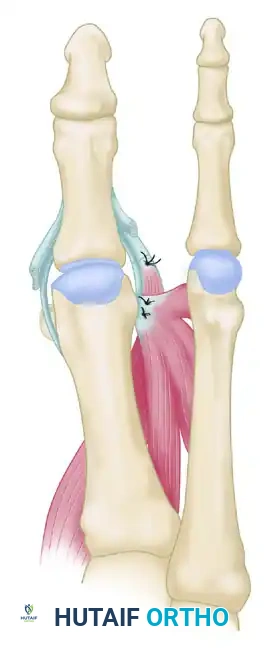
FIGURE 81-81B: Repositioning of the abductor hallucis. The tendon is routed to replace the function of the deficient adductor hallucis.
- Lateral Reconstruction: The adductor hallucis and flexor hallucis brevis conjoined tendon (if present) is mobilized, moved proximally, and sutured securely into the lateral aspect of the first metatarsal head, dorsal to the newly transferred abductor hallucis tendon.
- Fixation: The transferred abductor hallucis is sutured to the soft tissues medially under appropriate tension to maintain the hallux in a neutral to slight valgus alignment.

FIGURE 81-81C: Final construct showing the suturing of the abductor hallucis (lengthened by tendon graft if necessary) into the base of the proximal phalanx, alongside the repositioning of the conjoined tendon.
POSTOPERATIVE CARE AND REHABILITATION
The postoperative protocol is designed to protect the soft tissue healing while preventing recurrent contractures. Strict adherence to immobilization timelines is required to ensure the dermal adhesion matures without interruption.
Phase 1: Initial Healing (Weeks 0-3)
- Dressing Management: The initial surgical forefoot dressing is maintained undisturbed for 10 to 14 days. Leaving it intact for up to 19 to 21 days is permissible and often preferred to ensure robust skin healing without interrupting the fragile dermal adhesions.
- Immobilization: A removable short-leg walking boot is highly recommended to immobilize the ankle and reduce sheer forces across the forefoot, though a rigid postoperative shoe is an acceptable alternative in compliant patients.
- Weight Bearing: The patient is restricted to touch-down weight bearing with crutches for the first 3 weeks.
- Hygiene: The boot may be removed only for bathing during this initial 3-week period.
Phase 2: Progressive Loading (Weeks 3-6)
- Weight Bearing: At 3 weeks, the patient may progress to weight bearing as tolerated (WBAT) without crutches, but must remain in the removable walking boot.
- Immobilization: The boot can now be removed during periods of bed rest and bathing.
- Pin Management: The transarticular K-wire is typically removed in the office at 4 to 6 weeks.
- Clinical Pearl: If the intraoperative reduction of the sesamoids was difficult or required significant force, the pin should strictly be left in place for the full 6 weeks to allow maximum soft tissue fibrosis in the corrected position.
- The pin should never be removed before 3 weeks unless pressing circumstances (e.g., severe pin tract infection) demand it.
Phase 3: Dynamic Stabilization (Weeks 6+)
- If it becomes necessary to remove the K-wire earlier than planned, or immediately following routine pin removal at 6 weeks, the hallux must be dynamically taped to the second and third toes.
- This buddy-taping continues until the hallux demonstrates no tendency to drift medially from its corrected valgus posture during full weight-bearing stance.
- Physical therapy focusing on active and passive MTP joint range of motion, intrinsic foot muscle strengthening, and gait retraining is initiated to restore the propulsive function of the first ray.
COMPLICATIONS AND SALVAGE
Despite meticulous technique, complications can arise. Surgeons must be prepared to manage:
* Recurrence: Usually due to failure to reduce the tibial sesamoid or unrecognized dynamic imbalance. Salvage requires MTP arthrodesis.
* Overcorrection (Hallux Valgus): Caused by over-tensioning the lateral transfer or excessive medial release.
* Avascular Necrosis (AVN): Excessive stripping of the first metatarsal head capsule can disrupt the blood supply. Careful, limited subperiosteal dissection is mandatory.
* Stiffness: Prolonged K-wire fixation beyond 6 weeks or failure to initiate early post-pin-removal ROM exercises can lead to permanent arthrofibrosis.
By adhering to strict biomechanical principles, respecting the soft tissue envelope, and utilizing dynamic transfers like the Hawkins technique when indicated, orthopedic surgeons can reliably restore function and alignment to the hallux varus foot.
You Might Also Like