Mastering First Metatarsophalangeal Joint Cone Arthrodesis and Forefoot Reconstruction
Key Takeaway
First metatarsophalangeal (MTP) joint cone arthrodesis is a highly reliable procedure for end-stage hallux rigidus and severe rheumatoid forefoot deformities. By utilizing matched convex and concave reamers, surgeons achieve excellent bony congruency and optimal alignment. This comprehensive surgical guide details the biomechanical principles, step-by-step operative techniques, and postoperative protocols required to maximize fusion rates and restore forefoot biomechanics in complex reconstructive cases.
INTRODUCTION TO FIRST METATARSOPHALANGEAL JOINT ARTHRODESIS
Arthrodesis of the first metatarsophalangeal (MTP) joint remains the gold standard surgical intervention for end-stage hallux rigidus, severe hallux valgus, and complex rheumatoid forefoot deformities. The primary biomechanical objective of this procedure is to eliminate painful articulation while establishing a stable, plantigrade medial column that can effectively transfer loads during the toe-off phase of the gait cycle.
Among the various joint preparation techniques, the cone arthrodesis (cup-and-cone) method has gained significant prominence. Unlike flat planar saw cuts, which can lead to excessive shortening of the first ray and offer limited adjustability, the cone technique provides inherent multi-planar stability. By creating congruent convex and concave cancellous bone surfaces, the surgeon can precisely dial in the optimal degrees of valgus, dorsiflexion, and rotation prior to definitive fixation, all while maximizing the surface area available for osteosynthesis.
Clinical Pearl: The ideal position for first MTP arthrodesis is generally accepted as 10 to 15 degrees of valgus and 15 to 20 degrees of dorsiflexion relative to the first metatarsal shaft. Clinically, this translates to the hallux resting comfortably on the floor when the foot is weight-bearing, allowing for normal shoe wear and preventing excessive stress on the interphalangeal joint.
CONE ARTHRODESIS OF THE FIRST METATARSOPHALANGEAL JOINT
Preoperative Planning and Positioning
The patient is placed in the supine position on the operating table. A well-padded calf or thigh tourniquet is applied to ensure a bloodless surgical field. Fluoroscopy should be available to confirm alignment and hardware placement. Prophylactic intravenous antibiotics are administered prior to tourniquet inflation.
🔪 Surgical Technique 84-2: Step-by-Step Approach
1. Surgical Approach and Exposure
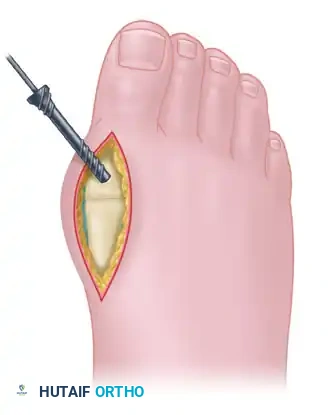
Make a dorsal longitudinal incision centered over the first MTP joint. The incision should be placed just medial to the extensor hallucis longus (EHL) tendon to avoid tendon irritation and bowstringing. Begin the incision just proximal to the interphalangeal joint and extend it proximally to approximately 3 cm proximal to the MTP joint.
Surgical Warning: If the patient has a compromised soft-tissue envelope or a history of poor wound healing (e.g., severe diabetes, peripheral vascular disease), a direct medial approach is a highly reasonable alternative to minimize the risk of dorsal skin necrosis.
Carefully dissect through the subcutaneous tissues, taking meticulous care to identify and protect the dorsomedial branch of the superficial peroneal nerve.

2. Capsulotomy and Joint Preparation
Open the joint capsule in line with the skin incision. Perform a thorough synovectomy, removing any hypertrophic synovium and dorsal osteophytes that may impede visualization. Release the joint capsule medially and laterally on both the phalangeal and metatarsal sides. This aggressive soft-tissue release is critical to expose the articular surfaces sufficiently and to allow for at least 3 to 5 mm of bony resection without tension.
Displace the proximal phalanx plantarly to fully expose the metatarsal head.
3. Articular Resection: Manual vs. Reamer System
Manual Technique: Use a sagittal saw to remove the articular cartilage of the metatarsal head in a circumferential manner, manually sculpting the bone to create the shape of a cone. Next, use the sagittal saw to remove the articular cartilage from the base of the proximal phalanx. The cut should be perpendicular to the base of the phalanx and only thick enough to reach subchondral bone at the center of this concave surface. With a Freer elevator or a small curette, gently create a concave surface in the soft cancellous bone of the phalanx until it is congruent with the metatarsal head.
Commercial Reamer Technique (Preferred): Alternatively, and more commonly in modern practice, utilize a commercially available MTP joint cone-arthrodesis system.
First, place a guide pin proximally through the center of the metatarsal head, directing it down the anatomical axis of the diaphysis using a wire driver. Pass the largest female (concave) reamer over the guide pin and gently ream the metatarsal head.
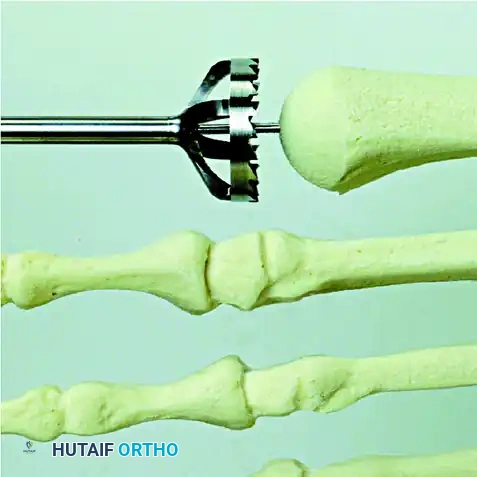
Use progressively smaller reamers until the appropriate size is reached to remove the entire articular surface, exposing healthy, bleeding subchondral bone. Note the size of the final female reamer used.
After removing the guide pin from the metatarsal, place a new guide pin into the exact center of the proximal phalanx base.
Clinical Pearl: We strongly recommend using a different guide pin from the one used in the metatarsal. The initial pin may have been notched or weakened by the reamer flutes and is highly prone to breakage inside the dense phalangeal bone.
Gently ream the base of the proximal phalanx starting with the smallest male (convex) reamer. Progress through the reamer sizes until the matching size reamer (corresponding to the final metatarsal reamer) has been used.
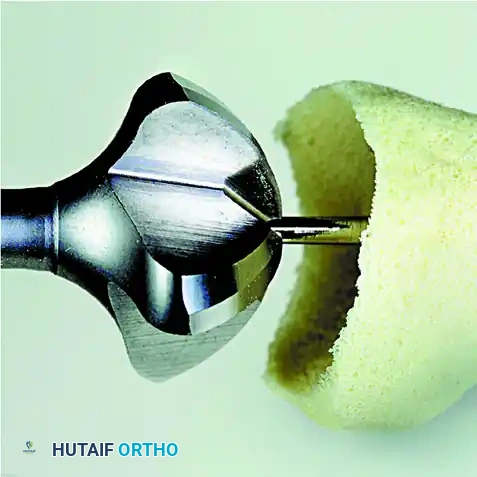
The articular surfaces should now be perfectly congruent, allowing significant freedom of motion to dial the hallux into the exact appropriate position for fusion.
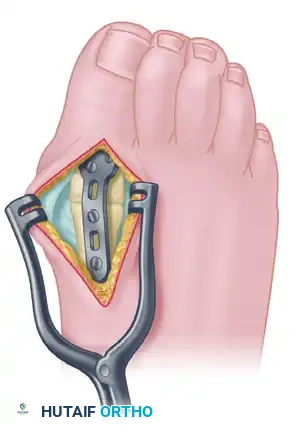
4. Provisional Fixation and Alignment
After joint preparation, position the hallux in the optimal alignment (10-15° valgus, 15-20° dorsiflexion, neutral rotation). Provisionally secure the MTP joint with a smooth Kirschner wire driven obliquely across the joint.
If using a modern plating system, the precontoured dorsal plate can be used as a template to assist in positioning the joint and guiding the provisional K-wire placement.
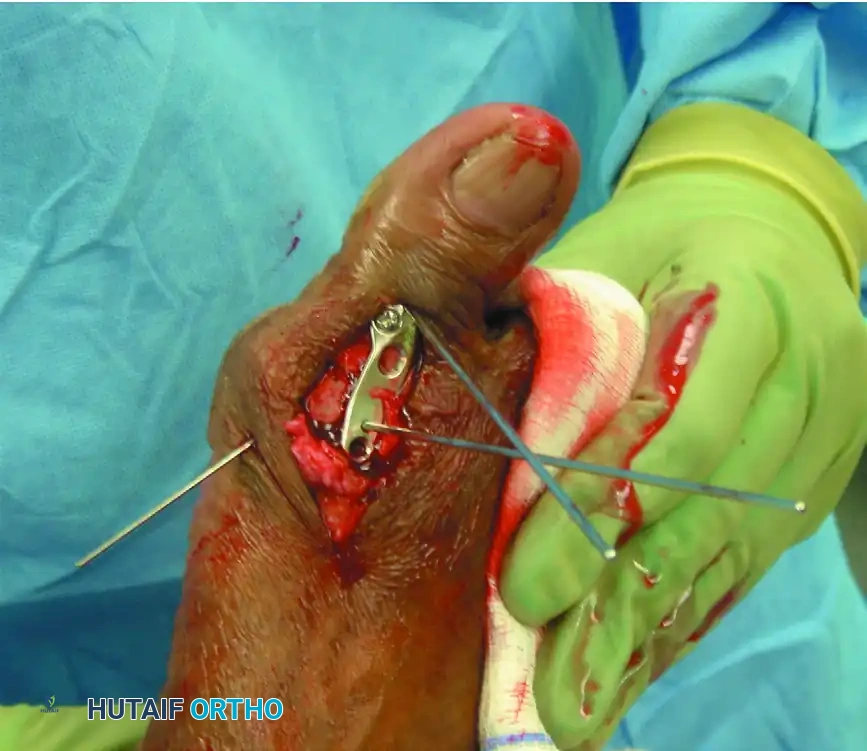
5. Definitive Internal Fixation
The method of internal fixation depends on surgeon preference, but the biomechanical gold standard is an obliquely placed headless compression screw combined with a precontoured dorsal neutralization plate.
Place the interfragmentary compression screw from distal-medial to proximal-lateral, ensuring it crosses the arthrodesis site and engages the thick lateral cortex of the metatarsal diaphysis. Predrill the near cortex before placement. Completely countersink the head of the screw into the proximal phalanx to prevent soft-tissue irritation.
Once interfragmentary compression is achieved, secure the precontoured, low-profile fusion plate to the dorsal aspect of the MTP joint using 2.7-mm to 4.0-mm multi-use compression or locking screws. In patients with osteopenia or poor bone quality, utilize larger screw sizes or locking technology to gain additional purchase and prevent hardware pullout.
6. Closure
Irrigate the wound copiously. Close the capsular and subcutaneous layers with interrupted poliglecaprone 25 (Monocryl; Ethicon) sutures. Close the skin with simple interrupted nylon sutures. Apply a sterile, non-adherent compression dressing.
Postoperative Care Protocol
- 0 to 48 Hours: Intravenous or oral antibiotics are administered for 48 hours. Strict elevation of the foot is mandatory to minimize edema.
- 48 to 72 Hours: The initial surgical dressings are removed. The wounds are inspected for signs of necrosis or infection. A new sterile dressing and a short-leg cast with a rigid toe plate are applied.
- 0 to 4 Weeks: Weight-bearing is strictly prohibited. The patient must remain non-weight-bearing on the operative extremity, though resting the heel on the ground while seated is permissible.
- 4 Weeks: Radiographs are obtained out of the cast. By 4 weeks, the arthrodesis typically demonstrates sufficient clinical and radiographic consolidation to allow protected ambulation in a hard-soled postoperative shoe or controlled ankle motion (CAM) boot.
- 8 Weeks: Repeat radiographs are obtained. If bridging trabecular bone is evident, dressings are discontinued, and the patient may transition to loose sneakers or extra-deep, wide toe-box shoes.
Rheumatoid Foot Considerations: In patients with rheumatoid arthritis, postoperative swelling may take several months to fully resolve. Patients often experience initial difficulty with proprioception and balance because the reconstructive surgery considerably alters forefoot anatomy. First MTP arthrodesis permanently limits heel height and shoe selection; patients must be counseled that they will likely require custom orthoses or specialized footwear postoperatively.
ADVANCED FOREFOOT RECONSTRUCTION: PLANTAR APPROACH
Resection of the Metatarsal Heads with First MTP Arthrodesis
In the setting of severe rheumatoid forefoot deformity, the degree of joint subluxation dictates the surgical approach. In subluxed but passively reducible MTP joints, dorsal longitudinal incisions allow easy access to the metatarsal heads and proximal phalanges without endangering the plantar neurovascular bundles.
However, if the MTP joints are completely dislocated and rigid (not passively reducible), the metatarsal heads are driven plantarly, becoming highly prominent beneath the skin. In these severe claw toe deformities, the metatarsal heads are readily exposed via a plantar approach. Furthermore, the flexor tendons and neurovascular bundles are safely out of harm's way, having been displaced deeply into the intermetatarsal spaces by the chronic dorsal dislocation of the proximal phalanges.
🔪 Surgical Technique 84-3: Step-by-Step Approach
1. Plantar Incision and Exposure
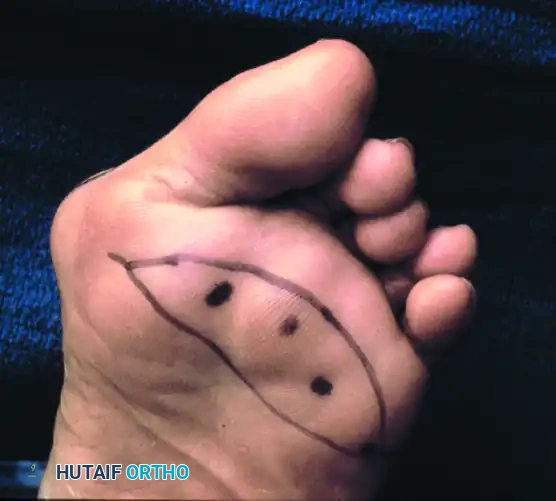
Mark the prominent lesser metatarsal heads on the plantar aspect of the foot. Outline a proposed elliptical skin incision directly over the prominences. The area of skin removed should be no more than 2.5 cm at its widest anteroposterior diameter to allow for tension-free closure.
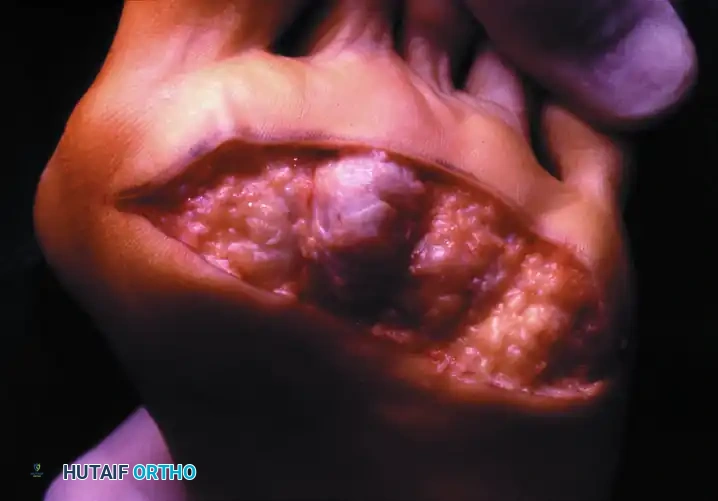
Once the skin ellipse has been excised, approach the metatarsal heads longitudinally through the overlying adventitial bursa and flexor tendon sheaths. If the flexor tendons are not already subluxated into the intermetatarsal spaces, carefully open the sheaths and retract the tendons to whichever side of the metatarsal head provides the best exposure.
Surgical Warning: Exercise extreme caution not to injure the flexor tendons or the neurovascular bundles, which become highly vulnerable at the proximal extent of the plantar incision.
2. Resection of the Lesser Metatarsals
Expose the medial, lateral, and dorsal aspects of each lesser metatarsal head via sharp dissection, staying strictly subperiosteal and close to the bone. Place a small right-angle retractor plantarward to expose the metatarsal neck and distal shaft.
Using a heavy bone-biter or an oscillating power saw with a small blade, resect the metatarsal head, neck, and a portion of the distal shaft.
* Metatarsals 2, 3, and 4: Resect up to 20% of the entire bone length.
* Metatarsal 5: Resect a more generous portion (approximately 30% of the distal metatarsal). A prominent bursa is common on the fifth metatarsal head, and painful symptoms will recur on the distal remnant if insufficient bone is resected.
Carefully palpate the distal stump of each resected metatarsal to ensure no sharp bony ridges remain. Thoroughly irrigate the wound to ensure no loose bony fragments are left in the soft tissues. Do not attempt to excise the first MTP sesamoids through this plantar approach.
3. First MTP Arthrodesis via Medial Approach
Approach the first MTP joint through a separate direct medial incision. Carry the incision straight down to the bone, staying directly in the midline of the proximal phalanx, the metatarsal head, and the distal half of the first metatarsal shaft. Raise full-thickness dorsal and plantar flaps at the subperiosteal bone level, rather than extracapsularly, to preserve the vascular supply to the skin edges.
Resect the medial eminence (bunion) flush with the metatarsal shaft.
Excise the articular cartilage and subchondral bone of the metatarsal head and the base of the proximal phalanx using an osteotome or oscillating saw. The cuts must be angled precisely to place the arthrodesis in 10 to 15 degrees of valgus and 15 to 20 degrees of dorsiflexion.
Clinical Pearl: Intraoperative estimation of dorsiflexion can be challenging. To avoid malposition, place a smooth Kirschner wire longitudinally across the joint. Using a sterilized goniometer, measure the angle between the plane of the heel pad/forefoot pad beneath the first metatarsal head and the pulp pad of the distal phalanx (holding the interphalangeal joint in neutral). This angle should be no more than 10 degrees. This clinical measurement reliably correlates to an osseous dorsiflexion angle of 18 to 25 degrees at the first MTP joint.
4. Sesamoidectomy
Removal of the articular surfaces of the first MTP joint greatly facilitates the exposure of the sesamoid complex. To assist with this difficult dissection, place a strong, two-toothed retractor beneath the metatarsal head and lift the first metatarsal dorsally.
Using a small curved elevator or a #15 blade, carefully disengage any fibrous adhesions binding the sesamoids to the plantar aspect of the metatarsal head. The fibular (lateral) sesamoid is typically the most adherent and difficult to mobilize. Incise the intersesamoid ligament longitudinally, and carefully shell out and remove the tibial (medial) sesamoid.
Surgical Warning: The flexor hallucis longus (FHL) tendon runs directly between the sesamoids. It is exceptionally vulnerable during the transection of the intersesamoid ligament and the excision of the sesamoids. Maintain direct visualization of the FHL at all times.
5. Final Fixation and Closure
Proceed with internal fixation of the first MTP joint using the lag screw and dorsal plate construct described in Technique 84-2. For the lesser toes, fixed hammer toe deformities are corrected by resecting 30% to 40% of the distal aspect of the proximal phalanx (the phalangeal bases are intentionally preserved to maintain soft tissue tension).
Close the plantar and medial wounds meticulously. Postoperative care mirrors that of the isolated MTP arthrodesis, though patients undergoing pan-metatarsal head resections require extended periods of offloading and specialized accommodative footwear to manage the profound changes to forefoot biomechanics.
Clinical Outcomes in Rheumatoid Deformity
The combination of first MTP arthrodesis and lesser metatarsal head resection provides profound pain relief and functional improvement for patients with severe rheumatoid forefoot deformities.
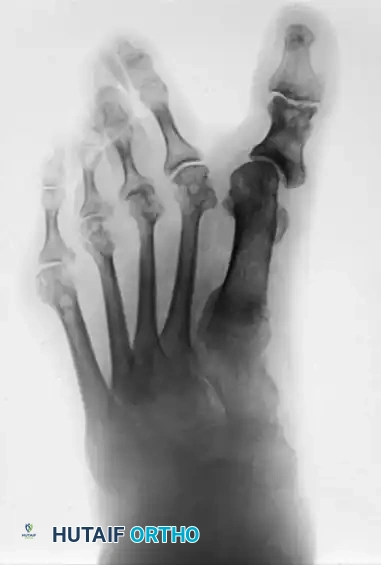
Preoperative Presentation: Multiple severe deformities, including hallux varus or valgus, dorsal dislocation of the lesser MTP joints, and intractable plantar ulcerations.
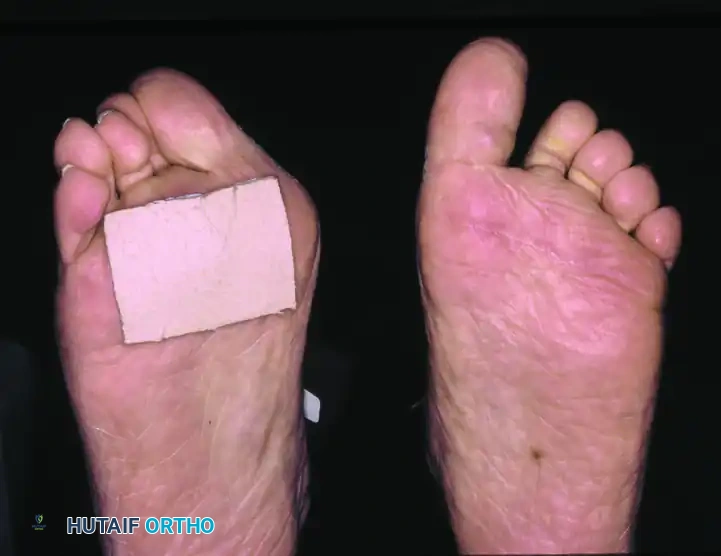
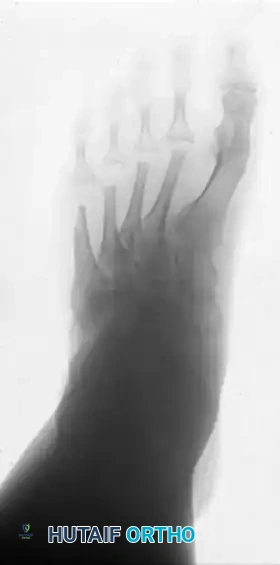
Postoperative Result: One year following arthrodesis of the first MTP joint and resection of the lesser metatarsal heads. The forefoot is plantigrade, the toes are realigned, and the plantar keratoses have resolved, allowing the patient to ambulate comfortably in accommodative footwear.
You Might Also Like
