Sternoclavicular & Patellar Instability: Surgical Guide
Key Takeaway
Sternoclavicular joint dislocations present unique clinical challenges. Anterior dislocations are typically managed conservatively, whereas posterior dislocations represent true orthopedic emergencies due to the proximity of vital mediastinal structures. Conversely, iatrogenic medial patellar instability often results from excessive lateral retinacular release, necessitating precise surgical reconstruction. This guide details the biomechanics, indications, and step-by-step operative techniques for managing both complex pathologies.
STERNOCLAVICULAR JOINT INSTABILITY
The sternoclavicular joint (SCJ) is a diarthrodial saddle joint that serves as the sole true synovial articulation between the upper extremity appendicular skeleton and the axial skeleton. Despite its minimal bony congruency, the SCJ is remarkably stable due to its robust ligamentous complex, which includes the anterior and posterior sternoclavicular ligaments, the interclavicular ligament, and the costoclavicular (rhomboid) ligament.
Instability of the SCJ is relatively rare, accounting for less than 3% of all shoulder girdle injuries. However, when dislocations do occur, they present a distinct dichotomy in management: anterior dislocations are generally benign and managed conservatively, whereas posterior dislocations are true orthopedic emergencies requiring immediate and precise intervention.
Anterior Sternoclavicular Dislocations
Most recurrent dislocations of the sternoclavicular joint are anterior. The mechanism of injury typically involves an indirect force, such as a lateral compressive blow to the shoulder that rolls the shoulder backward, levering the medial clavicle anteriorly.
Clinically, patients present with a visible and palpable prominence over the medial clavicle. Despite the striking clinical appearance, anterior dislocations rarely compromise neurovascular structures.
CLINICAL PEARL:
The medial clavicular epiphysis is the last physis in the body to close, typically fusing between the ages of 22 and 25. In patients under 25 years of time, what appears to be an anterior SCJ dislocation is frequently a Salter-Harris type I or II physeal fracture.
Management of Anterior Dislocations:
Anterior dislocations require only conservative treatment in the vast majority of cases. Closed reduction can be attempted in the acute setting (within 7 to 10 days) using posterior directed pressure over the medial clavicle while the shoulders are retracted; however, the joint is notoriously unstable, and the deformity often recurs immediately upon release of pressure.
Because the functional impairment of an unreduced anterior SCJ dislocation is minimal and the complication rate of operative intervention is unacceptably high, surgical stabilization is rarely indicated. Patients are typically placed in a figure-of-eight brace or a simple sling for comfort for 1 to 2 weeks, followed by progressive range of motion (ROM) and strengthening exercises.
Atraumatic Anterior Subluxation
Recurrent atraumatic anterior subluxation of the sternoclavicular joint is a distinct clinical entity. It usually occurs in young females and is provoked by specific shoulder movements, most notably abduction and extension.
Often, this condition is associated with generalized ligamentous laxity (e.g., Ehlers-Danlos syndrome, Marfan syndrome, or benign hypermobility syndrome). The subluxation is typically painless, though patients may complain of a disconcerting "clunking" sensation.
Management:
Atraumatic anterior subluxation is generally a self-limiting condition. Treatment is strictly non-operative, focusing on patient education, reassurance, and physical therapy aimed at periscapular stabilization. Operative intervention in atraumatic, voluntary, or habitual subluxators is strongly contraindicated, as it universally leads to failure, recurrent instability, and significant iatrogenic morbidity.
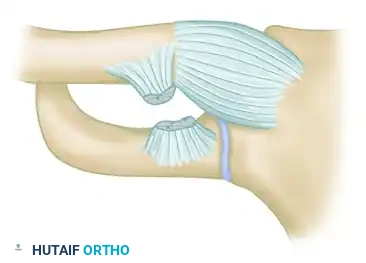
Posterior Sternoclavicular Dislocations
Posterior dislocations, although uncommon, are highly perilous. They occur via a direct blow to the anteromedial clavicle or an indirect force to the posterolateral shoulder that compresses and rolls the shoulder forward.
SURGICAL WARNING:
Posterior SCJ dislocations require urgent reduction because of the proximity and potential compromise of vital mediastinal structures. The subclavian vessels, innominate vein, esophagus, trachea, and brachial plexus lie directly posterior to the medial clavicle. Up to 30% of posterior dislocations are associated with life-threatening complications, including pneumothorax, tracheal compression, and vascular laceration.
Clinical Evaluation and Imaging:
Patients present with severe pain, a palpable void at the SCJ, and the shoulder postured in forward protraction. Symptoms of mediastinal compression—such as dyspnea, dysphagia, stridor, or diminished ipsilateral upper extremity pulses—must be immediately assessed.
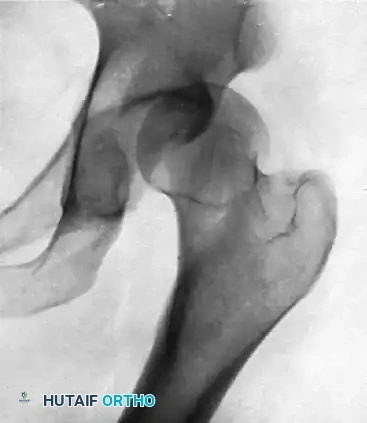
Standard radiography is often difficult to interpret due to overlapping anatomy. The "Serendipity view" (a 40-degree cephalic tilt view) can help differentiate anterior from posterior displacement. However, a computed tomography (CT) scan with intravenous contrast is the gold standard. It definitively characterizes the direction of dislocation, differentiates true dislocations from physeal fractures, and evaluates the integrity of the great vessels.
Closed Reduction Technique:
Closed reduction should be attempted for acute posterior dislocations (less than 3 weeks old) under general anesthesia in the operating room, with a cardiothoracic surgeon on standby.
1. Positioning: The patient is placed supine with a thick sandbag or rolled towel between the scapulae to allow the shoulders to fall posteriorly.
2. Traction: The arm is abducted to 90 degrees and extended. Inline traction is applied.
3. Manipulation: If traction alone does not reduce the joint, the surgeon may use a sterile towel clip to percutaneously grasp the medial clavicle and lift it anteriorly.
4. Post-Reduction: Once reduced, posterior dislocations are typically stable. The patient is immobilized in a figure-of-eight brace for 4 to 6 weeks.
Open Reduction and Reconstruction:
If closed reduction fails, or if the dislocation is chronic and symptomatic, open reduction and ligamentous reconstruction are indicated.
- Surgical Setup: A cardiothoracic surgeon must be available. The chest and bilateral lower extremities (for potential graft harvest) are prepped and draped.
- Approach: A transverse incision is made over the medial clavicle, extending to the manubrium. The periosteum is preserved.
- Reduction: The medial clavicle is carefully mobilized. Retractors must be placed meticulously to protect the retrosternal structures.
- Reconstruction: The preferred method is a figure-of-eight reconstruction using an autograft (semitendinosus or gracilis). Drill holes are made in the medial clavicle and the manubrium. The graft is passed through these tunnels in a figure-of-eight fashion and sutured to itself under tension.
- Absolute Contraindication: The use of Kirschner wires (K-wires) or Steinmann pins across the SCJ is absolutely contraindicated due to the high risk of catastrophic pin migration into the heart, aorta, or lungs.
IATROGENIC MEDIAL PATELLAR INSTABILITY
While lateral patellar instability is a common pathology, medial patellar instability is exceedingly rare in the virgin knee. Iatrogenic medial patellar instability is almost exclusively a complication of an overzealous or unwarranted lateral retinacular release (LRR), often performed for anterior knee pain or lateral patellar compression syndrome.
When the lateral retinaculum and the vastus lateralis tendon are excessively released, the patella loses its lateral tether. The unopposed pull of the vastus medialis obliquus (VMO) and the medial patellofemoral ligament (MPFL) dynamically subluxates the patella medially during knee flexion.
Clinical Diagnosis
Diagnosing iatrogenic medial patellar instability requires a high index of suspicion and a careful physical examination.
* Patient History: The patient typically reports a history of a previous lateral release, followed by worsening anterior knee pain, giving way, and a sensation of the kneecap "sliding inward."
* Physical Examination: Iatrogenic medial patellar instability is diagnosed when manual medial subluxation re-creates a patient’s symptoms. The examiner pushes the patella medially while the knee is flexed between 20 and 30 degrees; a positive test elicits apprehension and pain.
* Gravity Subluxation Test: With the patient in the lateral decubitus position (affected knee up), the knee is actively flexed and extended. A positive test occurs when the patella visibly subluxates medially under the force of gravity.
Surgical Management Strategies
Conservative management (bracing, VMO stretching, lateral strengthening) is rarely successful once the lateral structures have been structurally compromised. Surgical intervention is dictated by the nature of the previous procedures and the quality of the remaining tissue.
1. Direct Repair of the Vastus Lateralis:
Treatment consists of repairing the vastus lateralis if it was previously released and sufficient tissue quality remains. The lateral retinaculum is mobilized, and a direct side-to-side repair or advancement is performed to restore lateral tension.
2. Revision of Distal Realignment:
If the patient previously underwent a distal realignment procedure (e.g., Fulkerson or Elmslie-Trillat osteotomy) that medialized the tibial tubercle excessively, the treatment requires revising the distal realignment to a more lateral position. The tibial tubercle is osteotomized and translated laterally to restore a normal Tibial Tubercle-Trochlear Groove (TT-TG) distance.
3. Lateral Patellotibial Ligament Reconstruction:
If the initial procedure was proximal (an isolated lateral release) and inadequate tissues remain for a primary repair, a structural reconstruction is required. Repair or reconstruction using the lateral portion of the patellar tendon is done to create a robust lateral tether.
Step-by-Step Surgical Technique: Patellar Tendon Reconstruction
This technique utilizes a strip of the patient's own patellar tendon to reconstruct the lateral patellotibial ligament, effectively checking medial translation of the patella.
Step 1: Positioning and Exposure
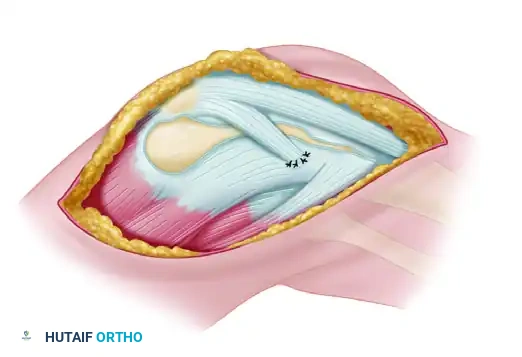
The patient is placed supine. A standard anterolateral incision is made, incorporating previous surgical scars if possible. Full-thickness fasciocutaneous flaps are elevated to expose the patella, the patellar tendon, and the lateral tibial metaphysis.
Step 2: Graft Harvest
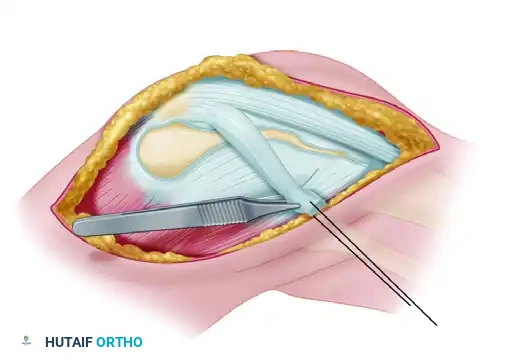
A lateral one-quarter strip of the patellar tendon is developed. The incision begins at the distal pole of the patella and extends distally to the tibial tubercle. The strip is sharply detached from its distal insertion on the tibial tubercle but is left meticulously attached proximally to the inferolateral pole of the patella.
Step 3: Graft Routing and Preparation
The detached distal end of the patellar tendon strip is mobilized. A heavy non-absorbable running locking suture (e.g., #2 FiberWire) is woven into the free distal end of the graft to allow for tensioning and fixation.
Step 4: Fixation to the Lateral Tibial Tubercle
The graft is routed laterally and distally. The strip is attached at the lateral tibial tubercle (or the lateral metaphysis of the tibia, depending on the required vector). Fixation can be achieved either by direct suture to the robust local periosteum or, more securely, through a bony tunnel or using a suture anchor.
SURGICAL PEARL:
Tensioning of the graft is the most critical step. The graft must be tensioned with the knee at 30 degrees of flexion. It should be tight enough to prevent medial subluxation past the medial trochlear ridge, but not so tight that it causes iatrogenic lateral compression or restricts normal patellar tracking.
Step 5: Closure
The wound is irrigated copiously. The subcutaneous tissues are closed with absorbable sutures, and the skin is closed with a subcuticular stitch or surgical staples.
Postoperative Rehabilitation Protocol
Successful outcomes following lateral patellar reconstruction depend heavily on strict adherence to a phased rehabilitation protocol.
Phase I: Maximum Protection (Weeks 0-4)
* Weight-Bearing: The patient is allowed touch-down weight-bearing with crutches.
* Bracing: The knee is locked in full extension in a hinged knee brace for ambulation and sleeping.
* Range of Motion: Passive range of motion (PROM) is initiated from 0 to 90 degrees. Active knee extension is strictly avoided to prevent stress on the healing graft.
* Exercises: Isometric quadriceps sets, straight leg raises (in the brace), and ankle pumps.
Phase II: Moderate Protection (Weeks 4-8)
* Weight-Bearing: Progress to full weight-bearing as tolerated.
* Bracing: The brace is unlocked to allow functional ROM during ambulation and is eventually discontinued once quadriceps control is adequate (no extensor lag).
* Range of Motion: Progress to full active and passive ROM.
* Exercises: Closed kinetic chain exercises (e.g., mini-squats, leg presses) are initiated. Open kinetic chain knee extension is still avoided.
Phase III: Return to Function (Weeks 8-16)
* Strengthening: Advanced strengthening focusing on core, gluteal, and quadriceps musculature.
* Proprioception: Balance board and agility drills are introduced.
* Return to Sport: Patients may begin a gradual return to sports-specific activities between 4 and 6 months postoperatively, provided they have achieved at least 90% limb symmetry index on functional testing and have no recurrent instability.
You Might Also Like