Masterclass in Shoulder Arthroplasty: Principles, Biomechanics, and Surgical Techniques
Key Takeaway
Total shoulder arthroplasty (TSA) and hemiarthroplasty are highly successful interventions for end-stage glenohumeral arthritis, osteonecrosis, and complex proximal humerus fractures. Achieving optimal outcomes requires a profound understanding of proximal humeral geometry, glenoid version, and meticulous soft-tissue balancing. This comprehensive guide details the evidence-based indications, biomechanical principles, step-by-step surgical techniques, and postoperative rehabilitation protocols essential for orthopedic surgeons to restore pain-free shoulder kinematics and maximize implant survivorship.
Introduction and Historical Context
The evolution of shoulder arthroplasty represents one of the most significant triumphs in modern reconstructive orthopedics. From the early attempts at restoring shoulder function by Albee in 1921 to the foundational monoblock prostheses introduced by Charles S. Neer II in the 1950s, the procedure has undergone continuous refinement. Today, Total Shoulder Arthroplasty (TSA) and Hemiarthroplasty (HA) are highly reliable procedures for alleviating pain and restoring function in patients with end-stage glenohumeral joint disease.
Modern prosthetic designs—driven by the three-dimensional geometric analyses of Boileau, Walch, and others—emphasize modularity, anatomic restoration, and adaptability. This masterclass provides a comprehensive, textbook-level analysis of the indications, biomechanics, surgical techniques, and postoperative protocols required to achieve excellence in shoulder arthroplasty.
Surgical Anatomy and Biomechanics
A profound understanding of glenohumeral geometry is the cornerstone of successful arthroplasty. The glenohumeral joint is inherently unstable, relying on a complex interplay of static (capsuloligamentous) and dynamic (rotator cuff) stabilizers.
Proximal Humeral Geometry
The proximal humerus exhibits highly variable three-dimensional geometry. Key anatomic parameters include:
* Humeral Head Retroversion: Averages 30° (range, 10° to 55°) relative to the transepicondylar axis of the distal humerus.
* Neck-Shaft Angle (Inclination): Averages 130° to 140°.
* Medial and Posterior Offset: The center of the humeral head is offset medially and posteriorly relative to the central axis of the humeral diaphysis. Failure to recreate this offset alters rotator cuff tension and joint kinematics.
Glenoid Geometry
The normal glenoid is pear-shaped, narrower superiorly than inferiorly.
* Version: The native glenoid is typically retroverted by 1° to 2°, though this varies widely. In osteoarthritic states, posterior wear (Walch B1 and B2 glenoids) frequently exacerbates retroversion, complicating component placement.
* Inclination: Averages 4° of superior tilt.
Clinical Pearl: Prosthetic adaptability is paramount. The goal of anatomic shoulder arthroplasty is not merely to insert an implant, but to perfectly replicate the patient's native center of rotation. Overstuffing the joint with an oversized humeral head will lead to excessive capsular tension, restricted range of motion, and accelerated glenoid wear.
Indications and Patient Selection
Total Shoulder Arthroplasty (TSA)
TSA is the gold standard for patients with end-stage glenohumeral arthritis and an intact, functioning rotator cuff.
* Primary Osteoarthritis: The most common indication.
* Inflammatory Arthritis: Rheumatoid arthritis, provided the rotator cuff remains functional and glenoid bone stock is adequate.
* Post-Traumatic Arthritis: Often complicated by malunion of the tuberosities and severe soft-tissue contractures.
* Avascular Necrosis (AVN): Advanced stages (Cruess Stage IV or V) with secondary glenoid involvement.
Hemiarthroplasty (HA)
While the indications for HA have narrowed with the advent of Reverse Total Shoulder Arthroplasty (RTSA), it remains a viable option in specific clinical scenarios:
* Avascular Necrosis (Cruess Stage III): Humeral head collapse with a pristine, uninvolved glenoid cartilage.
* Severe Glenoid Bone Loss: Cases where glenoid bone stock is insufficient to support a component, and bone grafting is not feasible.
* Young, High-Demand Patients: To avoid the risk of catastrophic glenoid component loosening in heavy laborers, though biologic resurfacing (e.g., meniscal allograft) or interposition arthroplasty may be considered.
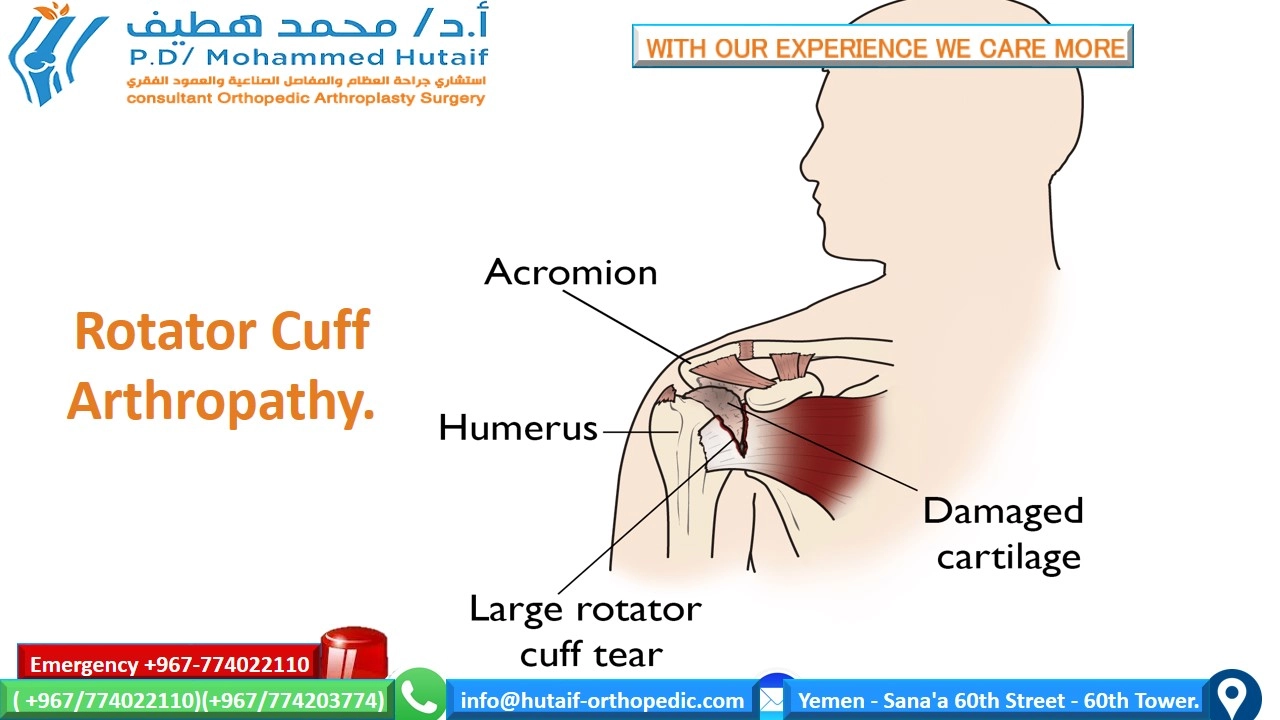
* Cuff Tear Arthropathy (Historical): Historically treated with HA (Neer's limited goals), but RTSA is now the definitive standard of care for pseudoparalysis and superior escape.
Preoperative Evaluation and Templating
Imaging Protocol
- Standard Radiographs: A true anteroposterior (Grashey) view, axillary lateral, and scapular Y view are mandatory. The axillary view is critical for assessing posterior subluxation and glenoid wear.
- Computed Tomography (CT): A 3D CT scan with metal artifact reduction (if prior hardware exists) is the gold standard for evaluating glenoid version, inclination, and available bone stock.
The Walch Classification of Glenoid Morphology
- Type A: Concentric wear (A1: minor, A2: major).
- Type B: Asymmetric posterior wear with posterior humeral subluxation (B1: narrowing, B2: biconcave, B3: monoconcave with >15° retroversion).
- Type C: Dysplastic retroversion (>25°) regardless of wear.
Surgical Warning: Unrecognized posterior glenoid wear (Walch B2) is a primary cause of early glenoid component failure. If retroversion exceeds 15°, eccentric anterior reaming or structural bone grafting must be employed to prevent posterior instability and eccentric loading of the polyethylene component.
Prosthesis Design and Selection
Humeral Components
Modern systems utilize modular stems and heads, allowing independent selection of stem diameter, head radius of curvature, and head thickness.
* Fixation: Press-fit (uncemented) diaphyseal fixation is preferred in primary OA with good bone quality. Cemented stems are reserved for osteoporotic bone, rheumatoid arthritis, or complex revisions.
Glenoid Components
The glenoid component remains the "weak link" in TSA, with aseptic loosening being the most common long-term complication.
* Pegged vs. Keeled: Biomechanical and finite element analyses (Lacroix, Lazarus, Gartsman) demonstrate that pegged glenoids offer superior resistance to shear forces, improved seating, and a lower incidence of radiolucent lines compared to keeled designs.
* Material: All-polyethylene cemented components are the gold standard. Metal-backed glenoids have historically demonstrated unacceptably high rates of failure due to polyethylene wear and component dissociation, though newer porous-metal designs are under investigation.
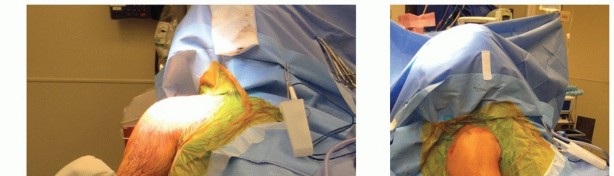
Surgical Technique: Step-by-Step
1. Positioning and Anesthesia
- Anesthesia: Interscalene regional block combined with general anesthesia.
- Positioning: The patient is placed in the beach-chair position with the head secured. The operative arm must be completely free to allow full extension, adduction, and rotation. A mechanical arm positioner is highly recommended.
2. Surgical Approach
- Incision: A standard deltopectoral approach is utilized, extending from the coracoid process to the deltoid insertion.
- Interval: The interval between the deltoid and pectoralis major is developed. The cephalic vein is typically retracted laterally with the deltoid to preserve its venous drainage, though medial retraction is acceptable.
- Deep Dissection: The clavipectoral fascia is incised. The conjoined tendon is retracted medially.
Clinical Pearl: Flatow’s "Tug Test" is essential at this stage. Palpate the axillary nerve on the anterior surface of the subscapularis muscle belly by gently tugging on the nerve as it courses inferior to the capsule. Protecting this nerve throughout the procedure is non-negotiable.
3. Subscapularis Management
Management of the subscapularis is critical for postoperative stability. Options include:
1. Subscapularis Peel: Detachment directly from the lesser tuberosity.
2. Tenotomy: Incision through the tendon 1 cm medial to its insertion.
3. Lesser Tuberosity Osteotomy (LTO): Championed by Gerber, this technique involves osteotomizing the lesser tuberosity with the subscapularis attached, allowing for bone-to-bone healing during closure. LTO has shown superior biomechanical strength and lower rates of postoperative subscapularis failure.
4. Humeral Head Resection
- The arm is externally rotated and extended to dislocate the humeral head.
- Peripheral osteophytes are removed to identify the true anatomic neck.
- Using an intramedullary or extramedullary guide, the humeral head is resected at the anatomic neck. The cut is typically made in 30° of retroversion, referencing the forearm.
5. Glenoid Exposure and Preparation
- Exposure: This is the most technically demanding portion of the procedure. Adequate exposure requires a complete circumferential capsular release (anterior, inferior, and posterior). A Fukuda retractor is placed posteriorly to displace the proximal humerus.
- Reaming: The glenoid is concentrically reamed to correct version and create a bleeding subchondral bone bed. Crucially, the subchondral bone plate must be preserved. Over-reaming leads to subsidence.
- Drilling and Cementing: Peg holes are drilled. The bone bed is meticulously dried using epinephrine-soaked sponges and pulsatile lavage. Thrombin and hydrogen peroxide can aid hemostasis. Cement is introduced early in its dough phase and pressurized. The polyethylene component is seated and held with firm, continuous pressure until polymerization is complete.
6. Humeral Preparation and Trialing
- The humeral canal is sequentially broached.
- Trial components are inserted.
- Soft Tissue Balancing: The joint is reduced. With the arm at the side, there should be 50% posterior translation and 50% inferior translation on the "shuck test." The arm should comfortably reach 40° to 50° of external rotation with the subscapularis approximated. If the joint is too tight, a thinner humeral head or further capsular release is required.
7. Closure
- The subscapularis is meticulously repaired. If an LTO was performed, heavy non-absorbable sutures or tapes are used to secure the bone fragment anatomically.
- The deltopectoral interval is closed loosely, followed by standard subcutaneous and skin closure. A closed suction drain may be used based on surgeon preference.
Postoperative Rehabilitation Protocol
Rehabilitation is as critical as the surgical execution. The protocol must balance the need to prevent stiffness with the imperative to protect the subscapularis repair.
- Phase I (Weeks 0-4): The patient is immobilized in a sling. Passive range of motion (PROM) is initiated immediately. Forward elevation is allowed as tolerated. External rotation is strictly limited to the intraoperative safe zone (typically 30° to 40°) to protect the subscapularis. Active internal rotation and extension are prohibited.
- Phase II (Weeks 4-8): The sling is discontinued. Active-assisted range of motion (AAROM) and active range of motion (AROM) begin. Gentle isometric strengthening is introduced.
- Phase III (Weeks 8-12): Progressive resistive exercises (PREs) for the rotator cuff and periscapular stabilizers are initiated. Subscapularis strengthening begins cautiously.
- Phase IV (Months 3-6): Return to advanced functional activities and light recreational sports (e.g., golf, swimming). Heavy lifting and impact sports are permanently discouraged to maximize implant longevity.
Complications and Management
Despite high success rates, complications can occur and must be managed aggressively:
- Glenoid Loosening: The most common cause of late failure. Presents with deep, aching pain. Radiographs may show progressive radiolucent lines or component shift. Revision to a hemiarthroplasty or RTSA (if bone loss is severe) is required.
- Instability:
- Anterior Instability: Usually due to subscapularis rupture or excessive humeral anteversion. Requires prompt surgical exploration and repair.
- Posterior Instability: Often stems from uncorrected glenoid retroversion or excessive soft-tissue laxity.
- Infection: Cutibacterium acnes (formerly Propionibacterium acnes) is an indolent, slow-growing organism frequently implicated in shoulder arthroplasty infections. Diagnosis requires holding cultures for up to 14 days. Treatment ranges from irrigation and debridement with modular exchange to two-stage revision.
- Periprosthetic Fracture: Intraoperative fractures (usually of the greater tuberosity or calcar) require immediate cerclage wiring. Postoperative fractures are managed based on stem stability (e.g., the Wright and Cofield classification).
Conclusion
Total shoulder arthroplasty and hemiarthroplasty are masterful procedures that demand a rigorous understanding of biomechanics, precise preoperative templating, and flawless surgical execution. By respecting the native anatomy, meticulously balancing the soft tissues, and adhering to evidence-based rehabilitation protocols, the orthopedic surgeon can consistently deliver excellent, long-lasting outcomes for patients suffering from debilitating shoulder pathology.
📚 Medical References
- shoulder arthroplasty, Orthopedics 21:155, 1998.
- McLaughlin HL: Lesions of the musculotendinous cuff of the shoulder: I. the exposure and treatment of tears with retraction, J Bone Joint Surg 26:31, 1944.
- McWhorter GL: Fracture of the greater tuberosity of the humerus with displacement: report of two operated cases with author’s technic of shoulder incision, Surg Clin North Am 5:1005, 1925.
- McWhorter GL: Old posterior dislocation of the shoulder with complete disability: reduction by the author’s posterior shoulder incision; technic of applying shoulder spica, Surg Clin North Am 12:1239, 1932.
- Rowe CR, Yee LBK: A posterior approach to the shoulder joint, J Bone Joint Surg 26:580, 1944.
- Thompson JE: Anatomical methods of approach in operations on the long bones of the extremities, Ann Surg 68:309, 1918.
- Humerus Berger RA, Buckwalter JA: A posterior surgical approach to the proximal part of the humerus, J Bone Joint Surg 71A:407, 1989.
- Henry AK: Exposure of the humerus and femoral shaft, Br J Surg 12:84, 1924–1925.
- King A, Johnston GH: A modifi cation of Henry’s anterior approach to the humerus, J Shoulder Elbow Surg 7:210, 1998.
- Moran MC: Modifi ed lateral approach to the distal humerus for internal fixation, Clin Orthop Relat Res 340:190, 1997.
- Thompson JE: Anatomical methods of approach in operations on the long bones of the extremities, Ann Surg 68:309, 1918.
- Elbow Bain GI, Mehta JA: Anatomy of the elbow joint and surgical approaches. In Baker CL Jr, Plancher KD, eds: Operative strategies of the elbow, New York, 2001, Springer-Verlag. Bryan RS, Morrey BF: Extensive posterior exposure of the elbow: a triceps-sparing approach, Clin Orthop Relat Res 166:188, 1982.
- Cadenat FM: Les vois de penetration des membres , Paris, Membre Superieur, 1932.
- Campbell WC: Incision for exposure of the elbow joint, Am J Surg 15:65, 1932.
- Ewald FC, Scheinberg RD, Poss R, et al: Capitellocondylar total
You Might Also Like