Arthroscopic Fixation of Type II SLAP Lesions: A Comprehensive Surgical Guide
Key Takeaway
Type II SLAP lesions involve the detachment of the superior labrum and biceps anchor from the supraglenoid tubercle. Arthroscopic fixation requires meticulous diagnostic evaluation, including the dynamic peel-back test, followed by precise anatomical repair using suture anchors. This guide details the surgical technique, from optimal portal placement and bone bed preparation to secure translabral fixation, ensuring restoration of the biceps-labral complex stability and optimal patient outcomes.
INTRODUCTION AND BIOMECHANICAL PRINCIPLES
The superior labrum anterior and posterior (SLAP) lesion represents a significant source of shoulder pain and dysfunction, particularly in overhead athletes and manual laborers. Originally classified by Snyder, the Type II SLAP lesion is characterized by the pathological detachment of the superior labrum and the long head of the biceps tendon anchor from the underlying supraglenoid tubercle. This detachment compromises the stabilizing "biceps-labral complex," leading to microinstability, pain, and mechanical symptoms.
Building upon the foundational work of Burkhart, Morgan, and Kibler, the contemporary understanding of Type II SLAP lesions emphasizes the biomechanical concept of "peel-back" forces. In the late cocking phase of throwing (abduction and maximal external rotation), torsional forces are transmitted through the biceps tendon, creating a sheer stress that peels the posterosuperior labrum off the glenoid rim. Successful arthroscopic fixation relies on accurate intraoperative diagnosis, meticulous bone bed preparation, and anatomically secure suture anchor repair to neutralize these forces.
PREOPERATIVE SETUP AND PATIENT POSITIONING
Optimal visualization and precise instrument trajectory are paramount in superior labral surgery. While both beach-chair and lateral decubitus positions are utilized in modern orthopedic practice, the lateral decubitus position offers distinct advantages for SLAP repairs, primarily through the application of balanced suspension traction which opens the glenohumeral joint space and provides unparalleled access to the superior glenoid.
Positioning and Anesthesia
- Positioning: Place the patient in the lateral decubitus position utilizing a secure beanbag or specialized lateral positioner. Ensure all bony prominences (peroneal nerve at the fibular head, greater trochanter) are meticulously padded.
- Traction Setup: Place the operative arm in 30 to 45 degrees of abduction and 20 degrees of forward flexion. Apply 5 to 10 lb of balanced suspension traction using a sterile sleeve system.
- Anesthesia and Temperature Control: Administer general endotracheal anesthesia. Regional interscalene blocks are highly recommended for postoperative pain control. Place a forced-air warming blanket over the non-operative body segments to prevent hypothermia, a common risk during prolonged arthroscopic fluid extravasation.
- Fluid Management: Utilize an automated arthroscopic pump system to maintain intraarticular pressure at a constant 60 mm Hg. This provides adequate hemostasis without excessive soft tissue extravasation.
- DVT Prophylaxis: Apply serial sequential compression devices (SCDs) on the lower extremities prior to induction.
Surgical Warning: Avoid excessive traction weight (>15 lbs) or prolonged surgical times in traction, as this significantly increases the risk of transient neurapraxia to the brachial plexus or the musculocutaneous nerve.
DIAGNOSTIC ARTHROSCOPY AND PATHOLOGIC FINDINGS
Establish a standard posterior viewing portal located approximately 2 cm inferior and 1 cm medial to the posterolateral corner of the acromion. Establish an anterior central working portal through the rotator interval for routine diagnostic arthroscopy.
Differentiating Normal Anatomy from Pathology
A thorough diagnostic sweep is critical. The superior labrum exhibits significant anatomic variability, including the sublabral foramen and the Buford complex (a cord-like middle glenohumeral ligament with an absent anterosuperior labrum). These normal variants must not be mistaken for SLAP lesions.
Use an angled arthroscopic probe to test the stability of the biceps-superior labral attachments to the glenoid. A normal superior sublabral sulcus is covered with articular cartilage and can be seen extending up to 5 mm medially beneath the labrum.
Arthroscopic Indicators of a Type II SLAP Lesion:
* Pathologic Sulcus Depth: If the sublabral sulcus is deeper than 5 mm, or if the labral attachments at the medial limit of the sulcus are tenuous and easily lifted.
* Displaceable Biceps Root: Assess whether the biceps root is easily displaceable with a probe. An unstable biceps root and superior labrum will easily displace medially onto the glenoid neck.
* Interstitial Disruption: Occasionally, the biceps root appears stable to superficial probing, yet tenuous superior labral attachments are present with underlying hemorrhage or fibrous granulation tissue. Such cases represent interstitial disruption of medially located attachments and require completion of the lesion, bone bed preparation, and formal repair.
* Positive Drive-Through Sign: Sweep the arthroscope from superior to inferior between the glenoid and the humeral head. If the arthroscope can be easily "driven through" the joint without resistance, it indicates capsular laxity. While a positive drive-through sign is a classic sign of multidirectional instability, the "pseudolaxity" associated with the loss of the superior labral bumper in SLAP lesions also frequently causes this sign.
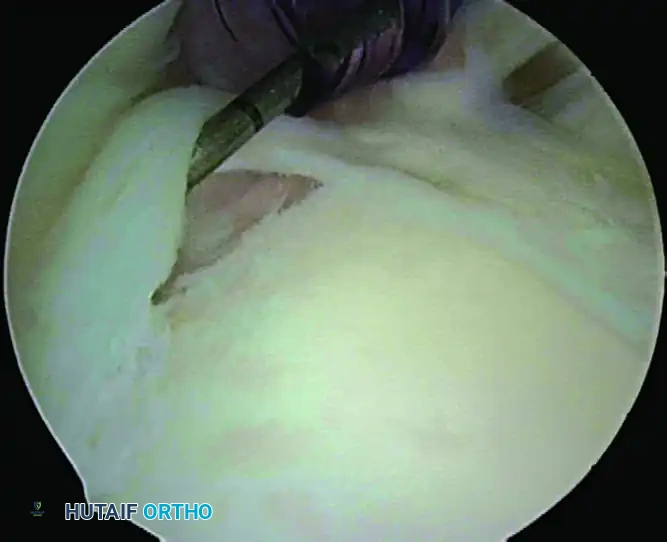
The Dynamic Peel-Back Test
The peel-back test, as described by Burkhart, is the definitive dynamic maneuver to evaluate for a posterior-dominant Type II SLAP lesion.
To perform the peel-back test:
1. Remove the operative arm from the traction suspension.
2. Observe the superior labrum arthroscopically from the posterior portal.
3. Have an unscrubbed assistant carefully bring the arm into 90 degrees of abduction and 90 degrees of external rotation (the late cocking position).
Arthroscopic view of a positive dynamic peel-back test demonstrating the medial displacement of the biceps-labral complex.
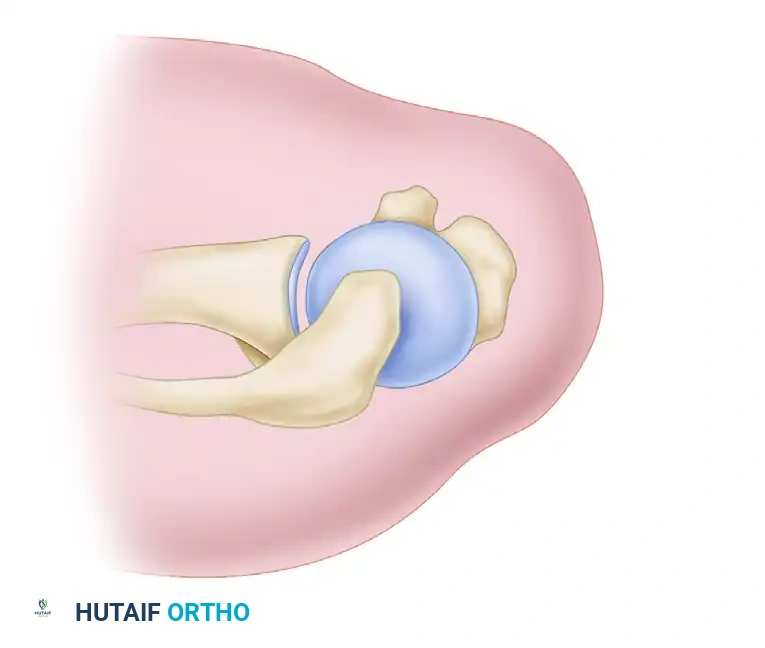
Diagrammatic representation of the peel-back mechanism. Torsional forces on the biceps tendon cause the superior labrum to peel medially over the glenoid rim.
Performing this dynamic maneuver in a shoulder with a posterior SLAP lesion causes the entire biceps-superior labrum complex to drop medially over the edge of the glenoid.
Clinical Pearl: The positive peel-back sign is highly diagnostic for a posterior SLAP lesion. However, isolated anterior SLAP lesions often have a negative peel-back test. In these cases, rely on the probe assessment, sulcus depth, and the presence of granulation tissue.
SURGICAL TECHNIQUE: ARTHROSCOPIC FIXATION
When the definitive diagnosis of a Type II SLAP lesion is made, proceed with the repair immediately. Delaying the repair until after other procedures (such as subacromial decompression) allows fluid extravasation and tissue swelling to obliterate the supralabral recess, severely obscuring surgical exposure.
Step 1: Advanced Portal Placement
Successful SLAP repair requires precise portal placement to achieve the correct trajectory for suture anchor insertion. Three portals are utilized:
1. Standard Posterior Viewing Portal: For visualization.
2. Anterior Portal: Located just above the lateral border of the subscapularis tendon, used for soft tissue preparation and suture management.
3. Anterosuperior Portal (The Working Portal): This is the critical portal for anchor placement. It is located just lateral to the anterolateral corner of the acromion.
Anterosuperior portal to access the superior glenoid for suture anchor placement, suture passing, and knot tying. The portal is typically located 1 cm off the anterolateral tip of the acromion, providing a 45-degree angle of approach to the corner of the superior glenoid.
Always use a spinal needle to locate the anterosuperior portal precisely before making the incision. The needle must provide a 45-degree angle of approach to the anterosuperior corner of the glenoid. If the angle is too steep, the drill may skid off the glenoid or penetrate the articular cartilage.
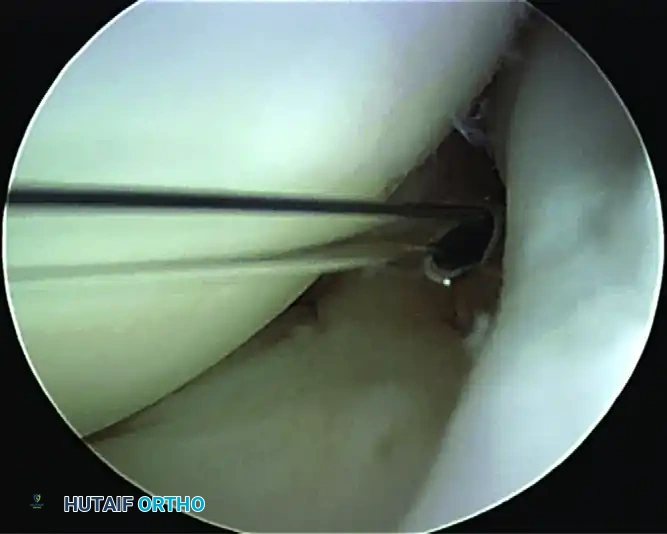
Step 2: Bone Bed Preparation
Through the anterior portal, introduce a motorized shaver or an arthroscopic rasp.
Elevate the detached superior labrum and prepare the bone bed on the superior neck of the glenoid, directly beneath the footprint of the biceps anchor.

Preparation of the bone bed on the superior neck of the glenoid using a motorized shaver. Care is taken to preserve the bony architecture.
Surgical Warning: Débride the soft tissues carefully down to a bleeding base of cancellous bone to promote biological healing. However, do not remove bone. Aggressive burring can destroy the superior glenoid rim, compromising the bony bumper and leading to anchor pull-out or iatrogenic instability.
Step 3: Suture Anchor Insertion
For the fixation of SLAP lesions, utilize small-diameter (e.g., 2.4 mm to 3.0 mm) biocomposite or all-suture anchors double-loaded with high-strength suture.
- Introduce the drill guide through the anterosuperior portal cannula.
- Position the guide on the prepared bone bed at the superior glenoid tubercle, slightly medial to the articular margin (approximately 1-2 mm onto the articular face is acceptable to ensure the labrum is tensioned back to the rim, but avoid deep articular penetration).
- Maintain the drill guide at a 45-degree angle to the glenoid face (the "deadman's angle") to maximize pull-out strength and avoid penetrating the suprascapular nerve medially or the articular cartilage laterally.
- Drill the socket and insert the suture anchor. Seat the anchor securely and test for pull-out strength.
Step 4: Suture Passing and Knot Tying
The goal is to create simple translabral loop sutures that securely approximate the labrum to the prepared bone bed.
- Retrieve one limb of the suture through the anterior portal.
- Introduce a curved suture-passing instrument (e.g., a penetrating bird-beak grasper or a shuttle relay device) through the anterosuperior portal.
- Pierce the superior labrum at the base of the biceps anchor. For a posterior SLAP, ensure the tissue bite is taken posterior to the biceps root to neutralize the peel-back force.
- Grasp the suture limb from the anterior portal and pull it through the labral tissue and out the anterosuperior portal.
- Retrieve the other suture limb from the anchor out the anterosuperior portal.
- Tie a secure, low-profile sliding knot (e.g., a Weston or SMC knot) followed by alternating half-hitches.
- Crucial Step: Ensure the knot is positioned away from the articular surface to prevent postoperative chondral abrasion. The knot should rest on the superior capsular side of the labrum.
- If the lesion extends significantly anterior or posterior, place a second anchor as needed, repeating the passing and tying steps.
Step 5: Final Assessment
Once fixation is complete, re-introduce the arthroscopic probe. The biceps root should now be firmly attached to the superior glenoid, with no medial displacement possible. Repeat the dynamic peel-back test; the repair should completely resist the medial subluxation of the biceps-labral complex during abduction and external rotation.
POSTOPERATIVE REHABILITATION PROTOCOL
The success of a Type II SLAP repair is heavily dependent on strict adherence to a phased postoperative rehabilitation protocol. The primary goal is to protect the healing biceps-labral complex while preventing adhesive capsulitis.
Phase I: Protection Phase (Weeks 0-4)
- Immobilization: The patient is placed in a shoulder sling with a small abduction pillow for 4 weeks.
- Range of Motion (ROM): Initiate passive range of motion (PROM) immediately.
- Forward flexion is limited to 90 degrees for the first 2 weeks, progressing to 120 degrees by week 4.
- External rotation (ER) at the side is limited to 30 degrees.
- Strict Precaution: No active biceps contraction. Avoid combined abduction and maximal external rotation (the peel-back position) entirely.
Phase II: Intermediate Phase (Weeks 5-8)
- Sling: Discontinue the sling at 4 weeks.
- ROM: Progress to active-assisted range of motion (AAROM) and active range of motion (AROM). Goal is full ROM by week 8.
- Strengthening: Initiate submaximal, pain-free rotator cuff and scapular stabilizer isometrics.
- Biceps Precaution: Continue to avoid resisted elbow flexion and resisted forearm supination to protect the healing anchor.
Phase III: Strengthening Phase (Weeks 9-16)
- Strengthening: Begin isotonic strengthening for the rotator cuff, deltoid, and periscapular musculature.
- Biceps: Gentle, progressive biceps strengthening may be initiated at week 10.
- Neuromuscular Control: Incorporate proprioceptive exercises and rhythmic stabilization.
Phase IV: Return to Sport (Months 4-6+)
- Advanced Strengthening: Plyometric exercises and sport-specific drills are introduced.
- Throwing Athletes: An interval throwing program is typically initiated around month 4 to 5, provided the patient has full, painless ROM and symmetric strength.
- Clearance: Unrestricted return to overhead sports or heavy manual labor is generally permitted between 6 to 8 months postoperatively, contingent upon passing functional criteria.
COMPLICATIONS AND PITFALLS
While arthroscopic SLAP repair is highly successful, surgeons must be vigilant to avoid specific complications:
- Postoperative Stiffness: The most common complication following SLAP repair. Over-tensioning the repair, capturing the capsule inadvertently, or prolonged immobilization can lead to severe loss of external rotation. Early, controlled PROM is essential.
- Hardware Complications: Prominent suture knots or anchors placed too close to the articular margin can cause devastating iatrogenic chondral damage to the humeral head. Always verify anchor trajectory and knot placement.
- Failure of Healing: Poor bone bed preparation, inadequate neutralization of the peel-back forces, or patient non-compliance with early biceps protection can result in recurrent detachment and persistent pain.
- Missed Concomitant Pathology: SLAP lesions frequently co-occur with partial articular-sided rotator cuff tears (PASTA lesions) or subtle instability. Failure to address these concurrent issues will result in suboptimal clinical outcomes.
You Might Also Like

