Arthroscopic Biceps Tenodesis: Comprehensive Surgical Technique and Biomechanical Principles
Key Takeaway
Arthroscopic biceps tenodesis is a highly effective surgical intervention for chronic bicipital tendinitis, SLAP lesions, and medial tendon subluxation. This comprehensive guide details the percutaneous intraarticular tendon technique, encompassing patient positioning, precise portal placement, biomechanical considerations, and step-by-step fixation using a bioabsorbable interference screw. Mastery of these principles ensures optimal anatomical repair, minimizes soft tissue complications, and accelerates postoperative rehabilitation for patients with complex long head of the biceps pathology.
INTRODUCTION TO ARTHROSCOPIC BICEPS TENODESIS
Pathology of the long head of the biceps (LHB) tendon is a well-recognized source of anterior shoulder pain, often presenting concomitantly with rotator cuff tears, superior labrum anterior-posterior (SLAP) lesions, and impingement syndromes. While conservative management remains the first line of treatment, surgical intervention is frequently required for refractory cases.
Arthroscopic biceps tenodesis has evolved as a superior alternative to simple tenotomy, particularly in patients where maintaining the length-tension relationship of the biceps muscle is critical for cosmetic appearance (avoiding the "Popeye" deformity) and functional strength (specifically supination and elbow flexion endurance). Sekiya et al. described a highly reproducible percutaneous intraarticular tendon technique that provides robust biomechanical fixation while minimizing surgical morbidity. This technique is particularly advantageous for middle-aged patients who are not engaged in high-level overhead sports or heavy occupational lifting but require reliable pain relief and functional restoration.
This comprehensive guide details the surgical anatomy, indications, step-by-step operative techniques in both the beach chair and lateral decubitus positions, and evidence-based postoperative rehabilitation protocols.
SURGICAL ANATOMY AND BIOMECHANICS
A profound understanding of the anterior shoulder anatomy is paramount for executing a safe and effective arthroscopic biceps tenodesis.
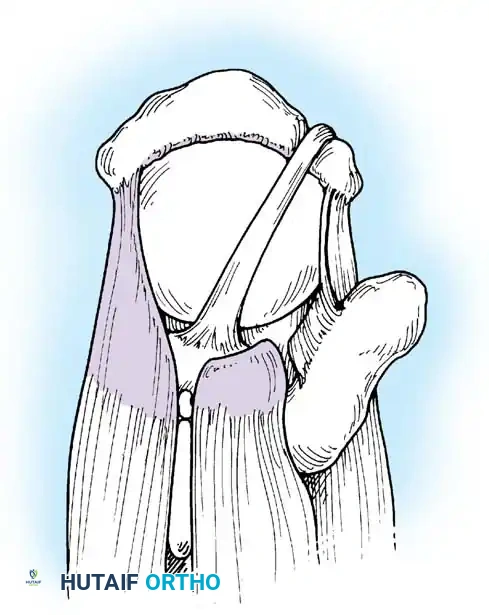
The Biceps Pulley and Intertubercular Groove
The LHB tendon originates from the supraglenoid tubercle and the superior glenoid labrum. It traverses the glenohumeral joint intraarticularly before exiting through the rotator interval. As it enters the bicipital groove (intertubercular sulcus), it is stabilized by the biceps pulley system, a complex capsuloligamentous sling composed of the superior glenohumeral ligament (SGHL), the coracohumeral ligament (CHL), and the distal attachment of the subscapularis tendon.
Vascular Considerations
The primary blood supply to the LHB and the surrounding bicipital groove arises from the anterior circumflex humeral artery.
Surgical Warning: The ascending branch of the anterior circumflex humeral artery traverses along the lateral edge of the bicipital groove. During soft tissue débridement and bone tunnel preparation, aggressive dissection along this lateral edge must be strictly avoided to prevent significant hemorrhage and devascularization of the surrounding osseous structures.
Biomechanical Rationale for Tenodesis
The LHB acts as a weak humeral head depressor and dynamic stabilizer of the glenohumeral joint. However, in the presence of chronic inflammation, partial tearing, or pulley incompetence, the tendon becomes a primary pain generator. Tenodesis removes the diseased intraarticular portion of the tendon while anchoring the healthy distal segment into the bicipital groove. This restores the resting tension of the muscle belly, preventing cramping, preserving supination torque, and maintaining the aesthetic contour of the arm.
INDICATIONS AND PATIENT SELECTION
Patient selection is the cornerstone of successful outcomes in arthroscopic biceps tenodesis. The technique described by Sekiya et al. is optimized for a specific demographic and pathology profile.
Primary Indications
- Chronic Bicipital Tendinitis: Refractory to conservative measures (NSAIDs, physical therapy, corticosteroid injections) for greater than 3 to 6 months.
- Partial LHB Tears: Tears involving greater than 25% to 50% of the tendon diameter.
- Medial Subluxation: Often associated with subscapularis tears or disruption of the SGHL/CHL pulley system.
- SLAP Lesions: Specifically Type II or Type IV SLAP tears in middle-aged patients (typically >40 years old) where primary labral repair has a higher failure rate and increased risk of postoperative stiffness.
- Concomitant Rotator Cuff Tears: Where the LHB is frayed, flattened, or hypertrophic (hourglass biceps).
Ideal Patient Profile
This specific percutaneous intraarticular technique is highly recommended for middle-aged patients who are not involved in elite-level overhead sports or heavy, repetitive lifting. For younger, high-demand athletes, a subpectoral tenodesis may be considered to completely remove the tendon from the bicipital groove, though the arthroscopic suprapectoral approach described here offers excellent outcomes with less surgical morbidity for the general population.
PREOPERATIVE SETUP AND POSITIONING
The procedure can be performed in either the beach chair or lateral decubitus position, depending on surgeon preference and concomitant procedures.
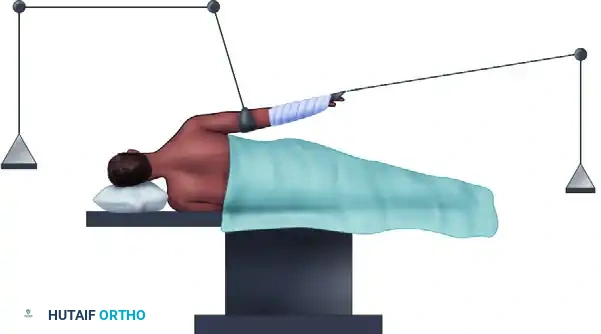
The Beach Chair Position
The beach chair position is widely preferred for this technique as it allows for anatomical orientation, easy conversion to an open approach if necessary, and excellent excursion of the biceps tendon.
- Anesthesia: General anesthesia combined with an interscalene regional nerve block is standard.
- Positioning: The patient is placed in a modified beach chair position with the head secured. The operative arm is draped free.
- Arm Placement: The arm is positioned in approximately 30 to 45 degrees of abduction and 20 degrees of internal rotation, resting comfortably on a padded Mayo stand or a specialized pneumatic arm holder. This specific degree of internal rotation optimally exposes the bicipital groove to the anterior working portals.
SURGICAL TECHNIQUE: THE BEACH CHAIR APPROACH
The following step-by-step protocol outlines the percutaneous intraarticular tendon technique for arthroscopic biceps tenodesis.
Step 1: Diagnostic Arthroscopy and Tendon Tagging
- Establish a standard posterior viewing portal and perform a comprehensive diagnostic arthroscopy of the glenohumeral joint.
- Evaluate the LHB tendon for fraying, erythema, partial tearing, or instability. Pull the tendon into the joint using an arthroscopic probe to inspect the extraarticular portion.
- Percutaneous Tagging: Pass an 18-gauge spinal needle from the anterolateral corner of the acromion, directing it through the rotator cuff (rotator interval) and piercing directly into the substance of the biceps tendon.
- Pass a No. 1 monofilament suture through the lumen of the 18-gauge needle.
- Establish an anterior working portal. Introduce an arthroscopic grabber through this portal, capture the monofilament suture, and extract it out of the anterior cannula.
Step 2: Intraarticular Tendon Release
- With the tendon securely marked and controlled by the monofilament suture, introduce an arthroscopic basket punch or electrocautery device.
- Release the LHB tendon from its origin just lateral to the superior labrum.
- This completes the intraarticular preparation. The glenohumeral joint work is concluded, and the arthroscope is redirected to the subacromial space.
Step 3: Subacromial Preparation and Portal Placement
- Anterolateral Portal Creation: Make an anterolateral portal 2 to 3 cm below the palpable edge of the anterior acromion, positioned in the center of the anterior third of the acromion.
- While visualization is maintained through the standard lateral portal, the anterior portal now becomes the primary working portal.
- Introduce an arthroscopic shaver into the anterior portal. Perform a thorough bursectomy, removing all adventitial tissue to expose the underlying anatomy.
- Landmark Identification: Use the previously placed monofilament suture and anatomical landmarks to localize the tendon within the bicipital groove. The falciform ligament of the pectoralis major tendon serves as a highly reproducible landmark; the biceps tendon lies directly deep to this structure.
Step 4: Sheath Dissection and Tendon Mobilization
- Using an arthroscopic basket, identify the transverse humeral ligament and the bicipital sheath, and open it longitudinally.
- Utilize electrocautery to meticulously clean the surrounding tissues. Use an arthroscopic probe to free the tendon from any intra-sheath adhesions.
- Extend the dissection proximally toward the lateral aspect of the rotator interval.
Surgical Pitfall: Avoid proceeding too far medially during the dissection of the biceps sheath. Overzealous medial dissection to expose the biceps tendon can inadvertently lead to partial displacement or iatrogenic injury to the superficial attachment of the subscapularis tendon.
Step 5: Tendon Retrieval and Exteriorization
Retrieval of the tendon can be achieved via two primary methods:
* Method A (Direct Extraction): Capture the monofilament tagging sutures with a crochet hook from the anterior portal and extract the tendon directly through that portal.
* Method B (Needle Localization): Localize the bicipital groove with a spinal needle in the anterolateral quadrant of the shoulder. Once a satisfactory angle is confirmed, make a small portal incision and retrieve the tendon using a hemostat.
Clinical Pearl: The natural excursion of the biceps tendon is relatively small. To improve excursion and make exteriorization easier, flex the patient's elbow and elevate the arm to greater than 90 degrees. If excessive fluid extravasation makes extraction difficult, transfer the arthroscope to the anterior portal and use the modified lateral portal for extraction.
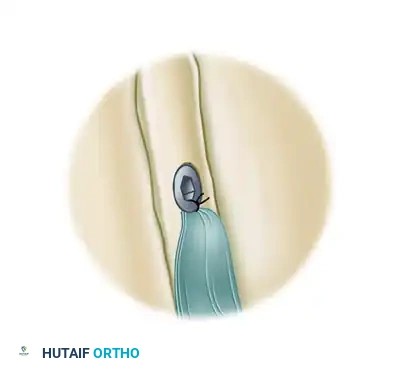
Once exteriorized, immediately place a hemostat on the tendon at the level of the skin to prevent it from retracting back underneath the dermal layer.
Step 6: Tendon Preparation and Suture Passage
- Sizing and Resection: To approximate the correct intraarticular distance and restore anatomical tension, resect exactly 20 mm of the diseased proximal tendon.
- Whipstitching: Place a running locking "whip stitch" in the distal 15 mm of the remaining tendon. Use a high-strength No. 2 braided composite suture (e.g., FiberWire, Arthrex, Naples, FL) measuring 36 inches in overall length. A Krakow tendon stitch technique is highly recommended for maximum pull-out strength.
- Place a square knot at the very end of the suture limbs. This knot maintains suture tension during insertion and helps direct the tendon when using the tenodesis driver.
- Remove the hemostat and allow the prepared tendon and sutures to fall back into the subacromial space.
- Place clear cannulas into the anterior and anterolateral portals. Shuttle the free suture limbs into the anterior portal to keep them out of the working field during bone tunnel preparation.
Step 7: Bone Tunnel Preparation
- Move the arthroscope to the lateral portal for optimal exposure of the bicipital groove.
- Gently débride the soft tissue overlying the groove until the cortical bone is clearly visible. Remember to strictly avoid the lateral edge to protect the ascending branch of the anterior circumflex vessel. Thorough débridement prevents soft tissue interposition during drilling and screw placement.
- Instrumentation: Insert an 8.25-mm clear cannula into the anterior portal to minimize soft tissue distention.
- Guide Pin Placement: Through the anterolateral portal, insert a 2.4-mm cannulated reamer guidewire into the exact center of the bicipital groove. The ideal entry point is 10 to 15 mm below the insertion of the supraspinatus, lateral to the subscapularis insertion, at the level of the transverse humeral ligament.
- Drilling: Advance the guidewire to a depth of 30 mm.
Note: Drilling beyond the posterior cortex of the humerus is unnecessary and increases the risk of neurovascular complications. - Measure the prepared tendon diameter using the sizing holes on the thumb pad of the biotenodesis driver. For most patients, an 8-mm tendon diameter is standard.
- Advance an 8-mm cannulated reamer over the guide pin to the 30-mm mark to create the bone socket. Remove the reamer and guide pin.
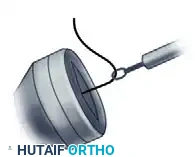
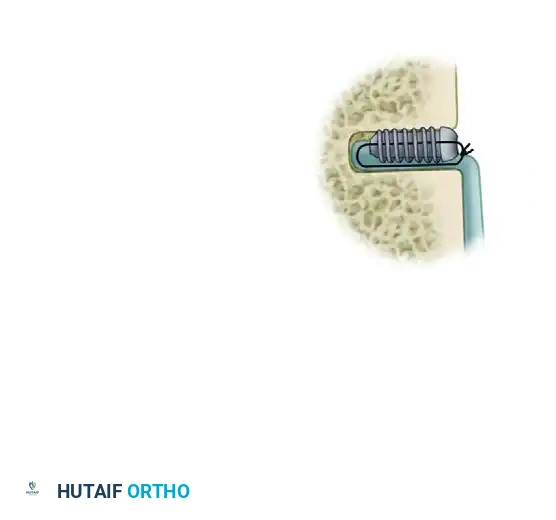
Step 8: Biotenodesis Interference Screw Fixation
- Assemble the biotenodesis driver and handle. Place an 8-mm bioabsorbable interference screw (standard length 23 mm) over the distal end of the driver.
- Retrieve the sutures through the anterolateral portal. Using a wire loop suture passer, pull one limb of the suture through the cannulated driver and the screwdriver handle. Hold the other limb loosely outside the assembly.
- Pull the shuttled limb tightly until the whipstitched end of the tendon is securely docked against the tip of the driver. Ensure the thumb pad is positioned against the driver handle so it does not interfere with screw insertion.
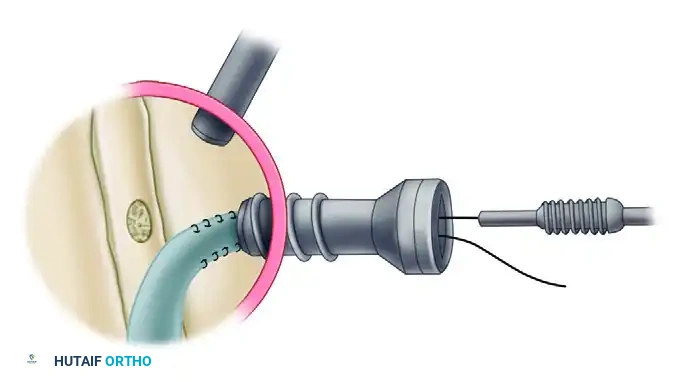
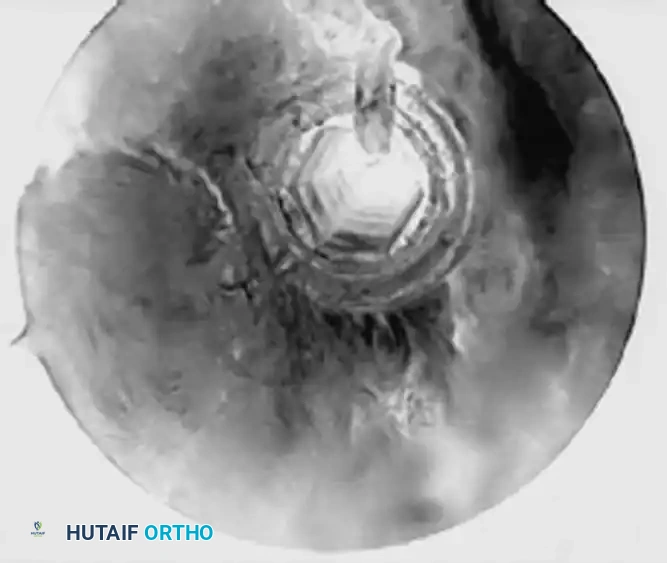
- Viewing from the lateral portal, introduce the tenodesis driver through the anterolateral cannula. Observe the tip of the driver and the tendon as they approach the bone socket.
- Place the tip of the driver at the superior aspect of the bone tunnel and manually push until the tendon reaches the base of the 30-mm tunnel. Hold the free suture limb tight against the driver with a hemostat.
- Once seated at the bottom, use the thumb pad to hold the tendon and suture against the base of the tunnel. Confirm appropriate insertion by visualizing the suture disappearing into the bone socket.
- Advance the bioabsorbable interference screw directly over the top of the tendon. Turn the driver until the head of the screw is flush with the base of the bicipital groove, sitting below the prominence of the medial and lateral intertubercular ridges.
- Remove the driver. Use a crochet hook to retrieve both suture limbs (one passing through the center of the screw, the other captured between the screw and the bone tunnel wall).
- Tie a secure knot composed of multiple alternating half-hitches over the top of the interference screw using standard arthroscopic knot-tying techniques. This provides secondary backup fixation to the interference fit.
- Irrigate the subacromial space thoroughly to remove any osseous debris or soft tissue remnants. Rotate the arm through a full range of motion to ensure there is no impingement from the screw head and that the tenodesis is mechanically stable.
SURGICAL TECHNIQUE: THE LATERAL DECUBITUS MODIFICATION
While the beach chair position is highly favored, the lateral decubitus position can also be utilized for subacromial surgery and arthroscopic biceps tenodesis, particularly when addressing concomitant posterior labral pathology.
Positioning and Limitations
- Position the arm in 30 to 45 degrees of abduction with longitudinal traction applied via a suspension system.
- Advantage: The glenohumeral anatomy remains rigidly fixed during the procedure, preventing unwanted shifting.
- Disadvantage: The traction cannot be easily removed intraoperatively. Because the elbow remains extended under traction, the surgeon cannot flex the arm to gain tendon excursion. Consequently, the biceps tendon length is often inadequate to routinely extract it from the anterior portal for exteriorized whipstitching.
The Romeo et al. Modification
To overcome the lack of tendon excursion in the lateral decubitus position, Romeo et al. recommended an all-inside modification where the biceps tendon remains within the subacromial space at all times.
- Identify the biceps tendon below the transverse humeral ligament via palpation or direct visualization.
- Release the tendon from the groove.
- Instead of exteriorizing the tendon, use a Viper punch (Arthrex, Naples, FL) to pass a single No. 2 FiberWire directly into the tendon, approximately 2 cm cephalad to the intended tenodesis bone socket.
- Retrieve both suture limbs out of the anterior portal and tie a sliding locking knot over the tendon to secure it.
- Establish the bone socket using the standard reaming technique described above.
- Deliver the tendon into the socket using the biotenodesis driver and secure it with the interference screw.
- Because the tendon was not pre-measured and resected outside the body, use an arthroscopic shaver or biting forceps to trim any excess proximal tendon stump at the conclusion of the fixation.
POSTOPERATIVE REHABILITATION PROTOCOL
Postoperative management is heavily dictated by any concomitant procedures performed (e.g., rotator cuff repair, labral repair). If an isolated arthroscopic biceps tenodesis is performed, the rehabilitation follows a structured, progressive timeline designed to protect the healing tendon-to-bone interface while preventing shoulder stiffness.
Phase I: Protection Phase (Weeks 0 to 4)
- Immobilization: The patient is placed in a standard clinical sling for 3 to 4 weeks.
- Range of Motion (ROM): Passive range of motion (PROM) of the shoulder is initiated immediately to prevent adhesive capsulitis.
- Elbow Restrictions: Active elbow flexion and active forearm supination are strictly prohibited to prevent early pull-out of the tenodesis. Passive elbow flexion and extension are permitted.
- Exercises: Pendulum exercises, scapular retractions, and passive forward elevation.
Phase II: Active Motion Phase (Weeks 4 to 8)
- Sling: Discontinue the sling at 4 weeks.
- ROM: Transition from PROM to active-assisted range of motion (AAROM), and eventually to active range of motion (AROM) of the shoulder.
- Elbow: Initiate active elbow flexion and supination without resistance.
- Strengthening: Begin light, submaximal isometric exercises for the rotator cuff and deltoid.
Phase III: Strengthening Phase (Weeks 8 to 12)
- Resistance: Introduce progressive resistive exercises (PREs) for the biceps and supinator muscles, starting with light therabands and progressing to light free weights.
- Scapulothoracic: Focus on periscapular strengthening to ensure proper glenohumeral rhythm.
- Milestones: Full, painless AROM should be achieved by week 10.
Phase IV: Return to Activity (Weeks 12+)
- Advanced Strengthening: Plyometrics and sport-specific or work-specific functional training.
- Clearance: Unrestricted return to heavy lifting or overhead sports is typically permitted between 3 to 4 months postoperatively, contingent upon the restoration of symmetric strength and the absence of pain at the bicipital groove.
CONCLUSION
Arthroscopic biceps tenodesis utilizing a percutaneous intraarticular tendon technique provides a biomechanically superior, cosmetically pleasing, and functionally robust solution for LHB pathology. By adhering strictly to anatomical landmarks, respecting the vascular supply of the bicipital groove, and achieving a secure interference fit, orthopedic surgeons can ensure excellent clinical outcomes and high patient satisfaction rates.
📚 Medical References
- Arthroscopic biceps tenodesis: indications and technique, Oper Tech Sports Med 10:105, 2002.
- Loew M, Heichel TO, Lehner B: Intraarticular lesions in primary frozen shoulder after manipulation under general anesthesia, J Shoulder Elbow Surg 14:16, 2005.
- Lohr JF, Uhthoff HK: The microvascular pattern of the supraspinatus tendon, Clin Orthop Relat Res 254:35, 1990.
- Loyd JA, Loyd HM: Adhesive capsulitis of the shoulder: arthrographic diagnosis and treatment, South Med J 76:879, 1983.
- Lundberg BJ: The frozen shoulder, Acta Orthop Scand 119(suppl):1, 1969.
- Lundberg BJ: Pathomechanics of the frozen shoulder and the effect of the brisement force. In Bayley J, Kessel L, eds: Shoulder surgery, Berlin, 1982, Springer-Verlag. MacDonald PB, Clark P, Sutherland K: An analysis of the diagnostic accuracy of the Hawkins and Neer subacromial impingement signs, J Shoulder Elbow Surg 9:299, 2000.
- Malcarney HL, Bonar F, Murrell GAC: Early infl ammatory reaction after rotator cuff repair with a porcine small intestine submucosal implant: a report of 4 cases, Am J Sports Med 33:907, 2005.
- Malkani AL, Sundine MJ, Tillett ED, et al: Transfer of the long head of the triceps tendon for irreparable rotator cuff tears, Clin Orthop Relat Res 428:228, 2004.
- Matava MJ, Purcell DB, Rudzki JR:
You Might Also Like