Posterior Glenoid Osteotomy & Capsular Shift Guide
Key Takeaway
Posterior shoulder instability with severe glenoid retroversion or anterior humeral head defects requires complex reconstruction. This guide details the capsular shift with posterior glenoid osteotomy and the McLaughlin procedure. It covers critical indications, step-by-step surgical techniques, biomechanical considerations, and postoperative rehabilitation protocols to optimize outcomes and minimize complications such as suprascapular nerve injury and glenohumeral osteonecrosis.
Introduction to Posterior Shoulder Instability
Posterior shoulder instability represents a complex and often underdiagnosed spectrum of glenohumeral pathology, accounting for approximately 2% to 10% of all shoulder instability presentations. Unlike anterior instability, which is frequently traumatic and associated with classic Bankart lesions, posterior instability often arises from repetitive microtrauma, structural osseous dysplasia (such as excessive glenoid retroversion), or significant traumatic events leading to posterior dislocations with concomitant anterior humeral head defects (reverse Hill-Sachs lesions).
The management of posterior instability requires a profound understanding of glenohumeral biomechanics, precise preoperative imaging (including three-dimensional computed tomography), and a versatile surgical armamentarium. This comprehensive guide details the advanced surgical techniques for addressing severe posterior instability, specifically focusing on the capsular shift reconstruction with posterior glenoid osteotomy, the principles of posterior capsulorrhaphy, and the McLaughlin procedure for engaging anteromedial humeral head defects.
Capsular Shift Reconstruction with Posterior Glenoid Osteotomy
Indications and Biomechanical Rationale
Posterior glenoplasty (glenoid osteotomy) is a technically demanding procedure that is rarely indicated as a first-line treatment. However, it remains a critical option in the surgeon's repertoire for specific, severe presentations. The primary indication is confirmed severe developmental or traumatic glenoid retroversion exceeding 20 degrees, as measured on axial CT reconstructed images. Normal glenoid version ranges from 2 degrees of anteversion to 8 degrees of retroversion; excessive retroversion fundamentally alters the joint's force vectors, predisposing the humeral head to posterior subluxation during flexion, adduction, and internal rotation.
Surgical Warning: High recurrence rates of up to 53% have been reported historically with isolated posterior glenoid osteotomies. Furthermore, Hawkins et al. reported a complication rate of 29%, which included catastrophic outcomes such as osteonecrosis of the glenoid and rapidly progressive degenerative arthritis of the glenohumeral joint. Due to these risks, contemporary practice often favors a simpler, meticulously executed glenoid osteotomy combined with a robust capsular shift for severe glenoid dysplasia, whether traumatic or congenital in origin.
Principles of Posterior Capsulorrhaphy (Tibone and Bradley)
Before detailing the osteotomy, it is essential to understand the foundational principles of posterior capsulorrhaphy, as soft-tissue balancing is paramount even when osseous correction is performed. The Tibone and Bradley technique illustrates the critical steps of capsular management.
Figure A: Development of the interval between the teres minor and infraspinous muscle to expose the underlying posterior capsule.

Figure B: A transverse capsular incision is made from lateral to medial, extending up to the posterior glenoid labrum.
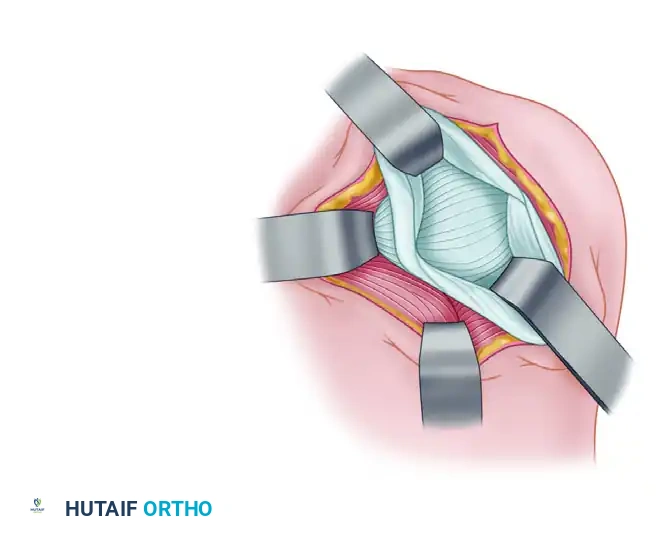
Figure C: A vertical capsular incision is created parallel to the glenoid labrum, creating distinct capsular flaps.
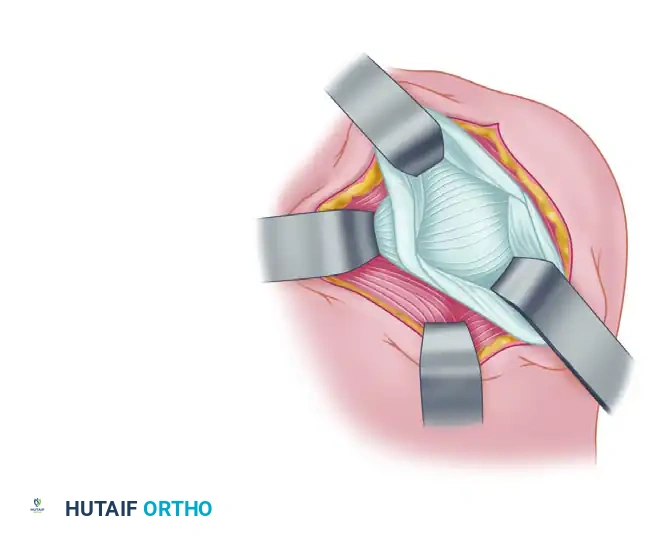
Figure D: Medial and superior advancement of the inferior capsular flap, securely attaching it to the labrum to eliminate inferior and posterior recess laxity.
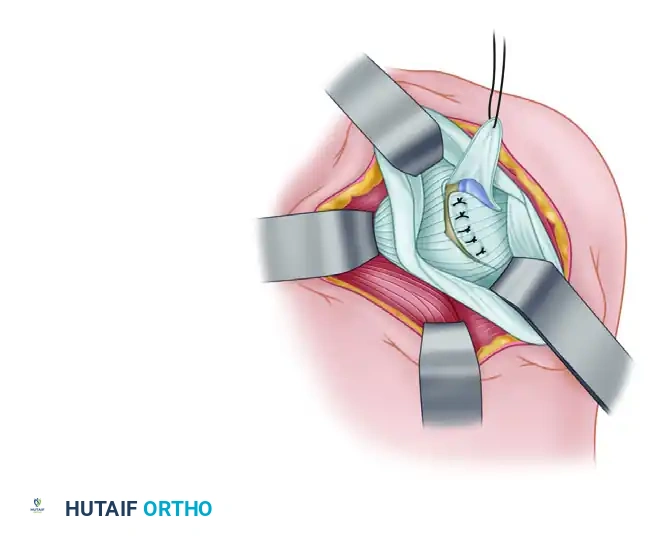
Figure E: The superior capsular flap is then sutured over the inferior flap in a "pants-over-vest" or double-breasted fashion to reinforce the posterior construct.
Surgical Technique: Posterior Glenoid Osteotomy (Rockwood and Neer)
The combined approach of a capsular shift with a posterior glenoid osteotomy addresses both the osseous retroversion and the redundant posterior capsule.
1. Patient Positioning and Anesthesia
- Administer general endotracheal anesthesia, often supplemented with an interscalene nerve block for postoperative pain control.
- Place the patient in the lateral decubitus position with the involved shoulder facing upward. Secure the patient with a beanbag and kidney rests.
- The operative arm is suspended using a sterile traction setup (e.g., STAR sleeve) in approximately 30 to 45 degrees of abduction and 15 degrees of forward flexion, with 10 to 15 pounds of traction to distract the glenohumeral joint.
2. Surgical Approach and Exposure
- Make a longitudinal skin incision beginning 2.5 cm medial to the posterolateral corner of the acromion, extending downward approximately 10 cm toward the posterior axillary crease.
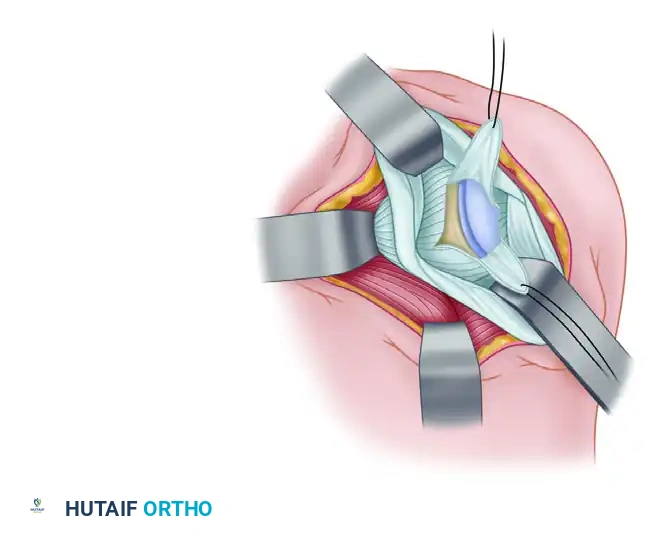
Figure: Initial skin incision mapping for the posterior approach.
- Dissect and retract the subcutaneous tissues to expose the underlying deltoid fascia.
- At a point 2.5 cm medial to the posterior corner of the acromion, split the deltoid distally 10 cm in line with its muscular fibers.
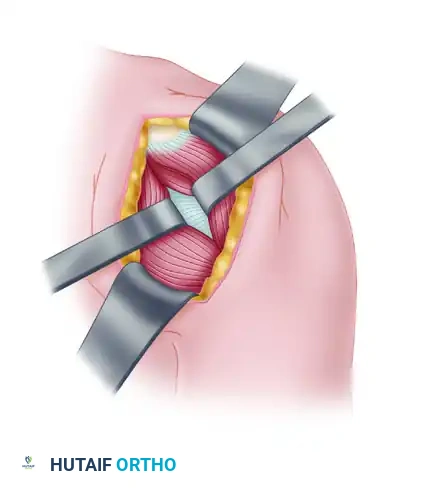
Figure: Splitting of the deltoid in line with its fibers.
Clinical Pearl: When splitting the deltoid, be acutely aware of the axillary nerve, which courses transversely across the deep surface of the deltoid approximately 5 to 7 cm distal to the acromial edge. Do not extend the split blindly; palpate the nerve and protect it with a blunt retractor.
- Retract the split deltoid medially and laterally to expose the underlying rotator cuff musculature, specifically the infraspinatus and teres minor.
- Identify the interval between the infraspinatus and teres minor. Reflect the teres minor tendon inferiorly down to the level of the inferior joint capsule. Divide the infraspinatus tendon and reflect it medially and laterally.
Surgical Warning: During medial retraction of the infraspinatus, exercise extreme caution to avoid traction injury or direct transection of the suprascapular nerve as it courses through the spinoglenoid notch to innervate the infraspinatus.
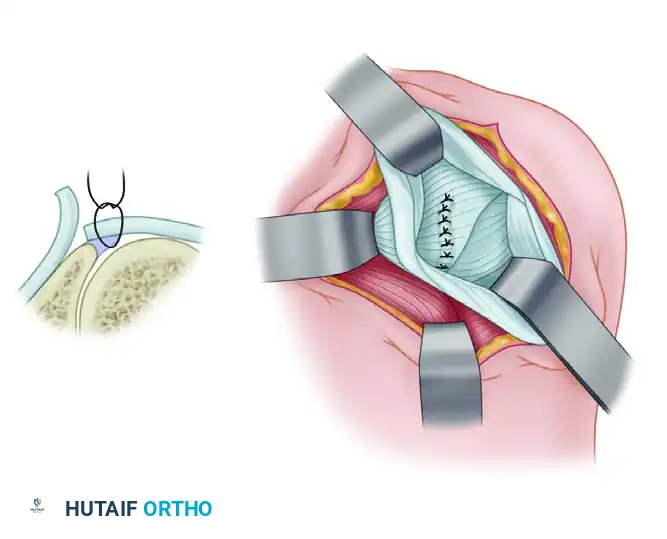
3. Capsulotomy and Joint Exploration
- Make a vertical incision in the posterior capsule to explore the glenohumeral joint.
- Crucially, make this incision exactly midway between the humeral and glenoid attachments. This central placement ensures adequate tissue on both sides so that a robust double-breasted closure can be performed later.
Figure: Capsular incision midway between humeral and glenoid attachments.
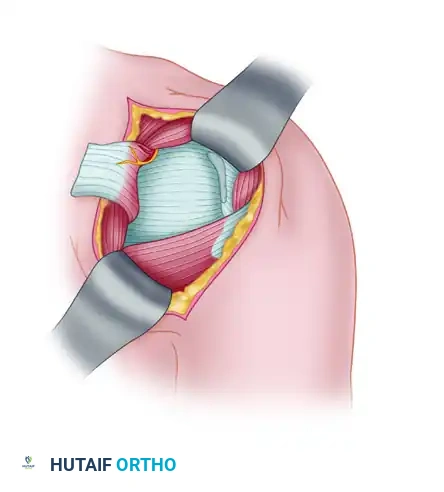
Figure: Deep exposure of the posterior capsule following infraspinatus reflection.
- Ensure the teres minor muscle is reflected sufficiently inferiorly so that the vertical cut in the capsule extends all the way down to the most inferior recess of the capsule, allowing for a true inferior capsular shift.
4. The Glenoid Osteotomy
- Pass a straight, blunt instrument (such as a periosteal elevator or a specialized retractor) into the glenohumeral joint so that it rests flat across the anterior and posterior glenoid rims. This instrument serves as a physical guide for the articular surface angle.
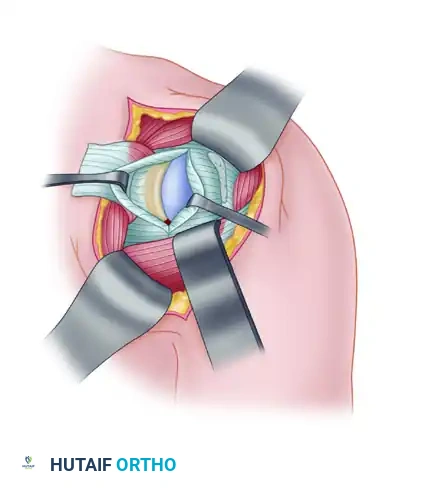
Figure: Determination of the angle of the slope of the glenoid using a blunt intracapsular instrument.
- Place a sharp, broad osteotome intracapsularly, directing it strictly parallel to the blunt instrument. This parallel trajectory is vital to lessen the chance of the osteotomy cut inadvertently entering the articular joint space, which would create a devastating intra-articular fracture.
- The Osteotomy Site: The cut must be initiated no more than 0.6 cm (6 mm) medial to the articular surface of the posterior glenoid.
Pitfall: If the osteotomy site is placed further medially than 0.6 cm, there is a high probability of transecting the suprascapular nerve as it wraps around the base of the scapular spine.
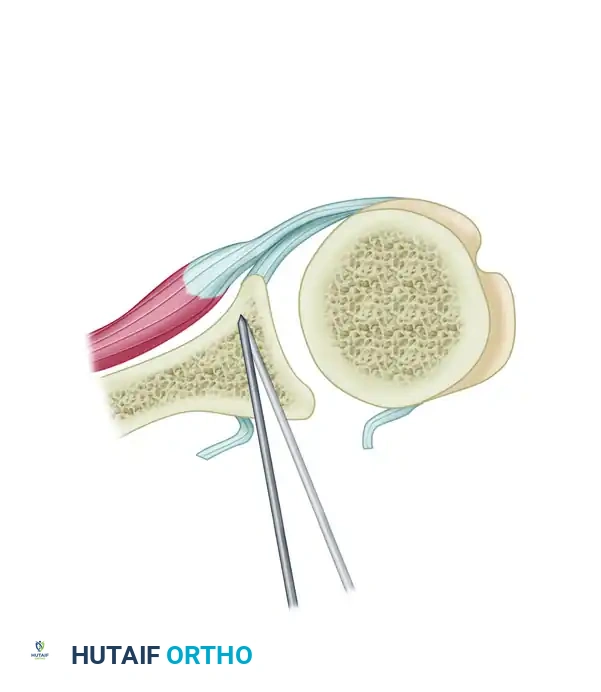
Figure: Execution of the posterior glenoid osteotomy.
- Advance the osteotome carefully. With each advancement, gently pry open the osteotomy site. This controlled prying creates a lateral plastic deformation of the posterior glenoid vault.
- The Hinge: The osteotomy incision must not exit anteriorly. It should stop just short of the anterior cortex of the scapular neck. The intact anterior cortex, along with its periosteum and anterior soft tissues, acts as a vital tension-band hinge. This hinge allows the bone graft to be securely press-fit into the osteotomy gap without the absolute need for internal hardware fixation.
5. Bone Grafting and Capsular Reconstruction
- Harvest a tricortical bone graft, approximately 8 mm × 30 mm, from the posterior acromion or iliac crest (depending on surgeon preference and required graft volume).
- Use osteotomes to gently pry open the osteotomy site to the desired correction angle, and impact the bone graft into position.

Figure: Tricortical bone graft impacted securely in place, correcting the retroversion.
- Begin the capsular shift. Place heavy, nonabsorbable sutures (e.g., #2 FiberWire) into the edge of the medial capsular flap.
- Hold the patient's arm in neutral rotation. Suture the medial capsule laterally and superiorly, advancing it under the lateral capsular flap.
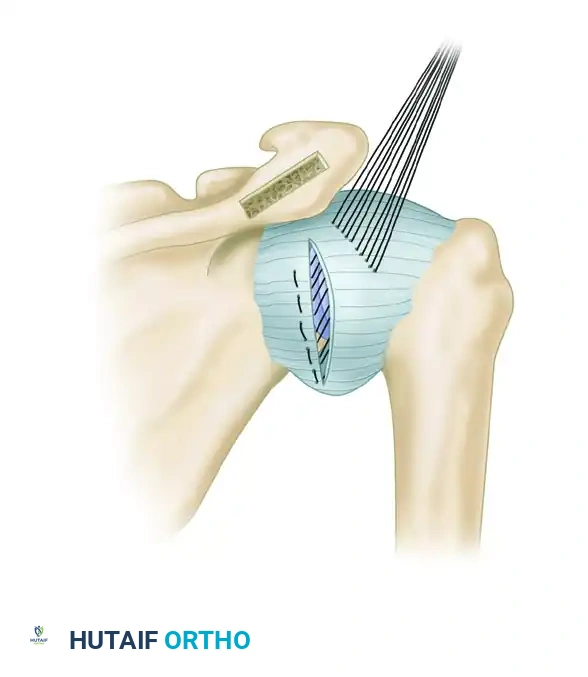
Figure: Suturing of the medial capsule laterally and superiorly.
- Next, suture the lateral capsule medially and superiorly over the medial capsule, completing the double-breasted (pants-over-vest) repair. This eliminates posterior redundancy and reinforces the posterior wall.
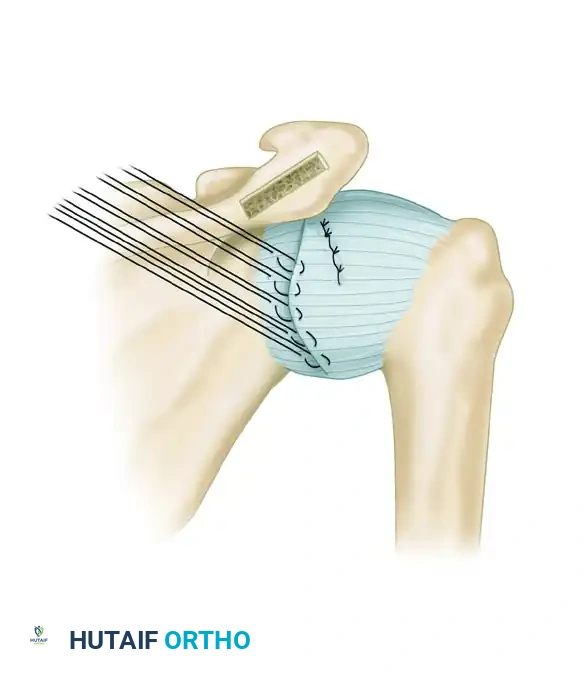
Figure: Suturing of the lateral capsule over the medial capsule.
- Repair the infraspinatus tendon with the arm maintained in neutral rotation. If the tendon appears lax after the underlying osseous correction, double-breast the tendon repair to restore appropriate resting tension.
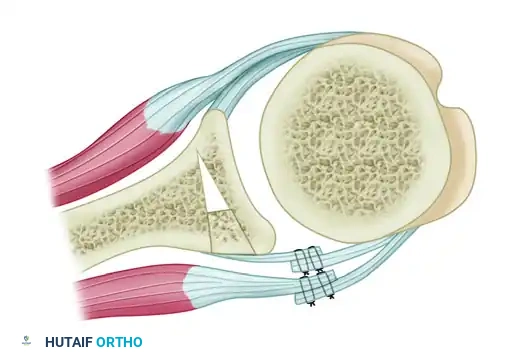
Figure: Suture of the infraspinatus tendon, utilizing a double-breasted technique to reduce laxity.
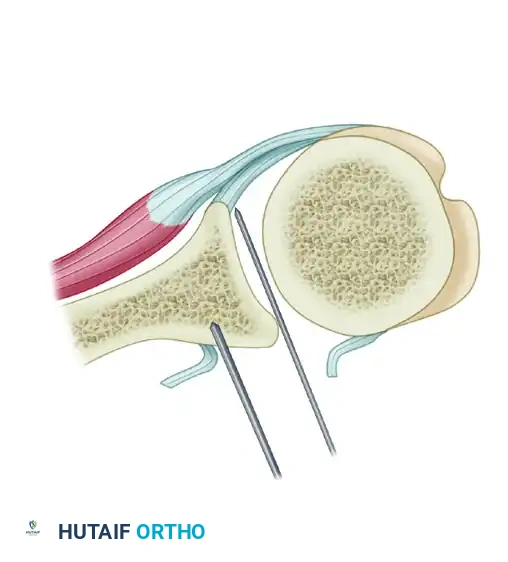
Figure: Cross-sectional overview of the completed posterior reconstruction.
- Close the deltoid fascia, subcutaneous tissues, and skin in a standard layered fashion.
Postoperative Care Protocol
- Phase I (0-6 Weeks): The shoulder is strictly immobilized with the arm at the side in slight abduction (10-15 degrees) and neutral rotation for 6 weeks. A custom plastic orthosis (gunslinger brace) is utilized to maintain this position, support the weight of the arm, and prevent any inferior or posterior stress on the capsular repair and osteotomy site.
- Phase II (6-12 Weeks): At 6 weeks, the brace is discontinued. Range-of-motion (ROM) exercises are initiated, focusing on elevation in the scapular plane and gentle external rotation. Isometric strengthening begins.
- Restrictions: Elevation greater than 150 degrees and any internal rotation exercises (which stretch the posterior repair) are strictly avoided for the first 3 months.
- Phase III (3-9 Months): Progressive strengthening is introduced. Return to heavy labor or sports activities, particularly swimming, throwing, or contact sports, is strictly prohibited for 9 months to 1 year postoperatively to ensure complete osseous union and ligamentous maturation.
Management of Surgical Failures in Posterior Instability
Despite meticulous technique, posterior stabilization procedures can fail. A thorough physical examination and three-dimensional CT imaging are mandatory to evaluate for unrecognized or progressive bony defects.
Causes of Failure in Surgical Repair (Box 47-2)
- Inadequate soft tissue healing: Poor tissue quality or non-compliance with postoperative bracing.
- Ligamentous laxity: Underlying connective tissue disorders (e.g., Ehlers-Danlos, Marfan syndrome).
- Deficient capsule: Iatrogenic loss or severe attritional wear.
- Deficient subscapularis: Leading to anterior escape or unbalanced force couples.
- Deficient glenoid: Unrecognized severe retroversion or posterior bone loss >20%.
- Engaging Hill-Sachs lesion: Anteromedial humeral head defects that lever the joint out posteriorly.
- Overconstrained joint: Excessive tightening leading to obligate translation in the opposite direction.
- Nerve dysfunction: Axillary or suprascapular nerve palsy altering dynamic muscle stabilization.
Revision Strategies
Significant glenoid bone loss is a primary driver of failure. In revision scenarios, a posterior Latarjet procedure (using distal tibia or iliac crest), structural bone grafts, or arthroscopic remplissage procedures are indicated. Capsular deficiencies can be managed with soft tissue allograft supplementation (Achilles or posterior tibial tendon). Subscapularis deficiency requires a pectoralis major transfer. Excessive stiffness from over-tensioning generally requires precision arthroscopic capsular release.
The McLaughlin Procedure for Posterior Dislocation
Posterior shoulder dislocations are notorious for causing an impaction fracture on the anteromedial aspect of the humeral head (the reverse Hill-Sachs lesion) as it engages the posterior glenoid rim. When this defect is large (typically 20% to 40% of the articular surface), it causes recurrent instability and requires surgical filling. The McLaughlin procedure, and its modification by Neer and Foster, are the gold standards for this pathology.
Surgical Technique: McLaughlin and Neer-Foster Modification
1. Approach and Exposure
- Place the patient in the beach-chair position.
- Approach the shoulder anteriorly through a standard deltopectoral interval.
- Identify and retract the cephalic vein laterally with the deltoid. Retract the conjoined tendon medially to expose the underlying subscapularis tendon.
2. Management of the Subscapularis
- Classic McLaughlin Technique: Divide the subscapularis tendon transversely as close to its insertion on the lesser tuberosity as possible.
- Neer and Foster Modification: Instead of dividing the tendon, osteotomize the lesser tuberosity along with the intact insertion of the subscapularis tendon. The inclusion of this bone fragment provides a robust, bone-to-bone healing interface when transferred into the humeral defect, which is biomechanically superior to tendon-to-bone healing.
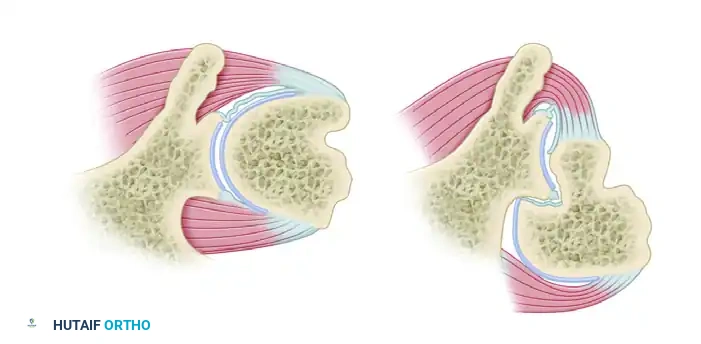
Figure A: Cross section of the left shoulder viewed from above, demonstrating normal anatomy.
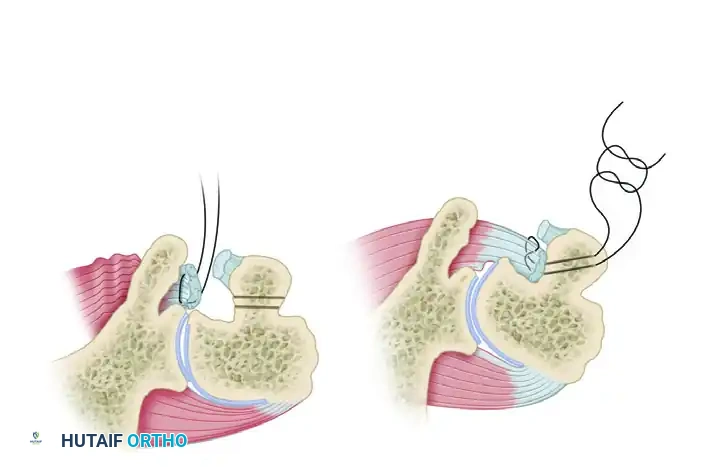
Figure B: Deformity in posterior dislocation showing engagement of the posterior glenoid rim within the anteromedial humeral head defect (Reverse Hill-Sachs).
3. Defect Preparation and Transfer
- Internally rotate the arm to expose the anteromedial humeral head defect.
- Thoroughly débride the base and margins of the defect using a curette or motorized burr to expose bleeding cancellous bone, ensuring an optimal healing bed.
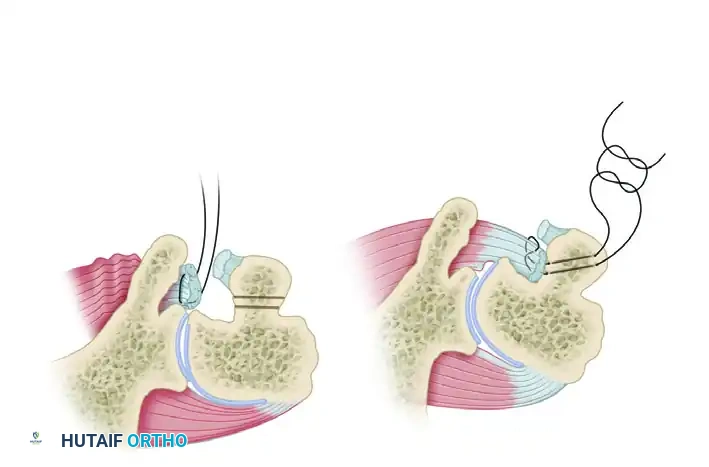
Figure C & D: (C) The dislocation is reduced, but instability remains with internal rotation. (D) Stabilization is achieved by medial transposition of the subscapularis insertion directly into the defect.
- Fixation (McLaughlin): Reattach the subscapularis tendon into the depths of the defect using heavy nonabsorbable mattress sutures passed through transosseous drill holes in the humerus, or via modern suture anchors.
- Fixation (Neer-Foster): Transfer the osteotomized lesser tuberosity (with the attached subscapularis) into the defect. Secure the bone fragment rigidly using one or two partially threaded cancellous bone screws with washers.
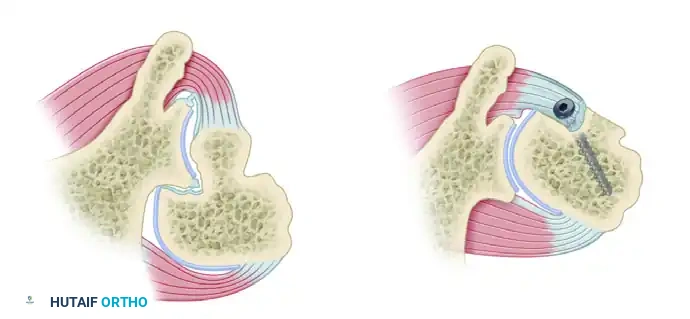
Figure: Neer and Foster modification of the McLaughlin technique. The lesser tuberosity, with the attached subscapularis tendon, is transferred into the defect and rigidly fixed with a bone screw.
Postoperative Care (McLaughlin Procedure)
- Immediate Post-op: For the first 24 hours, the arm is maintained in a
You Might Also Like