Intramedullary Nailing of Proximal Humeral Fractures
Key Takeaway
Intramedullary nailing of proximal humeral fractures offers a biomechanically advantageous, minimally invasive alternative to plating. This comprehensive guide details the surgical technique, emphasizing precise patient positioning, meticulous rotator cuff management, and axillary nerve protection. By achieving stable fixation with minimal soft tissue disruption, surgeons can facilitate early active-assisted rehabilitation, optimizing functional outcomes for complex two- and three-part proximal humerus fractures.
Introduction to Proximal Humeral Nailing
Proximal humeral fractures account for approximately 4% to 5% of all fractures, with an increasing incidence in the aging, osteoporotic population. While nonoperative management remains the standard of care for minimally displaced fractures, surgical intervention is indicated for displaced, unstable, or highly comminuted fracture patterns.
Historically, open reduction and internal fixation (ORIF) with locking plates has been the workhorse for these injuries. However, intramedullary nailing has emerged as a highly effective, minimally invasive alternative, particularly for two-part surgical neck fractures and select three-part fractures. Intramedullary devices act as load-sharing implants, offering distinct biomechanical advantages over laterally based load-bearing plates. By residing within the central mechanical axis of the humerus, intramedullary nails significantly reduce bending moments, thereby minimizing the risk of varus collapse—a common mode of failure in proximal humeral fixation.
This comprehensive guide details the advanced surgical technique for intramedullary nailing of proximal humeral fractures, emphasizing meticulous patient positioning, precise entry point selection, rotator cuff preservation, and axillary nerve protection.
Surgical Anatomy and Biomechanics
A profound understanding of the local anatomy is paramount to executing this procedure safely and effectively.
The Axillary Nerve
The axillary nerve is the most critical neurovascular structure at risk during the anterolateral approach and proximal locking. It originates from the posterior cord of the brachial plexus, passes through the quadrangular space, and courses circumferentially around the surgical neck of the humerus from posterior to anterior.
* Anatomical Landmark: The nerve typically lies 5 to 7 cm distal to the lateral edge of the acromion.
* Surgical Implication: Deltoid splitting must never extend beyond 5 cm distal to the acromion to prevent iatrogenic denervation of the anterior deltoid.
The Rotator Cuff Footprint
The entry point for a straight proximal humeral nail is typically located at the apex of the humeral head, slightly medial to the greater tuberosity and posterior to the bicipital groove. This trajectory necessitates an incision through the supraspinatus tendon. Meticulous repair of this iatrogenic defect is critical; failure to do so is a primary cause of postoperative shoulder pain and dysfunction following intramedullary nailing.
Biomechanical Pearl: Intramedullary nails provide superior biomechanical stability in bending and torsion compared to lateral locking plates, particularly in the presence of medial calcar comminution. The central placement of the nail resists the deforming forces of the pectoralis major (which pulls the shaft medially) and the rotator cuff (which abducts and externally rotates the proximal fragment).
Indications and Contraindications
Indications
- Displaced two-part surgical neck fractures.
- Select three-part fractures (surgical neck combined with a greater tuberosity fracture).
- Pathologic fractures or impending pathologic fractures of the proximal humerus.
- Osteoporotic fractures where lateral plating may fail due to poor screw purchase.
Contraindications
- Absolute: Active local or systemic infection, head-splitting fractures, severe four-part fractures with a high risk of avascular necrosis (AVN) where arthroplasty is indicated.
- Relative: Pre-existing severe rotator cuff arthropathy, extremely narrow medullary canals, or significant deformity of the humeral shaft precluding nail passage.
Preoperative Planning and Imaging
Standard preoperative imaging must include a true anteroposterior (Grashey) view, a scapular Y view, and an axillary lateral view. A CT scan with 3D reconstruction is highly recommended for complex fracture patterns to assess articular involvement, tuberosity comminution, and the exact location of the fracture lines relative to the planned entry point.
Templating should be performed to determine the estimated nail diameter and length, as well as to anticipate the need for specific reduction adjuncts (e.g., heavy non-absorbable sutures, reduction forceps, or joystick pins).
Patient Positioning and Fluoroscopy Setup
Optimal patient positioning and unhindered fluoroscopic access are the cornerstones of a successful intramedullary nailing procedure.
Position the patient on a radiolucent table. The thorax should be “bumped” or elevated 30 to 40 degrees into a semi-beach chair position. This allows the arm to hang freely, utilizing gravity to assist with longitudinal traction and fracture reduction. Ensure the head and neck are secured in a neutral position to avoid brachial plexus traction injuries.
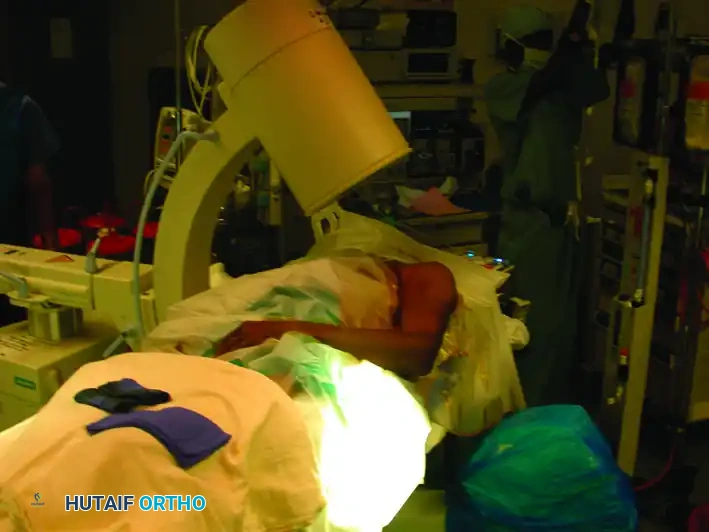
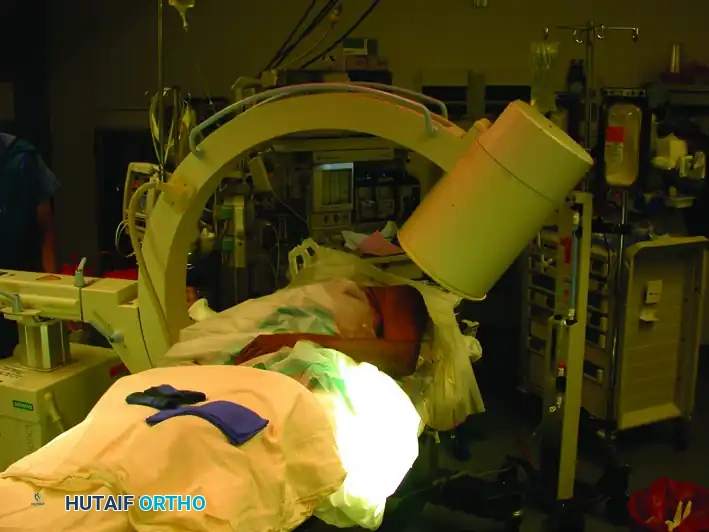
C-Arm Positioning
Place the image intensifier (C-arm) unit on the opposite side of the table from the surgeon. The monitor should be placed at the foot of the bed or across from the surgeon for direct line-of-sight.
The mobility of the C-arm is critical for obtaining orthogonal views without moving the patient's injured extremity:
* Anteroposterior (AP) View: Rolling the C-arm unit back away from the patient allows an adequate AP view of the shoulder and humerus.
* Lateral View: Rolling the unit forward over the patient allows an adequate lateral (scapular Y) view.
Image demonstrating the C-arm rolled back to obtain the Anteroposterior (AP) view.
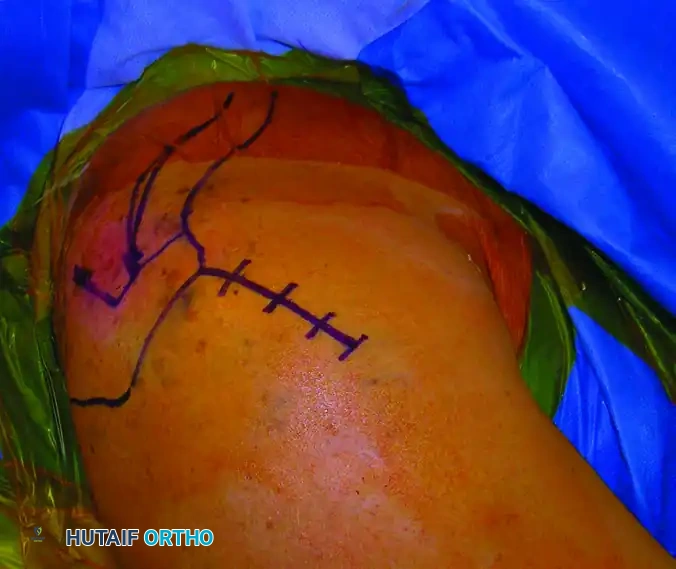
Image demonstrating the C-arm rolled forward to obtain the Lateral view of the shoulder and humerus.
Composite view: Placement of the image intensifier for intramedullary nailing. Rolling the unit back allows the AP view, whereas rolling it forward allows the lateral view.
Surgical Approach
Incision and Deltoid Split
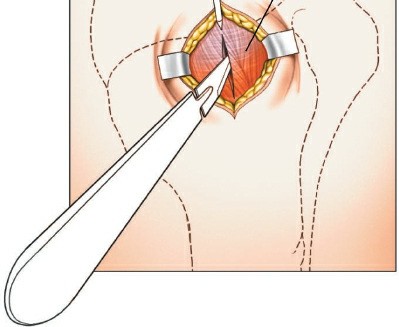
Make a longitudinal or slightly diagonal incision starting from the anterolateral corner of the acromion and extending distally for approximately 3 to 5 cm.
Preoperative skin marking outlining the anterolateral acromial approach.
Proceed with sharp dissection through the subcutaneous tissue to identify the deltoid fascia. Split the deltoid muscle in line with its fibers, specifically targeting the raphe between the anterior and middle thirds of the deltoid.
Surgical Warning: To protect the axillary nerve, strictly avoid splitting the deltoid more than 5 cm distal to the lateral edge of the acromion. If distal extension is required, a stay suture should be placed at the inferior apex of the split to prevent inadvertent propagation of the dissection into the nerve.
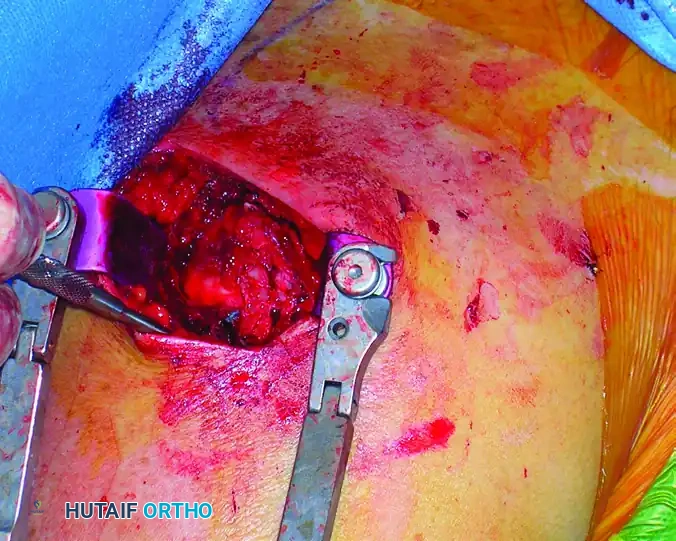
Rotator Cuff Management
Once the subdeltoid bursa is excised, the rotator cuff footprint is visualized. Under direct observation, incise the supraspinatus tendon in line with its fibers (longitudinally) to access the articular surface of the humeral head.
Place heavy, full-thickness non-absorbable stay sutures (e.g., #2 FiberWire or similar) into the anterior and posterior leaflets of the incised rotator cuff. These sutures serve a dual purpose: they act as retractors to expose the entry point and, crucially, they protect the cuff tissue from being macerated by the reamers during canal preparation.
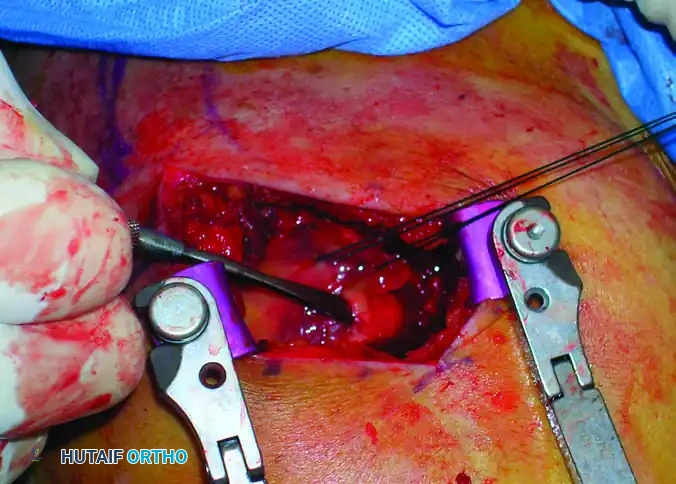
Intraoperative view showing the deltoid split and the rotator cuff incised and retracted, exposing the proximal humerus.
Fracture Reduction Techniques
Achieving an anatomic or near-anatomic reduction prior to reaming and nail insertion is mandatory. The nail will not reduce the fracture; rather, it will lock the humerus in whatever position it is reamed.
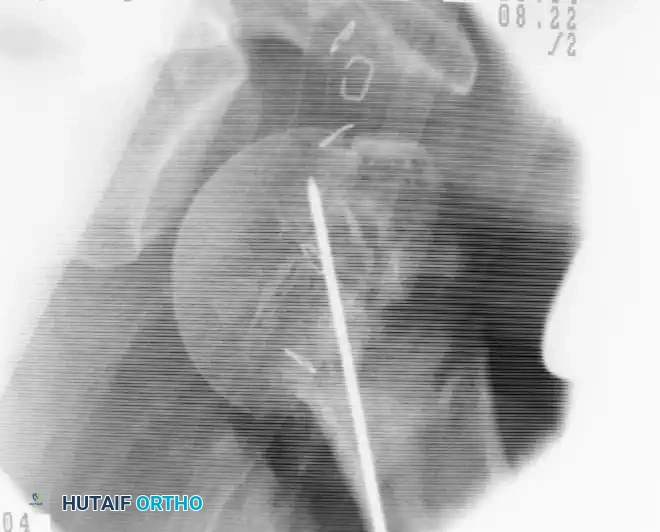
The "Joystick" Technique
Proximal humeral fractures often present with the humeral head fragment extended and externally rotated due to the pull of the intact posterior rotator cuff.
1. Insert a 2.5 mm or 3.0 mm threaded Schanz pin or Steinmann pin percutaneously into the posterior aspect of the humeral head.
2. Use this pin as a "joystick" to derotate the head internally and flex it into a reduced position matching the humeral shaft.
3. Longitudinal traction applied to the arm by an assistant will help restore length and correct varus/valgus angulation.
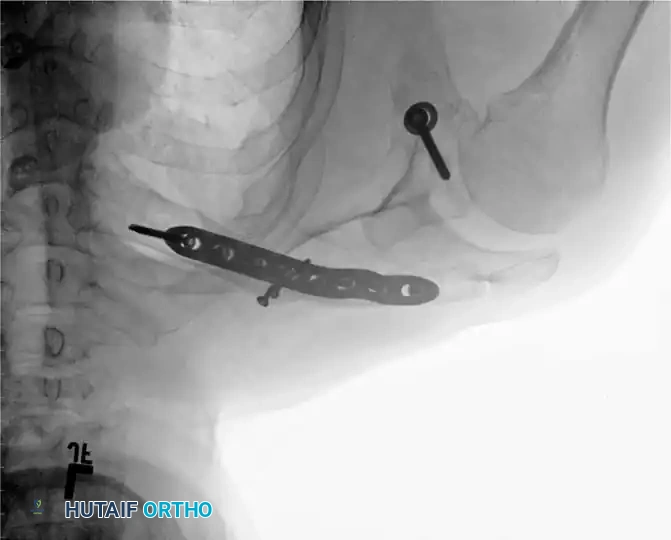
Fluoroscopic AP view demonstrating the use of a threaded pin as a joystick in the humeral head to achieve and maintain reduction.
Step-by-Step Intramedullary Nailing
1. Guidewire Placement and Entry Point
The entry point is the most critical step of the operation. An eccentric entry point will lead to malalignment (typically varus) upon nail insertion.
* Identify the bicipital groove. The entry point should be posterior to the biceps tendon.
* Position the starting awl or initial guidewire at the apex of the humeral head, just medial to the greater tuberosity footprint.
* Advance the guidewire under orthogonal fluoroscopic guidance down the center of the humeral shaft.
Fluoroscopic lateral view confirming the central placement of the guidewire within the humeral canal.
2. Reaming the Humeral Canal
- Pass the proximal opening reamer over the guidewire. Carefully advance the proximal reamer while an assistant maintains tension on the rotator cuff stay sutures, pulling the tendon leaflets away from the spinning reamer flutes.
- Once the proximal segment is opened, pass a bead-tipped guidewire down to the distal metaphysis.
- Use sequentially larger flexible reamers to prepare the diaphysis. Ream the humerus to the predetermined diameter, usually 1.0 to 1.5 mm larger than the selected nail diameter, to prevent cortical blowout or iatrogenic fracture during insertion.
3. Nail Insertion
- Attach the selected intramedullary nail to the radiolucent targeting outrigger device.
- Pass the nail down the humeral canal over the guidewire. Insert the nail manually with gentle twisting motions; avoid heavy mallet strikes to prevent iatrogenic comminution.
- Crucial Step: Ensure that the proximal tip of the nail is countersunk at least 2 to 4 mm below the articular surface of the humeral head. A proud nail will impinge on the acromion, leading to severe postoperative pain and restricted range of motion.
- Monitor the fracture site fluoroscopically during insertion to ensure the fracture is not distracted. If distraction occurs, back the nail out slightly, compress the fracture manually, and re-advance.
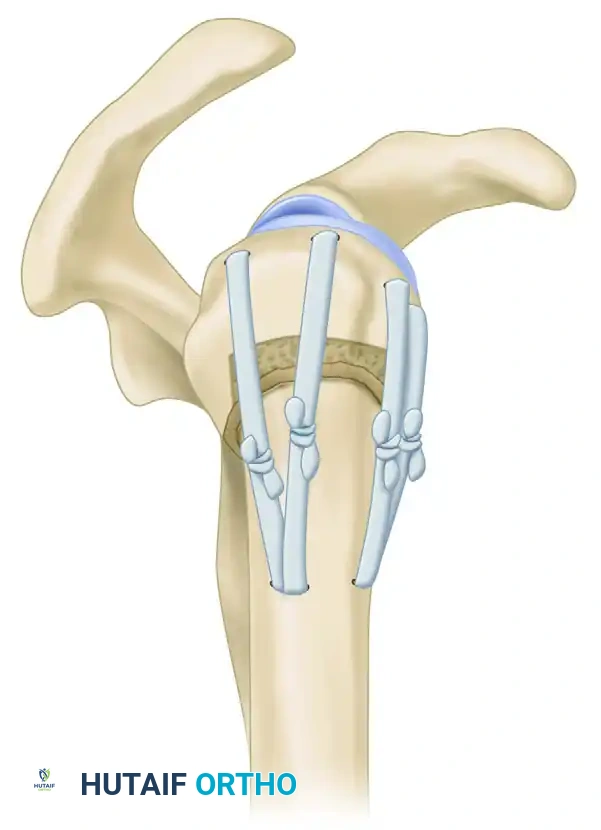
4. Proximal and Distal Locking
- Proximal Locking: Utilize the outrigger device to insert the proximal locking bolts. These bolts often target the humeral head and the lesser/greater tuberosities.
- Soft Tissue Protection: When making stab incisions for the proximal locking screws, carefully spread the soft tissues bluntly down to the bone using a hemostat. This blunt dissection is vital to avoid injury to the axillary nerve, which crosses the lateral humerus in this vicinity.
- Distal Locking: Depending on the nail design, distal locking is performed either via a targeting jig or a freehand perfect-circle fluoroscopic technique. Ensure the anterior structures (biceps, musculocutaneous nerve) are protected during anterior-to-posterior distal locking.
Rotator Cuff Repair and Closure
Once the nail is securely locked and final fluoroscopic images confirm satisfactory reduction, hardware placement, and appropriate screw lengths (ensuring no screws penetrate the articular surface into the glenohumeral joint), the outrigger is removed.
The integrity of the rotator cuff must be restored to ensure optimal functional recovery.
* Irrigate the subacromial space thoroughly to remove bone debris generated during reaming, which can cause heterotopic ossification.
* Repair the longitudinal split in the supraspinatus tendon using the previously placed heavy non-absorbable sutures. Use a robust, full-thickness figure-of-eight or Mason-Allen suturing technique under direct observation.
Intraoperative view demonstrating the meticulous repair of the rotator cuff with full-thickness sutures following nail insertion.
Close the deltoid fascia loosely, followed by standard closure of the subcutaneous tissues and skin.
Postoperative Rehabilitation Protocol
Successful outcomes following intramedullary nailing of the proximal humerus rely heavily on a structured, phased rehabilitation program.
Phase I: Immediate Postoperative (Weeks 0-4)
- The patient is placed in a standard shoulder sling for comfort.
- Early rehabilitation is initiated within the first 3 to 5 days postoperatively.
- Focus on active range of motion (ROM) of the elbow, wrist, and hand to prevent distal stiffness.
- Begin gentle, active-assisted range-of-motion exercises for the shoulder (e.g., pendulum exercises, supine forward elevation using the contralateral arm).
- Strictly avoid active shoulder abduction and external rotation to protect the rotator cuff repair and tuberosity fixation.
Phase II: Intermediate (Weeks 4-8)
- Wean out of the sling as clinical and radiographic evidence of early callus formation appears.
- Progress to active range of motion in all planes.
- Initiate gentle isometric strengthening of the deltoid and rotator cuff.
Phase III: Advanced Strengthening (Weeks 8-12+)
- Once radiographic union is confirmed, progress to isotonic strengthening and resistance exercises.
- Focus on scapulothoracic mechanics and restoring full functional overhead reach.
- Maximum medical improvement is typically achieved between 6 to 12 months postoperatively.
Complications and Pitfalls
While intramedullary nailing is highly effective, surgeons must be vigilant regarding potential complications:
1. Shoulder Pain and Impingement: The most common complication, usually resulting from a proud nail, inadequate rotator cuff repair, or superior migration of the greater tuberosity.
2. Axillary Nerve Injury: Can occur during the deltoid split or proximal locking. Adherence to safe zones and blunt dissection is mandatory.
3. Varus Malunion: Often caused by an entry point that is too lateral. Ensure the starting point is at the absolute apex of the humeral head.
4. Iatrogenic Fracture: Can occur during reaming or nail insertion in osteoporotic bone. Always over-ream by 1.0 to 1.5 mm and avoid forceful impaction.
By adhering to strict biomechanical principles, respecting the soft tissue envelope, and executing precise surgical techniques, orthopedic surgeons can leverage intramedullary nailing to achieve excellent, reproducible outcomes in the management of complex proximal humeral fractures.
📚 Medical References
- intramedullary nailing for ankle arthrodesis, Foot Ankle 16:443, 1995.
- Moran CG, Pinder IM, Smith SR: Ankle arthrodesis in rheumatoid arthritis: 30 cases followed for 5 years, Acta Orthop Scand 62:538, 1991.
- Morrey BF, Wiedeman GP Jr: Complications and long-term results of ankle arthrodesis following trauma, J Bone Joint Surg 62A:777, 1980.
- Morris HD, Hand WW, Dunn AW: The modifi ed Blair fusion for fractures of the talus, J Bone Joint Surg 53A:1289, 1971.
- Myerson MS, Allon SM: Arthroscopic ankle arthrodesis, Contemp Orthop 19:21, 1989.
- Myerson MS, Quill G: Ankle arthrodesis: a comparison of an arthroscopic and an open method of treatment, Clin Orthop Relat Res 268:84, 1991.
- O’Brien TS, Hart TS, Shereff MJ, et al: Open versus arthroscopic ankle arthrodesis: a comparative study, Foot Ankle Int 20:368, 1999.
- Ogilvie-Harris DJ, Fitsialos D, Hedman TP: Arthrodesis of the ankle: a comparison of two versus three screw fi xation in a crossed confi guration, Clin Orthop Relat Res 304:195, 1994.
- Ogilvie-Harris DJ, Lieberman I, Fitsialos D: Arthroscopically assisted arthrodesis for osteoarthritis ankles, J Bone Joint Surg 75A:1167, 1993.
- Ottolenghi CE, Animoso J, Burgo PH: Percutaneous arthrodesis of the ankle joint, Clin Orthop Relat Res 68:72, 1970.
- Ouzounian TJ: Ankle arthrodesis, Tech Orthop 11:255, 1996.
- Paremain GP, Miller SD, Myerson MS: Ankle arthrodesis: results after miniarthrotomy technique, Foot Ankle 17:247, 1996.
- Pochatko DJ, Smith JW, Phillips RA, et al: Anatomic structures at risk: combined subtalar and ankle arthrodesis with a retrograde intramedullary rod, Foot Ankle 16:542, 1995.
- Pridie KH: Arthrodesis of the ankle, J Bone Joint Surg 35B:152, 1953.
- Quill GE Jr: Tibiotalocalcaneal arthrodesis, Tech Orthop 11:269, 1996.
- Rowan R, Davey KJ: Ankle arthrodesis using an anterior AO T plate, J Bone Joint Surg 81B:113, 1999.
- Russotti GM, Johnson KA, Cass JR: Tibiotalocalcaneal arthrodesis for arthritis and deformity of the hind part of the foot, J Bone Joint Surg 70A:1304, 1988.
- Schaap EJ, Huy J, Tonino AJ: Long-term results of arthrodesis of the ankle, Int Orthop 14:9, 1990.
- Schneider JM, Bono JV, Jacobs RL: Ankle arthrodesis: technique tips, J Orthop Tech 2:5, 1994.
- Scranton PE Jr: Use of internal compression in arthrodesis of the ankle, J Bone Joint Surg 67A:550, 1985.
- Scranton PE Jr: An overview of ankle arthrodesis, Clin Orthop Relat Res 268:96, 1991.
- Smith EJ, Wood PL: Ankle arthrodesis in the rheumatoid patient, Foot Ankle 10:252, 1990.
- Sonnabend DH, Duckworth D: A new technique of ankle arthrodesis, Aust N Z J Surg 62:965, 1992.
- Sowa DT, Krackow KA: Ankle fusion: a new technique of internal fi xation using a compression blade plate, Foot Ankle 9:232, 1989.
- Stauffer RN: Salvage of painful total ankle arthroplasty, Clin Orthop Relat Res 170:184, 1982.
- Stephenson KA, Kile TA, Graves SC: Estimating the insertion site during retrograde intramedullary tibiotalocalcaneal arthrodesis, Foot Ankle 17:781, 1996.
- Stewart MJ, Beeler TC, McConnell JC: Compression arthrodesis of the ankle: evaluation of a cosmetic modifi cation, J Bone Joint Surg 65A:219, 1983.
- Stewart MJ, Harley SJ: Personal communication, 1978.
- Stone KH, Helal B: A method of ankle stabilization, Clin Orthop Relat Res 268:102, 1991.
- Stranks GJ, Cecil T, Jeffrey IT: Anterior ankle arthrodesis with cross-screw fi xation: a dowel graft method used in 20 cases, J Bone Joint Surg 76B:943, 1994.
- Stuart MJ, Morrey BF: Arthrodesis of the diabetic neuropathic ankle joint, Clin Orthop Relat Res 253:209, 1990.
- Swärd L, Hughes JS, Howell CJ, et al: Posterior internal compression arthrodesis of the ankle, J Bone Joint Surg 74B:752, 1992.
- Thordarson DB, Markolf K, Cracchiolo A III: Stability of an ankle arthrodesis fi xed by cancellous bone screws compared to that fi xed by an external fi xator: a biomechanical study, J Bone Joint Surg 74A:1050, 1992.
- Thordarson DB, Markolf KL, Cracchiolo A III: External fi xation in arthrodesis of the ankle: a biomechanical study comparing a unilateral frame with a modifi ed transfi xion frame, J Bone Joint Surg 76A:1541, 1994.
- Turan I, Wredmark T, Fellander-Tsai L: Arthroscopic ankle arthrodesis in rheumatoid arthritis, Clin Orthop Relat Res 320:110, 1995.
- Wang GJ, Shen WJ, McLaughlin RE, et al: Transfi bular compression arthrodesis of the ankle joint, Clin Orthop Relat Res 289:223, 1993.
- Weltmer JB Jr, Choi SH, Shenoy A, et al: Wolf blade plate ankle arthrodesis, Clin Orthop Relat Res 268:107, 1991.
- Whitman A: Astragalectomy and backward displacement of the foot: an investigation of its practical results, J Bone Joint Surg 4:266, 1922.
- Williams JE Jr, Marcinko DE, Lazerson A, et al: The Calandruccio triangular compression device: a schematic introduction, J Am Podiatr Assoc 10:536, 1983.
- Knee Bigliani LU, Rosenwasser MP, Caulo N, et al: The use of pulsing electromagnetic fi elds to achieve arthrodesis of the knee following failed
You Might Also Like