Surgical Management of Peroneal Tendon Subluxation: Retinaculum Repair and Fibular Groove Deepening
Key Takeaway
Recurrent peroneal tendon subluxation often requires surgical intervention to restore the superior peroneal retinaculum (SPR) and deepen the fibular retromalleolar groove. This comprehensive surgical guide details the anatomical repair of the SPR and the Zoellner and Clancy osteoperiosteal flap technique for groove deepening. Emphasizing precise tissue handling, biomechanical restoration, and structured postoperative rehabilitation, these procedures ensure optimal tendon stability and a safe return to high-demand athletic activities.
Introduction to Peroneal Tendon Instability
Peroneal tendon subluxation and dislocation represent a significant source of lateral ankle pain and dysfunction, particularly in the athletic population. The primary restraint to anterior displacement of the peroneus longus and brevis tendons is the Superior Peroneal Retinaculum (SPR), a fibrous band extending from the posterolateral fibula to the lateral calcaneus. Secondary stabilization is provided by the morphology of the retromalleolar groove and the fibrocartilaginous ridge bordering its lateral margin.
When conservative management fails in the setting of acute or chronic SPR incompetence, surgical intervention is mandated. The surgical strategy must address the specific pathoanatomy, which may involve a redundant or avulsed SPR, a shallow or convex retromalleolar groove, or a combination of both. This masterclass details two foundational operative approaches: the direct repair/reconstruction of the SPR and the fibular groove deepening technique utilizing a vascularized osteoperiosteal flap as described by Zoellner and Clancy.
Preoperative Evaluation and Indications
Clinical Presentation
Patients typically present with a history of a forced dorsiflexion and inversion injury, often accompanied by a "popping" sensation posterolateral to the ankle. Chronic cases exhibit recurrent snapping, lateral ankle swelling, and a subjective feeling of instability on uneven terrain.
Diagnostic Imaging
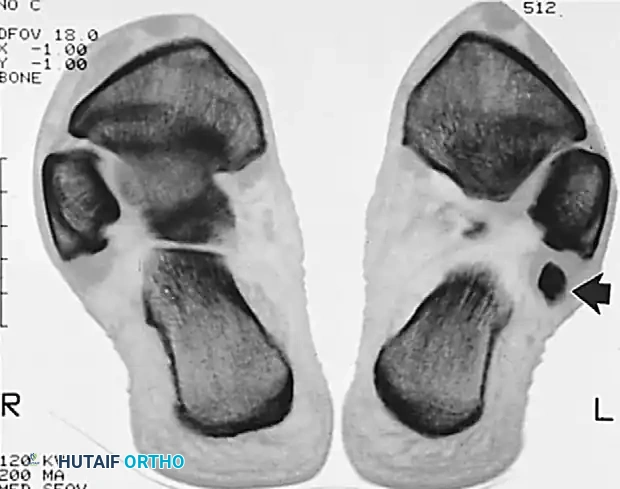
- Radiographs: Standard weight-bearing views of the ankle. Look for the "fleck sign"—a cortical avulsion fracture off the posterolateral fibula, pathognomonic for an SPR avulsion (Eckert-Davis Grade IV).
- Ultrasound: Excellent dynamic imaging modality to visualize real-time subluxation of the tendons over the lateral malleolus during active dorsiflexion and eversion.
- Magnetic Resonance Imaging (MRI): The gold standard for evaluating the integrity of the SPR, the depth of the retromalleolar groove, and the presence of concomitant pathology such as peroneus brevis longitudinal split tears or tenosynovitis.
Surgical Indications
- Acute peroneal tendon dislocation in high-demand athletes.
- Chronic, recurrent peroneal tendon subluxation refractory to conservative management (immobilization, taping, physical therapy).
- Concomitant peroneal tendon tears requiring debridement and tubularization.
Surgical Warning: Always evaluate for concomitant lateral ankle instability (ATFL/CFL laxity) and hindfoot varus alignment. Failure to address a cavovarus foot posture will place excessive stress on the peroneal repair, leading to a high risk of recurrent failure.
Surgical Anatomy and Patient Positioning
Relevant Anatomy
The retromalleolar groove is formed by the posterior surface of the distal fibula. In approximately 18% of the population, this groove is convex or flat, predisposing individuals to instability. The SPR originates from the periosteum of the lateral malleolus and inserts onto the lateral wall of the calcaneus. The sural nerve courses superficially in the posterolateral ankle, typically crossing the operative field 1 to 2 cm posterior to the fibula.
Positioning and Preparation
- Position: The patient is placed in the lateral decubitus position with the operative leg up. Alternatively, a supine position with a large bump under the ipsilateral hip can be utilized to internally rotate the leg, providing excellent access to the posterolateral ankle.
- Tourniquet: A well-padded thigh tourniquet is applied and inflated to 250-300 mmHg after exsanguination.
- Preparation: Standard sterile prep and drape from the toes to the proximal tibia.
Surgical Technique 1: Direct Repair of the Superior Peroneal Retinaculum
This technique is primarily indicated when the retromalleolar groove is of adequate depth, but the SPR is avulsed, redundant, or incompetent. The goal is to restore the anatomical tension of the retinaculum and provide a stable osseous fulcrum for the tendons.
Step 1: Surgical Approach
Make a longitudinal incision over the posterior aspect of the distal third of the fibula. Extend the incision distally and slightly anteriorly over the lateral border of the foot toward the cuboid.
Clinical Pearl: Perform meticulous blunt dissection in the subcutaneous tissues to identify and protect the sural nerve and the lesser saphenous vein. Retract these structures posteriorly.
Step 2: Flap Elevation
At the level of the lateral malleolus superficially, elevate the posterior skin flap. From the deep fascia, carefully dissect and form an ample fascial flap. The base of this flap must remain firmly attached to the tip of the lateral malleolus to ensure adequate vascularity and structural integrity.
Step 3: Tendon Retraction and Groove Preparation
Incise the remaining SPR (if not completely avulsed) and open the peroneal tendon sheath. Inspect the peroneus brevis and longus tendons for longitudinal tears; perform tubularization if necessary.
Retract the sheaths and tendons of the peroneal muscles anteriorly to expose the posterior aspect of the lateral malleolus.
Using a sharp, narrow osteotome or a high-speed burr, make a longitudinal groove in the posterior aspect of the lateral malleolus. This osseous trough provides a deepened, stable bed for the tendons. Place the peroneal tendons meticulously into this newly created groove.
Step 4: Retinaculum Reconstruction and Closure
Bring the previously elevated fascial flap over the relocated tendons. Suture this flap under appropriate tension to the remains of the native retinacula, the local periosteum, or the soft tissue on the lateral side of the calcaneus.
Test the repair by taking the ankle through a full range of motion, specifically forced dorsiflexion and eversion. The tendons must remain securely in their normal anatomical position without subluxation.
Surgical Technique 2: Fibular Groove Deepening with Tissue Transfer (Zoellner and Clancy)
When the retromalleolar groove is anatomically shallow or convex, soft tissue repair alone is insufficient. The Zoellner and Clancy technique utilizes a vascularized cortical osteoperiosteal flap to deepen the groove while preserving a smooth, anatomical gliding surface for the tendons.
Step 1: Incision and Exposure
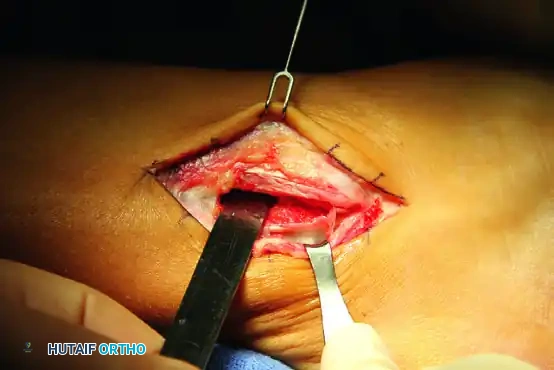
Make a 7-cm J-shaped curvilinear incision posterior to the lateral malleolus, following the anatomical course of the peroneal tendons. Deepen the incision through the subcutaneous tissue, taking extreme care to protect the sural nerve.
Step 2: Tendon Mobilization
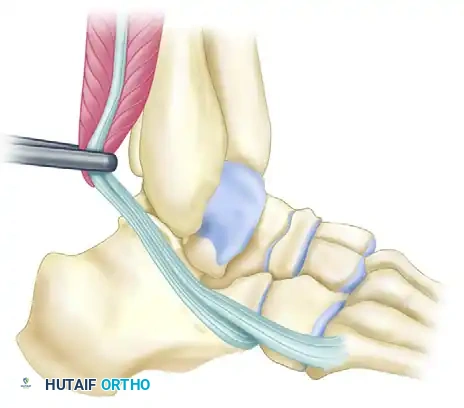
Identify the superior peroneal retinaculum. Incise the SPR longitudinally to free the tendons from their sheath. Inspect the tendons for pathology.
Figure A: With the tendons freed from their sheath, retract them anteriorly over the lateral malleolus to expose the retromalleolar groove.
Step 3: Raising the Osteoperiosteal Flap
Using a scalpel, outline a rectangular flap on the posterolateral aspect of the distal fibula. With a sharp, thin osteotome, raise a cortical osteoperiosteal flap measuring approximately 3 cm in length by 1 cm in width.
Surgical Warning: It is critical to leave the posteromedial border of this flap intact. This intact border acts as a living hinge, preserving the periosteal blood supply and ensuring the flap does not become a free, avascular bone graft.
Step 4: Deepening the Retromalleolar Groove
Swing the osteoperiosteal flap posteriorly on its hinge. This exposes the underlying cancellous bone of the distal fibula.
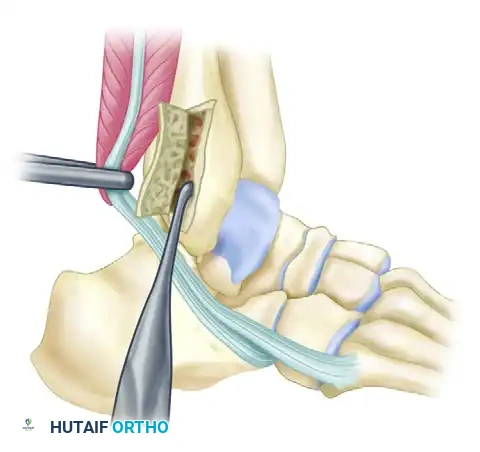
Figure B: The cortical flap is hinged posteriorly. Cancellous bone is systematically removed from the posterior aspect of the fibula to deepen the groove.
Using a curette or a high-speed motorized burr, remove the cancellous bone to deepen the groove by 6 to 9 mm. Ensure the excavation is uniform to prevent creating a focal stress riser in the fibula.
Step 5: Flap Reduction and Tendon Relocation
Once adequate depth is achieved, gently tamp the cortical osteoperiosteal flap back into position. This creates a deepened, concave groove measuring 3 to 4 cm long. Because the original cortical surface is preserved, the floor of the newly deepened groove provides a perfectly smooth gliding surface for the peroneal tendons, minimizing the risk of postoperative adhesions or tenosynovitis.
Replace the peroneus brevis and longus tendons into the deepened groove. Move the ankle through a full range of motion. The tendons should remain well seated within the concavity and show absolutely no tendency to subluxate or dislocate.
Step 6: Superior Peroneal Retinaculum Repair and Augmentation
Assess the quality of the native SPR.
* If the SPR is robust: Plicate it directly over the tendons using non-absorbable sutures (e.g., 2-0 Ethibond or FiberWire) through drill holes in the fibula or using suture anchors.
* If the SPR is tenuous (Common Scenario): Raise an additional periosteal flap (approximately 1 cm²) from the lateral surface of the malleolus. Leave this secondary flap hinged on its posterolateral side.
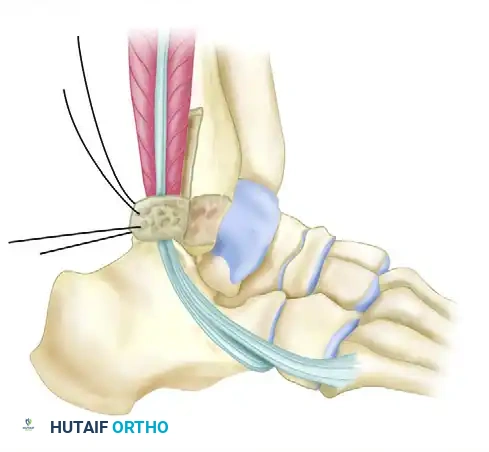
Figure C: The secondary periosteal flap is swung posteriorly over the tendons in the deepened groove and sutured to the medial part of the peroneal retinaculum to reinforce the repair.
Reflect this secondary flap posteriorly and suture it securely to the medial part of the remaining peroneal retinaculum, effectively creating a neo-retinaculum.
Step 7: Closure
Deflate the tourniquet and achieve meticulous hemostasis. Close the subcutaneous tissue with absorbable sutures and the skin with non-absorbable nylon or staples. Apply a sterile dressing and a well-padded short-leg splint or cast.
Postoperative Care and Rehabilitation Protocol
The postoperative rehabilitation must balance the need for tissue healing with the prevention of peritendinous adhesions and ankle stiffness. The protocol varies slightly depending on the exact technique utilized and the quality of the tissue repair.
Phase 1: Maximum Protection (Weeks 0 to 3)
- Immobilization: The foot is immobilized in a short-leg cast or rigid splint. The ankle is positioned in slight eversion and neutral dorsiflexion (90 degrees to the leg) to remove tension from the SPR repair.
- Weight-Bearing: Strict non-weight-bearing (NWB) or protected touch-down weight-bearing with crutches, depending on surgeon preference and repair security.
- Edema Control: Strict elevation above the heart level is mandated to minimize swelling and optimize wound healing.
Phase 2: Controlled Mobilization (Weeks 3 to 6)
- Immobilization: At 3 weeks, the initial cast is removed. The patient is transitioned to a hinged short-leg cast or a controlled ankle motion (CAM) walker boot.
- Range of Motion: The hinged cast or boot is adjusted to allow active and active-assisted dorsiflexion and plantar flexion exercises. Inversion is strictly prohibited to protect the lateral repair.
- Weight-Bearing: Progression to full weight-bearing (FWB) as tolerated within the cast or removable brace.
Phase 3: Strengthening and Proprioception (Weeks 6 to 12)
- Bracing: Transition from the CAM boot to a lace-up ankle brace (e.g., ASO brace) for daily activities.
- Physical Therapy: Initiate formal physical therapy. Focus on peroneal tendon strengthening (isometrics progressing to isotonics), Achilles stretching, and aggressive proprioceptive training (BAPS board, single-leg stance).
- Activity: Stationary cycling and straight-line swimming can be initiated.
Phase 4: Return to Sport (Months 3 to 6)
- Strenuous athletic activities, cutting sports, and explosive jumping are not permitted until the patient demonstrates a full, pain-free range of motion, normal peroneal strength (5/5), and symmetrical performance on functional hop testing.
- Return to high-demand sports typically occurs between 4 to 6 months postoperatively.
Complications and Management
While surgical outcomes for SPR repair and groove deepening are generally excellent, surgeons must be prepared to manage potential complications:
- Sural Neuritis: The most common complication. Caused by direct intraoperative injury, aggressive retraction, or entrapment in scar tissue. Management includes gabapentinoids, targeted nerve blocks, or surgical neurolysis if conservative measures fail.
- Recurrent Subluxation: Often due to failure to address a shallow groove, inadequate SPR tensioning, or an unrecognized cavovarus foot deformity. May require revision surgery with a more robust groove deepening or a lateralizing calcaneal osteotomy.
- Peroneal Tendon Adhesions: Can cause lateral ankle pain and restricted inversion. Prevented by early, controlled sagittal plane motion (dorsiflexion/plantar flexion) at 3 weeks post-op.
- Fibular Fracture: A rare complication of the groove deepening technique if the cortical hinge is violated or excessive cancellous bone is removed. Requires immediate internal fixation.
By adhering to strict anatomical principles, respecting the vascularity of the osteoperiosteal hinge, and employing a phased rehabilitation protocol, orthopedic surgeons can achieve durable stability and excellent functional outcomes in patients with peroneal tendon instability.
You Might Also Like