Indirect (Impaction) Fibular Groove Deepening: The Shawen and Anderson Technique
Key Takeaway
The indirect (impaction) fibular groove deepening technique, popularized by Shawen and Anderson, is a highly effective surgical intervention for chronic peroneal tendon subluxation. By reaming the distal fibula and impacting the posterior cortex, surgeons can deepen the retromalleolar groove without violating the articular cartilage. This comprehensive guide details the indications, biomechanical principles, step-by-step surgical approach, and postoperative rehabilitation protocols required to achieve optimal outcomes and restore lateral ankle stability.
INTRODUCTION TO PERONEAL TENDON INSTABILITY
Peroneal tendon subluxation and dislocation represent a complex spectrum of lateral ankle pathology, frequently misdiagnosed as simple lateral ankle sprains. The primary restraint to peroneal tendon subluxation is the superior peroneal retinaculum (SPR), supported secondarily by the morphology of the retromalleolar fibular groove. In approximately 11% to 18% of the population, this groove is flat or convex, predisposing individuals to chronic instability, particularly following an acute inversion and dorsiflexion injury that strips or ruptures the SPR.
Historically, direct groove deepening techniques required the elevation of the fibrocartilaginous floor of the retromalleolar groove, burring of the underlying cancellous bone, and subsequent reattachment of the cartilage flap. While effective, this direct approach risks iatrogenic damage to the gliding surface, leading to postoperative adhesions, tendon tethering, and secondary tendinopathy.
To mitigate these risks, Shawen and Anderson popularized the Indirect (Impaction) Fibular Groove Deepening technique. This elegant, joint-sparing procedure involves intramedullary reaming of the distal fibula followed by controlled impaction of the posterior cortex. This deepens the groove while meticulously preserving the native fibrocartilaginous gliding surface, optimizing postoperative tendon kinematics.
SURGICAL ANATOMY AND BIOMECHANICS
A profound understanding of the lateral ankle anatomy is mandatory for executing this procedure safely and effectively.
The Retromalleolar Groove
The posterior surface of the distal fibula forms the retromalleolar groove, which houses the peroneus brevis (anterior/medial) and peroneus longus (posterior/lateral) tendons. The groove is lined with a smooth fibrocartilaginous layer that facilitates frictionless tendon excursion during ankle plantarflexion and dorsiflexion.
The Superior Peroneal Retinaculum (SPR)
The SPR is the primary static restraint against peroneal subluxation. It originates from the posterolateral ridge of the distal fibula and inserts onto the lateral wall of the calcaneus. Pathological stripping of the SPR from its fibular attachment (often creating a false pouch) is the hallmark of the Eckert and Davis classification of peroneal subluxation.
Anomalous Musculature
Intrasheath crowding is a major biomechanical contributor to peroneal instability.
* Low-Lying Peroneus Brevis Muscle Belly: A muscle belly that extends distal to the fibular tip can overcrowd the retromalleolar space.
* Peroneus Quartus: Present in up to 20% of individuals, this accessory muscle typically arises from the peroneus brevis and inserts onto the retrotrochlear eminence of the calcaneus, further reducing the available volume within the fibular groove.
💡 Clinical Pearl
Always evaluate for intrasheath crowding on preoperative MRI. Failure to excise a peroneus quartus or a low-lying peroneus brevis muscle belly will leave the retromalleolar space over-pressurized, significantly increasing the risk of recurrent subluxation even after a successful groove deepening.
INDICATIONS AND CONTRAINDICATIONS
Indications
- Chronic, symptomatic peroneal tendon subluxation or dislocation refractory to conservative management (e.g., immobilization, physical therapy, taping).
- Acute peroneal tendon dislocation in high-demand or elite athletes.
- Intraoperative finding of a flat or convex retromalleolar fibular groove during lateral ankle stabilization procedures.
- Concomitant peroneal tendon tears requiring debridement and tubularization in the setting of a shallow groove.
Contraindications
- Absolute: Active local or systemic infection, severe peripheral vascular disease, medically unfit for surgery.
- Relative: Severe osteopenia or osteoporosis (which may lead to catastrophic fibular fracture during impaction), advanced osteoarthritis of the ankle joint, or significant uncorrected hindfoot varus (which places excessive tension on the lateral compartment).
PREOPERATIVE PLANNING AND POSITIONING
Imaging
- Radiographs: Weight-bearing anteroposterior, lateral, and mortise views of the ankle to assess overall alignment and rule out avulsion fractures (e.g., "fleck sign" indicating SPR avulsion).
- MRI: Essential for evaluating the integrity of the peroneus longus and brevis tendons, identifying anomalous muscles (peroneus quartus), and assessing the morphology of the fibular groove.
- CT Scan / Ultrasound: Dynamic ultrasound can confirm subluxation in real-time. CT is occasionally used for precise 3D mapping of the fibular groove morphology.
Patient Positioning
- The patient is placed in the lateral decubitus position, or supine with a large bump under the ipsilateral hip to internally rotate the leg, providing unhindered access to the posterolateral ankle.
- A well-padded thigh tourniquet is applied.
- The operative leg is prepped and draped in a standard sterile fashion.
- Ensure fluoroscopy (C-arm) is available to verify guide pin and reamer placement.
STEP-BY-STEP SURGICAL TECHNIQUE (SHAWEN AND ANDERSON)
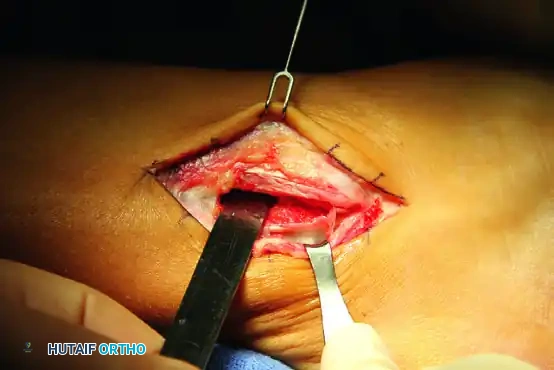
1. Incision and Soft Tissue Exposure
- Make a 6- to 8-cm longitudinal incision curved slightly anteriorly over the tip of the fibula, following the posterior edge of the fibular shaft.
- Develop full-thickness skin flaps. This is a critical step; the lateral ankle has tenuous vascularity, and raising thin or subcutaneous flaps significantly increases the risk of postoperative skin necrosis and wound dehiscence.
- Identify and protect the sural nerve and the short saphenous vein, which typically lie posterior and inferior to the incision.
2. Management of the Superior Peroneal Retinaculum (SPR)
- Carefully incise the distal 4 to 5 cm of the SPR from its attachment on the fibula.
- Crucial Step: Leave a 3-mm cuff of retinacular tissue attached to the posterolateral ridge of the fibula. This cuff will serve as a robust anchor point for the subsequent soft tissue repair.
- Elevate the remainder of the retinacular cuff off the fibula to expose the lateral cortex.
- Using a curette or a small rongeur, roughen the lateral cortex of the fibula down to bleeding cancellous bone. This prepares a biologically active bed to promote healing of the advanced SPR.
3. Intrasheath Debridement and Tendon Inspection
- Retract the peroneal tendons anteriorly to inspect the retromalleolar groove.
- Inspect the tendons for longitudinal split tears (most common in the peroneus brevis). Perform debridement and tubularization as necessary.
- Excise any space-occupying lesions: Resect any low-lying peroneus brevis muscle belly that extends into the groove. Identify and excise supernumerary muscles, such as the peroneus quartus, to decompress the lateral leg compartment.
- Remove any fibrinous or scar tissue within the fibular groove that may impede smooth tendon gliding.
4. Fibular Preparation and Intramedullary Reaming
- Expose the distal tip of the fibula.
- Create a small entry portal at the exact distal tip of the fibula using an awl or a small drill bit.
- Guide Pin Placement: Place an intramedullary guide pin from distal to proximal into the fibula. Direct the pin so that it closely follows the posterior cortex of the fibula. Verify placement with intraoperative fluoroscopy to ensure the pin does not breach the anterior, medial, or lateral cortices.
- Sequential Reaming: Sequentially ream over the guide pin. Begin with a smaller reamer (e.g., 4.5 mm) and gradually increase the size to an appropriate diameter, usually 7 to 8 mm, depending on the native size of the patient's fibula.
⚠️ Surgical Warning
Do not over-ream the fibula. The goal is to hollow out the cancellous bone immediately deep to the posterior cortex. Over-reaming, especially in patients with small fibulae, can compromise the structural integrity of the lateral malleolus and lead to an iatrogenic fracture during the impaction phase.
5. Indirect Cortical Impaction
- Once the intramedullary canal is adequately prepared, use a smooth, curved bone tamp and a mallet to gently impact the posterior cortex of the fibula from posterior to anterior.
- The thinned posterior cortex will collapse into the reamed intramedullary void, effectively deepening the retromalleolar groove without violating the overlying fibrocartilage.
- Distal Tip Management: Pay special attention to the distal tip of the fibula. Be sure to impact the distal tip inward. Failure to do so can leave a sharp, prominent bony edge that will act as a fulcrum, causing postoperative impingement, fraying, or rupture of the peroneal tendons.
6. Retinacular Repair and Closure
- After the groove has been deepened and all tendon repairs are complete, reduce the peroneal tendons into the newly formed concavity. Take the ankle through a full range of motion (especially dorsiflexion and eversion) to confirm stability and absence of subluxation.
- Assess the SPR. Excise any redundant, stretched, or pathological tissue to ensure a tight repair.
- SPR Advancement: Advance the remaining SPR to the previously prepared, bleeding cortical bed on the fibula.
- Secure the SPR using either transosseous drill holes or modern small-diameter suture anchors (e.g., 2.5 mm or 3.0 mm biocomposite anchors) placed along the posterolateral ridge.
- "Pants-Over-Vest" Repair: Suture the 3-mm cuff of tissue (left on the fibula during the initial exposure) over the advanced SPR in a "pants-over-vest" fashion. This double-layer closure provides superior biomechanical strength and a watertight seal.
- Close the subcutaneous tissue with absorbable sutures and the skin with non-absorbable sutures or staples in a standard fashion.
POSTOPERATIVE REHABILITATION PROTOCOL
The postoperative protocol must balance the need for tissue healing with the prevention of arthrofibrosis and tendon tethering. The following is a highly structured, evidence-based timeline.
Phase 1: Maximum Protection (Weeks 0 to 2)
- Immobilization: The patient is placed in a well-padded short-leg cast or a rigid posterior splint with the ankle in a strictly neutral position (0 degrees of dorsiflexion/plantarflexion and neutral inversion/eversion).
- Weight-Bearing Status: Strictly non-weight bearing (NWB) on the operative extremity.
- Goals: Edema control, wound healing, and protection of the SPR repair.
Phase 2: Controlled Mobilization (Weeks 2 to 6)
- Wound Care: At 2 weeks postoperatively, the cast is removed, and sutures or staples are extracted.
- Immobilization: A short-leg walking cast or a rigid controlled ankle motion (CAM) boot is applied.
- Weight-Bearing Status: The patient is transitioned to weight-bearing as tolerated (WBAT).
- Goals: Gradual introduction of axial load to stimulate bone healing at the impaction site while continuing to protect the soft tissue repair from inversion stresses.
Phase 3: Early Rehabilitation (Weeks 6 to 10)
- Immobilization: The cast or CAM boot is discontinued. The patient is transitioned to an Aircast (Summit, NJ), a lace-up ankle brace, or a similar supportive device to prevent sudden ankle inversion.
- Physical Therapy: Active range of motion (AROM) exercises are initiated. Emphasis is placed on restoring sagittal plane motion (plantarflexion and dorsiflexion).
- Strengthening: At 8 to 10 weeks, once baseline ROM is achieved and the repair is biologically secure, aggressive peroneal strengthening is initiated. This includes isometric, concentric, and eventually eccentric strengthening of the peroneus longus and brevis.
- Goals: Restore normal gait mechanics, improve proprioception, and rebuild lateral compartment strength.
Phase 4: Return to Activity (Months 4 to 6)
- Advanced Rehabilitation: Progression to sport-specific drills, plyometrics, and agility training (e.g., figure-of-eight running, cutting maneuvers).
- Clearance: Full return to high-impact activities and competitive sports is usually permitted between 4 and 6 months after surgery, provided the patient demonstrates symmetrical strength, full ROM, and no apprehension during dynamic testing.
COMPLICATIONS AND PITFALLS
While the indirect fibular groove deepening technique is highly successful, surgeons must be vigilant regarding potential complications:
- Sural Nerve Injury: The sural nerve is highly vulnerable during the initial incision and retractor placement. Injury can result in painful neuromas or lateral foot numbness. Meticulous dissection and the use of blunt retractors are mandatory.
- Skin Necrosis: The lateral malleolus has poor soft tissue coverage. Creating thin skin flaps or applying excessive retractor tension can lead to marginal necrosis and deep infection. Always utilize full-thickness flaps.
- Iatrogenic Fibular Fracture: Over-reaming the intramedullary canal or using excessive force during impaction can fracture the lateral or anterior cortex of the fibula. If a fracture occurs, it must be immediately stabilized with a lateral neutralization plate and screws.
- Recurrent Instability: Usually the result of inadequate groove deepening, failure to address intrasheath crowding (missed peroneus quartus), or a lax SPR repair.
- Tendon Tethering: Over-tightening the SPR or failing to initiate early ROM can lead to adhesions between the peroneal tendons and the retinaculum, resulting in chronic lateral ankle pain and restricted inversion.
🔪 Surgical Pitfall
A common error during the impaction phase is failing to impact the very distal tip of the fibula. This leaves a sharp, bony prominence at the distal exit of the groove. As the peroneal tendons glide over this sharp edge during gait, they are subjected to severe mechanical attrition, leading to postoperative tenosynovitis or secondary tendon rupture. Always ensure the distal tip is smoothly impacted inward.
CONCLUSION
The indirect (impaction) fibular groove deepening technique, as described by Shawen and Anderson, represents the gold standard for addressing morphological deficiencies of the retromalleolar groove in the setting of chronic peroneal instability. By combining meticulous intrasheath debridement, joint-sparing intramedullary reaming, and a robust "pants-over-vest" retinacular repair, orthopedic surgeons can reliably restore lateral ankle stability, preserve native tendon kinematics, and facilitate a successful return to high-demand activities.
You Might Also Like