Wrist Arthrodesis: The Corticocancellous Inlay Graft Technique
Key Takeaway
Wrist arthrodesis remains a highly effective salvage procedure for end-stage radiocarpal arthropathy, providing predictable pain relief and stability. The corticocancellous inlay graft technique, utilizing an iliac crest autograft and Kirschner wire fixation, offers excellent fusion rates. This comprehensive guide details the surgical approach, precise trough preparation, graft impaction, and postoperative immobilization protocols essential for achieving a solid, functional radiocarpal fusion in complex orthopedic reconstructions.
Introduction to Radiocarpal Fusion
Total wrist arthrodesis is a highly reliable and durable salvage procedure designed to provide a stable, painless wrist in patients suffering from end-stage radiocarpal and intercarpal arthropathy. While modern osteosynthesis frequently employs rigid dorsal plating (AO/ASIF techniques), the classic corticocancellous inlay bone graft technique—historically championed by pioneers such as Campbell, Keokarn, Haddad, and Riordan—remains an indispensable procedure in the orthopedic surgeon's armamentarium.
This technique is particularly valuable in scenarios where dorsal skin integrity is compromised, in patients with severe rheumatoid arthritis possessing osteopenic bone that cannot hold screws, in pediatric patients with open physes, or when severe deformity precludes the application of a standard pre-contoured dorsal plate. By utilizing a structural iliac crest bone graft (ICBG) inlaid across the radiocarpal and midcarpal joints, the surgeon achieves both biological augmentation and mechanical stability.
Indications and Contraindications
Primary Indications
- Post-Traumatic Osteoarthritis: Advanced Scapholunate Advanced Collapse (SLAC) or Scaphoid Nonunion Advanced Collapse (SNAC) wrists where limited intercarpal fusions are no longer viable.
- Rheumatoid Arthritis: End-stage inflammatory arthropathy with severe carpal subluxation, ulnar translation, and bone stock depletion.
- Failed Arthroplasty: Salvage of a failed total wrist arthroplasty or failed partial wrist fusion.
- Neuromuscular Disorders: Stabilization of a flail or spastic wrist in conditions such as cerebral palsy, brachial plexus palsy, or severe peripheral nerve injuries.
- Infection: Post-septic arthritis reconstruction (performed in a delayed fashion after eradication of infection).
Contraindications
- Active, untreated joint infection.
- Inadequate soft tissue coverage over the dorsal or radial aspect of the wrist.
- A functional, painless wrist with preserved motion (relative contraindication).
- Severe ipsilateral shoulder or elbow stiffness, where wrist fusion would completely eliminate the patient's ability to position the hand in space.
Biomechanics and Preoperative Planning
Optimal Position of Fusion
The functional position of the wrist is critical for maximizing grip strength and facilitating activities of daily living (ADLs).
* Extension: The wrist should ideally be fused in 10 to 15 degrees of extension. This optimizes the length-tension relationship of the extrinsic finger flexors.
* Deviation: Slight ulnar deviation (0 to 5 degrees) is preferred to assist with power grip and to compensate for the natural tendency of the hand to rest in radial deviation following fusion.
Clinical Pearl: In patients with bilateral wrist arthrodesis, consider fusing the dominant wrist in 10–15 degrees of extension for power grip, and the non-dominant wrist in neutral to slight flexion to assist with personal hygiene and perineal care.
Preoperative Templating
Standard posteroanterior (PA), lateral, and oblique radiographs of the wrist are mandatory. The surgeon must assess the degree of carpal collapse, the presence of cystic changes in the distal radius and metacarpals, and the overall bone stock. If an iliac crest bone graft is planned, the donor site should be evaluated clinically and radiographically if necessary.
Surgical Anatomy and Exposures
The inlay technique utilizes a radial-sided dorsal approach. Mastery of the extensor compartments and regional neurovascular structures is paramount.
- Superficial Radial Nerve (SRN): Emerges from beneath the brachioradialis approximately 9 cm proximal to the radial styloid. Its branches cross the anatomical snuffbox and must be meticulously protected to avoid debilitating neuromas.
- Radial Artery: The deep branch of the radial artery passes through the anatomical snuffbox, deep to the abductor pollicis longus (APL) and extensor pollicis brevis (EPB), before diving between the two heads of the first dorsal interosseous muscle.
- Extensor Compartments: The surgical interval lies between the first compartment (APL, EPB) and the second/third compartments (extensor carpi radialis longus/brevis [ECRL/ECRB], and extensor pollicis longus [EPL]).
Step-by-Step Surgical Technique
1. Patient Positioning and Preparation
The patient is placed supine on the operating table with the operative arm extended on a radiolucent hand table. A well-padded pneumatic tourniquet is applied to the proximal arm. The ipsilateral anterior iliac crest is prepped and draped simultaneously for bone graft harvesting. Prophylactic intravenous antibiotics are administered prior to tourniquet inflation.
2. Incision and Superficial Dissection
- Make a longitudinal incision on the radial aspect of the dorsal wrist.
- The incision should extend from approximately 6 cm proximal to the radiocarpal joint (over the distal radius) down to the distal aspect of the second metacarpal.
- Carefully dissect through the subcutaneous tissues.
Surgical Warning: The superficial radial nerve branches are highly variable and extremely sensitive to traction. Identify the nerve branches early, mobilize them gently with vessel loops, and retract them out of the surgical field. Avoid aggressive retraction to prevent postoperative complex regional pain syndrome (CRPS) or neuritis.
3. Deep Dissection and Interval Development
- Identify the extensor retinaculum and incise it longitudinally.
- Identify the first extensor compartment. Free the extensor pollicis brevis (EPB) and abductor pollicis longus (APL) and retract them in a palmar (volar) direction.
- Identify the third extensor compartment. Mobilize the extensor pollicis longus (EPL) and retract it dorsally and ulnarly, along with the extensor carpi radialis longus (ECRL) and extensor carpi radialis brevis (ECRB).
- Protect the deep branch of the radial artery as it courses through the snuffbox.
- Distally, identify the base of the second metacarpal. Carefully elevate the origin of the first dorsal interosseous muscle from the radial shaft of the second metacarpal using a periosteal elevator.
4. Preparation of the Fusion Bed (The Trough)
The success of the inlay technique relies on the precise creation of a bleeding, vascularized bony trough that spans the radiocarpal and midcarpal joints.
- Using a high-speed burr, osteotomes, and rongeurs, fashion a continuous longitudinal groove.
- Dimensions: The trough should extend from 2 cm proximal to the articular surface of the distal radius, across the carpus, and end 1 cm distal to the bases of the second and third metacarpals.
- Carpal Involvement: The groove must pass directly through the scaphoid, capitate, lunate, and trapezoid.
- Depth: The depth of the groove should penetrate just through the dorsal cortex and cancellous bone of the metacarpals and carpus, exposing bleeding cancellous bone. The depth must be perfectly even throughout to ensure uniform contact with the graft.
Pitfall: Do not penetrate the volar cortex of the carpal bones or the distal radius. Violation of the volar cortex compromises the structural integrity of the construct and risks injury to the volar neurovascular structures and flexor tendons.
5. Iliac Crest Bone Graft Harvesting
- Attention is turned to the prepped anterior iliac crest.
- Make an incision parallel to the crest, starting 2 cm posterior to the anterior superior iliac spine (ASIS) to avoid the lateral femoral cutaneous nerve.
- Harvest a rectangular, outer cortical piece of iliac bone graft. The graft must be meticulously measured to match the exact dimensions of the prepared wrist trough (typically 4 to 6 cm in length and 1 to 1.5 cm in width).
- Ensure the graft has a robust layer of cancellous bone attached to the cortical strut.
6. Graft Placement and Mechanical Locking
- Place the harvested corticocancellous iliac bone graft into the prepared trough with the cancellous side facing down (contacting the bleeding cancellous bed of the radius, carpus, and metacarpals). The cortical side should face dorsally to act as a structural strut.
- The Locking Maneuver: To achieve rigid mechanical compression without plates, utilize the natural kinematics of the wrist. Place the graft into the trough while the wrist is in slight ulnar deviation. Once the graft is seated, bring the wrist from ulnar deviation into a neutral or slightly radially deviated position. This maneuver effectively "locks" the graft into the carpal and metacarpal slots, providing immediate structural stability.
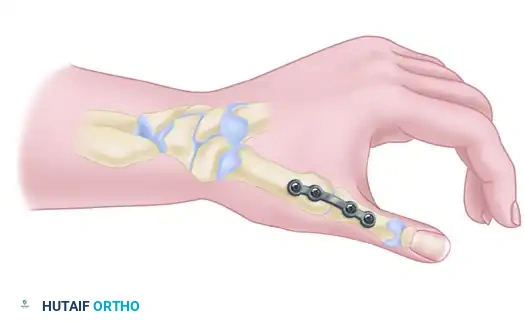
7. Kirschner Wire Fixation
While the locking maneuver provides excellent primary stability, supplemental fixation is required to maintain alignment during the incorporation phase.
- Drive two or three 0.045-inch (1.14 mm) Kirschner wires obliquely across the construct.
- Proximal Fixation: Pass K-wires through the intact dorsal cortex of the distal radius, through the graft, and into the volar cortex of the radius.
- Distal Fixation: Pass K-wires through the second and third metacarpals, through the distal aspect of the graft, and into the adjacent metacarpal shafts.
- Ensure the K-wires do not tether the extensor tendons. The wires can be cut flush with the bone or left protruding through the skin for easy removal in the clinic, depending on surgeon preference and patient compliance.
8. Closure
- Deflate the tourniquet and achieve meticulous hemostasis. Hematoma formation under the dorsal skin flaps can lead to wound breakdown.
- Allow the extensor retinaculum to fall back over the graft, but do not close it tightly if it causes bowstringing or excessive pressure on the extensor tendons. The EPL is often left transposed subcutaneously.
- Close the subcutaneous tissues with absorbable sutures and the skin with non-absorbable monofilament sutures.
Postoperative Protocol and Aftertreatment
Strict adherence to postoperative immobilization is critical for the success of an unplated, K-wire-stabilized arthrodesis.
- Phase 1 (Weeks 0-1): The patient is placed in a bulky, well-padded short-arm or long-arm surgical splint immediately postoperatively. Elevation and strict digital range of motion (ROM) exercises are initiated immediately to prevent tendon adhesions and reduce edema.
- Phase 2 (Weeks 1-4): At the first postoperative visit (1 week), the surgical splint and sutures are removed. The patient is transitioned into a rigid long-arm cast. Crucially, this cast must incorporate the thumb, index, and long fingers to neutralize the deforming forces of the extrinsic tendons on the second and third metacarpals.
- Phase 3 (Weeks 4-8): At 4 weeks, the long-arm cast is removed. Radiographs are obtained to assess early graft incorporation. The patient is then placed in a short-arm cast or rigid short-arm splint for an additional 2 to 4 weeks.
- Hardware Removal: The 0.045-inch Kirschner wires are removed only when radiographic evidence confirms a solid fusion mass across the radiocarpal and midcarpal joints (typically between 8 and 12 weeks).
Complications and Management
1. Nonunion (Pseudarthrosis)
Nonunion is the most significant complication, occurring in 5% to 10% of cases, particularly at the carpometacarpal (CMC) junction. Risk factors include smoking, inadequate decortication, and premature discontinuation of immobilization.
* Management: Asymptomatic nonunions may be observed. Symptomatic nonunions require revision surgery, typically involving rigid dorsal plating and revision bone grafting.
2. Superficial Radial Nerve Neuritis
Injury or traction to the SRN can result in severe neuropathic pain.
* Management: Prevention is paramount. If a neuroma develops, initial management includes gabapentinoids, desensitization therapy, and diagnostic blocks. Refractory cases may require surgical exploration and neuroma excision with proximal burying of the nerve stump.
3. Extensor Tendon Adhesions or Rupture
The dorsal approach places the extensor tendons at risk of adhering to the healing bone graft or rupturing over prominent K-wires.
* Management: Immediate postoperative digital motion is essential. If K-wires are left proud, they must be monitored closely. Late tendon ruptures (e.g., EPL) may require tendon transfer (e.g., EIP to EPL).
4. Donor Site Morbidity
Harvesting the ICBG can lead to chronic pain, hematoma, or injury to the lateral femoral cutaneous nerve.
* Management: Meticulous surgical technique at the donor site, including layered closure and the use of local anesthetics or regional blocks, minimizes these risks.
Conclusion
The corticocancellous inlay graft technique for wrist arthrodesis is a time-tested, biologically robust procedure. While modern plating systems have largely superseded K-wire fixation for routine cases, the inlay technique remains a critical salvage option. By meticulously preparing the fusion bed, utilizing the mechanical advantage of the wrist's kinematics to lock the graft, and adhering to strict postoperative immobilization, the orthopedic surgeon can achieve excellent, reproducible outcomes in patients with complex radiocarpal pathology.
You Might Also Like