Posterior Ankle Arthrodesis and Talar Body Fractures: Operative Techniques
Key Takeaway
The posterior approach for ankle and subtalar arthrodesis utilizes an onlay graft technique, offering robust fixation and high union rates. Concurrently, talar body fractures demand precise anatomical reduction, often requiring medial malleolar osteotomy. This guide details the step-by-step surgical execution of posterior arthrodesis, talar body fracture classification, and advanced internal fixation strategies to mitigate osteonecrosis and posttraumatic arthritis.
Introduction to Posterior Arthrodesis and Talar Trauma
The posterior approach to the ankle and subtalar joints provides an exceptional, extensile corridor for complex reconstructive procedures, particularly tibiotalocalcaneal (TTC) arthrodesis. The Johnson onlay graft technique capitalizes on the robust vascularity of the posterior soft tissue envelope and allows for the application of a massive structural graft under compression. Concurrently, the management of talar body fractures remains one of the most formidable challenges in orthopedic traumatology. Due to the tenuous retrograde blood supply of the talus, these fractures are fraught with high rates of osteonecrosis (AVN) and posttraumatic osteoarthrosis. This comprehensive guide delineates the surgical mastery required for both the posterior onlay graft arthrodesis and the operative fixation of talar body fractures.
Onlay Graft Technique Through a Posterior Approach (Johnson)
The posterior onlay graft technique is primarily indicated for salvage of failed total ankle arthroplasty, severe posttraumatic arthritis, avascular necrosis of the talus, and severe neuropathic (Charcot) arthropathy. By utilizing a posterior approach, the surgeon avoids compromised anterior soft tissues and gains direct access to the posterior tibia, talus, and calcaneus.
Surgical Pearl: The posterior approach is particularly advantageous in patients with anterior soft tissue compromise or previous multiple anterior incisions. It allows for simultaneous preparation of the ankle and subtalar joints while providing a flat, vascularized bed for the onlay graft.
Preoperative Planning and Positioning
Meticulous preoperative planning is mandatory. Weight-bearing radiographs of the ankle and foot, along with a computed tomography (CT) scan, are essential to assess bone stock, deformity, and the presence of cystic changes.
- Anesthesia and Positioning: The patient is placed in the prone position. General anesthesia or a robust regional block is administered.
- Tourniquet: A thigh tourniquet is applied to ensure a bloodless surgical field.
- Preparation: The entire lower extremity from the toes to the proximal thigh is prepped and draped in a standard sterile fashion. The ipsilateral posterior superior iliac spine (PSIS) is also prepped for bone graft harvest.
Surgical Approach and Dissection
The posterior approach requires careful navigation of the neurovascular structures, specifically the sural nerve and the posterior tibial neurovascular bundle.
- Make a longitudinal midline incision over the posterior ankle, extending from the distal third of the calf to the calcaneal tuberosity.
- Carefully identify and retract the sural nerve, which typically crosses the lateral border of the Achilles tendon in the distal third of the leg.
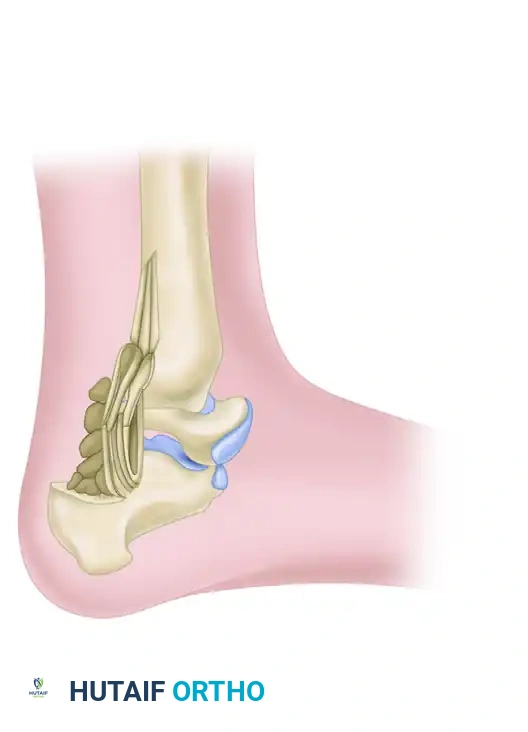
Figure 88-39A: Posterior extraarticular arthrodesis of the ankle and subtalar joints.
- Enter the Achilles tendon sheath and carefully protect it. To achieve adequate exposure of the posterior ankle and subtalar joints, divide the Achilles tendon in the coronal plane (Z-lengthening or step-cut). Retract the proximal and distal stumps.
- Enter the deep posterior compartment. Develop the internervous and intermuscular interval between the flexor hallucis longus (FHL) medially and the peroneus longus and brevis laterally.
Surgical Warning: The FHL is the primary protector of the posterior tibial neurovascular bundle. Always retract the FHL medially; straying medial to the FHL places the tibial nerve and posterior tibial artery at imminent risk of iatrogenic injury.
Joint Preparation and Trough Creation
Adequate joint preparation is the cornerstone of a successful arthrodesis. All cartilage and fibrous tissue must be meticulously excised to expose bleeding subchondral bone.
- Elevate the periosteum from the posterior aspect of the tibia and the dorsal aspect of the calcaneal tuberosity.
- Insert a femoral distractor to assist in the distraction of the ankle and subtalar joints. Place the proximal pin in the posterior tibia and the distal pin in the calcaneal tuberosity.
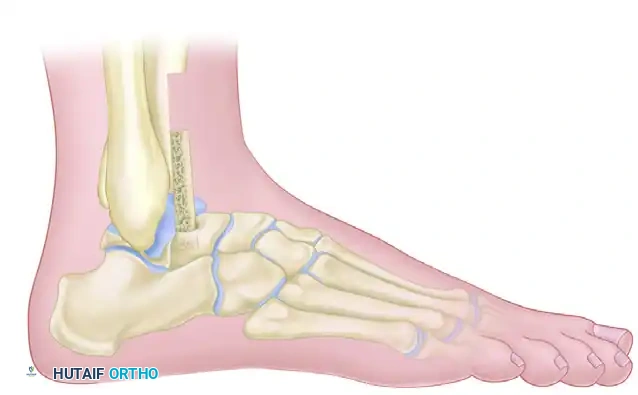
Figure 88-39B: Posterior intraarticular arthrodesis of the ankle and subtalar joints.
- Using a combination of curettes, rongeurs, and high-speed burrs, aggressively débride the articular cartilage from the surfaces of the tibiotalar and subtalar joints. Penetrate the subchondral bone with a 2.0-mm drill bit to encourage osteogenic bleeding.
- Use a 1/2-inch osteotome to create a continuous, longitudinal trough. This trough must incorporate the posterior aspect of the tibia, the posterior half of the talar body, the superior portion of the calcaneal tuberosity, and the posterior facet of the calcaneus.
Trough creation incorporating the posterior tibia, talus, and calcaneus.
Fixation and Grafting
Rigid internal fixation combined with robust biological grafting is required to achieve union across these complex joint spaces.
- Harvest copious amounts of cancellous and cortical strips of bone from the posterior superior iliac crest (PSIS).
- Introduce a retrograde intramedullary arthrodesis nail. The entry point is on the plantar aspect of the heel, slightly lateral to the midline to avoid the medial calcaneal nerve branches.
- Ream the calcaneus, talus, and tibia sequentially.
- Stabilize the arthrodesis in a neutral position (0 degrees of dorsiflexion, 5 degrees of valgus, and 5 to 10 degrees of external rotation) with the intramedullary nail. Apply dynamic compression if the nail design allows.
Application of the bone graft through the entire posterior aspect of the tibia, talus, and calcaneus.
- Once rigid fixation is achieved, pack the harvested autograft tightly into the previously created posterior trough, bridging the tibia, talus, and calcaneus.
Closure and Postoperative Protocol
- Place a closed suction drain deep in the wound to prevent hematoma formation.
- Repair the Achilles tendon using multiple interrupted 0 braided, absorbable sutures (e.g., Vicryl or PDS) using a Krackow or modified Kessler technique.
- Close the subcutaneous tissue and skin in layers.
Postoperative Care:
- A bulky plaster splint is applied in the operating room.
- At 2 weeks, the splint is removed, the wound is inspected, and sutures are removed if healing is satisfactory.
- The extremity is then placed in a short-leg, strictly non–weight-bearing cast.
- Weight-bearing is delayed until there is definitive radiographic evidence of union, typically at 10 to 12 weeks.
- Once union is confirmed, the patient is transitioned to a prefabricated walking boot, gradually advancing weight-bearing. Final rehabilitation involves transferring to a shoe modified with a full-length steel shank and a rocker sole to compensate for the loss of ankle and subtalar motion.
Talar Body Fractures: Diagnosis and Management
Talar body fractures are severe, high-energy injuries that must be strictly distinguished from talar neck fractures. The distinction is anatomically defined: injuries are considered talar body fractures if the inferior fracture line exits proximal to the lateral process of the talus, whereas they are classified as talar neck fractures if the inferior fracture line exits distal to the lateral process.
Pathoanatomy and Prognosis
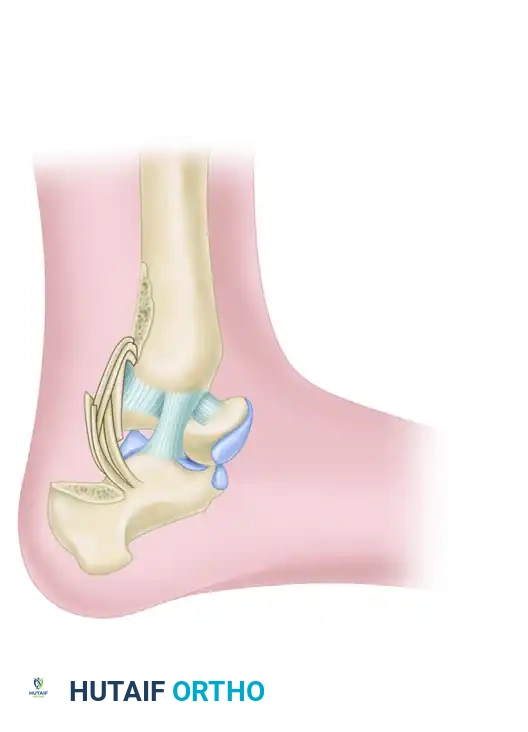
The talus is unique; approximately 60% of its surface is covered by articular cartilage, leaving limited areas for vascular penetration. The blood supply is primarily retrograde, arising from the artery of the tarsal canal (a branch of the posterior tibial artery), the deltoid branch, and the artery of the sinus tarsi.
Although the incidence of osteonecrosis (AVN) is similar between talar neck and talar body fractures when comparing non-displaced or displaced-without-dislocation patterns, talar body fractures carry a significantly higher incidence of posttraumatic subtalar osteoarthrosis.
- Nondisplaced talar body fractures: Reported AVN incidence of 25%.
- Displaced talar body fractures: AVN rate escalates to 50% or higher.
Clinical Pitfall: A review of surgical treatments for talar body fractures confirms severe morbidity. Up to 88% of patients develop osteonecrosis or posttraumatic arthritis. All patients with open fractures who subsequently develop osteonecrosis experience catastrophic collapse of the talar body.
Classification Systems
Accurate classification dictates the surgical approach and prognosticates the outcome.
Sneppen Classification:
Based on anatomical location and fracture morphology:
- Type I: Osteochondral or transchondral fractures.
- Type II: Coronal-sagittal, horizontal, noncomminuted, shear fractures.
- Type III: Posterior tubercle fractures (often involving the FHL groove).
- Type IV: Lateral process fractures (snowboarder's fracture).
- Type V: Crush/comminuted fractures.
AO/OTA Classification:
The AO classification groups fractures according to increasing severity, which correlates directly with treatment difficulty and a worsening prognosis.

Figure 88-40A: AO classification of talar body fractures (Type A - Extra-articular or minor articular).
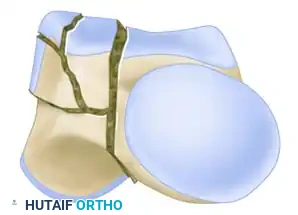
Figure 88-40B: AO classification of talar body fractures (Type B - Partial articular).
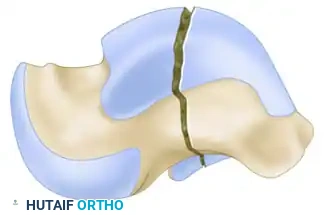
Figure 88-40C: AO classification of talar body fractures (Type C - Complete articular/Crush).
Clinical Evaluation and Imaging
Diagnosis begins with a high index of suspicion following high-energy axial loads (e.g., motor vehicle accidents, falls from height).
- Standard Radiographs: AP, lateral, and mortise views of the ankle, plus a Canale view to assess the talar neck and body alignment.
- Computed Tomography (CT): A fine-cut CT scan with sagittal and coronal reconstructions is absolutely mandatory. It defines the fracture pattern, degree of comminution, articular step-off, and subtle subluxations that plain films miss.
Surgical Management: ORIF and Osteotomies
Displaced talar body fractures require Open Reduction and Internal Fixation (ORIF) to restore articular congruity and mechanical alignment. The surgical approach is dictated entirely by the fracture pattern.
Surgical Approaches:
- Anteromedial Approach: Utilized for medial body fractures.
- Anterolateral Approach: Utilized for lateral body fractures.
- Medial Malleolar Osteotomy: Frequently, standard approaches provide insufficient visualization of the central and posterior talar dome. A medial malleolar osteotomy is often required for extensile exposure.
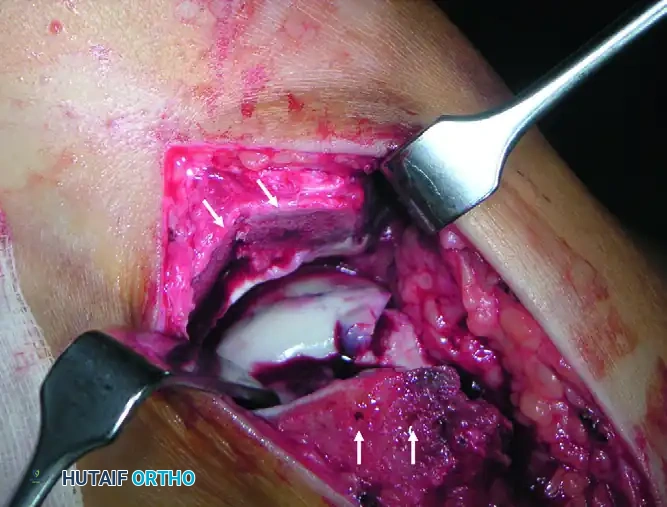
Figure 88-41: Chevron osteotomy of the medial malleolus provides critical exposure of the talar body fracture. Note the predrilled holes (arrows) for subsequent anatomical fixation with small-fragment screws.
Fixation Techniques:
Because the surfaces available for fixation in the talar body almost always contain articular cartilage, standard screw heads will cause devastating iatrogenic joint damage.
- Fixation usually consists of headless compression screws or bioabsorbable pins.
- Countersinking is mandatory to ensure that the hardware is not prominent within the tibiotalar or subtalar joints.
- In severely comminuted fractures, mini-fragment plates (2.0 mm or 2.4 mm) can be applied to the non-articular medial or lateral processes to act as buttress plates.
Complications and Salvage Procedures
Comminuted fractures of the body of the talus with gross displacement are notoriously difficult to treat. The long-term result is almost always uniformly poor, as accurate anatomical replacement of the fragments is often impossible or impracticable due to severe cartilage damage and devascularization.
When primary ORIF fails, or in the setting of severe crush injuries (Sneppen Type V), salvage procedures are indicated.
Talectomy:
In adults, the results of a primary talectomy are usually poor. Patients suffer from chronic pain on weight-bearing, severe hindfoot instability, limb shortening, and a profound lack of endurance.
Calcaneotibial Fusion:
The results of a calcaneotibial fusion combined with talectomy are vastly superior to talectomy alone. This procedure provides a painless, stable, and plantigrade foot, offering enough compensatory function for activities of daily living.
Blair Fusion:
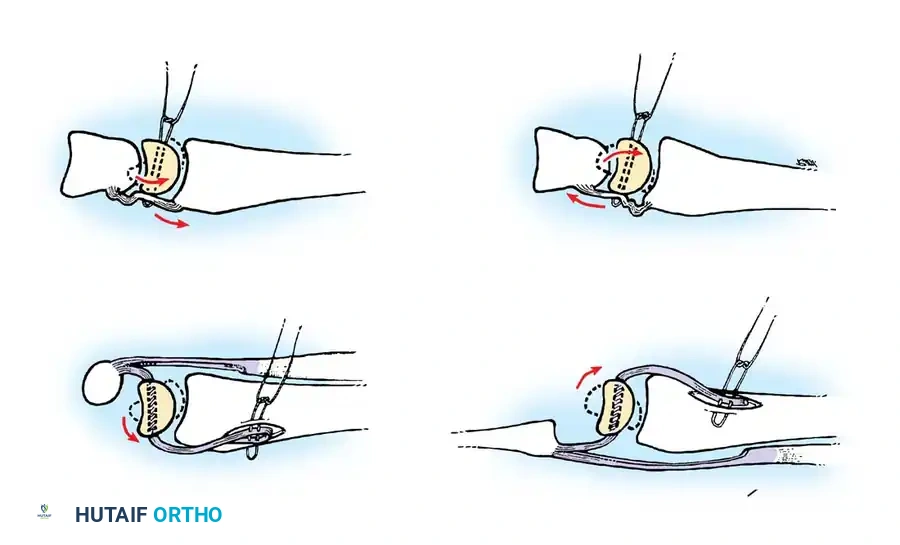
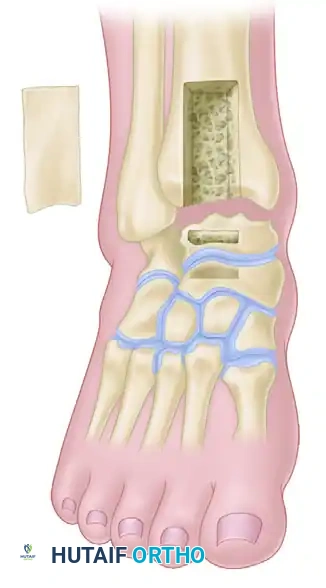
For severe comminuted fractures and fracture-dislocations of the talar body where the talar neck and head remain viable, the Blair fusion is a classic salvage technique. It involves excising the avascular/comminuted talar body and sliding a cortical graft from the anterior tibia into a slot created in the viable talar neck.
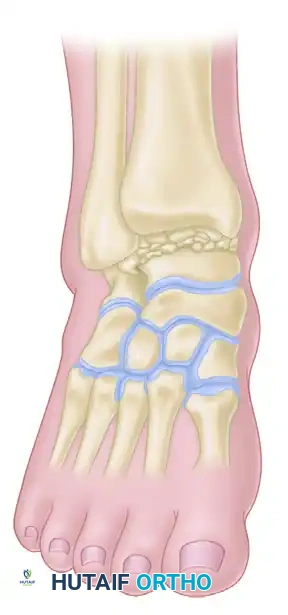
Figure 88-38: Blair fusion for comminuted fractures and fracture-dislocations of the body of the talus. A, Line of skin incision. B, Sliding graft removed from the distal anterior surface of the tibia and comminuted fragments excised. C, Graft embedded in a slot in the neck of the talus.
Conclusion
The management of complex hindfoot pathology requires a deep understanding of both reconstructive and traumatological principles. The Johnson posterior onlay graft technique remains a powerful tool for achieving solid arthrodesis in the compromised ankle and subtalar joint. Conversely, talar body fractures demand immediate, precise surgical intervention, often requiring extensile osteotomies and headless fixation to mitigate the devastating complications of osteonecrosis and arthritis. When primary fixation is impossible, salvage procedures like the Blair fusion or tibiocalcaneal arthrodesis remain essential techniques in the orthopedic surgeon's armamentarium.
📚 Medical References
- talar body fractures, J Bone Joint Surg 86A:180, 2004.
- Viladot A, Lorenzo JC, Salazar J, et al: The subtalar joint: embryology and morphology, Foot Ankle 5:54, 1984.
- Wildenauer E: Die Blutversorgung der Talus, Z Anat 115:32, 1950.
- Zimmer TJ, Johnson KA: Subtalar dislocations, Clin Orthop Relat Res 238:190, 1989.
- Ziran BH, Abidi NA, Scheel MJ:
You Might Also Like