Operative Management of the Rheumatoid Hindfoot and Midfoot: Arthrodesis Techniques
Key Takeaway
The rheumatoid hindfoot frequently presents with heel valgus, midfoot arch collapse, and forefoot rotation. Surgical management prioritizes bony stabilization over soft-tissue procedures due to progressive articular destruction. This guide details evidence-based operative techniques, including subtalar, talonavicular, and calcaneocuboid arthrodesis. Strict adherence to biomechanical alignment—specifically restoring 5 to 10 degrees of hindfoot valgus—is critical for optimal functional outcomes and pain relief in advanced rheumatoid arthritis.
PATHOPHYSIOLOGY OF THE RHEUMATOID HINDFOOT
The most critical clinical challenges encountered in the rheumatoid hindfoot are progressive heel valgus, resultant midfoot arch collapse (pes planus), and forefoot rotation in the axial plane. The pathogenesis of these deformities is multifactorial, primarily driven by chronic synovitis, aggressive synovial hypertrophy, and eventual articular destruction of the tibiotalar (ankle), subtalar, and talonavicular joints.
As the subtalar joint subluxates into valgus, the talar head plantarflexes and migrates medially, stretching the spring ligament and the posterior tibial tendon. This leads to a profound mechanical disadvantage and eventual insufficiency of the posterior tibial muscle-tendon unit.
Indications for Surgical Intervention
Persistent synovitis and synovial hypertrophy of the tibiotalar joint that remains unrelieved after six months of aggressive medical therapy (including disease-modifying antirheumatic drugs [DMARDs] and biologic agents) is a primary indication for synovectomy, provided that major articular damage has not already occurred. Notably, isolated synovectomy of the subtalar joint is seldom indicated due to the rapid progression of the disease in this articulation.
Clinical Pearl: Symptomatic heel valgus and pes planus caused by insufficiency of the posterior tibial muscle-tendon unit in a rheumatoid patient should seldom be treated by tendon transfer, tendon graft, or tendon advancement. The destructive underlying disease process and poor tissue quality doom soft-tissue reconstructions to failure. Bony stabilization is mandatory to maintain correction and relieve symptoms.
An exception to the rule of bony stabilization is isolated heel valgus with symptoms localized strictly along the course of the posterior tibial tendon, accompanied by obvious tenosynovitis and synovial hypertrophy, but without lateral hindfoot pain or fixed deformity. In such rare cases, a tenosynovectomy of the posterior tibial tendon may relieve symptoms, provided the deformity of the subtalar and midtarsal joints is completely passively reducible.
If symptomatic hindfoot valgus is unrelieved by conservative measures (arch supports, custom orthoses, appropriate footwear, and ankle-hindfoot orthoses [AFOs]) and oral anti-inflammatory medications, arthrodesis is indicated.
* Subtalar Arthrodesis: Indicated to correct heel valgus if the midtarsal joint has been spared by the rheumatoid destructive process.
* Triple Arthrodesis: Indicated if the midtarsal joints (talonavicular and calcaneocuboid) are also involved.
A weight-bearing anteroposterior (AP) radiograph of the ankle joint is essential to diagnose concomitant ankle joint instability. The ultimate goal of surgical treatment is to restore hindfoot stability in the optimal biomechanical position: 5 to 10 degrees of hindfoot valgus.
Achieving this alignment often requires manually lifting the head and neck of the talus dorsally and laterally while translating the forefoot medially and plantarward until the hindfoot position is corrected.
Surgical Warning: Forefoot supination must be strictly avoided when final fixation is placed across the talonavicular joint. A percutaneous lengthening of the Achilles tendon (TAL) may be required if the reduction places the ankle into obligate equinus.
CONCOMITANT FOREFOOT DEFORMITY CORRECTION
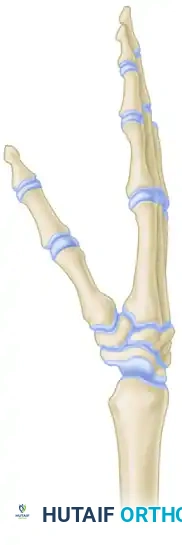
Rheumatoid hindfoot deformities are frequently accompanied by severe forefoot pathology. Addressing proximal interphalangeal (PIP) joint flexion deformities is often necessary to restore global foot mechanics.
Correction of Flexion Deformities of the Proximal Interphalangeal Joints (Technique 81-4)
- Incision and Exposure: Through a dorsal elliptical incision over the affected joint, excise the head and neck of the proximal phalanx. The elliptical incision allows for the removal of redundant skin, providing secondary soft-tissue stability.
- Fixation: Before closing the dorsal wound over the lesser toe PIP joints, insert 0.054-inch Kirschner wires (K-wires) in a retrograde fashion from the PIP joint distally, then drive them proximally through the proximal phalangeal medullary canal and into the lesser metatarsal remnant.
- Note: K-wires may be omitted if the elliptical incision provides adequate stability and if a painstakingly applied forefoot compression dressing is maintained for 3 weeks postoperatively.
- Closure: Remove the tourniquet and obtain meticulous hemostasis. Close the wounds with nonabsorbable 3-0 suture. Apply a bulky forefoot compression dressing. If K-wires have been used, bend the ends to avoid migration or cover them with commercially supplied protective spheres. Close the plantar skin wound with 3-0 nonabsorbable suture, bringing the metatarsophalangeal (MTP) joints into a neutral or slight flexion position.
- First Ray Considerations: If the first MTP joint is treated concurrently with a Keller arthroplasty or an arthrodesis, a separate midline medial incision is recommended to preserve skin bridges.
Postoperative Protocol (Forefoot):
Using a walker or with assistance, the patient is allowed to walk to the bathroom or bedside commode on the day of surgery. After 72 hours, the patient is permitted to be out of bed and bear weight to tolerance in a rigid postoperative shoe.
MIDFOOT PATHOLOGY IN RHEUMATOID ARTHRITIS
Deformity resulting from articular destruction in the intercuneiform, naviculocuneiform, metatarsal-cuneiform, and metatarsal-cuboid joints is relatively uncommon in patients with rheumatoid arthritis compared to osteoarthritis. However, involvement of the first metatarsocuneiform joint is the most frequent midfoot manifestation and may lead to profound instability with collapse of the medial longitudinal arch, often accompanied by hallux valgus.
An arthrodesis of the first metatarsocuneiform joint, and possibly the medial cuneiform-navicular articulation, is required to correct this medial column collapse.
HINDFOOT ARTHRODESIS TECHNIQUES
When performing hindfoot arthrodesis, two primary incisions are typically utilized: one anterolateral and one medial. This allows for comprehensive exposure and internal fixation of the talonavicular and calcaneocuboid joints with large smooth Steinmann pins, staples, or cannulated screws.
Biomechanical Principle: If the midtarsal joints (talonavicular and calcaneocuboid) are rigidly stabilized, and excellent bony apposition is present at the subtalar joint, internal fixation of the subtalar joint may occasionally be omitted, though modern practice heavily favors rigid internal fixation of all prepared joints to maximize fusion rates.
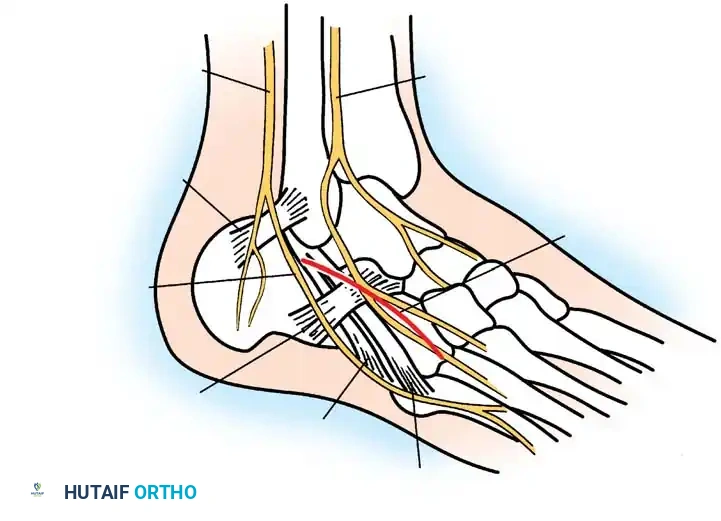
Subtalar Arthrodesis (Technique 81-5)
Anatomical diagram highlighting the sural nerve and peroneal tendons, which must be meticulously protected during the lateral approach to the subtalar joint.
Exposure and Joint Preparation:
* Incision: Begin a straight lateral incision 1 cm inferior to the tip of the fibular malleolus, extending distally over the anterolateral border of the calcaneus and cuboid. Protect the sural nerve and peroneal tendons in the posterior aspect of the wound.
* Identification: Abduct and adduct the midfoot to locate the calcaneocuboid joint; invert and evert the subtalar joint to confirm its location.
* Soft Tissue Elevation: Locate the proximal tendons of origin of the extensor digitorum brevis (EDB) and extensor hallucis brevis (EHB). With sharp dissection, lift them from the sinus tarsi under the lateral border of the muscle belly. Extend the dissection, lifting the EDB from proximal to distal until the calcaneocuboid joint is exposed.
* Crucial Step: Do not open the calcaneocuboid joint if it is not being fused. Use a small-blade knife to identify the joint without violating the dorsolateral or lateral calcaneocuboid ligaments, which are vital stabilizers.
* Subtalar Entry: Enter the joint just superior to the lateral calcaneocuboid ligament. Identify the subtalar joint and remove the deep components of the inferior extensor retinaculum from the floor of the sinus tarsi. Release the talocalcaneal interosseous ligament (medial and posterior to the cervical ligament).
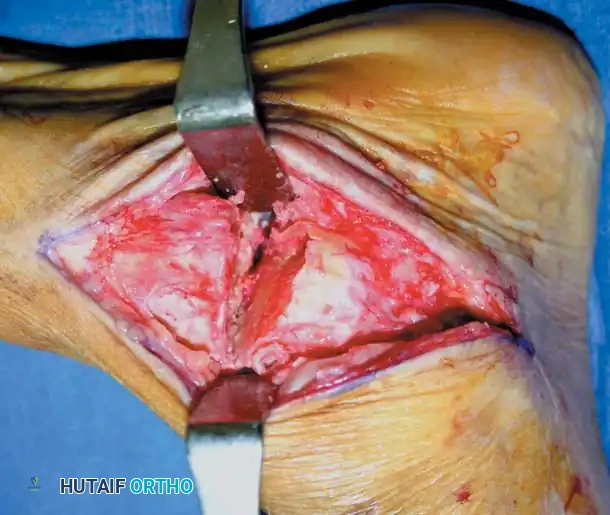
Clinical photograph demonstrating wide exposure of the subtalar joint following soft tissue clearance and placement of a lamina spreader.
- Distraction: Place a right-angle retractor or a curved Hohmann retractor parallel to the posterior facet to lift the peroneal tendons laterally and posteriorly. Place a lamina spreader into the depths of the sinus tarsi, resting on the plantar aspect of the talar neck, lateral to the middle and anterior facets.
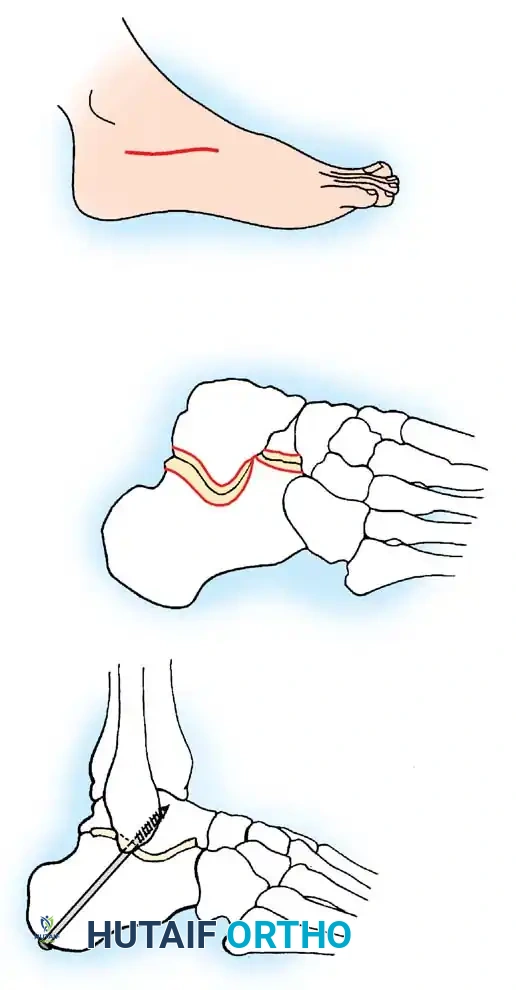
Diagram detailing the articular facets of the subtalar joint. A: Skin incision. B: Excision of the articular surface of the posterior facet. C: Cannulated screw trajectory from the calcaneal tuberosity to the talar neck-body junction.
- Debridement: Depending on joint condition, begin debridement with a curette or osteotome on the anterolateral talar side. If the posterior facet is obscured, distract further. In severely fibrosed joints, drill multiple holes on both surfaces to facilitate debridement.
- Pitfall: Posteromedially, as the posterior facet curves plantarward, the flexor hallucis longus (FHL) tendon is highly vulnerable. Exercise extreme caution.
- Remove all eburnated or subchondral bone down to bleeding, cancellous bone. Small, thin osteotomes (curved and straight) and aggressive curettes are essential.
Alignment and Fixation:
* Assessment: Evaluate the foot position with denuded surfaces apposed. If subluxation is severe (>33% of the lateral calcaneal surface exposed and abutting the fibula), subtalar arthrodesis alone is insufficient. If <33% is exposed, adequate dissection and manual translation can correct the deformity.
* Positioning: Place the calcaneus in 8 to 10 degrees of valgus with the tibiotalar joint at neutral (90 degrees to the leg).
* Bone Grafting: Assess the need for bone graft. If the heel falls into excessive valgus upon apposition, structural bone graft is required to fill the gap and maintain the optimal 5 to 10 degrees of valgus.

Clinical photograph showing the insertion of a guidewire for cannulated screw fixation across the subtalar joint.
- Temporary Fixation: Use one or two 0.062-inch K-wires or a guidewire for temporary fixation.
- Definitive Fixation: In rheumatoid patients, osteopenic bone makes fixation challenging.
- Place a cannulated or noncannulated 6.5-mm or 7.0-mm partially threaded screw from the posterior aspect of the calcaneal tuberosity into the body of the talus.
- The entry point is ~1 cm lateral to the midline of the calcaneal tuberosity. The optimal trajectory exits the talus just distal to the body-neck junction, allowing the screw threads to grip the dense superior cortex of the talar neck.
- Use a washer to prevent the screw head from sinking into osteopenic calcaneal bone.
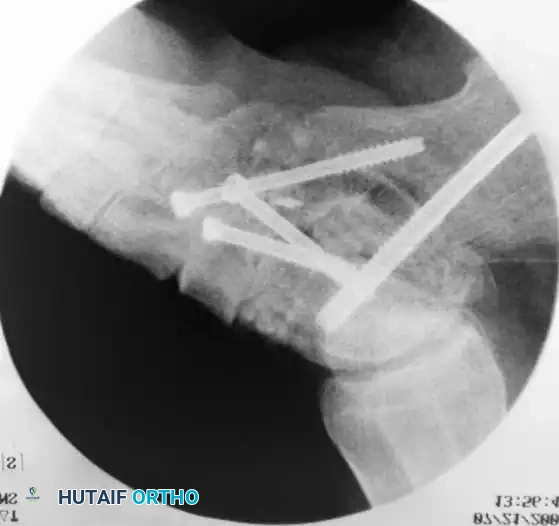
Intraoperative fluoroscopy confirming the trajectory and compression of the large-fragment cannulated screws across the subtalar arthrodesis site.
- Closure: Deflate the tourniquet, place a 1/8-inch drain for continuous suction (24 hours), and apply a bulky compression dressing and short leg cast. Perform an ankle block with 0.5% bupivacaine for immediate postoperative pain control.
Postoperative Protocol (Subtalar Arthrodesis):
Hospitalization for 1 to 2 nights is recommended for pain control and IV antibiotics. The drain is removed on postoperative day 1. Non-weight-bearing (NWB) ambulation is initiated. Frail patients may require a wheelchair for 4 to 6 weeks. Sutures are removed at 3 weeks, and a new short leg cast is applied. Full weight-bearing is restricted for 6 to 8 weeks. Radiographic fusion is typically evident by 12 weeks, at which point transition to a supportive shoe or walking boot is permitted.
Talonavicular Arthrodesis (Technique 81-6)
The talonavicular joint is the primary joint of the transverse tarsal complex. Its fusion virtually eliminates all complex hindfoot motion, making rigid fixation and perfect alignment critical.
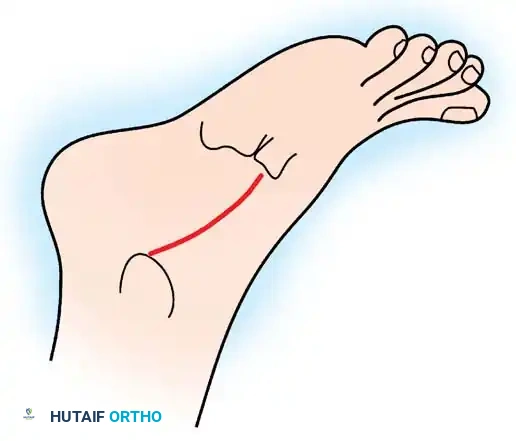
Diagram illustrating the medial incision approach for talonavicular arthrodesis.
- Incision: Make an incision distal to the tip of the medial malleolus along the dorsomedial aspect of the talonavicular joint, ending at the naviculocuneiform joint. Carry dissection through subcutaneous tissue, strictly protecting the anterior tibial tendon beneath the dorsal skin flap.
- Exposure: Release the capsule medially, dorsally, and plantarward. Place a towel clip on the dorsomedial surface of the navicular to apply traction, significantly increasing joint exposure.
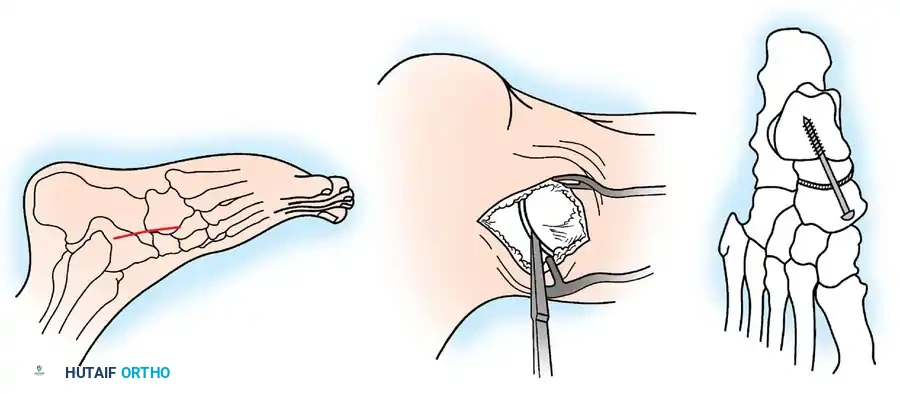
Talonavicular arthrodesis technique. A: Medial incision. B: Articular surfaces removed down to bleeding subchondral bone using an osteotome. C: Compression screw in place.
- Joint Preparation: Using a small, curved osteotome or curette, remove the articular cartilage. Abducting, adducting, plantarflexing, and dorsiflexing the ankle during distraction allows preparation of 90% of the talonavicular articulation.
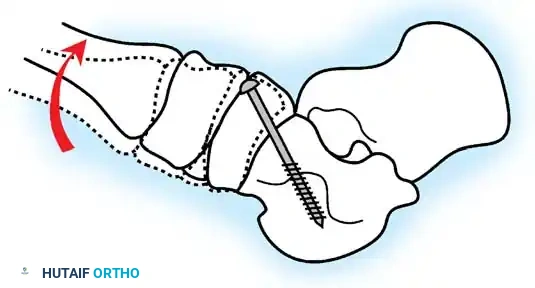
Diagram demonstrating the correction of forefoot abduction and supination. The forefoot must be derotated to neutral alignment prior to fixation.
- Alignment: Place the foot into satisfactory alignment: calcaneus in 5 to 10 degrees of valgus, forefoot in neutral abduction/adduction. Do not leave the forefoot supinated. Derotate the forefoot once the heel is in the proper position and the talonavicular joint is apposed.
- Fixation Preparation: Make a small trough in the dorsomedial edge of the medial cuneiform to countersink the screw head, preventing cortical levering or prominence.
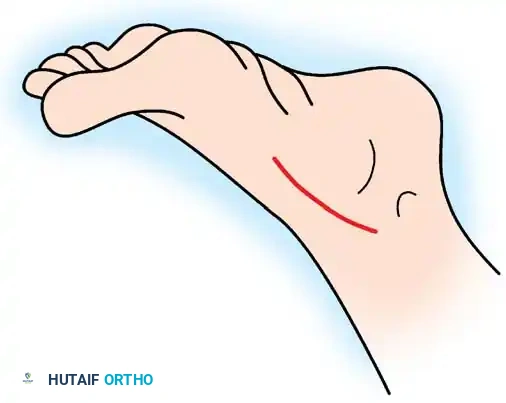
Diagram showing the trajectory of the compression screw from the medial cuneiform/navicular into the head and neck of the talus.
- Screw Insertion: Place a guidewire from medial-plantar to lateral-dorsal, entering the head and neck of the talus. Drill parallel to the wire (or ream over it for a cannulated system). Measure and tap (tapping is rarely needed in rheumatoid osteopenic bone, but mandatory in sclerotic osteoarthritis).
- Compression: Use a partially threaded 6.5-mm or 7.0-mm screw to lag the surfaces together. A washer is frequently required in rheumatoid bone. Alternatively, two 4.0-mm fully threaded cancellous screws using a lag technique (overdrilling the near cortex) provide excellent rotational stability.
- Closure: Release the tourniquet, insert a drain, close in layers, and apply a compression splint.
Calcaneocuboid Joint Arthrodesis (Technique 81-7)
When the lateral column is involved, or as part of a formal triple arthrodesis, the calcaneocuboid joint must be addressed.
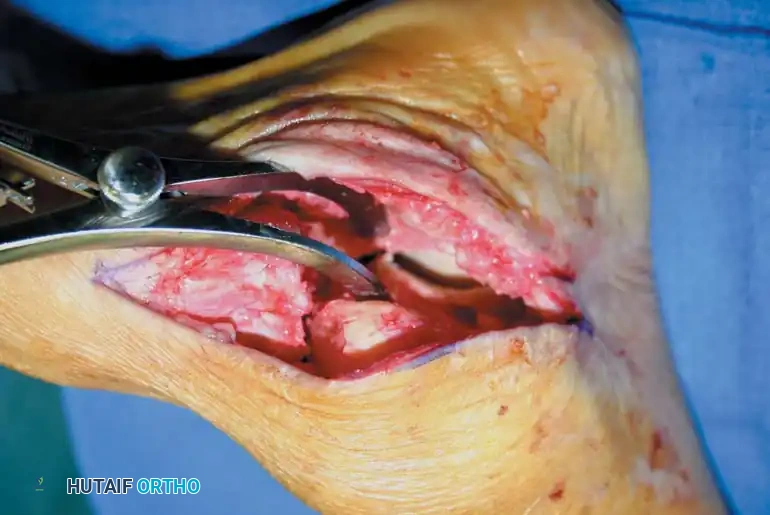
Diagram illustrating the dorsolateral approach and screw trajectory for isolated calcaneocuboid arthrodesis.
- Incision: On the dorsolateral surface of the calcaneocuboid joint (located by abducting/adducting the forefoot), begin a straight incision extending 2 to 3 cm proximal and distal to the joint.
- Nerve Protection: Meticulously protect any branches of the sural nerve. Raise dorsal and plantar flaps sharply off the bone, elevating the extensor digitorum brevis (EDB) dorsally.
- Exposure: Expose the plantar aspect of the calcaneocuboid joint by elevating the full-thickness plantar flaps. Retract the peroneal tendons inferiorly.
- Preparation: Resect the articular cartilage of both the distal calcaneus and the proximal cuboid using a sharp osteotome or high-speed burr, ensuring parallel cuts to prevent lateral column shortening, which can exacerbate forefoot abduction. Penetrate the subchondral plate to expose healthy, bleeding cancellous bone.
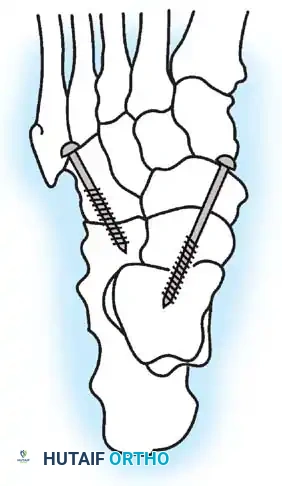
Diagram showing dual screw fixation utilized in a combined talonavicular and calcaneocuboid (Chopart) arthrodesis.
- Fixation: Appose the flat cancellous surfaces. Fixation is typically achieved using a two-hole compression plate, staples, or a single 4.5-mm or 6.5-mm partially threaded lag screw directed from the anterolateral cuboid into the plantar-medial calcaneus. Ensure the lateral column length is maintained to balance the medial column correction achieved at the talonavicular joint.
- Closure: Perform a layered closure, ensuring the EDB muscle belly is sutured back over the hardware to provide soft-tissue coverage and prevent hardware prominence. Apply a rigid, well-padded short leg splint in neutral alignment.
You Might Also Like