Tibiotalocalcaneal Fusion with Femoral Head Allograft: A Masterclass in Complex Hindfoot Reconstruction
Key Takeaway
Join us in the OR for a masterclass on tibiotalocalcaneal fusion with femoral head allograft. We'll meticulously reconstruct severe talar defects, addressing avascular necrosis or failed total ankle arthroplasty. Learn precise surgical anatomy, intricate intraoperative steps, critical pearls, and comprehensive postoperative management to achieve stable, pain-free hindfoot function.
Alright, fellows, gather 'round. Welcome to a challenging but incredibly rewarding case today. We're tackling a complex hindfoot reconstruction, specifically a tibiotalocalcaneal fusion utilizing a femoral head allograft. This procedure is reserved for patients with significant talar body pathology, where conventional fusion or revision options are simply not viable. It's a testament to reconstructive orthopaedics, and I want you to pay close attention to every detail.
Indications for Femoral Head Allograft
When do we consider such an extensive reconstructive option? Primarily, we're looking at two main scenarios:
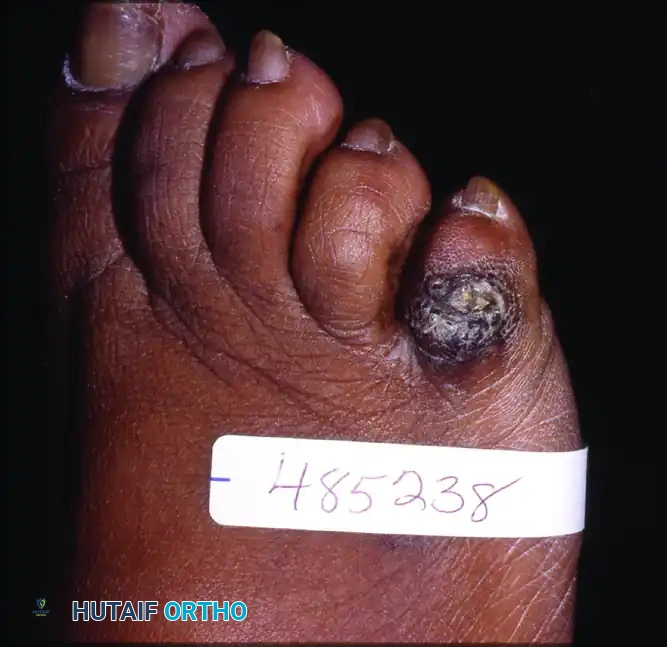
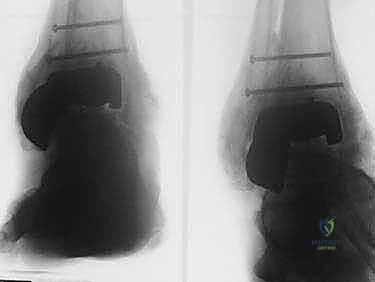
- Talar Body Avascular Necrosis (AVN) with Collapse or Infection: This is our patient today. We have a severe case of talar body AVN, compounded by previous infection, leading to significant structural collapse and pain. The talus, being largely cartilaginous in its articulating surfaces and having a tenuous blood supply, is particularly susceptible to AVN. Once the talar body collapses, the biomechanics of the ankle and subtalar joints are irrevocably altered, often necessitating fusion. Infection, as in this case, further compromises bone viability and requires aggressive débridement, often leaving a substantial defect.
* Failed Total Ankle Arthroplasty (TAA) with Insufficient Bone Stock: In some unfortunate cases, a primary TAA can fail due to aseptic loosening, subsidence, or periprosthetic infection, leaving a significant void in the talus and/or tibia. When there isn't enough viable bone for a standard revision TAA or even a straightforward fusion, a femoral head allograft provides the necessary structural support to bridge this large defect and achieve a solid fusion.
Contraindications and Preoperative Planning
Before we even consider bringing a patient to the OR for this, meticulous planning is paramount.
Preoperative Assessment and Imaging
We review comprehensive imaging: plain radiographs, CT scans, and MRI. The CT scan is crucial for assessing the extent of bone loss, the morphology of the remaining viable bone surfaces (distal tibia, talar head/neck, posterior calcaneal facet), and the overall alignment of the hindfoot. We're looking for viable bone margins that will provide a good bed for fusion.
Patient Selection and Deformity Correction
One critical contraindication to note, fellows, is severe hindfoot valgus, typically exceeding 25 degrees. While this technique can correct some deformity, attempting to correct severe valgus can lead to excessive tension on the lateral soft tissues. This tension can compromise vascularity, leading to skin necrosis and poor wound healing, which, as you know, can be disastrous in a high-risk fusion case. In such scenarios, a tibiocalcaneal fusion with medial ankle shortening might be a more appropriate, albeit different, strategy.
Allograft Procurement
Our femoral head allograft is already being prepared. It's thawed in a warm saline bath at the beginning of the procedure, ensuring it's ready when we need it. This takes time, so communicate with your tissue bank and OR staff well in advance.
Patient Positioning and Anesthesia
Let's talk about how our patient is set up.
Anesthesia
Our anesthesiologist has successfully administered a spinal anesthetic block coupled with general anesthesia. This provides excellent intraoperative pain control and muscle relaxation, which is vital for precise surgical maneuvers, and also helps with postoperative pain management.
Operating Table Setup
The patient is in a supine position on the operating table. Crucially, we've placed a hip bump – often a rolled blanket or a specialized foam wedge – under the ipsilateral hip. This bump facilitates internal rotation of the leg, which brings the lateral malleolus and the entire lateral aspect of the ankle and hindfoot into a more accessible position for our incision and subsequent dissection. Ensure the bump is stable and doesn't shift during the case.
Lower Extremity Preparation
The entire lower extremity, from the mid-thigh down to the toes, is meticulously prepped and draped in the usual sterile fashion. This typically involves a chlorhexidine or iodine-based solution, ensuring a wide sterile field. We then apply an impervious stockinette followed by a split sheet drape to isolate the surgical site.
Tourniquet Application
A thigh tourniquet has been applied high on the thigh. Before inflation, we exsanguinate the leg using an Esmarch bandage, wrapping it tightly from distal to proximal. This minimizes blood loss and provides a clear, bloodless field, which is essential for identifying critical structures and ensuring precise bone cuts and hardware placement. Once exsanguinated, the tourniquet is inflated to 250 mm Hg. We'll monitor tourniquet time closely, aiming to keep it under two hours if possible.
Comprehensive Surgical Anatomy: A Quick Review
Before we make our incision, let's quickly review the critical anatomy we'll encounter:
- Lateral Malleolus and Fibula: Our primary landmark. The fibula provides stability to the ankle, and its distal portion forms the lateral wall. We'll be osteotomizing this.
- Peroneal Tendons: The peroneus longus and brevis tendons run posterior to the lateral malleolus, within the peroneal groove. They are crucial for eversion and plantarflexion. We must retract them carefully.
- Sural Nerve: This sensory nerve typically runs along the posterior aspect of the fibula and then distally along the lateral foot. It's superficial and highly susceptible to injury during incision and retraction. We must protect it.
- Superficial Peroneal Nerve: This nerve typically emerges more anteriorly, piercing the deep fascia in the distal leg and then dividing into intermediate and medial dorsal cutaneous nerves. While our incision is more posterior, branches can be at risk with wide anterior retraction.
- Distal Tibia (Plafond): The weight-bearing surface articulating with the talus. We'll be preparing this for fusion.
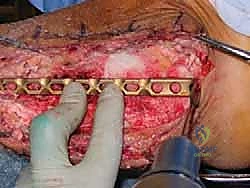
- Talus: Specifically, the talar head and neck, and the posterior facet of the subtalar joint. The body is the primary area of pathology we're addressing.
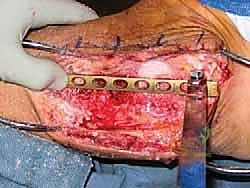
- Calcaneus: The heel bone. We'll be fusing to its superior surface and inserting our blade plate here.
- Neurovascular Bundle (Posterior Tibial Artery, Veins, and Tibial Nerve): Located on the medial side of the ankle, posterior to the medial malleolus. While our primary approach is lateral, aggressive medial retraction or over-penetration with hardware can injure this critical bundle.
Step-by-Step Intraoperative Execution
Now, let's scrub in and begin.
1. Incision and Exposure
"Scalpel, please."
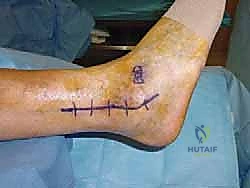
We begin with a 12 to 14-cm lateral incision. This curvilinear incision starts approximately 6 cm proximal to the ankle joint, running along the posterior border of the distal fibula. It then extends distally, curving slightly anteriorly along the anterior border of the peroneal tendons, terminating at the peroneal tubercle on the lateral aspect of the calcaneus.
Surgical Warning: Be mindful of the sural nerve during your skin incision and subcutaneous dissection. It typically lies superficially in this region. Use meticulous blunt dissection with small Metzenbaum scissors or a fine Bovie cautery on a low setting to identify and protect it. Any stretching or direct injury can lead to chronic neuropathic pain or numbness.
Once through the skin and subcutaneous tissue, we encounter the deep fascia. Incise this longitudinally. Now, identify the peroneus longus and brevis tendons. These are our key landmarks.
"Fellows, carefully retract the peroneal tendons posteriorly. Use a broad Hohmann or a small Army-Navy retractor, ensuring you don't damage the tendon sheaths or the tendons themselves."
This posterior retraction exposes the distal fibula, the lateral ankle joint capsule, and the subtalar joint. You'll now have a clear view of the lateral aspect of the hindfoot.
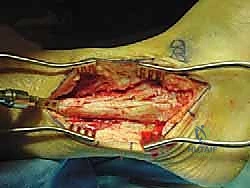
2. Fibulectomy and Débridement
Next, we need to gain access to the talar body and the fusion surfaces. This requires a fibulectomy.
"Give me an oscillating saw, please. We're going to perform a fibulectomy."
We'll osteotomize the fibula approximately 6 cm proximal to the ankle joint. Make a clean, perpendicular cut. Ensure your saw blade is protected from the surrounding soft tissues with malleable retractors. After the osteotomy, carefully dissect the distal fibula from its attachments, including the distal tibiofibular syndesmosis and any remaining ligamentous attachments.
"Retractors here, please. We'll excise this segment of the fibula."
Once excised, hand me a bone rongeur. We'll morcelize this fibular segment into small chips. This autograft will be invaluable later to augment our fusion. Place these chips in a sterile basin, ready for mixing.
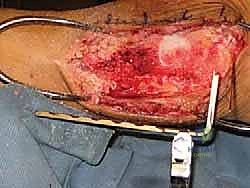
Now, the true extent of the pathology becomes evident.
"Alright, fellows, this is where we get meticulous. We need to débride all avascular bone, remove any remaining osteophytes, and if applicable, extract any failed implant components from a previous total ankle arthroplasty."
Use osteotomes, curettes, and a high-speed burr to remove all non-viable, sclerotic bone. You're looking for viable, bleeding cancellous bone at the fusion surfaces. These surfaces include:
* The distal tibial plafond.
* The talar head and neck.
* The posterior facet of the subtalar joint on the calcaneus.
Ensure all necrotic tissue and any signs of infection are thoroughly removed. We want a clean, healthy bed for our allograft.
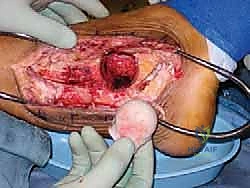
3. Defect Sizing and Reaming
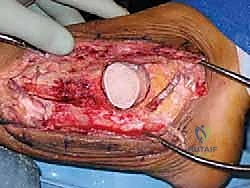
With the defect now fully exposed and débrided, we need to precisely size it for the femoral head allograft.
"Let's get the total hip arthroplasty acetabular reamer set ready. We'll use the male reamers for sizing."
Carefully select the acetabular reamer that best fits the defect. You're aiming for a snug, congruent fit. We're essentially creating a spherical socket to receive our spherical allograft.
Surgical Warning: Protect the surrounding soft tissues meticulously with Army-Navy or Hohmann retractors while using the power reamers. These reamers are aggressive, and soft tissue injury, especially to neurovascular structures, is a significant risk.
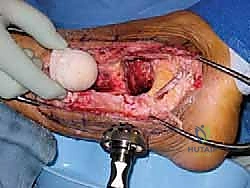
"Now, an assistant is critical here. Please hold the foot and ankle firmly in the desired position for fusion."
The ideal fusion position is:
* Neutral ankle dorsiflexion/plantarflexion.
* Approximately 5 degrees of hindfoot valgus relative to the distal tibia. This slight valgus helps optimize weight-bearing mechanics and reduces the risk of varus collapse, which is poorly tolerated.
* Neutral rotation of the foot on the tibia.
"With the ankle and hindfoot held precisely in this neutral position, proceed with reaming the defect. Remember, we're only removing enough subchondral bone to expose viable, softer cancellous bone. This cancellous interface is crucial for biological fusion."
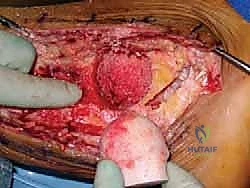
The ankle should remain relatively stable even after extensive débridement, so provisional fixation isn't usually necessary at this stage. As you ream, collect the bone shavings. These will be mixed with our morcelized fibular autograft to create a powerful bone slurry.
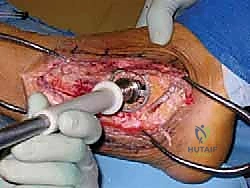
4. Allograft Preparation
Our femoral head allograft has been thawing since the start of the case.
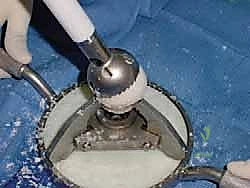
"Let's get the Allogrip Bone Vice, DePuy, ready."
Place the thawed femoral head allograft securely in the bone vice, ensuring the three limbs grip the femoral neck firmly. This provides stable control for shaping.
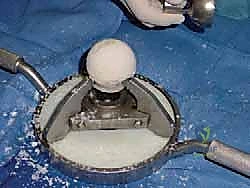
"Now, we'll use the female reamer that corresponds exactly to the size of the male reamer we used to prepare the defect."
Mount the female reamer and use it to decorticate the femoral head allograft. This removes the hard subchondral bone, exposing the underlying cancellous bone, which is essential for promoting fusion with the recipient site.

References B
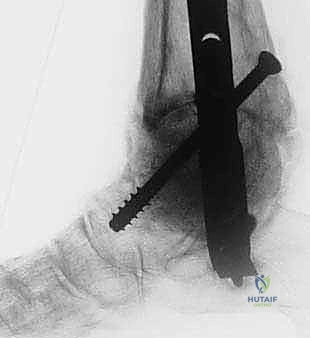
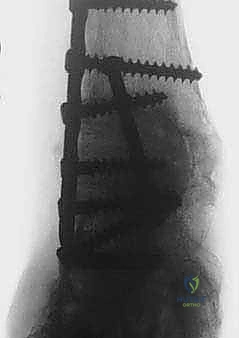
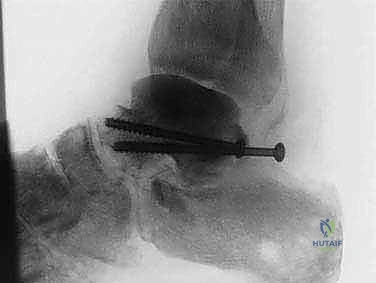
FIG 3 • AP ( A ) and lateral ( B ) radiographs taken 3 months postoperatively demonstrating callus formation about the femoral head allograft.
-
Alvarez RG, Barbour TM, Perkins TD. Tibiocalcaneal arthrodesis for nonbraceable ankle deformity. Foot Ankle Int 1994;15:354–359.
-
Chiodo CP, Acevedo JI, Sammarco VJ, et al. Intramedullary rod fixation compared with blade-plate-and-screw fixation for tibiocalcaneal arthrodesis: A biomechanical investigation. J Bone Joint Surg Am 2003;85A:2425–2428.
-
Den Hartog BD, Palmer DS. Femoral head allografts for large talar defects. Tech Foot Ankle Surg 2008;7:264–270.
-
Myerson MS, Alvarez RG, Lam PW. Tibiocalcaneal arthrodesis for the management of severe ankle and hindfoot deformities. Foot Ankle Int 2000;21:643–650.
You Might Also Like