Subtalar Distraction Arthrodesis: Comprehensive Surgical Technique and Protocol
Key Takeaway
Subtalar distraction arthrodesis is a powerful salvage procedure for late complications of calcaneal fractures, specifically addressing loss of hindfoot height, subtalar arthritis, and subfibular impingement. By utilizing a structural tricortical iliac crest bone graft and rigid screw fixation, surgeons can restore the talocalcaneal angle, decompress the peroneal tendons, and correct varus or valgus malalignment, ultimately improving patient gait and alleviating chronic hindfoot pain.
Introduction to Distraction Arthrodesis
Distraction arthrodesis of the subtalar joint is a highly specialized, reconstructive salvage procedure primarily indicated for the management of late complications following displaced intra-articular calcaneal fractures. Originally popularized by Carr et al., this technique addresses the complex, multiplanar deformities characteristic of calcaneal malunions.
When a calcaneal fracture heals in a collapsed, malaligned position, the patient typically presents with a constellation of debilitating symptoms: severe subtalar arthrosis, loss of hindfoot height, horizontalization of the talus leading to anterior ankle impingement, and a "blowout" of the lateral calcaneal wall that causes subfibular impingement of the peroneal tendons. Traditional in situ subtalar arthrodesis may address the arthritic pain but fails to correct the profound biomechanical derangements. Distraction arthrodesis, utilizing a structural tricortical bone graft, simultaneously restores hindfoot height, corrects the talocalcaneal angle, and decompresses the lateral compartment, thereby restoring the functional biomechanics of the foot and ankle.
Pathoanatomy and Biomechanical Rationale
Understanding the pathoanatomy of a calcaneal malunion is paramount for executing a successful distraction arthrodesis. The classic deformity involves:
- Loss of Hindfoot Height: The collapse of the posterior facet reduces the calcaneal pitch and horizontalizes the talus. This decreases the talocalcaneal angle (normally 25 to 45 degrees) and leads to anterior tibiotalar impingement during dorsiflexion, severely limiting the patient's gait cycle.
- Lateral Wall Exostosis (Blowout): As the calcaneus collapses axially, it expands laterally. This lateral mass impinges against the distal fibula, creating a "nutcracker" effect on the peroneal tendons, leading to tenosynovitis, subluxation, or tearing.
- Hindfoot Varus: The tuberosity frequently shifts into varus, shifting the mechanical axis laterally and overloading the lateral column of the foot.
💡 Clinical Pearl: The "Nutcracker" Effect
Subfibular impingement is often the primary source of lateral hindfoot pain in calcaneal malunions, sometimes overshadowing the subtalar arthritis itself. Failure to adequately decompress the lateral wall during arthrodesis will result in persistent postoperative pain, regardless of a solid fusion.
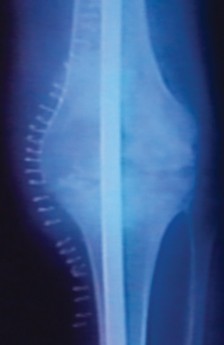
Peroneal tenogram in an acute fracture of the calcaneus. The peroneal sheaths fail to fill with contrast medium opposite the laterally displaced fragment of the calcaneus, illustrating the severe impingement that persists into the malunion phase. (Courtesy of Daiji Kashiwagi, MD.)
Preoperative Planning and Templating
Meticulous preoperative planning is required to determine the extent of the deformity and the size of the structural graft needed.
- Radiographic Evaluation: Standard weight-bearing anteroposterior (AP), lateral, and axial (Harris) views of both feet are mandatory. A weight-bearing lateral view of the contralateral, unaffected foot is highly valuable for templating the normal talocalcaneal angle and determining the exact height of the structural graft required.
- Advanced Imaging: A computed tomography (CT) scan of the hindfoot (coronal, sagittal, and axial planes) is essential to evaluate the degree of subtalar arthrosis, the exact morphology of the lateral wall blowout, and the presence of any subfibular impingement or peroneal tendon pathology.
Patient Positioning and Preparation
Optimal positioning is critical for simultaneous access to the hindfoot and the bone graft harvest site.
- Positioning: Place the patient in the lateral decubitus position with the affected side facing up. Secure the patient with a beanbag and ensure all bony prominences (especially the contralateral peroneal nerve) are heavily padded. An axillary roll must be placed.
- Preparation: The entire affected lower extremity is prepped and draped free to allow for intraoperative manipulation and assessment of alignment.
- Graft Site: Concurrently prepare and drape the ipsilateral posterior iliac crest. The posterior crest is preferred over the anterior crest as it provides a greater volume of bone and a more favorable cortical curvature for structural hindfoot grafting.
- Hemostasis: Apply a well-padded pneumatic thigh tourniquet to ensure a bloodless surgical field, which is vital for identifying the distorted anatomy.
Surgical Technique: Step-by-Step
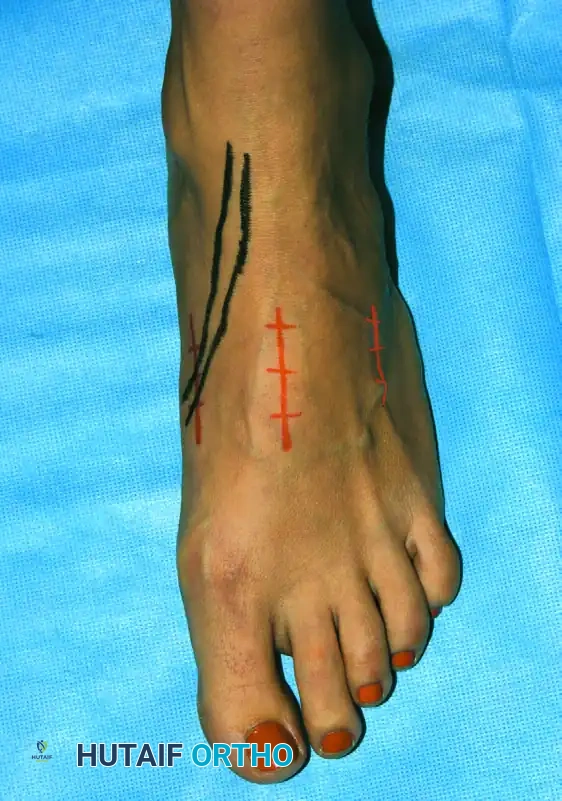
1. The Surgical Approach
Under tourniquet control, make a longitudinal posterolateral Gallie-type approach to the subtalar joint. The incision should be placed carefully between the posterior margin of the fibula and the lateral border of the Achilles tendon.
⚠️ Surgical Warning: Incision Trajectory
There should be absolutely no horizontal extension of this incision. Horizontal limbs create undue tension on the wound edges during closure, significantly increasing the risk of marginal necrosis, wound dehiscence, and sural nerve injury.
2. Lateral Wall Decompression
Deepen the dissection to expose the lateral calcaneal wall subperiosteally. The sural nerve must be identified, mobilized, and protected throughout the procedure.
Identify the prominent, laterally displaced bone mass (the "blowout"). Using an osteotome or an oscillating saw, excise this lateral wall to restore a more normal calcaneal width. This step is non-negotiable; it ensures complete peroneal and fibular decompression. The excised autograft bone can be morselized and saved to supplement the arthrodesis site later.
3. Joint Preparation and Distractor Application
Identify the subtalar joint. Due to the malunion, the joint line may be obscured by osteophytes and scar tissue.
Apply a femoral distractor to facilitate joint opening and deformity correction.
* Place one half-pin into the medial subcutaneous border of the distal tibia.
* Place the second half-pin into the medial aspect of the calcaneal tuberosity.
💡 Biomechanical Pearl: Medial Pin Placement
The medial application of the distractor is a critical technical nuance. As distraction is applied, the medial placement inherently helps to correct the typical hindfoot varus deformity by creating a valgus moment arm.
Apply distraction gradually. Use a lamina spreader within the joint to aid in exposure. Meticulously denude the posterior facet of the subtalar joint down to bleeding subchondral bone using curettes, osteotomes, and a high-speed burr. Complete removal of all cartilage and fibrous tissue is imperative for a successful arthrodesis.
4. Deformity Correction and Graft Sizing
With the joint distracted and prepared, manually correct any residual heel varus or valgus by manipulation.
Obtain intraoperative fluoroscopic radiographs (lateral view) to assess the correction. The goal is to restore the lateral talocalcaneal angle to its normal physiological range of 25 to 45 degrees. Compare this intraoperative view with the preoperative template of the contralateral normal foot.
Once the desired alignment and height are achieved, use a caliper to measure the exact dimensions of the subtalar joint gap.
5. Bone Graft Harvest and Insertion
Proceed to the prepared posterior iliac crest. Harvest an appropriately sized tricortical structural bone graft based on your caliper measurements.
- For severe deformities, a block up to 2.5 cm in height may be required.
- It is often necessary to harvest and shape two separate tricortical pieces to completely fill the medial-to-lateral void of the distracted subtalar joint. Filling the gap completely is crucial to provide broad structural support and prevent late collapse into varus or valgus.
Carefully impact the tricortical graft(s) into the subtalar gap. Pack any remaining voids with the morselized autograft obtained during the lateral wall decompression. Once the graft is securely seated, slowly release the distraction forces. The inherent tension of the soft tissues will compress the calcaneus and talus against the structural graft, locking it into place.
6. Rigid Internal Fixation
Rigid fixation is required to neutralize rotational forces and prevent the graft from crushing under compressive loads.
Insert two fully threaded, 6.5-mm AO cancellous screws. These are typically placed through small stab incisions in the non-weight-bearing portion of the posterior heel. The trajectory should be directed anteriorly, superiorly, and slightly medially, passing through the calcaneus, traversing the structural graft, and purchasing solidly into the dense bone of the talar body and neck.
⚠️ Surgical Warning: Screw Selection
You must use fully threaded screws for this procedure. Partially threaded lag screws will compress the joint, which will crush the structural tricortical graft, resulting in an immediate loss of the height and alignment you just worked so hard to restore. Fully threaded screws act as position screws, maintaining the distracted space while providing rigid stability.
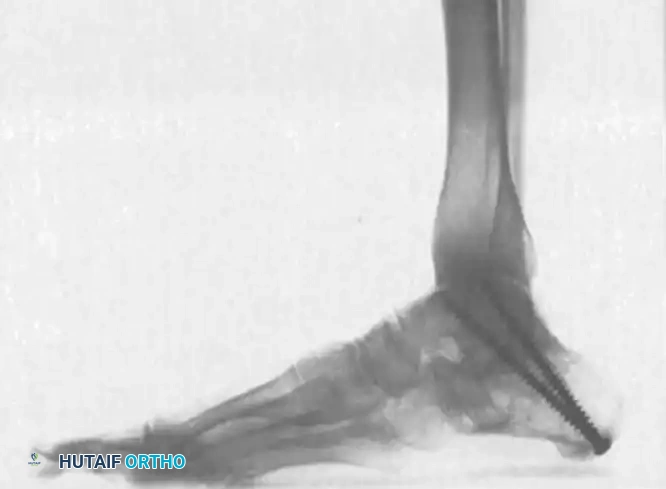
Lateral radiograph demonstrating distraction arthrodesis. Note the restoration of the talocalcaneal angle, the placement of the structural bone graft, and the use of fully threaded screws to maintain height without compressing the graft.
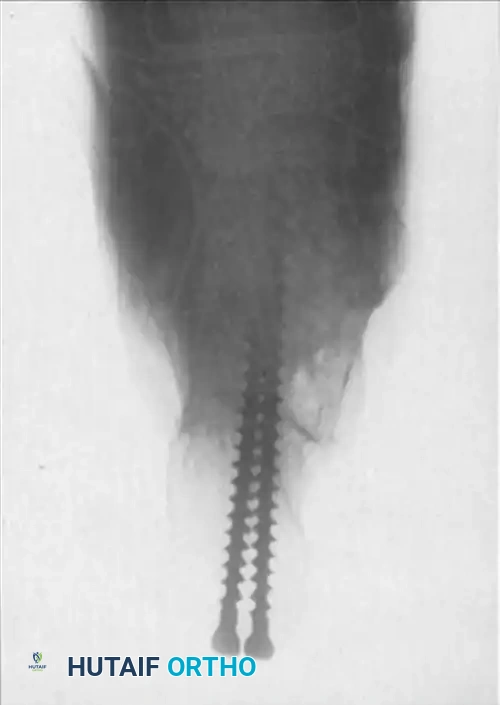
Axial (Harris) view confirming the parallel placement of two fully threaded 6.5-mm screws, providing rigid rotational stability to the arthrodesis construct.
7. Closure and Final Imaging
Obtain final multiplanar fluoroscopic images to confirm the exact position of the hardware, the alignment of the hindfoot, and the seating of the bone graft.
Thoroughly irrigate the wound. Place a closed suction drain deep within the wound bed to prevent hematoma formation, which can compromise wound healing. Close the subcutaneous tissues and skin in a layered, tension-free manner. Apply a bulky, well-padded posterior splint.
Comprehensive Postoperative Care Protocol
The postoperative rehabilitation following a distraction arthrodesis is lengthy and requires strict patient compliance to ensure graft incorporation and prevent hardware failure.
Phase 1: Immediate Postoperative (0 to 2 Weeks)
- Drain Management: The closed suction drain is typically removed at 24 hours postoperatively, provided output is minimal.
- Elevation: Strict elevation of the foot above heart level is mandatory for the first 72 hours to mitigate severe postoperative edema.
- Immobilization: The initial splint or cast is left intact and not bivalved, provided the neurovascular status remains satisfactory.
- Weight Bearing: Strict non-weight-bearing (NWB) status with crutches or a walker is enforced.
Phase 2: Early Healing (2 to 6 Weeks)
- Wound Check: At 2 weeks, the patient is seen in the clinic. The cast is removed, and the surgical incisions are inspected. Sutures are removed if the wound is fully healed.
- Immobilization: A well-molded, short-leg non-walking cast is applied.
- Compliance Protocol: If patient compliance concerning strict non-weight-bearing is questionable, a long-leg cast with the knee bent at 45 degrees should be applied. This prevents the patient from bearing weight and neutralizes the pull of the gastrocnemius-soleus complex, which could otherwise load the calcaneus and displace the graft.
- Rehabilitation: Active toe exercises are strongly encouraged to prevent tendon adhesions and promote venous return.
Phase 3: Intermediate Healing (6 to 12 Weeks)
- Clinical Evaluation: At 6 weeks, the cast is removed, and clinical stability is assessed.
- Radiographic Evaluation: AP, lateral, and axial radiographs of the arthrodesis are obtained to assess for early graft incorporation and hardware integrity.
- Immobilization & Weight Bearing: If radiographs demonstrate satisfactory healing, a short-leg walking cast or a rigid controlled ankle motion (CAM) boot is applied. Weight bearing to tolerance (WBAT) is now allowed and gradually advanced.
Phase 4: Late Maturation (12+ Weeks)
- Radiographic Evaluation: Final radiographs are obtained at 12 weeks to confirm solid bony union of the arthrodesis and complete incorporation of the tricortical graft.
- Footwear: Once clinical and radiographic union is confirmed, the patient is transitioned out of the cast/boot. Usually, a leather lace-up shoe with a rigid shank is recommended to support the midfoot and hindfoot.
- Edema Control: A leather lace-up ankle corset or high-grade compression stocking is prescribed to control dependent edema for another 4 to 6 weeks.
💡 Clinical Pearl: Managing Patient Expectations
Extensive preoperative counseling is required regarding postoperative swelling. The patient must be explicitly informed that dependent swelling around the hindfoot and ankle is a normal physiological response to this extensive reconstruction and may persist for 6 to 9 months after surgery.
Conclusion
Distraction arthrodesis remains the gold standard salvage procedure for debilitating calcaneal malunions. By adhering to strict biomechanical principles—meticulous lateral wall decompression, precise medial distraction, structural tricortical grafting, and rigid position-screw fixation—the orthopedic surgeon can reliably restore hindfoot architecture. While technically demanding and requiring a protracted recovery period, this procedure offers profound improvements in pain relief, gait mechanics, and overall quality of life for patients suffering from the sequelae of severe calcaneal trauma.
📚 Medical References
You Might Also Like