Intertrochanteric Varus Osteotomy: A Masterclass in Femoral Reorientation
Key Takeaway
This masterclass provides an exhaustive, real-time guide to intertrochanteric varus osteotomy. Fellows will learn intricate surgical anatomy, meticulous preoperative planning, and granular intraoperative execution from incision to hardware placement. We cover essential pearls, potential pitfalls, and comprehensive postoperative management, ensuring a deep understanding of femoral reorientation to improve hip joint congruency and prevent progressive destruction.
Introduction and Epidemiology
Proximal femoral osteotomy represents a cornerstone in the armamentarium of joint-preserving hip surgery. This chapter focuses comprehensively on the use of intertrochanteric adduction (varus) osteotomy, as well as abduction (valgus), flexion, extension, and rotational osteotomies, to reorient the proximal femur. The primary objective of these interventions is to improve femoral head coverage, restore hip joint congruency, and optimize the biomechanical distribution of forces across the articular surface.

Historically, prior to the overwhelming success and widespread adoption of total hip arthroplasty (THA), proximal femoral osteotomies were routinely performed for primary osteoarthritis. Currently, surgical treatment for advanced stages of degenerative joint disease is dominated by THA. However, in the young, active patient with secondary osteoarthritis or structural hip dysplasia, joint preservation remains the gold standard. The epidemiology of conditions necessitating femoral osteotomy heavily features childhood developmental disorders that alter proximal femoral morphology. These include developmental dysplasia of the hip (DDH), Legg-Calvé-Perthes disease, and slipped capital femoral epiphysis (SCFE).

If the joint load constantly exceeds the resistibility of the articular cartilage, arthrotic changes inevitably begin to develop. Untreated, this pathoanatomy results in progressive destruction of the hip joint. By altering the proximal femoral geometry, surgeons can move damaged cartilage out of the primary weight-bearing zone and bring healthy cartilage into articulation, thereby halting or significantly delaying the progression of secondary osteoarthritis.

Pathogenesis of Hip Incongruency
A variety of pathologic processes can affect hip joint congruence. Incongruences of the hip joint are associated primarily with a reduced weight-bearing area, which exponentially increases the load and shear forces on the remaining joint surface. When conditions such as coxa valga or severe antetorsion reduce the contact area between the femoral head and the acetabular dome, the peak contact stress increases. This mechanical overload initiates a cascade of chondrocyte apoptosis, proteoglycan depletion, and subchondral bone sclerosis, culminating in early-onset osteoarthritis.

Surgical Anatomy and Biomechanics
The hip joint is a strong, highly constrained, multiaxial ball-and-socket synovial joint. In the standing position, the entire weight of the upper body is transmitted through the pelvis to the lower extremities. Understanding the intricate anatomy and biomechanics of this joint is paramount for the successful execution of a proximal femoral osteotomy.

Osteology and Articular Cartilage
Because the depth of the acetabulum is increased by the fibrocartilaginous labrum, more than half of the femoral head fits within the acetabulum, providing inherent osseous and soft-tissue stability. The femoral head is covered with hyaline articular cartilage, except for the fovea capitis, which serves as the attachment site for the ligamentum teres. The central and inferior part of the acetabulum, the acetabular fossa, contains the pulvinar (a fat pad) and does not participate physiologically in the transmission of weight-bearing forces.

Vascular Anatomy
The preservation of the blood supply to the femoral head is the most critical safety consideration during any proximal femoral osteotomy. The main blood supply of the femoral head is derived from the circumflex femoral arteries, especially the medial circumflex femoral artery (MCFA).

The deep branch of the MCFA courses posteriorly and superiorly along the femoral neck, giving rise to the retinacular vessels that penetrate the capsule and supply the epiphysis. The lateral circumflex femoral artery (LCFA) provides an anterior contribution, though it is less dominant in the adult hip. When performing an intertrochanteric osteotomy, meticulous dissection and avoidance of excessive posterior capsular stripping are required to prevent iatrogenic avascular necrosis (AVN).

Biomechanical Principles
The rationale for intertrochanteric osteotomy is heavily based on Pauwels' biomechanical principles. The joint reaction force across the hip is dictated by body weight, the abductor muscle force, and their respective lever arms.

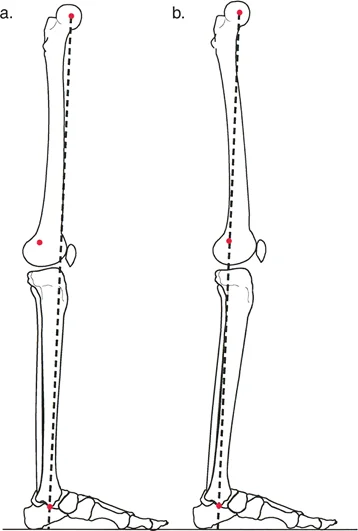
A varus osteotomy decreases the neck-shaft angle, which medializes the femoral shaft relative to the center of rotation. This effectively lengthens the abductor lever arm, thereby reducing the required abductor muscle force and subsequently decreasing the overall joint reaction force. Furthermore, varus angulation improves the containment of the femoral head within the acetabulum in cases of coxa valga. Conversely, a valgus osteotomy increases the neck-shaft angle and is typically employed to redirect a superior-lateral cartilaginous defect (such as in localized avascular necrosis or non-union of the femoral neck) out of the primary weight-bearing zone, converting shear forces into compressive forces to promote healing.

Indications and Contraindications
The prerequisite for a successful operative treatment is the absolute necessity that the joint incongruence can be improved. This is typically assessed dynamically under fluoroscopy or with functional plain radiographs (e.g., maximum abduction or adduction views) prior to definitive surgical intervention.

Clinical conditions that constitute good indications for this operative technique include:
1. Mild epiphyseal dysplasia of the femoral head with the lateral part of the head intact.
2. Circumscribed anteromedial necrosis or osteochondritis dissecans (OCD) of the femoral head.
3. Valgus head, in particular when the fovea lies within the weight-bearing zone of the hip joint.
4. Developmental dysplasia of the hip (DDH), specifically when the procedure is performed in conjunction with pelvic osteotomy (e.g., periacetabular osteotomy) to obtain better joint congruences.
5. Posttraumatic joint incongruence or malunion of the proximal femur.

Contraindications primarily revolve around the presence of advanced degenerative changes where cartilage viability is insufficient to support joint preservation.

Operative and Non Operative Parameters
| Parameter | Operative Indications (Femoral Osteotomy) | Non-Operative / Arthroplasty Indications |
|---|---|---|
| Patient Age | Generally < 40-50 years | Generally > 50 years (relative) |
| Joint Space | Preserved (> 2 mm) on functional views | Obliterated (< 2 mm) or bone-on-bone |
| Range of Motion | Functional ROM (Flexion > 90°, Abduction > 15°) | Severe stiffness or ankylosis |
| Arthritis Grade | Tönnis Grade 0, 1, or early 2 | Tönnis Grade 3 |
| Inflammatory Disease | Absent (Mechanical etiology only) | Present (e.g., Rheumatoid Arthritis) |
| Congruency | Improvable on functional radiographs | Non-congruent on all functional views |

Pre Operative Planning and Patient Positioning
Thorough preoperative evaluation and meticulous templating are the most critical steps in ensuring the success of a proximal femoral osteotomy.

Patient History and Physical Findings
To assess the duration and severity of symptoms as well as potential actuating circumstances, a complete history must be taken. This must explicitly include childhood disorders such as developmental hip dysplasia, sustained Perthes disease, or slipped capital femoral epiphysis.

General examination of the hip should always include active and passive range of motion as well as gait inspection to identify Trendelenburg or abductor lurch, and precise leg length comparison (both apparent and true leg length discrepancies).

Specific physical examination methods include:
1. Anterior impingement test (FADIR): The test is positive if the passive movement (flexion, adduction, internal rotation) provokes groin pain, which relates to a femoroacetabular impingement (FAI) at the anterior wall or a labral tear.
2. Apprehension test: The test is positive if the patient complains about a feeling of imminent joint luxation during extension and external rotation, which indicates an insufficient anterior coverage of the femoral head.

Imaging and Other Diagnostic Studies
A standard plain, anteroposterior (AP) radiograph of the entire pelvis is needed to determine the type of pathology in the femoral head or the femoral neck. The patient is positioned with slight internal rotation of the hip (approximately 15 degrees) to compensate for the normal femoral antetorsion, allowing for accurate assessment of the true neck-shaft angle.

Other helpful projections are:
1. Axial view: To assess the anterior-posterior morphology of the femoral head-neck junction.
2. False-profile view: Described by Lequesne, this serves as a true lateral projection of the femoral head and acetabulum, allowing measurement of the anterior coverage (VCA angle).
3. Oblique view: Tangential to the superoanteromedial edge of the acetabulum to assess localized structural deficiencies.

Functional views (AP pelvis in maximum abduction and maximum adduction) are mandatory to confirm that the proposed osteotomy will indeed improve joint congruency and increase the weight-bearing articular surface. Digital templating is utilized to determine the exact size of the wedge to be resected, the optimal site for the osteotomy, and the specific angle of the blade plate or dynamic hip screw required for stable fixation.

Patient Positioning
The patient is typically placed in the supine position on a radiolucent operating table. A fracture table may be utilized by some surgeons to aid in traction and rotational control, though a flat radiolucent table allows for easier manipulation of the limb to assess intraoperative range of motion and impingement. The entire ipsilateral lower extremity is prepped and draped free. An image intensifier (C-arm) is positioned to allow unhindered AP and lateral views of the proximal femur and hip joint throughout the procedure.

Detailed Surgical Approach and Technique
The same operative technique can be used for correction of the proximal femur in abduction, flexion, extension, and rotation, and every combination thereof. The precise execution of the osteotomy dictates the biomechanical outcome.

Surgical Exposure
A direct lateral approach to the proximal femur is most commonly employed. A longitudinal incision is made centered over the greater trochanter, extending distally along the femoral shaft. The fascia lata is incised in line with the skin incision.

The vastus lateralis is identified. While there is no true internervous plane here (the vastus lateralis is entirely innervated by the femoral nerve), the muscle can be safely split longitudinally or elevated subperiosteally from the linea aspera and retracted anteriorly. This exposes the lateral aspect of the greater trochanter and the proximal femoral shaft. Retractors are carefully placed anteriorly and posteriorly, ensuring the posterior retractor does not plunge deeply to avoid injury to the sciatic nerve or the ascending branches of the MCFA.

Guidewire Placement and Seating Chisel
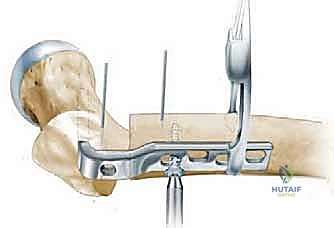
Under fluoroscopic guidance, a Kirschner wire is inserted into the femoral neck and head to determine the trajectory of the fixation device. For a standard 90-degree angled blade plate used in a varus osteotomy, the seating chisel is driven into the proximal femur parallel to the guidewire. The entry point is typically in the greater trochanter, and the trajectory must account for the planned angular correction.

It is imperative that the chisel is seated in the anterior half of the femoral neck on the lateral view to allow room for the subsequent osteotomy and to avoid posterior cortical blowout.

Executing the Osteotomy
The level of the osteotomy is typically at the intertrochanteric line, just proximal to the lesser trochanter. For a varus (adduction) osteotomy, a medially based closing wedge is planned. Using an oscillating saw, the transverse cut is made first, perpendicular to the femoral shaft.

The second cut is made obliquely to remove the predetermined wedge of bone. If rotational correction is also required, reference marks (e.g., drill holes or Kirschner wires) are placed in the proximal and distal fragments prior to the completion of the osteotomy to accurately gauge the degree of derotation.

Reduction and Fixation
Once the wedge is removed, the osteotomy is closed. The proximal fragment is manipulated to achieve the desired varus, flexion/extension, and rotation.

The angled blade plate (or alternative device such as a dynamic hip screw or proximal femoral locking plate) is inserted into the path created by the seating chisel.

The plate is then clamped to the femoral shaft. An articulated tension device is often applied to the distal end of the plate to generate axial compression across the osteotomy site, which is critical for primary bone healing and immediate structural stability.

Cortical screws are subsequently placed to secure the plate to the distal fragment. Fluoroscopy is utilized to confirm the final alignment, hardware position, and joint congruency.

Complications and Management
Despite meticulous planning and execution, proximal femoral osteotomies carry inherent risks. Recognizing and managing these complications promptly is essential for optimal patient outcomes.

Common Complications and Salvage Strategies
| Complication | Estimated Incidence | Etiology / Risk Factors | Salvage Strategy |
|---|---|---|---|
| Nonunion / Delayed Union | 2% - 5% | Inadequate compression, thermal necrosis, smoking | Revision fixation with autologous bone grafting; assess for infection. |
| Avascular Necrosis (AVN) | 1% - 3% | Injury to MCFA during posterior dissection or intra-articular hardware | Core decompression (early); Total Hip Arthroplasty (late/collapse). |
| Malunion (Over/Undercorrection) | 5% - 10% | Inaccurate preoperative templating, loss of fixation | Corrective osteotomy if symptomatic; shoe lift for LLD. |
| Hardware Failure | 2% - 4% | Premature weight-bearing, nonunion | Revision open reduction and internal fixation (ORIF). |
| Leg Length Discrepancy (LLD) | 10% - 20% | Inherent to varus (shortens) or valgus (lengthens) correction | Contralateral epiphysiodesis (in growing patients); shoe lift. |
| Infection | 1% - 2% | Prolonged operative time, comorbidities | Irrigation and debridement, targeted antibiotics, hardware retention if stable. |

One of the most challenging biomechanical complications of a varus osteotomy is the creation of a significant leg length discrepancy and a secondary Trendelenburg gait. Because the varus angulation shortens the limb and alters the resting tension of the abductor musculature, patients must be counseled preoperatively regarding these functional changes.

If hardware penetrates the joint space, rapid chondrolysis can occur. Intraoperative fluoroscopy using multiple planes, including a true lateral and an AP view with traction, is mandatory to confirm that the blade or screw has not breached the subchondral bone.

Post Operative Rehabilitation Protocols
The success of a proximal femoral osteotomy relies heavily on a structured, phased postoperative rehabilitation protocol. The primary goal in the early postoperative period is to protect the osteotomy site to allow for osseous union while preventing stiffness and deep vein thrombosis (DVT).

Phase I: Protection and Early Motion (0 to 6 Weeks)
Patients are typically restricted to toe-touch weight-bearing (TTWB) or a maximum of 15 to 20 kg of partial weight-bearing on the operative extremity using crutches or a walker. Active-assisted and passive range of motion exercises are initiated immediately. Active abduction is generally avoided for the first 4 to 6 weeks to prevent excessive tensile forces on the lateral cortex and the fixation construct. Chemical DVT prophylaxis (e.g., low molecular weight heparin or direct oral anticoagulants) is administered according to standard orthopedic guidelines.

Phase II: Progressive Weight-Bearing (6 to 12 Weeks)
At the 6-week postoperative mark, AP and lateral radiographs are obtained to assess for callus formation and obliteration of the osteotomy line. If radiographic healing is progressing satisfactorily, weight-bearing is gradually advanced by 25% of body weight per week until full weight-bearing is achieved. Aquatic therapy and stationary cycling can be introduced to enhance joint mobility and initiate gentle muscle strengthening.

Phase III: Strengthening and Functional Return (3 to 6 Months)
Once osseous union is confirmed and full weight-bearing is tolerated without pain, the focus shifts to aggressive abductor strengthening and gait normalization. Patients who underwent a varus osteotomy may require a shoe lift on the operative side to accommodate the iatrogenic shortening and assist in eliminating a compensatory Trendelenburg lurch. Return to high-impact activities is generally deferred until 6 to 9 months postoperatively.

Summary of Key Literature and Guidelines
The foundational principles of proximal femoral osteotomy are deeply rooted in the biomechanical models proposed by Friedrich Pauwels in the mid-20th century. Pauwels eloquently demonstrated how altering the proximal femoral geometry could decrease the resultant joint reaction force, thereby facilitating the regeneration of articular cartilage in dysplastic and osteoarthritic hips.
Subsequent contributions by Renato Bombelli expanded on these concepts, categorizing osteoarthritis into morphological types and tailoring the osteotomy (varus, valgus,
Clinical & Radiographic Imaging
You Might Also Like