Mastering Fixator-Assisted Nailing: Precision Deformity Correction, Hardware & Osteotomy
Key Takeaway
Fixator-Assisted Nailing (FAN) is an orthopedic technique for precise deformity correction. It combines external fixator accuracy for acute intraoperative alignment with intramedullary nail stability. This method overcomes limitations of standalone fixation, ensuring accurate osteotomy and hardware placement for superior biomechanical outcomes.
Evolution of Deformity Correction and Fixator Assisted Nailing
The evolution of orthopedic deformity correction has fundamentally shifted from prolonged, cumbersome purely external fixation methods to sophisticated, integrated approaches. Central to this modern paradigm is the concept of Fixator Assisted Nailing. This surgical technique marries the precise, triplanar control of an external fixator during the acute intraoperative correction phase with the definitive, internal stability of an intramedullary nail.
Understanding hardware and osteotomy considerations is not merely about selecting the right implant. It requires a profound comprehension of lower extremity biomechanics, spatial geometry, and biological bone healing. When addressing complex angular deformities, particularly those that manifest in multiple planes or at multiple levels, the surgeon must meticulously plan the intervention. Failure to accurately calculate the Center of Rotation of Angulation, the osteotomy level, and the hardware trajectory inevitably leads to iatrogenic translation, malalignment, or hardware failure.
This comprehensive guide delves deeply into the biomechanical principles, preoperative planning protocols, and step by step surgical execution required for successful deformity correction using advanced hardware and osteotomy techniques. It is designed to provide orthopedic surgeons, residents, and fellows with a high yield, actionable framework for mastering Fixator Assisted Nailing.
The Paradigm Shift in Orthopedic Surgery
Historically, the Ilizarov method revolutionized the treatment of complex deformities, nonunions, and limb length discrepancies. However, standalone external fixation requires the patient to wear a bulky frame for months. This prolonged external fixation time is associated with high rates of pin tract infections, joint stiffness, muscle tethering, and significant psychological distress for the patient.
Conversely, standalone intramedullary nailing is highly tolerable for the patient and provides excellent load sharing internal stability. Yet, achieving precise angular and rotational correction acutely over a guidewire without external control is notoriously difficult. The intramedullary nail tends to follow the path of least resistance within the canal, often resulting in residual deformity or malunion when used in isolation for complex corrections.
Fixator Assisted Nailing bridges this gap. By utilizing the external fixator strictly as an intraoperative reduction tool, the surgeon achieves the microscopic precision of a frame. Once the optimal alignment is secured, the intramedullary nail is deployed to lock the correction in place, allowing for immediate removal of the external frame.
Paley Principles of Lower Extremity Alignment
Before selecting hardware or performing an osteotomy, the foundational principles of deformity analysis, popularized by Dr. Dror Paley, must be rigorously applied. The success of Fixator Assisted Nailing relies entirely on accurate preoperative templating and a deep understanding of standard lower extremity alignment.
Mechanical Axis Deviation and Joint Orientation
The mechanical axis of the lower extremity is defined by a line drawn from the center of the femoral head to the center of the ankle mortise. In a normally aligned limb, this line passes just medial to the center of the knee joint, typically measured at eight millimeters plus or minus seven millimeters medial to the midline of the knee.
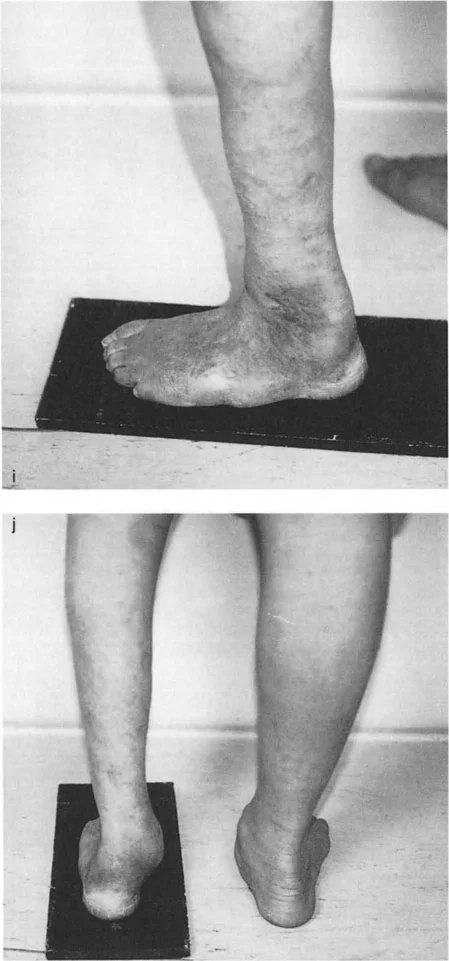
Mechanical Axis Deviation occurs when this axis falls outside the normal parameters. A medial shift indicates a varus deformity, while a lateral shift indicates a valgus deformity. Mechanical Axis Deviation is the primary indicator that a deformity requires correction to prevent abnormal load distribution across the articular cartilage, which predictably leads to premature joint degeneration and osteoarthritis.
To properly align the limb, the surgeon must not only center the mechanical axis but also restore normal joint orientation angles. These angles dictate the relationship between the anatomical or mechanical axis of the bone and the joint line. When executing Fixator Assisted Nailing, the hardware trajectory must be planned to respect and restore these specific angular parameters.
Standard Joint Orientation Angles
The following table summarizes the critical joint orientation angles required for accurate deformity analysis and surgical planning. Mastery of these values is non negotiable for the deformity surgeon.
| Angle Abbreviation | Full Name | Normal Value | Clinical Significance |
|---|---|---|---|
| mLDFA | Mechanical Lateral Distal Femoral Angle | 87° | Dictates distal femoral valgus/varus alignment. |
| mMPTA | Mechanical Medial Proximal Tibial Angle | 87° | Critical for proximal tibial osteotomy planning. |
| mLPFA | Mechanical Lateral Proximal Femoral Angle | 90° | Assesses proximal femoral geometry and neck shaft angle. |
| mLDTA | Mechanical Lateral Distal Tibial Angle | 89° | Determines ankle mortise orientation relative to the tibia. |
| JLCA | Joint Line Convergence Angle | 0° to 2° | Evaluates intra-articular deformity or ligamentous laxity. |
Clinical Pearls for Alignment Analysis
- Always obtain full length, weight bearing, standing anteroposterior radiographs of both lower extremities on a single cassette. Supine films are inadequate for assessing Mechanical Axis Deviation.
- Ensure the patellae are facing forward during the radiograph to accurately assess the coronal plane without rotational artifact.
- Evaluate the Joint Line Convergence Angle carefully. A widened JLCA may indicate ligamentous laxity rather than a true osseous deformity, which will alter your surgical approach and expected correction magnitude.
Mastering the Center of Rotation of Angulation
The Center of Rotation of Angulation is the intersection point of the proximal and distal mechanical or anatomical axes of a deformed bone. Identifying the Center of Rotation of Angulation is the most critical step in osteotomy planning. The relationship between the Center of Rotation of Angulation, the osteotomy site, and the hinge of the fixation device dictates the geometric outcome of the correction.
Paley Osteotomy Rules Explained
Dr. Paley defined three fundamental osteotomy rules that govern how a bone will behave when cut and realigned. Understanding these rules is essential for preventing secondary translation or iatrogenic deformities during Fixator Assisted Nailing.
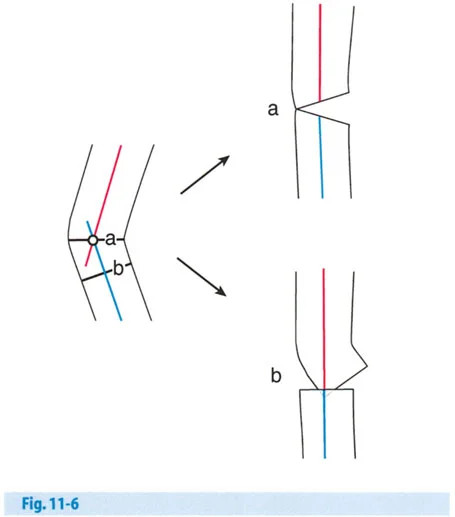
Osteotomy Rule 1
If the osteotomy and the hinges of the fixation device are placed exactly at the Center of Rotation of Angulation, the bone will undergo pure angular correction without any translation. The mechanical axis will be perfectly restored, and the proximal and distal bone segments will remain flush at the osteotomy site. This is the ideal scenario for bone healing, as it maximizes cortical contact and provides optimal stability for the intramedullary nail.
Osteotomy Rule 2
In many clinical scenarios, making the cut exactly at the Center of Rotation of Angulation is biologically or mechanically unfavorable. For example, the Center of Rotation of Angulation may lie within the joint space, or it may be located in poor quality diaphyseal bone where healing is compromised.
If the osteotomy is performed at a level different from the Center of Rotation of Angulation, but the hinge of correction remains exactly at the Center of Rotation of Angulation, the mechanical axis will realign correctly. However, the bone ends will translate at the osteotomy site. The surgeon must anticipate this translation. While the limb will be straight, the offset bone ends may complicate intramedullary nail insertion, requiring a larger diameter reamer or specific blocking screw placement to guide the nail through the translated segments.
Osteotomy Rule 3
If the hinge of correction and the osteotomy are both placed away from the Center of Rotation of Angulation, a secondary translation deformity will be induced. This results in a zig zag mechanical axis. The bone ends will remain flush, but the overall mechanical axis of the limb will be shifted, failing to resolve the Mechanical Axis Deviation. This is a severe planning error and must be avoided, as it leaves the patient with altered joint biomechanics despite a healed osteotomy.
Biomechanical Advantages of Fixator Assisted Nailing
Fixator Assisted Nailing was developed specifically to overcome the inherent limitations of both standalone external fixation and standalone intramedullary nailing. By combining the strengths of both modalities, surgeons can achieve unprecedented accuracy and patient satisfaction.
Overcoming Limitations of Traditional Fixation
Standalone external fixation allows for highly accurate, gradual correction. The Ilizarov method utilizes the principle of distraction osteogenesis, which is excellent for large corrections and limb lengthening. However, the biological cost includes a high rate of pin tract infections, severe patient discomfort, and the risk of fracture through the regenerate bone upon frame removal.
Standalone intramedullary nailing is comfortable and provides excellent internal stability. The nail acts as an internal splint, allowing for early weight bearing. However, performing an acute correction over a guidewire is challenging. The reamer and the nail naturally follow the widest part of the medullary canal. If the deformity is juxta-articular, the "bell-mouthing" effect of the metaphysis provides no guidance for the nail, leading to loss of reduction during hardware insertion.
The Synergy of Combined Techniques
Fixator Assisted Nailing provides the optimal solution by utilizing the external fixator temporarily in the operating room. It acts as a highly adjustable surgical jig. The surgeon can acutely correct the deformity, restore the mechanical axis, and hold the bone fragments in perfect alignment. Once the alignment is locked in by the fixator, the medullary canal is reamed, and the intramedullary nail is introduced and locked. The fixator is then immediately removed.
Key advantages include:
* Immediate Patient Comfort: The patient wakes up with internal hardware and no bulky external frame, drastically improving postoperative quality of life.
* High Precision Alignment: The fixator allows for microscopic, dialed in adjustments in the coronal, sagittal, and axial planes before the internal fixation is committed.
* Early Weight Bearing: The load sharing nature of the intramedullary nail promotes secondary bone healing via micromotion while preventing catastrophic failure.
* Protection of Soft Tissues: Minimally invasive incisions for the osteotomy and pin placements preserve the periosteal blood supply, which is critical for rapid osteogenesis.
Preoperative Planning Protocols for Fixator Assisted Nailing
Meticulous preoperative planning is the cornerstone of successful Fixator Assisted Nailing. The surgeon must transition from a conceptual understanding of the deformity to a concrete, mathematical surgical blueprint.
Systematic Radiographic Evaluation
The planning process begins with high quality imaging. Standardized weight bearing radiographs are mandatory. The surgeon should employ the following systematic approach:
- Draw the Mechanical Axis: Draw a line from the center of the femoral head to the center of the ankle mortise. Measure the Mechanical Axis Deviation in millimeters.
- Determine the Primary Deformity Source: Evaluate the joint orientation angles (mLDFA, mMPTA, mLDTA) to determine whether the deformity originates in the femur, the tibia, or both.
- Locate the Center of Rotation of Angulation: Draw the proximal and distal anatomical or mechanical axes of the deformed bone segment. The intersection is the Center of Rotation of Angulation.
- Measure the Magnitude of Deformity: Measure the angle between the intersecting axes to determine the exact degrees of correction required.
- Plan the Osteotomy Level: Select an osteotomy site that balances biological healing potential (metaphyseal bone is preferred over diaphyseal) with mechanical feasibility (Osteotomy Rule 1 or 2).
- Template the Hardware: Superimpose digital templates of the intramedullary nail to determine the optimal diameter, length, and entry point. Assess the need for blocking screws to prevent the nail from drifting into the wide metaphyseal bone.
Clinical Pearls for Templating
- Account for magnification. Ensure your digital templating software is properly calibrated using a radiographic marker of known size.
- Plan the entry point meticulously. In proximal tibial deformities, a slightly more lateral or medial entry point may be required to guide the nail correctly through the corrected osteotomy site.
- Anticipate the "wedge effect." When performing an opening wedge osteotomy, the limb will lengthen. When performing a closing wedge osteotomy, the limb will shorten. Calculate these length discrepancies during the planning phase.
Correcting Oblique Plane and Multiapical Deformities
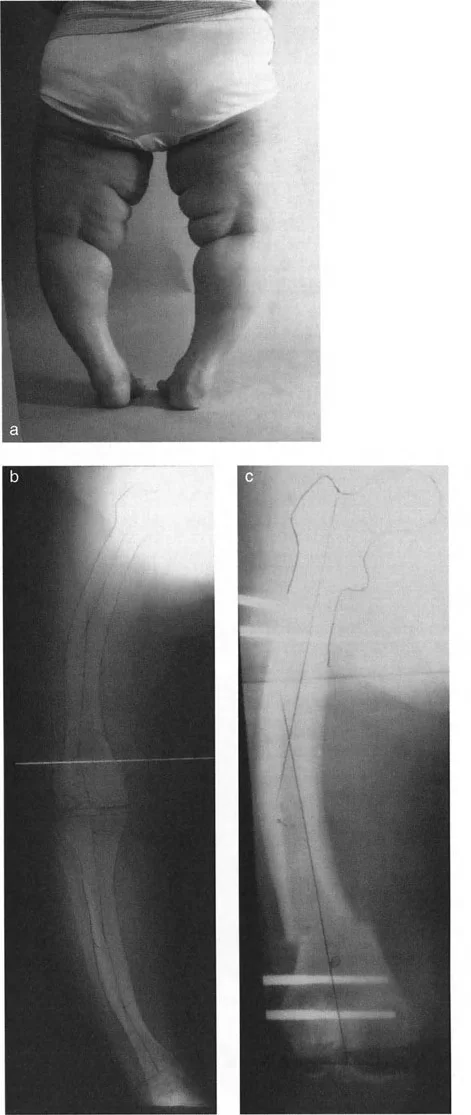
A common pitfall in deformity correction is treating a bowed limb as a simple single plane issue. In reality, most angular deformities have elements in at least two planes. For example, a patient may present with varus in the coronal plane and recurvatum in the sagittal plane. This combination creates an oblique plane deformity.
The Biplanar Fixator Method
The true magnitude and direction of an oblique plane deformity can be calculated using trigonometric principles or specialized software. The maximum deformity lies in the oblique plane, which is rotated away from the standard coronal and sagittal planes. Surgically correcting this requires rigid multiplanar control.
The biplanar fixator method of Fixator Assisted Nailing is specifically designed for this purpose. By applying half pins in orthogonal planes (typically anterior to posterior and medial to lateral), the surgeon creates a rigid construct that allows for independent manipulation of the coronal and sagittal deformities.
When utilizing the biplanar fixator, the surgeon can apply translation forces, rotational forces, and angular forces simultaneously. This is particularly critical for multiapical deformities, where the bone has multiple Centers of Rotation of Angulation. In these complex cases, multiple osteotomies may be required, and the fixator must bridge the entire segment to maintain overall limb alignment while the intramedullary nail is passed sequentially through each corrected segment.
Step by Step Surgical Execution of Fixator Assisted Nailing
The transition from preoperative plan to surgical execution requires discipline and strict adherence to protocol. The following steps outline the standard approach for Fixator Assisted Nailing of a lower extremity deformity.
Patient Positioning and Initial Setup
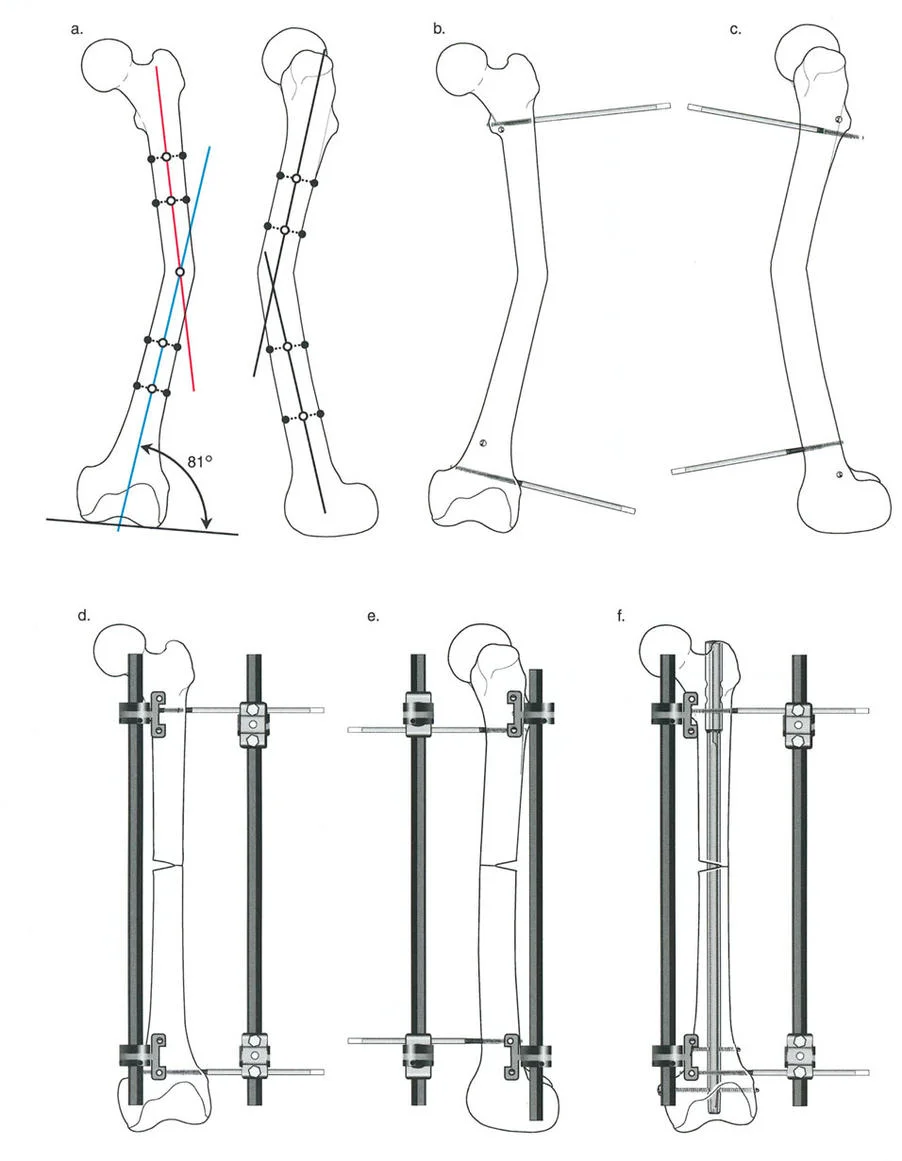
The patient is positioned supine on a radiolucent Jackson table or a standard operating table with a bump under the ipsilateral hip to control rotation. A sterile tourniquet may be applied but is often left uninflated to monitor perfusion. Fluoroscopy must be positioned to allow unhindered orthogonal views of the entire bone segment.
Before any incisions are made, the mechanical axis is verified using a radiopaque alignment rod (the "Bovie cord technique") stretched from the center of the femoral head to the center of the ankle.
External Fixator Pin Placement
The placement of the external fixator pins must be strategic. They must provide rigid stability for the acute correction but must not obstruct the trajectory of the intramedullary nail or the reamer.
- Proximal Pin Placement: Insert two half pins into the proximal segment. These should be placed outside the planned path of the intramedullary nail, often utilizing a unicortical or off axis trajectory.
- Distal Pin Placement: Insert two half pins into the distal segment, again ensuring they will not block the nail.
- Frame Assembly: Attach the external fixator bar or rings to the pins but leave the clamps loose.
Executing the Osteotomy
A percutaneous or minimally invasive approach is utilized to preserve the periosteal blood supply.
- Drill Hole Technique: Multiple drill holes are made along the planned osteotomy line using a sharp drill bit. Copious irrigation is used to prevent thermal necrosis of the bone.
- Osteotome Completion: An osteotome is inserted, and the cortex is gently fractured to complete the osteotomy. A low energy osteotomy preserves local osteogenic factors.
- Verification: The completeness of the osteotomy is verified under fluoroscopy by gently rotating the distal segment.
Acute Correction and Intramedullary Nailing
With the osteotomy complete, the deformity is acutely corrected.
- Manipulation: The distal segment is manipulated until the mechanical axis is perfectly restored, as verified by the alignment rod under fluoroscopy.
- Locking the Frame: Once perfect alignment is achieved in the coronal, sagittal, and axial planes, the clamps on the external fixator are tightened, locking the bone in the corrected position.
- Guidewire Insertion: The intramedullary canal is opened, and a ball tipped guidewire is passed across the osteotomy site into the distal segment.
- Reaming: The canal is reamed over the guidewire. The rigid external fixator prevents any loss of reduction during the reaming process.
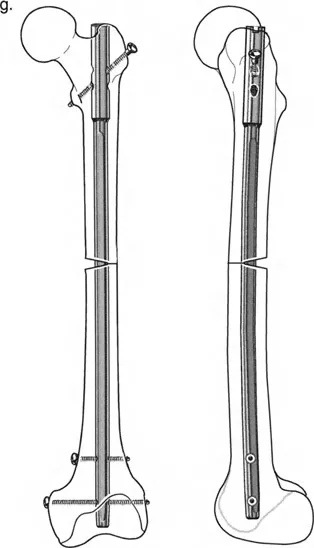
- Nail Insertion: The selected intramedullary nail is inserted and locked proximally and distally.
- Frame Removal: The external fixator is immediately removed, and the pin tracts are irrigated and closed.
Hardware Selection and Intramedullary Nail Optimization
The success of Fixator Assisted Nailing depends heavily on selecting the correct intramedullary nail and optimizing its trajectory. The nail must provide sufficient stability to maintain the correction while allowing for physiological load sharing.
Nail Trajectory and Entry Point Accuracy
The entry point dictates the trajectory of the nail. An eccentric entry point will force the nail to rest against the opposite cortex, potentially inducing a secondary deformity as the nail is seated.
For tibial deformities, a parapatellar or suprapatellar approach may be utilized. The suprapatellar approach is highly advantageous in proximal tibial deformities, as it allows the knee to remain in a semi extended position, neutralizing the deforming forces of the extensor mechanism and the gastrocnemius.
Role of Blocking Screws in Deformity Correction
Blocking screws, also known as Poller screws, are indispensable tools in Fixator Assisted Nailing. When an osteotomy is performed in the wide metaphyseal region, the intramedullary nail lacks cortical contact to guide its trajectory. The nail will naturally follow the path of least resistance, which often leads to loss of reduction.
Blocking screws are placed strategically to artificially narrow the medullary canal and direct the nail.
* Concave Side Placement: Blocking screws are typically placed on the concave side of the deformity.
* Mechanical Principle: They act as an artificial cortex, forcing the nail toward the center of the canal and preventing translation of the bone segment.
* Surgical Pearl: Place the blocking screws before reaming. This ensures the reamer follows the correct path and prevents the creation of an eccentric reamed cavity.
Avoiding Complications in Fixator Assisted Nailing
While Fixator Assisted Nailing is a powerful technique, it is technically demanding and carries specific risks. Anticipating and mitigating these complications is a hallmark of an expert deformity surgeon.
Intraoperative Troubleshooting Strategies
Iatrogenic Translation
Translation often occurs when the osteotomy is performed away from the Center of Rotation of Angulation (Rule 2) without anticipating the offset. If translation prevents nail passage, the surgeon must use a specialized reduction tool (such as a ball spike pusher) or insert blocking screws to guide the nail across the translated segment.
Thermal Necrosis During Reaming
Acute correction often narrows the medullary canal at the osteotomy site. Aggressive reaming can generate excessive heat, leading to thermal necrosis of the diaphyseal bone and subsequent nonunion. To prevent this, use sharp reamers, advance slowly, and pause frequently to allow the bone to cool.
Compartment Syndrome
Acute correction of severe deformities alters the volume of the fascial compartments. Lengthening or significant angular correction can stretch the neurovascular structures and increase intracompartmental pressure. The surgeon must have a low threshold for performing prophylactic fasciotomies, particularly in large tibial corrections.
Hardware Failure
Using an intramedullary nail that is too small in diameter can lead to fatigue failure before the osteotomy heals. Always ream to allow for the largest possible nail diameter that the isthmus can safely accommodate. Furthermore, dynamically locking the nail when appropriate can encourage micromotion, accelerating callus formation and reducing the stress on the interlocking screws.
By adhering to the principles of Dr. Dror Paley, executing meticulous preoperative planning, and employing the rigid intraoperative control of Fixator Assisted Nailing, orthopedic surgeons can achieve reproducible, high quality outcomes in even the most complex lower extremity deformities.
!!! info "Academic Resource & Medical Review"
This academic resource was prepared and medically reviewed by Prof. Dr. Mohammed Hutaif, Consultant Orthopedic & Spine Surgeon. It is formulated specifically for medical students, orthopedic residents, and surgeons preparing for high-stakes board examinations (AAOS, FRCS Tr & Orth, Arab Board).
!!! warning "Disclaimer"
The surgical techniques, classifications, and clinical guidelines presented herein are for educational and academic review purposes only. They are not intended to replace institutional protocols or independent clinical judgment.
You Might Also Like