Paley's Principles: Mastering Angulation-Translation Deformity Correction

Key Takeaway
Paley's Principles offer orthopedic surgeons a systematic method to correct complex angulation-translation deformities. This involves identifying the Center of Rotation of Angulation (CORA), understanding biomechanics, and applying specific osteotomy rules to restore mechanical axis and joint orientation angles for precise limb realignment.
Introduction to Complex Three Dimensional Deformity Correction
In the realm of orthopedic deformity correction, transitioning from simple two dimensional angular corrections to complex multi planar three dimensional reconstructive surgery separates the novice from the master surgeon. While pure angulation or pure translation can often be managed with straightforward uniplanar techniques, the combination of these forces presents a significant biomechanical and surgical challenge.
When a bone heals in a malaligned position following high energy trauma, or develops abnormally due to congenital conditions such as tibial hemimelia or Blount disease, the resulting deformity rarely respects the simple orthogonal planes of our standard radiographs. Instead, these deformities exist in oblique planes, twisting and shifting the bone in three dimensional space. To correct these malunions and restore the Mechanical Axis Deviation to neutral, surgeons must employ the rigorous systematic approach pioneered by Dr Dror Paley.
This comprehensive guide is designed for orthopedic surgeons, deformity correction fellows, and senior residents who wish to deeply understand the biomechanics, radiographic analysis, and surgical execution required to correct complex angulation translation deformities. We will explore the nuances of oblique plane deformities, deformities occurring in orthogonal planes, the critical importance of the Center of Rotation of Angulation, and the advanced graphic methods used to template these corrections perfectly every single time.
Foundational Biomechanics and Paleys Principles
Before diving into the complexities of combined angulation and translation, we must establish a rock solid foundation in Paleys principles of deformity correction. The ultimate goal of any lower extremity realignment is to restore the mechanical axis of the limb, ensuring that the ground reaction forces pass appropriately through the center of the hip, knee, and ankle joints.
Calculating the Mechanical Axis Deviation
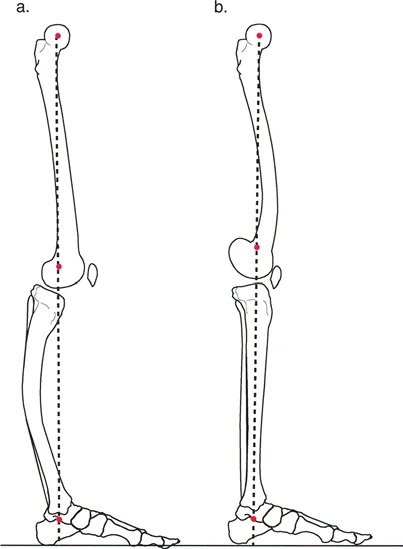
The Mechanical Axis Deviation is the absolute distance between the mechanical axis line of the lower extremity and the center of the knee joint. In a normal limb, a line drawn from the center of the femoral head to the center of the tibial plafond should pass slightly medial to the center of the knee joint, typically by about eight millimeters.
When a deformity is present, the mechanical axis shifts. A medial shift results in a varus Mechanical Axis Deviation, overloading the medial compartment of the knee. A lateral shift results in a valgus Mechanical Axis Deviation, overloading the lateral compartment. Correcting an angulation translation deformity requires neutralizing this deviation to prevent premature osteoarthritis and mechanical failure of the limb.
Standard Joint Orientation Angles
To accurately assess where the deformity lies and how much correction is needed, surgeons rely on specific joint orientation angles. These angles measure the relationship between the anatomical or mechanical axis of a bone and its respective joint line.
| Joint Orientation Angle | Abbreviation | Normal Value | Clinical Significance |
|---|---|---|---|
| Mechanical Lateral Distal Femoral Angle | mLDFA | 87 degrees | Determines distal femoral coronal alignment |
| Medial Proximal Tibial Angle | MPTA | 87 degrees | Determines proximal tibial coronal alignment |
| Joint Line Convergence Angle | JLCA | 0 to 2 degrees | Assesses intra articular deformity or ligamentous laxity |
| Lateral Distal Tibial Angle | LDTA | 89 degrees | Determines ankle joint coronal alignment |
| Posterior Proximal Tibial Angle | PPTA | 81 degrees | Determines proximal tibial sagittal alignment (tibial slope) |
Restoring these angles to their normal anatomic values is the primary objective of any osteotomy. If a surgeon fails to recognize a translation component during an angular correction, these joint orientation angles will remain abnormal, leading to joint malorientation despite a seemingly straight limb.
The Center of Rotation of Angulation
The Center of Rotation of Angulation is the foundational concept in Paleys methodology. It is defined as the point of intersection between the proximal mid diaphyseal line and the distal mid diaphyseal line. Identifying this intersection is the most critical step in preoperative planning.
- In pure angulation: The Center of Rotation of Angulation represents the apex of the deformity.
- In pure translation: The proximal and distal axes are parallel, meaning they never intersect. The center of rotation is effectively at infinity.
- In combined angulation translation: The identification becomes more complex but remains the linchpin of surgical planning. The intersection point will be offset from the anatomic fracture or malunion site.
Accurately locating this point allows the surgeon to determine exactly where the bone needs to be cut and how the fragments must be manipulated to restore the mechanical axis without inducing secondary deformities.
The Impact of Translation on the Mechanical Axis
While angulation drastically alters joint orientation angles such as the mLDFA or the MPTA, pure translation shifts the mechanical axis parallel to itself. This shift induces a Mechanical Axis Deviation without altering the joint orientation angles.
However, when translation is combined with angulation, the mechanical axis is both deviated and tilted. If a surgeon only corrects the angulation and ignores the translation, the joint orientation angles may be restored, but the limb will remain mechanically malaligned with a persistent deviation. Conversely, if the surgeon attempts to correct the mechanical axis without addressing the translation, they will inevitably induce an iatrogenic joint malorientation.
Consider a distal femur malunion with both varus angulation and medial translation. If the surgeon performs a simple opening wedge osteotomy to correct the varus, the mechanical axis will still fall medial to the center of the knee because the medial translation was left unaddressed. The surgeon must plan an osteotomy that simultaneously hinges open to correct the angle and slides laterally to correct the translation.
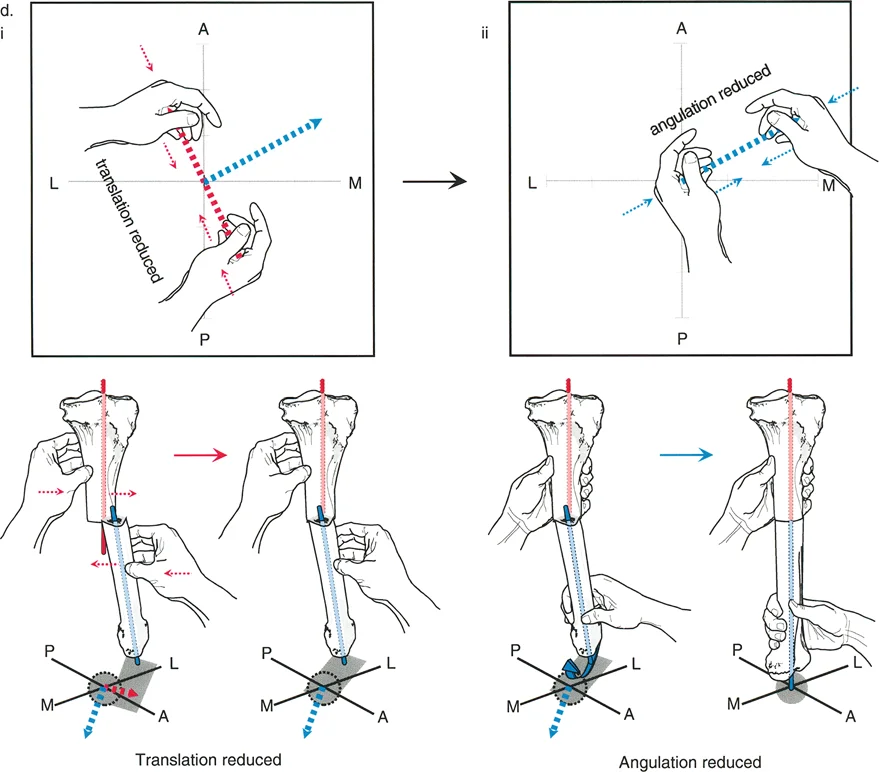
Paleys Osteotomy Rules for Deformity Correction
To safely navigate these corrections, Dr Paley established three fundamental osteotomy rules. Mastery of these rules is non negotiable for any deformity surgeon.
Osteotomy Rule One
When the osteotomy and the hinge are both located at the Center of Rotation of Angulation, pure angulation correction achieves complete realignment without inducing translation.
This is the ideal scenario. The bone is cut exactly at the apex of the deformity, and the fragments are rotated around a hinge placed exactly at that same apex. The mechanical axis is restored, and the bone ends remain perfectly opposed, allowing for excellent bone healing and straightforward internal or external fixation.
Osteotomy Rule Two
When the osteotomy is at a different level than the Center of Rotation of Angulation, but the hinge remains at the center of rotation, the correction will require both angulation and translation at the osteotomy site to achieve realignment.
This rule is highly applicable in clinical practice. Often, the apex of the deformity is located very close to the joint line, where there is insufficient bone stock to perform a stable osteotomy or apply fixation. By moving the osteotomy away from the joint into the diaphysis, but keeping the hinge at the joint line apex, the surgeon can correct the deformity. However, as the bone hinges open, the bone ends will translate relative to one another. The surgeon must anticipate this translation and ensure the fixation construct can accommodate it.
Osteotomy Rule Three
When the hinge is placed away from the Center of Rotation of Angulation, the correction will induce an iatrogenic translation deformity, which will offset the mechanical axis.
While generally considered a pitfall, Rule Three can be used intentionally. If a patient presents with an angulation translation deformity, the surgeon can deliberately place the hinge away from the deformity apex to induce a compensatory translation that cancels out the existing translation. This is an advanced technique that requires meticulous preoperative templating.
- Surgical Pearl One: Always template your osteotomy rules on digital or printed radiographs before entering the operating room.
- Surgical Pearl Two: If utilizing Rule Two, ensure your chosen fixation method allows for controlled translation. Intramedullary nails can be difficult to use with Rule Two unless blocking screws are employed.
- Surgical Pearl Three: Rule Three is frequently utilized when using hexapod external fixators, as the software can calculate the exact virtual hinge required to correct both angulation and translation simultaneously.
Classifying Angulation Translation Deformities
Understanding the spatial relationship between the angulation and the translation is critical for accurate preoperative planning. Paley classifies these combined deformities into distinct variants based on their radiographic presentation.
Variant One Orthogonal Plane Deformities
In a Variant One deformity, the angulation occurs entirely in one orthogonal plane, while the translation occurs entirely in the other orthogonal plane. For example, a patient may present with pure varus angulation in the coronal plane, combined with pure anterior translation in the sagittal plane.
When analyzing this on standard radiographs, the Anteroposterior view will show only angulation, with perfectly collinear diaphyseal lines indicating zero translation. The Lateral view will show only translation, with perfectly parallel diaphyseal lines indicating zero angulation. Correcting this variant requires a biplanar surgical approach, often utilizing a multi planar external fixator or a highly customized internal fixation construct.
Variant Two Oblique Plane Deformities
One of the most common yet frequently misunderstood complex deformities is the Oblique Plane Deformity, classified under Paleys system as a Variant Two Angulation Translation Deformity.
In this variant, both the angulation and the translation occur in the exact same oblique plane. Because the plane of deformity is rotated relative to the standard orthogonal X ray beams, both the Anteroposterior and Lateral radiographs will display a component of the angulation and a component of the translation.
To visualize this, imagine a tibia that has been broken and healed with both varus and procurvatum, while simultaneously shifting medially and posteriorly.
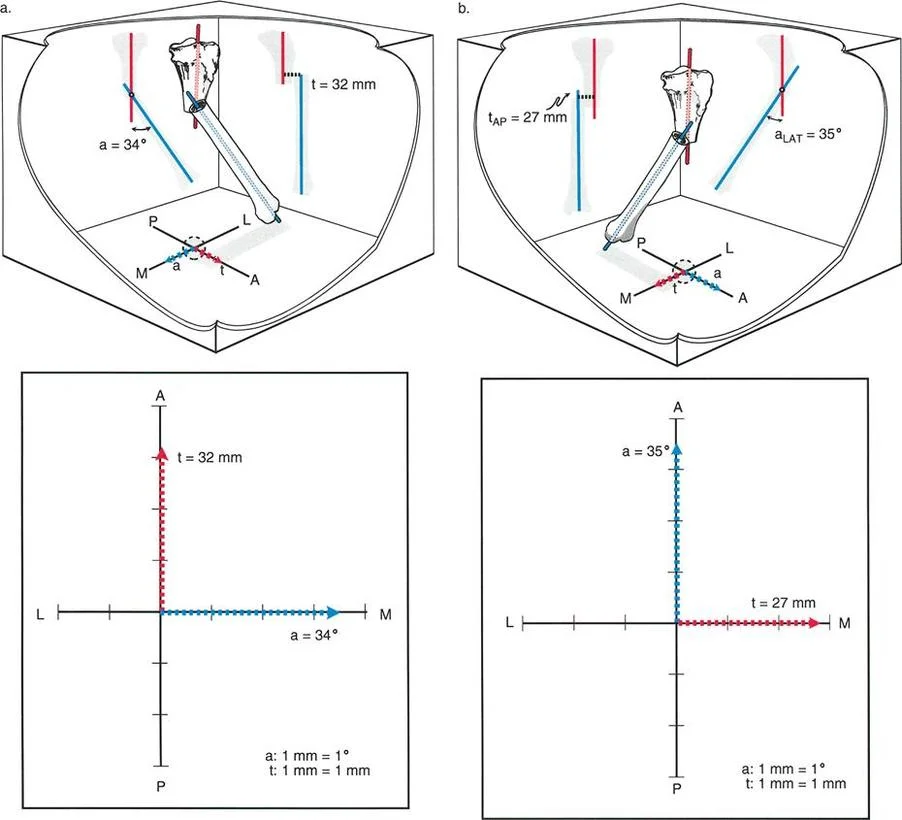
When analyzing this deformity on standard radiographs, angulation and translation are clearly visible on both the AP and LAT views. Crucially, the Center of Rotation of Angulation will be located at the exact same level on both radiographs. It may be proximal or distal to the actual fracture level, depending on the magnitude and direction of the translation relative to the angulation.
If you were to obtain a radiograph perfectly perpendicular to the oblique plane of the deformity, you would see the maximum true angulation and the maximum true translation. The measurements on this specific oblique view dictate the true magnitude of the deformity.
Calculating the True Oblique Plane
To correct a Variant Two deformity, the surgeon must calculate the true magnitude of the angulation and the axis of the oblique plane. This is done using trigonometric principles.
The true angulation magnitude is calculated using the Pythagorean theorem applied to the apparent angulation on the AP and Lateral views. Similarly, the direction of the oblique plane is found by calculating the tangent of the angle, which is the ratio of the AP magnitude to the Lateral magnitude. Modern digital templating software and hexapod fixator algorithms perform these calculations automatically, but a master surgeon must understand the underlying mathematics to verify the computer generated plan.
Step by Step Radiographic Planning for Complex Deformities
Successful correction of angulation translation deformities requires a disciplined, reproducible approach to preoperative planning. The following steps outline the Paley Method for radiographic analysis.
- Obtain High Quality Radiographs: Ensure full length, weight bearing, true Anteroposterior and Lateral radiographs of the entire lower extremity are available. The patella must be facing strictly forward on the AP view.
- Draw the Mechanical Axes: Draw the mechanical axis of the normal segment and extend it across the joint. Draw the mechanical axis of the deformed segment.
- Identify Joint Orientation Angles: Measure the mLDFA, MPTA, JLCA, and LDTA. Compare these to normal population values or the contralateral normal limb.
- Determine the Mechanical Axis Deviation: Measure the distance from the center of the knee joint to the mechanical axis line.
- Locate the Center of Rotation of Angulation: Find the intersection of the proximal and distal diaphyseal lines on both the AP and Lateral views. Confirm if they are at the same level to diagnose an oblique plane deformity.
- Measure Magnitudes: Quantify the degrees of angulation and millimeters of translation.
- Plan the Osteotomy Level: Choose an osteotomy site based on bone quality, soft tissue envelope, and proximity to the joint.
- Apply Osteotomy Rules: Determine whether Rule One, Two, or Three applies based on your chosen osteotomy level and the location of the Center of Rotation of Angulation.
Surgical Execution and Fixation Strategies
Once the preoperative plan is finalized, the surgeon must choose the appropriate fixation method to execute the correction. The choice between internal and external fixation depends on the magnitude of the deformity, the presence of poor soft tissues, patient compliance, and surgeon experience.
External Fixation and Hexapod Systems
For complex angulation translation deformities, particularly those involving multi planar oblique components, circular external fixation utilizing hexapod technology is the gold standard. Systems like the Taylor Spatial Frame utilize the principles of the Stewart Gough platform to provide simultaneous correction in all six degrees of freedom.
The true power of a hexapod system lies in its ability to utilize a virtual hinge. The surgeon is not constrained by placing a physical hinge exactly at the Center of Rotation of Angulation. Instead, the software calculates a virtual hinge point in three dimensional space. The six struts adjust incrementally over days or weeks, gradually correcting both the angulation and the translation simultaneously. This gradual correction is particularly beneficial for stretching contracted soft tissues and neurovascular structures safely.
Internal Fixation Techniques
Advances in internal fixation have made acute correction of angulation translation deformities more feasible. However, executing a Rule Two or Rule Three osteotomy acutely requires exceptional surgical skill.
When using plates and screws, the surgeon must perform the osteotomy, manually translate and angulate the bone ends to the pre calculated position, temporarily hold this unstable construct with K wires or reduction clamps, and then apply a rigid locking plate.
When utilizing intramedullary nails, managing translation is notoriously difficult, as the nail naturally wants to align the medullary canal, which may inadvertently correct the translation but fail to correct the angulation, or vice versa.
The Role of Blocking Screws
To overcome the limitations of intramedullary nailing in complex deformities, surgeons utilize blocking screws, also known as Poller screws. These screws are placed adjacent to the planned path of the nail, artificially narrowing the medullary canal and forcing the nail into a specific trajectory.
By strategically placing blocking screws in the concavity of the deformity, the surgeon can force the nail to translate the bone fragment as it passes through the osteotomy site. This technique effectively allows the surgeon to execute a Rule Two osteotomy with an intramedullary nail, achieving both angular and translational correction simultaneously.
Managing Soft Tissue and Neurovascular Structures
Bone is highly forgiving; soft tissues are not. The correction of angulation translation deformities, particularly when large translations are involved, places immense stress on surrounding neurovascular structures.
The Peroneal Nerve
Corrections involving valgus angulation and lateral translation of the proximal tibia are particularly hazardous to the common peroneal nerve. Acute correction can stretch the nerve, leading to devastating foot drop.
When planning a large acute correction, surgeons must have a low threshold for performing a prophylactic peroneal nerve decompression. If the tension is deemed too high during surgery, the plan must pivot from acute internal fixation to gradual external fixation, allowing the nerve to accommodate the stretch at a rate of one millimeter per day.
Fasciotomy Considerations
Acute translation of diaphyseal bone ends alters the volume of the fascial compartments of the leg. A significant translation can increase compartment pressures, leading to acute compartment syndrome. Surgeons must remain vigilant and perform prophylactic single or double incision fasciotomies if there is any concern regarding compartment tightness following an acute angulation translation correction.
Common Pitfalls in Angulation Translation Correction
Even experienced surgeons can fall victim to the complexities of 3D deformity correction. Avoiding these common pitfalls is essential for achieving optimal patient outcomes.
- Failing to Recognize Translation: The most common error is treating an angulation translation deformity as a pure angular deformity. This results in a straight bone with a persistent Mechanical Axis Deviation and abnormal joint orientation angles.
- Incorrect Center of Rotation Calculation: If the diaphyseal lines are drawn incorrectly due to poor radiograph quality or rotational malalignment, the intersection point will be wrong. The entire surgical plan will be based on a flawed foundation.
- Ignoring the Sagittal Plane: Surgeons often fixate on the coronal plane AP radiograph. Failing to address a sagittal plane translation can lead to recurvatum or procurvatum deformities that severely impact gait biomechanics.
- Inadequate Fixation for Translation: Using a standard dynamic compression plate for a Rule Two osteotomy may fail, as the plate cannot adequately bridge the translated bone ends. Locking plates or external fixators are mandatory.
Conclusion and Mastery of Paleys Principles
Mastering the correction of angulation translation deformities is a defining achievement for an orthopedic surgeon. It requires a departure from intuitive, eyeball based surgery and a commitment to rigorous mathematical and geometric planning.
By strictly adhering to Dr Dror Paleys principles, accurately identifying the Center of Rotation of Angulation, calculating the Mechanical Axis Deviation, and flawlessly applying the three osteotomy rules, surgeons can reliably transform complex, multi planar malunions into perfectly aligned, mechanically sound extremities. Whether utilizing advanced hexapod external fixators or sophisticated internal fixation techniques with blocking screws, the foundation of success remains the same: meticulous preoperative planning and a profound understanding of three dimensional bone biomechanics.
!!! info "Academic Resource & Medical Review"
This academic resource was prepared and medically reviewed by Prof. Dr. Mohammed Hutaif, Consultant Orthopedic & Spine Surgeon. It is formulated specifically for medical students, orthopedic residents, and surgeons preparing for high-stakes board examinations (AAOS, FRCS Tr & Orth, Arab Board).
!!! warning "Disclaimer"
The surgical techniques, classifications, and clinical guidelines presented herein are for educational and academic review purposes only. They are not intended to replace institutional protocols or independent clinical judgment.
You Might Also Like