Mastering Frontal Plane Osteotomy: Paley's Guide to Multiapical Deformity Correction
Key Takeaway
Frontal plane realignment osteotomy is a critical intervention for correcting lower extremity deformities, especially complex multiapical cases. Dr. Dror Paley's principles, including the CORA concept and osteotomy rules, provide a systematic approach to restore mechanical axis, optimize joint orientation, and preserve joint health, crucial for long-term patient outcomes.
Introduction to Frontal Plane Realignment Osteotomy
The correction of lower extremity deformities has evolved dramatically from an art form based on visual estimation to a precise, mathematically driven science. At the absolute core of this modern evolution are the principles established by Dr. Dror Paley. His methodologies provide orthopedic surgeons with a universal language and a highly systematic approach to deformity analysis, preoperative planning, and surgical correction. Frontal plane realignment osteotomy is arguably the most critical intervention in joint preservation surgery, as the frontal plane dictates the primary weight bearing load distribution across the hip, knee, and ankle joints.
When a lower limb deviates from its normal mechanical axis, the resulting Mechanical Axis Deviation leads to asymmetric joint loading. This localized overload causes accelerated, premature cartilage wear, subchondral sclerosis, and ultimately early onset osteoarthritis. While uniapical deformities presenting with a single bend in the bone are relatively straightforward to manage, multiapical deformities present a formidable surgical challenge. These complex multi level deformities are frequently encountered in metabolic bone diseases like rickets, osteogenesis imperfecta, skeletal dysplasias, or complex post traumatic malunions.
This masterclass provides an exhaustive, high yield deep dive into the biomechanics, preoperative planning, and surgical execution of frontal plane realignment osteotomies. By mastering Paley's deformity correction principles, orthopedic surgeons can confidently tackle complex, multiapical deformities of the femur and tibia, restoring both limb alignment and joint orientation to optimize long term patient outcomes.
Biomechanical Foundations of Lower Limb Alignment
Before addressing complex multiapical deformities, the orthopedic surgeon must possess an absolute mastery of normal lower limb alignment. Deformity correction is entirely predicated on restoring these normal geometric relationships. Without a deep understanding of the normal mechanical and anatomic axes, accurate preoperative planning is impossible.
Defining the Mechanical Axis
The mechanical axis of the lower limb represents the line of gravity that transmits the ground reaction force during the stance phase of the human gait cycle. Understanding this axis is the first step in any deformity analysis.
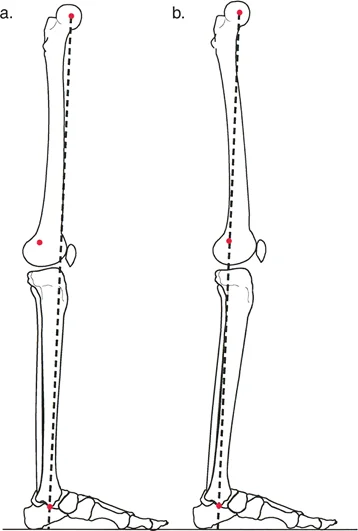
The Mechanical Axis of the Lower Limb, classically referred to as the Mikulicz Line, is a straight line drawn from the exact center of the femoral head to the center of the ankle joint at the tibial plafond. In a perfectly aligned, normal lower extremity, this line passes just medial to the exact center of the knee joint. Specifically, it should pass through or just medial to the medial tibial spine. This slight medial offset explains why the medial compartment of the knee naturally bears approximately sixty percent of the body weight during normal ambulation.
Calculating Mechanical Axis Deviation
Mechanical Axis Deviation is the primary metric used to quantify the overall malalignment of a lower limb. It is measured in millimeters and dictates the severity of the mechanical overload on the knee joint.
If the Mikulicz line falls completely medial to the center of the knee joint, the limb is in varus alignment. This places excessive compressive forces on the medial compartment and tensile forces on the lateral collateral ligament complex. Conversely, if the line falls lateral to the center of the knee, the limb is in valgus alignment, overloading the lateral compartment and stressing the medial collateral ligament. The absolute perpendicular distance from the center of the knee joint to the Mikulicz line represents the magnitude of the Mechanical Axis Deviation.
Understanding the Anatomic Axis
While the mechanical axis represents the line of force, the anatomic axis represents the physical structure of the bone itself. The anatomic axis is defined as the mid diaphyseal line drawn through the center of the medullary canal of a given bone.
In the tibia, the anatomic axis and the mechanical axis are nearly perfectly parallel, typically demonstrating zero to two degrees of difference. Therefore, for most practical planning purposes in the tibia, the anatomic and mechanical axes can be used interchangeably.
However, in the femur, the relationship is vastly different. The anatomic axis of the femur diverges from the mechanical axis by approximately seven degrees. This divergence is not a fixed number; it varies between five and nine degrees depending on the individual patients pelvic width, femoral neck length, and overall femoral length. A short patient with a wide pelvis will have a larger divergence angle than a tall patient with a narrow pelvis.
Joint Orientation Angles in Deformity Planning
Restoring the mechanical axis to the center of the knee is only half the battle in deformity correction. The joints themselves must also be oriented parallel to the ground during the stance phase of gait to prevent destructive shear forces across the articular cartilage. We measure these orientations using the intersection of the anatomical or mechanical axes with the specific joint lines.
Normal Joint Orientation Parameters
To systematically evaluate a limb, surgeons utilize specific acronyms to define the angles formed by the intersection of the bone axes and the joint lines. The nomenclature specifies whether the angle is measured relative to the Mechanical (m) or Anatomic (a) axis, whether it is Medial (M) or Lateral (L), whether it is Proximal (P) or Distal (D), and specifies the Femur (F) or Tibia (T).
| Angle Acronym | Full Anatomical Name | Normal Range | Average Value | Clinical Significance |
|---|---|---|---|---|
| mLDFA | Mechanical Lateral Distal Femoral Angle | 85° – 90° | 87° | Evaluates distal femoral varus/valgus deformity. |
| aLDFA | Anatomic Lateral Distal Femoral Angle | 79° – 83° | 81° | Used when mechanical axis cannot be drawn. |
| MPTA | Medial Proximal Tibial Angle | 85° – 90° | 87° | Evaluates proximal tibial varus/valgus deformity. |
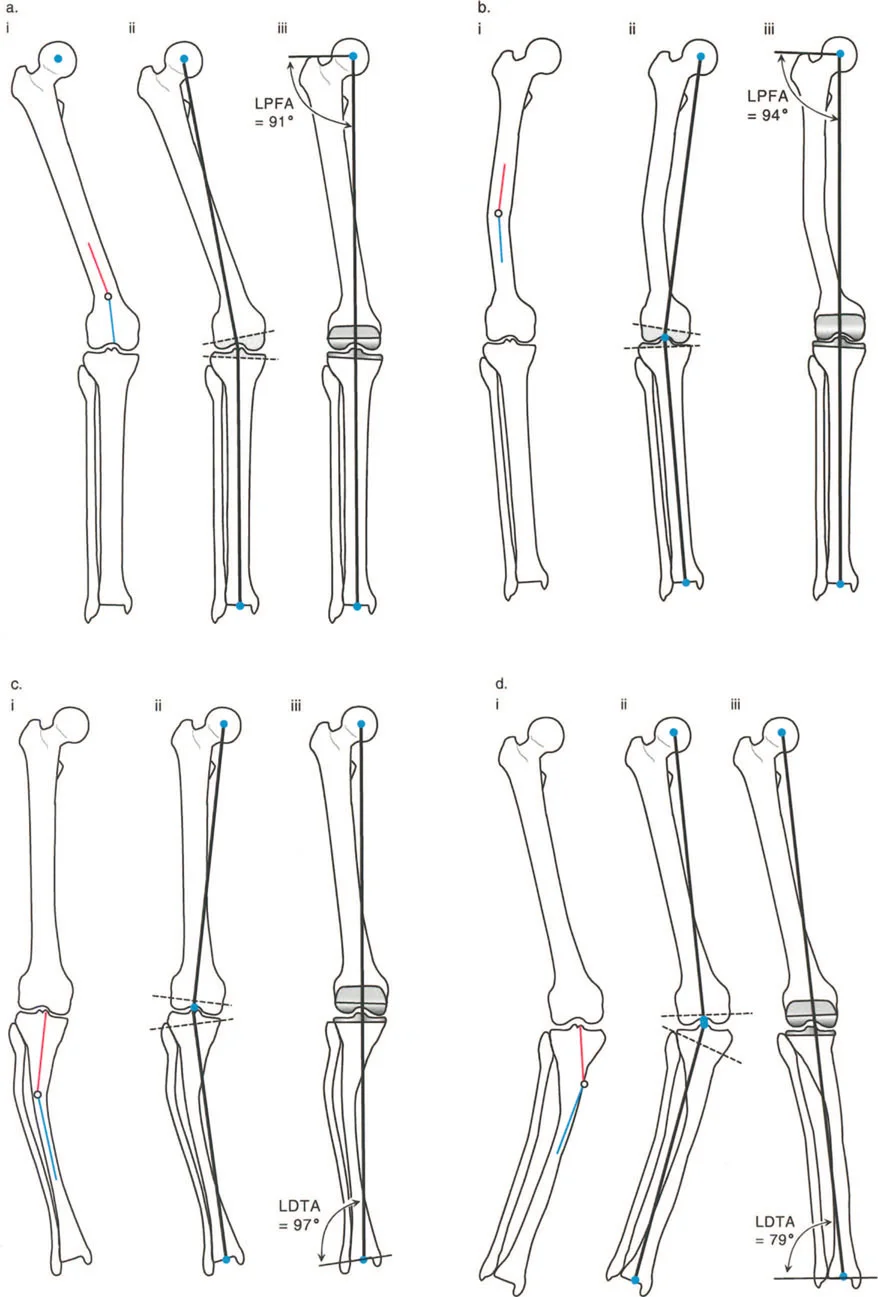
| LPFA | Lateral Proximal Femoral Angle | 85° – 95° | 90° | Evaluates femoral neck shaft angle and coxa vara/valga. |
| LDTA | Lateral Distal Tibial Angle | 86° – 92° | 89° | Evaluates ankle joint orientation and supramalleolar deformity. |
Joint Line Convergence Angle
The Joint Line Convergence Angle is a critical, yet frequently overlooked, parameter in deformity planning. It is the angle formed between the articular surface of the distal femur and the articular surface of the proximal tibia.
In a normal knee, the Joint Line Convergence Angle is approximately zero to two degrees, meaning the joint surfaces are nearly parallel. If this angle is significantly increased on a standing radiograph, it indicates either intra articular cartilage loss, meniscal wear, or collateral ligament laxity. When planning a bony osteotomy, the surgeon must account for the Joint Line Convergence Angle; otherwise, correcting the bone perfectly might still leave the patient with a clinical deformity due to the soft tissue or intra articular defect.
Mastering the Center of Rotation of Angulation
The absolute cornerstone of Dr. Dror Paley's deformity planning methodology is the Center of Rotation of Angulation, universally known as the CORA. The CORA is defined as the exact point where the proximal mechanical axis line and the distal mechanical axis line of a deformed bone intersect. Identifying the CORA is the mandatory first step in determining where and how to cut the bone.
Paleys Rules of Osteotomy
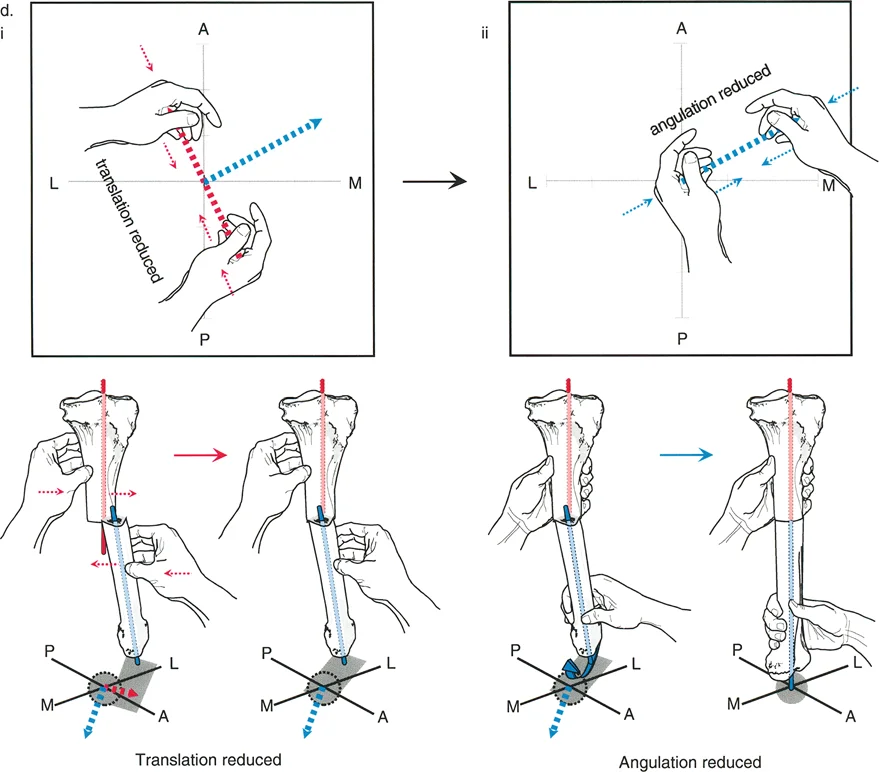
To achieve perfect mechanical realignment without introducing unwanted secondary translation or displacement at the osteotomy site, the orthopedic surgeon must strictly adhere to Paley's Three Rules of Osteotomy. Understanding the geometric consequences of hinge placement and osteotomy level is what separates a master deformity surgeon from a novice.
- Osteotomy Rule One
If the bone cut (osteotomy) and the axis of correction (the hinge) are both placed exactly at the CORA, the bone will angulate and perfectly realign without any translation. The mechanical axis is restored, and the bone ends remain perfectly apposed. This is the ideal scenario for most diaphyseal deformities. - Osteotomy Rule Two
If the osteotomy is made at a different level than the CORA, but the hinge remains exactly at the CORA, the mechanical axis will successfully realign. However, the bone ends will translate (shift) at the osteotomy site. This rule is frequently utilized intentionally. For example, if the CORA is located inside the knee joint, you cannot cut through the joint. You must cut the bone in the metaphysis (away from the CORA) but place your external fixator hinge at the joint (at the CORA). This results in a corrected limb with an intentional, planned translation at the metaphyseal cut. - Osteotomy Rule Three
If the osteotomy and the hinge are both placed away from the CORA, the mechanical axis will not realign perfectly. Instead, the surgeon will introduce a secondary translation deformity, creating a zigzag effect in the bone. The mechanical axis will remain deviated. Rule Three is generally considered a surgical error and should be avoided, unless the surgeon is intentionally creating a translation to compensate for a separate, uncorrectable deformity elsewhere in the limb.
Analyzing Multiapical Deformities
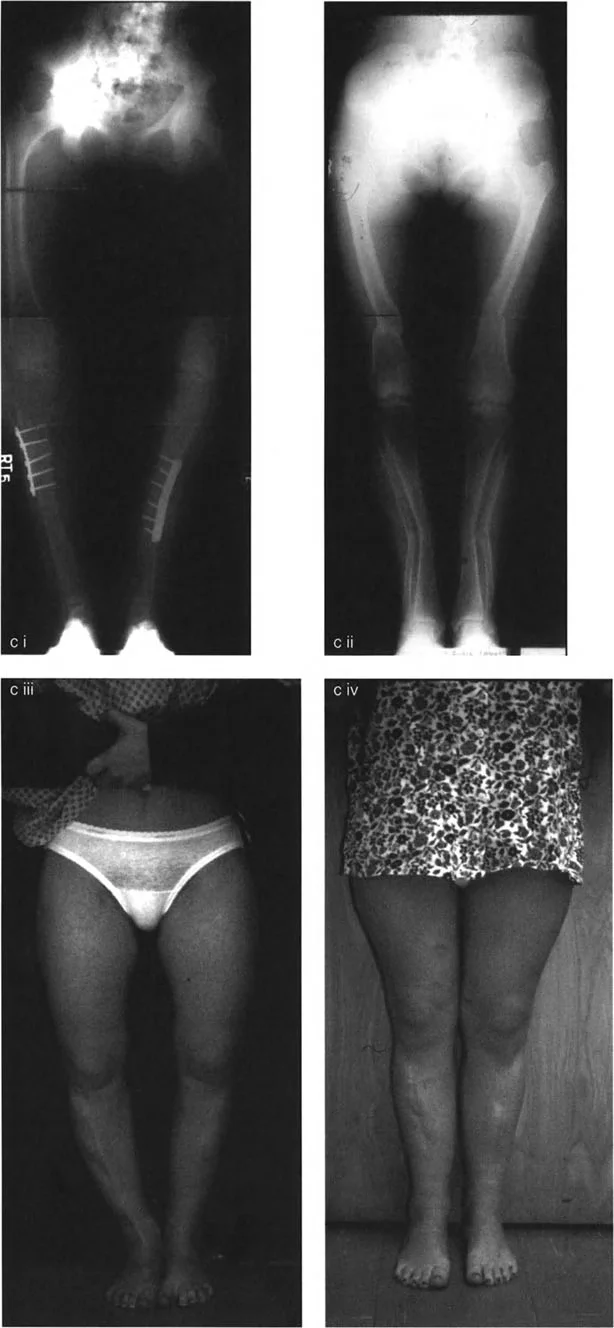
A multiapical deformity exists when there is more than one CORA present within a single bone. This means the bone has multiple distinct bends, creating a complex bowing effect rather than a simple angular deformity. These deformities are classically seen in metabolic bone diseases such as rickets, osteomalacia, osteogenesis imperfecta, and Paget's disease, where the softened bone yields to muscle forces and weight bearing loads over an extended period.
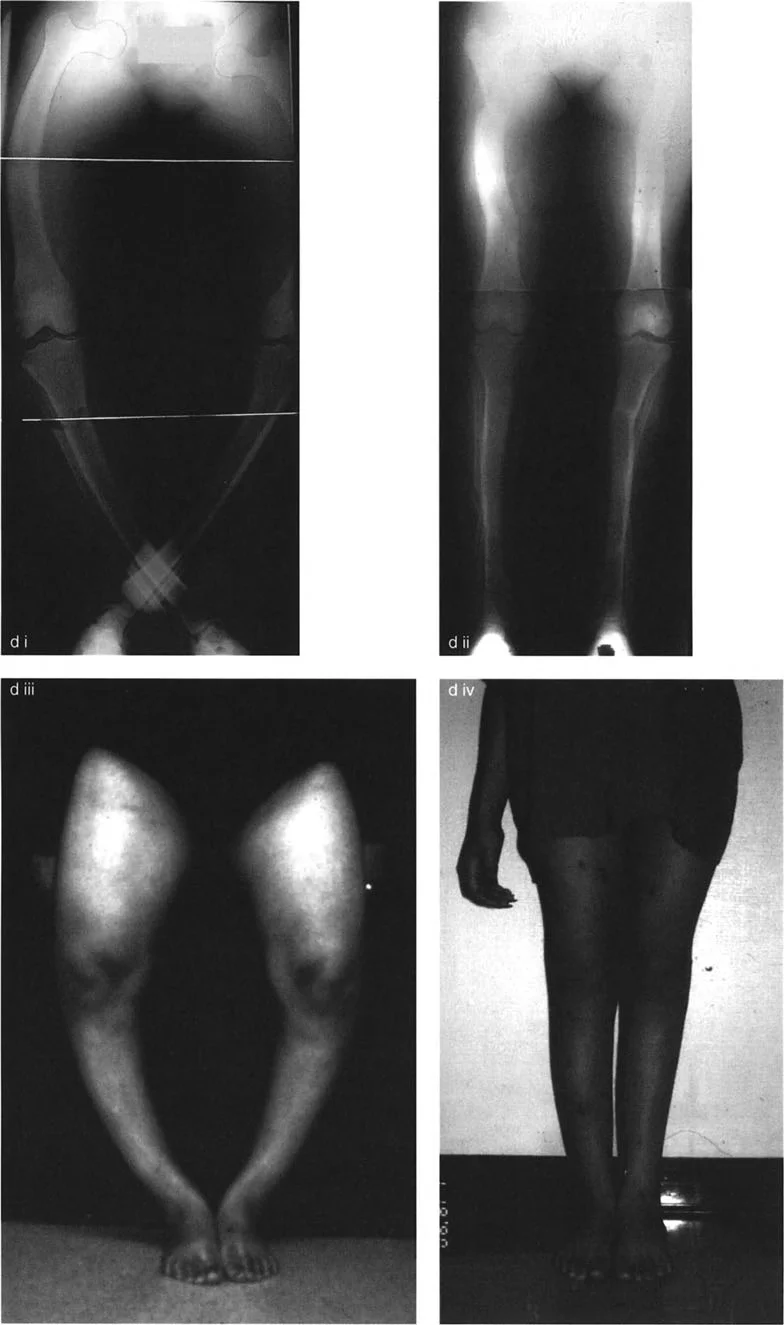
The Rickets Femur Model
In severe rickets, the femur typically deforms in a highly predictable, multiapical pattern due to the specific biomechanical stresses placed on the yielding bone during childhood development. Analyzing the rickets femur provides the perfect model for understanding multiapical deformity planning.
The classic rickets femur presents with three distinct zones of deformity:
* Proximal Deformity
The femoral neck bends under the massive weight of the trunk, leading to severe coxa vara. This decreases the neck shaft angle and drastically alters the Lateral Proximal Femoral Angle. An abnormal LPFA of 112 degrees, for instance, indicates severe varus malorientation of the hip joint.
* Diaphyseal Deformity
The mid shaft of the femur bows outward into a prominent varus or anterolateral bow, driven by the pull of the vastus lateralis and the iliotibial band on the softened bone.
* Distal Metaphyseal Deformity
The distal femur often compensates for the proximal varus by yielding into valgus. This drastically alters the mechanical Lateral Distal Femoral Angle, dropping it well below the normal 87 degrees.
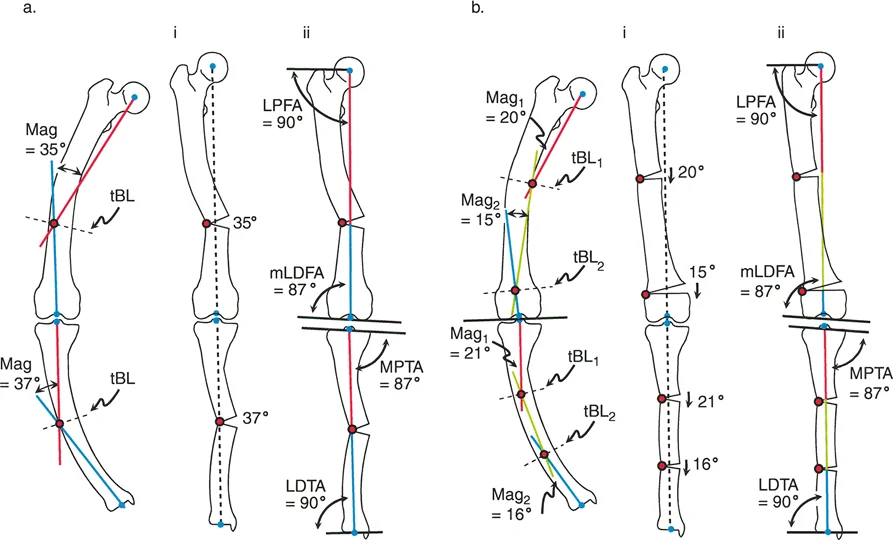
Identifying Hidden Secondary Deformities
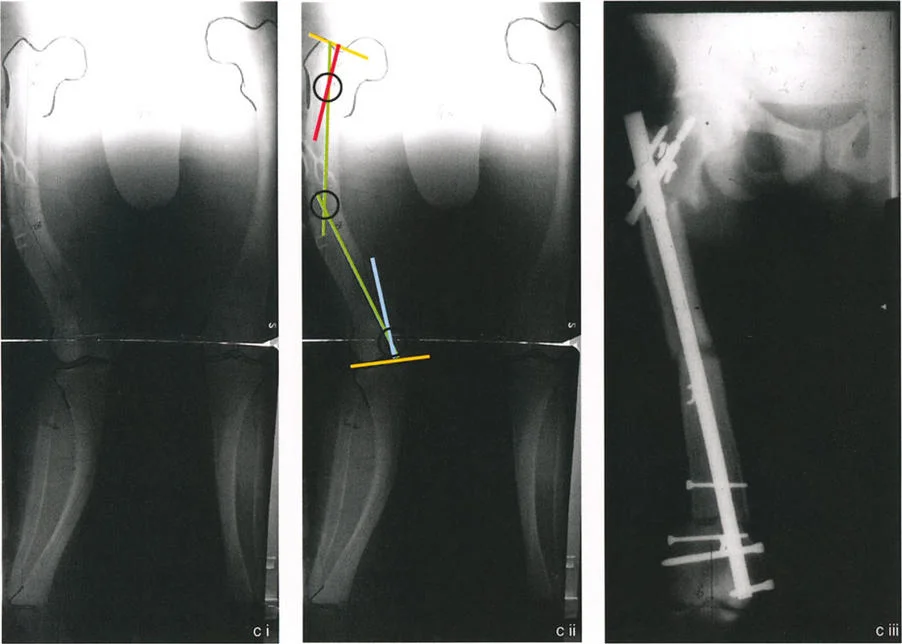
When the Proximal Mechanical Axis line and Distal Mechanical Axis line are drawn on a multiapical limb, they may intersect at the level of the obvious diaphyseal deformity. A novice surgeon might assume this single intersection is the only CORA and plan a single midshaft osteotomy. This is a critical error.
If the hip joint is severely maloriented relative to the Proximal Mechanical Axis line (e.g., an LPFA of 112 degrees), this indicates a hidden or secondary CORA at the level of the hip joint. The single intersection in the diaphysis is a false CORA. In reality, the bone has a proximal deformity and a distal deformity.
To fully restore the limb, the mechanical axis must be realigned by two separate osteotomies. For instance, the surgeon must execute a 22 degree valgus producing angular correction around the proximal CORA, and a 26 degree varus producing angular correction around the distal CORA. This multilevel approach ensures that both the hip and knee joint orientations are returned to normal, parallel alignment.
Comprehensive Preoperative Planning
Preoperative planning is the most important phase of deformity correction. A surgeon should never enter the operating room without a fully templated plan detailing the exact degrees of correction, the size of the wedges, the location of the cuts, and the hardware to be utilized.
Step by Step Deformity Analysis
Mastering the Paley method requires a strict, reproducible workflow for every single patient.
- Obtain Proper Imaging
Acquire full length, standing, weight bearing anteroposterior and lateral radiographs of both lower extremities. The patellae must be facing perfectly forward to control for rotation. - Perform the Malalignment Test
Draw the Mikulicz line from the center of the femoral head to the center of the ankle. Measure the Mechanical Axis Deviation from the center of the knee. This determines if a deformity exists and quantifies its severity. - Perform the Malorientation Test
Measure all joint orientation angles (mLDFA, MPTA, LPFA, LDTA, and JLCA). Compare these to the normal population averages. This step identifies exactly which bone, and which end of that bone, is responsible for the mechanical axis deviation. - Draw the Bone Reference Lines
Once the deformed bone segment is identified, draw the normal mechanical or anatomic axis lines for the proximal segment and the distal segment of that specific bone. - Locate the CORA
Find the intersection of the proximal and distal bone reference lines. If the joint orientation angles indicate multiple deformities, draw a mid diaphyseal line to connect the proximal and distal segments, revealing multiple CORAs. - Plan the Osteotomy and Hinge
Apply Paley's Rules of Osteotomy. Decide whether an opening wedge, closing wedge, or neutral dome osteotomy is required. Plan the exact level of the bone cut and the placement of the hinge to avoid unwanted translation.
Surgical Execution of Multiapical Osteotomies
Translating a perfect preoperative plan into surgical reality requires meticulous soft tissue handling, precise bone cutting techniques, and robust fixation. Multiapical deformities inherently require double or even triple level osteotomies, significantly increasing the complexity of the procedure.
Choosing the Right Osteotomy Type
The geometry of the bone cut dictates the local effects on limb length and soft tissue tension.
- Opening Wedge Osteotomy
This involves cutting the bone and opening a gap on the concave side of the deformity. It adds length to the limb, which is highly beneficial if the patient has a concomitant limb length discrepancy. However, it creates a bony void that may require autograft, allograft, or bone substitutes, and it significantly increases tension on the soft tissues on the concave side. - Closing Wedge Osteotomy
This involves removing a wedge of bone from the convex side of the deformity. It provides excellent bone to bone contact for rapid healing and does not require bone grafting. However, it inherently shortens the limb and can leave soft tissues lax on the convex side. - Dome Osteotomy
A highly advanced technique where a semi circular cut is made. The bone ends slide along the arc of the cut. This allows for massive angular correction without altering limb length and without creating a bony void. It is mechanically highly stable but technically demanding to execute perfectly.
Fixation Strategies and Hardware Selection
The choice of fixation depends on the surgeon's experience, the soft tissue envelope, and the need for postoperative adjustability.
- Circular External Fixation
Devices like the Ilizarov frame or the Taylor Spatial Frame are the gold standard for complex multiapical deformities. They allow for gradual, postoperative correction of angulation, translation, rotation, and length simultaneously. If the surgeon's intraoperative cut is slightly imperfect, the computer assisted hexapod frame can be adjusted in the clinic to achieve perfect alignment. - Internal Fixation with Plates
Heavy duty locking plates provide rigid, immediate stability. This is more comfortable for the patient than an external fixator. However, internal fixation requires absolute intraoperative perfection. There is no room for postoperative adjustment. The surgeon must use specialized instrumentation to hold the limb in the perfectly planned alignment before applying the plate. - Intramedullary Nailing
IM nails are excellent for diaphyseal deformities. To prevent translation when correcting a deformity with a nail, surgeons use the reverse rule of thumb, employing blocking screws (Poller screws) to artificially narrow the medullary canal and force the nail to guide the bone into perfect alignment.
Soft Tissue and Neurovascular Considerations
Bone deformity correction is inherently a soft tissue operation. Changing the shape of the bone drastically alters the tension on nerves, vessels, ligaments, and muscles.
When correcting a severe valgus deformity (such as an mLDFA of 75 degrees), the surgeon is stretching the structures on the lateral side of the knee. The common peroneal nerve is highly sensitive to traction. In severe corrections, a prophylactic common peroneal nerve decompression at the fibular neck is mandatory to prevent postoperative foot drop.
Similarly, opening wedge osteotomies increase the volume of the skeletal structures within a fixed fascial compartment. The surgeon must maintain a high index of suspicion for acute compartment syndrome and perform prophylactic fasciotomies if the soft tissue tension is excessive upon closure.
Postoperative Management and Rehabilitation
The surgery is only the beginning of the deformity correction process. Proper postoperative management dictates the ultimate success or failure of the realignment.
Weight Bearing and Bone Healing
For internal fixation constructs, weight bearing is typically restricted until early callus formation is visible on radiographs, usually around six weeks. Premature weight bearing on a plate can lead to catastrophic hardware failure.
Conversely, circular external fixators are designed for immediate weight bearing. The micro motion provided by the tensioned wires of an Ilizarov frame actually stimulates osteogenesis and accelerates bone healing. Patients are strongly encouraged to walk on the frame immediately, which also prevents severe osteopenia and maintains joint range of motion.
Physical therapy is mandatory to prevent joint contractures. The muscles crossing the osteotomy site will naturally spasm and tighten. Aggressive range of motion exercises for the hip, knee, and ankle must begin on postoperative day one.
High Yield Clinical Pearls for Orthopedic Surgeons
To consolidate this masterclass, here are the most critical, high yield clinical pearls for mastering frontal plane realignment osteotomies:
- Treat the Joint Line Convergence Angle: Never ignore the JLCA. If a patient has a varus deformity but a wide open lateral joint line on a standing X ray, a portion of their deformity is ligamentous. If you correct the bone 100% based on the MAD, they will end up overcorrected into valgus when they lie down. Always subtract the abnormal JLCA from your total bony correction angle.
- Beware the False CORA: In multiapical deformities like rickets, a single diaphyseal intersection of the proximal and distal mechanical axes is almost always a false CORA. Always measure the joint orientation angles (LPFA and mLDFA) to uncover the hidden proximal and distal deformities.
- Respect Rule Three: Never place your osteotomy and your hinge away from the CORA unless you intentionally want to create a translation deformity. Unplanned translation leads to a zigzag limb, poor cosmesis, and altered biomechanics.
- Protect the Peroneal Nerve: Any acute correction of a severe valgus deformity or a severe flexion contracture puts the common peroneal nerve at immense risk. Have a low threshold for prophylactic nerve release.
- The Patella Must Face Forward: A radiograph taken with the foot facing forward but the patella rotated is useless for deformity planning. The rotational profile of the femur will artificially alter the appearance of the frontal plane angles. Always insist on a true, patella forward standing radiograph.
By deeply integrating Dr. Dror Paley's principles of CORA, Mechanical Axis Deviation, and precise joint orientation analysis, the orthopedic surgeon can transform the daunting challenge of multiapical deformity correction into a highly logical, reproducible, and successful surgical science.
!!! info "Academic Resource & Medical Review"
This academic resource was prepared and medically reviewed by Prof. Dr. Mohammed Hutaif, Consultant Orthopedic & Spine Surgeon. It is formulated specifically for medical students, orthopedic residents, and surgeons preparing for high-stakes board examinations (AAOS, FRCS Tr & Orth, Arab Board).
!!! warning "Disclaimer"
The surgical techniques, classifications, and clinical guidelines presented herein are for educational and academic review purposes only. They are not intended to replace institutional protocols or independent clinical judgment.
You Might Also Like