Paley's Osteotomy & CORA: A Surgeon's Guide to Frontal Plane Deformity Correction
Key Takeaway
Paley's osteotomy concepts provide geometric rules for precise lower extremity deformity correction. They define the Center of Rotation of Angulation (CORA) as the deformity apex and the Angulation Correction Axis (ACA) as the hinge. Paley's three rules guide osteotomy placement to restore mechanical axis alignment.
Introduction to Frontal Plane Realignment and Deformity Correction
In the realm of modern orthopedic surgery, the correction of lower extremity deformities is both an art and a rigorous geometric science. Historically, surgeons relied on guesswork, intraoperative "eyeballing," and purely intuitive surgical approaches. These outdated methods inevitably lead to mechanical axis deviation, abnormal joint contact pressures, and the premature onset of osteoarthritis. To achieve reproducible, biomechanically sound results, modern orthopedic surgeons must rely on the foundational principles established by Dr. Dror Paley.
This comprehensive masterclass delves deep into the concepts of frontal plane realignment, focusing heavily on the Center of Rotation of Angulation, the Angulation Correction Axis, and the strategic execution of single versus multiapical osteotomies. Whether you are addressing a post-traumatic malunion, a congenital bow, or complex multi-level bowing, mastering these geometric rules is non-negotiable for the deformity surgeon. Understanding the spatial relationship between the deformity apex, the surgical cut, and the hinge point allows the surgeon to predict and control the exact postoperative alignment.
Foundational Concepts of Lower Extremity Alignment
Before making a single cut, the surgeon must understand the intrinsic geometry of the deformed bone and the overall alignment of the lower extremity. The geometry dictates the pathology, and the pathology dictates the surgical solution.
Mechanical Axis Deviation and the Malalignment Test
The mechanical axis of the lower extremity is a straight line drawn from the center of the femoral head to the center of the ankle joint (the center of the tibial plafond). In a normal, well-aligned limb, this mechanical axis line passes precisely through the center of the knee joint, or slightly medial to the tibial spines.
Mechanical Axis Deviation occurs when this line falls outside the center of the knee. Medial deviation indicates a varus deformity, leading to medial compartment overload. Lateral deviation indicates a valgus deformity, leading to lateral compartment overload. The Malalignment Test is the first step in preoperative planning, dictating whether a deformity exists and quantifying its magnitude.
By identifying Mechanical Axis Deviation, the surgeon can then isolate whether the deformity originates in the femur, the tibia, or the knee joint itself (such as ligamentous laxity or intra-articular bone loss).
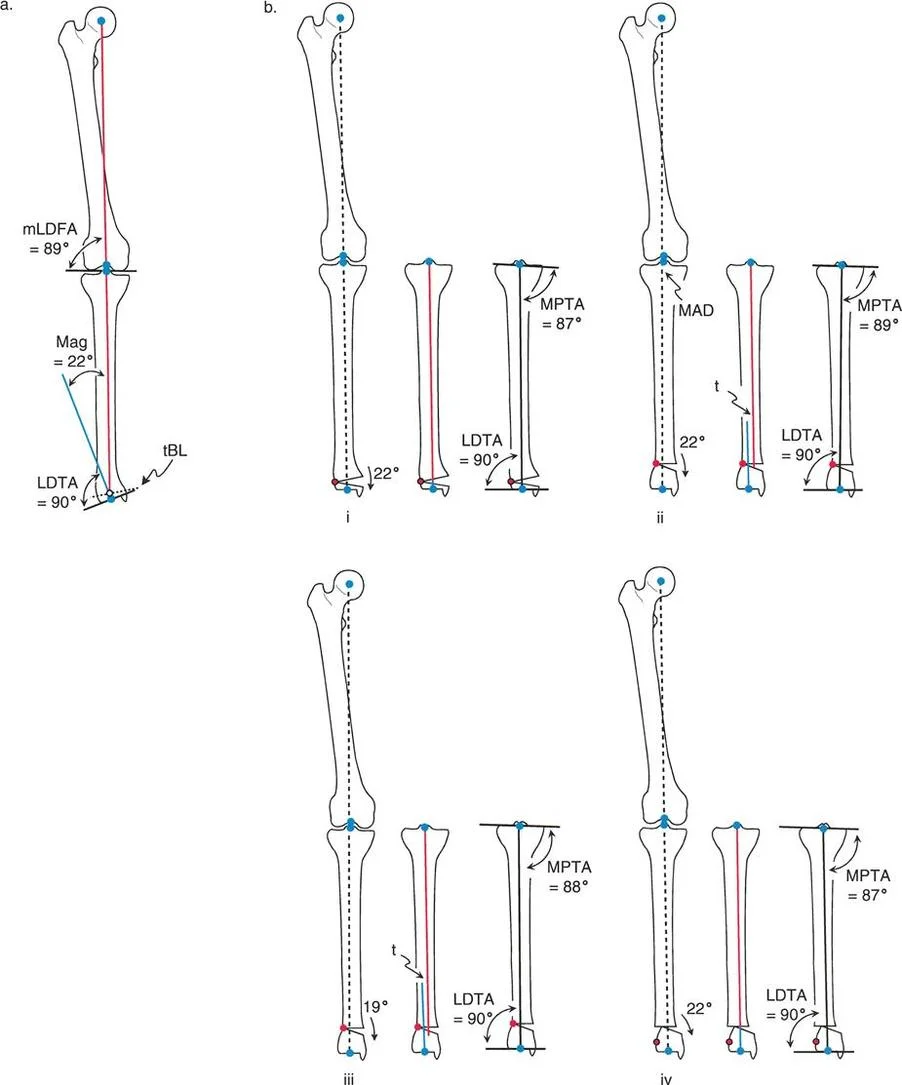
Normal Joint Orientation Angles Reference Guide
To isolate the source of the deformity, surgeons utilize specific joint orientation angles. These angles measure the relationship between the mechanical or anatomic axes of the long bones and their respective joint lines. Memorizing these normal values is essential for accurate deformity planning.
| Joint Orientation Angle | Abbreviation | Normal Value Range | Average Value | Clinical Significance |
|---|---|---|---|---|
| Mechanical Lateral Proximal Femoral Angle | mLPFA | 85 to 95 degrees | 90 degrees | Assesses proximal femur alignment |
| Mechanical Lateral Distal Femoral Angle | mLDFA | 85 to 90 degrees | 88 degrees | Assesses distal femur alignment |
| Medial Proximal Tibial Angle | MPTA | 85 to 90 degrees | 87 degrees | Assesses proximal tibia alignment |
| Lateral Distal Tibial Angle | LDTA | 86 to 92 degrees | 89 degrees | Assesses distal tibia alignment |
| Joint Line Convergence Angle | JLCA | 0 to 2 degrees | 1 degree | Assesses intra-articular knee deformity or laxity |
When a patient presents with Mechanical Axis Deviation, the surgeon measures the mLDFA and MPTA. If the mLDFA is 95 degrees (abnormal) and the MPTA is 87 degrees (normal), the surgeon instantly knows the varus deformity is isolated to the distal femur.
Core Geometric Principles of Deformity Planning
Once the source of the deformity is identified using joint orientation angles, the surgeon must map the specific geometry of the deformed bone.
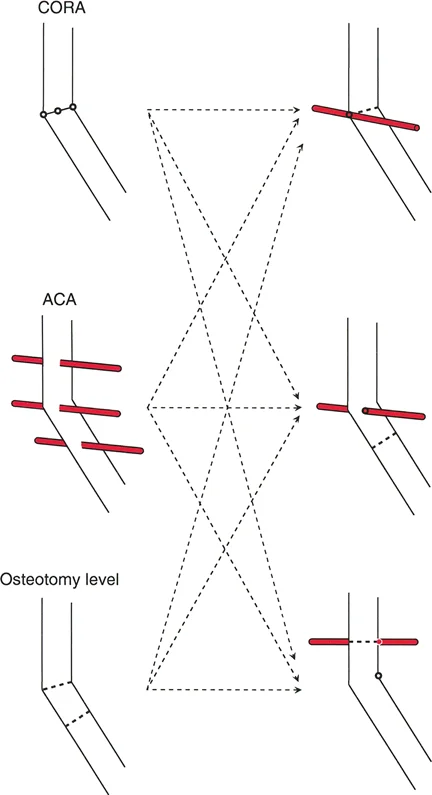
Defining the Center of Rotation of Angulation
The Center of Rotation of Angulation is a fundamental property of the bone deformity. It is defined as the point of intersection between the proximal mechanical axis line and the distal mechanical axis line of the deformed bone segment. The identical concept applies when using anatomic axes.
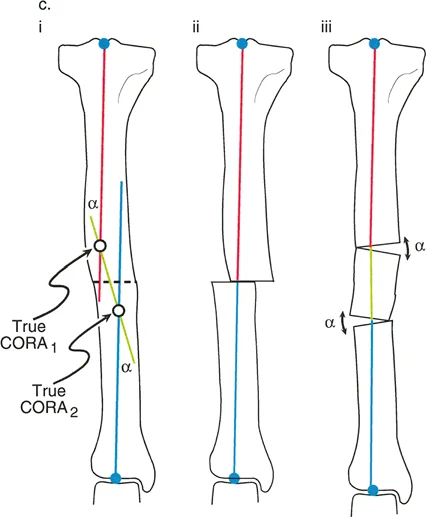
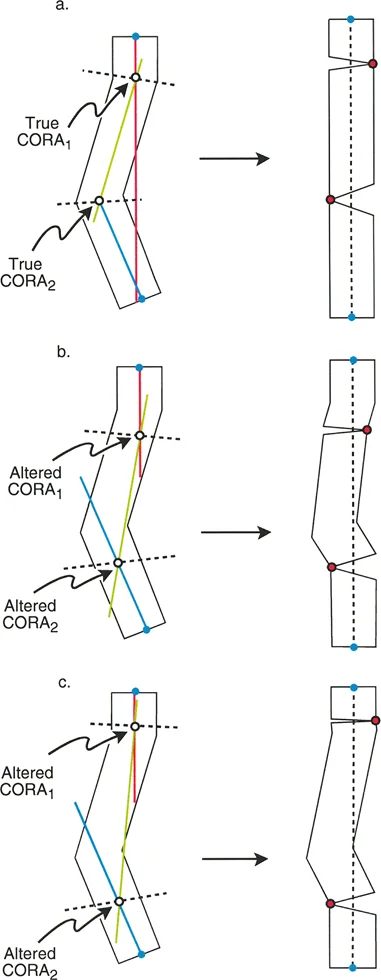
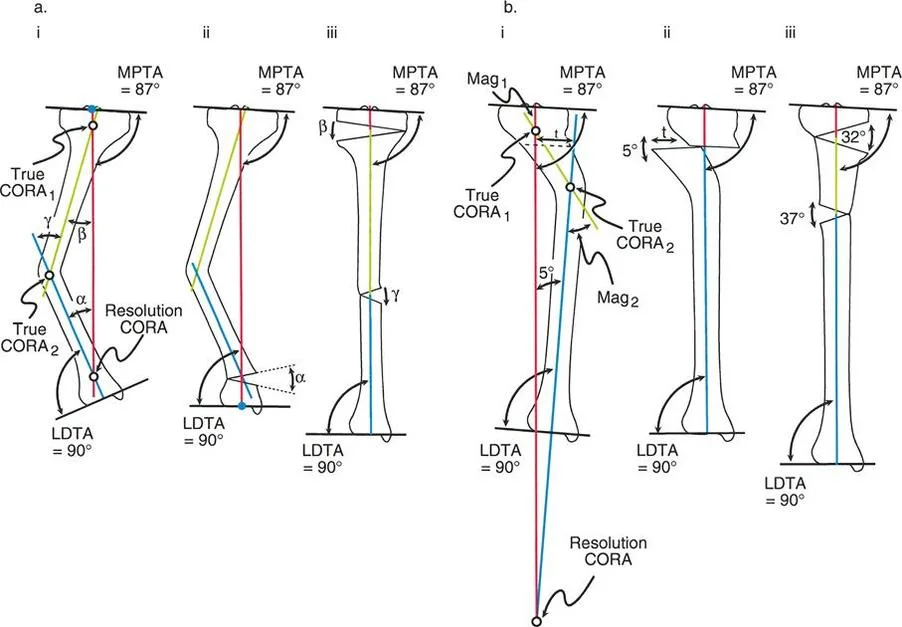
- True CORA: This represents the actual anatomical apex of the deformity. In a uniapical deformity, the intersection of the proximal and distal axes falls exactly on the bend of the bone.
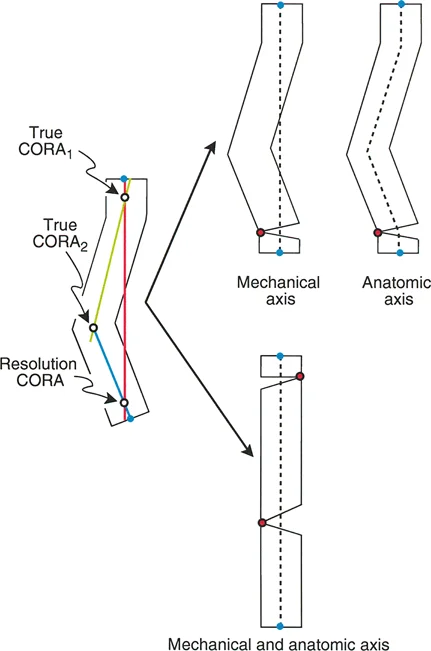
- Resolution CORA: This is a theoretical point used in multiapical deformities. When a bone has multiple bends (such as a "boomerang" femur), the ultimate proximal and distal axes will intersect at a point that may or may not lie within the bone itself. Correcting the entire deformity through this single Resolution CORA can restore overall alignment, though it may alter the local anatomy.
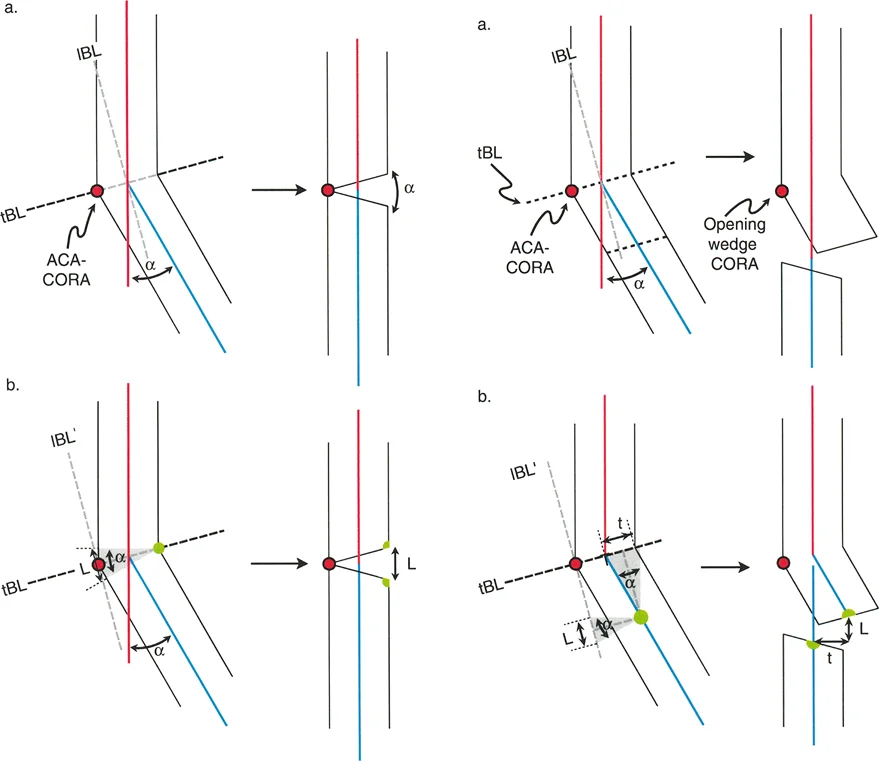
The Angulation Correction Axis
While the Center of Rotation of Angulation is a fixed anatomical reality dictated by the patient pathology, the Angulation Correction Axis is partially under the surgeon control. The Angulation Correction Axis represents the hinge point around which the distal bone segment rotates to achieve correction.
Optimally, the Angulation Correction Axis should be oriented perpendicular to the plane of the deformity and pass directly through the Center of Rotation of Angulation. When applying an external fixator, such as a Taylor Spatial Frame or an Ilizarov apparatus, the hinges of the frame act as the Angulation Correction Axis. In internal fixation, the hinge is the intact cortex in a closing or opening wedge osteotomy.
Selecting the Optimal Osteotomy Level
The level at which the bone is cut is completely under the surgeon control. The geometric relationship between the Osteotomy Level, the Angulation Correction Axis, and the Center of Rotation of Angulation determines the exact type of correction produced.
Surgeons often choose an osteotomy level based on biological rather than geometric factors. Metaphyseal bone has a robust blood supply and a large cross-sectional area, promoting rapid bone healing. Diaphyseal cortical bone heals much slower. Therefore, even if the true deformity apex is in the diaphysis, a surgeon might intentionally place the osteotomy in the metaphysis to ensure reliable union. This decision directly impacts the geometric outcome, leading us to Paley rules of osteotomy.
Paley Three Golden Rules of Osteotomy
Understanding the spatial relationship between the cut, the hinge, and the deformity apex is the secret to flawless realignment. Paley rules of osteotomy dictate the mechanical outcomes of your surgical plan and predict whether secondary, iatrogenic deformities will arise.
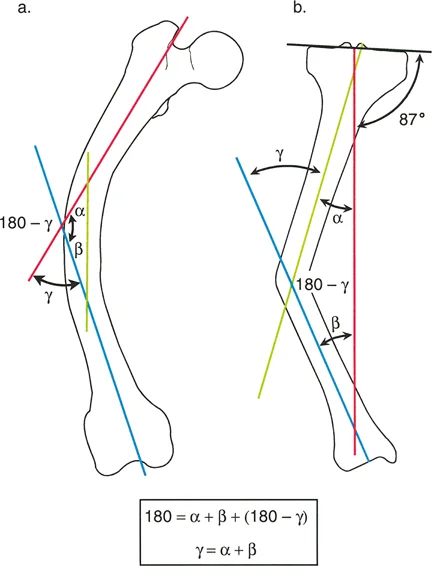
Rule One Osteotomy and ACA Pass Through the CORA
When both the osteotomy cut and the Angulation Correction Axis pass directly through the Center of Rotation of Angulation, the angular deformity is corrected perfectly.
In this ideal scenario, the mechanical axis is completely restored, there is no Mechanical Axis Deviation, and the proximal and distal bone segments remain completely collinear. The anatomical axis of the proximal segment aligns perfectly with the anatomical axis of the distal segment.
This is most often achieved with a simple opening or closing wedge osteotomy placed precisely at the apex of the deformity. Because the hinge and the cut are at the apex, the bone merely opens or closes like a book, restoring straightness without any shifting or sliding of the bone ends.
Rule Two ACA Passes Through the CORA and Osteotomy is at a Different Level
Clinical reality often dictates that cutting directly at the deformity apex is unfeasible. The patient may have poor skin overlying the apex, previous hardware blocking the saw blade, or the apex may be located in dense diaphyseal bone with poor healing potential.
If the Angulation Correction Axis remains at the Center of Rotation of Angulation, but the osteotomy is performed at a different level (either proximal or distal to the apex), the angular deformity is still fully corrected. The overall mechanical axis is restored, and the joint orientation angles are normalized.
However, because the bone is rotating around a hinge point that is distant from the actual cut, the bone ends at the osteotomy site will translate relative to one another. This creates a "bump" or zigzag deformity in the anatomic axis. While this translational bump may look unusual on postoperative radiographs, it is biomechanically sound. The hip, knee, and ankle joints are perfectly aligned, and the limb will function normally. Over time, bone remodeling will smooth out the translational bump.
Rule Three Osteotomy and ACA Do Not Pass Through the CORA
Rule Three represents the classic pitfall in deformity correction. If the Angulation Correction Axis and the osteotomy are both placed away from the Center of Rotation of Angulation, a secondary translation deformity is induced.
When the surgeon executes the angular correction at this incorrect hinge point, the proximal and distal mechanical axes may become parallel to each other, but they will not be collinear. This lack of collinearity results in a residual Mechanical Axis Deviation.
This error frequently occurs when a surgeon attempts to correct a diaphyseal deformity using a metaphyseal osteotomy but fails to account for the hinge placement. The resulting translational shift pushes the entire distal segment off-axis, leading to abnormal joint loading and eventual joint failure.
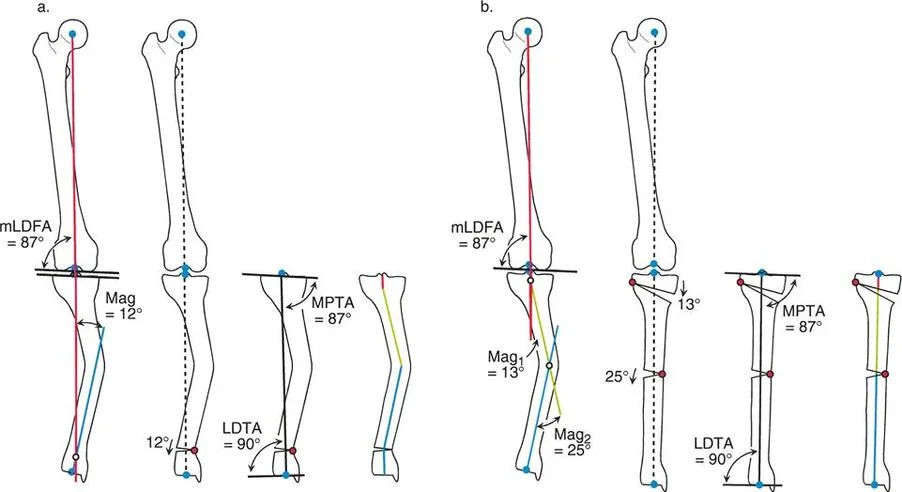
Advanced Femoral Deformity Planning and Osteotomy Execution
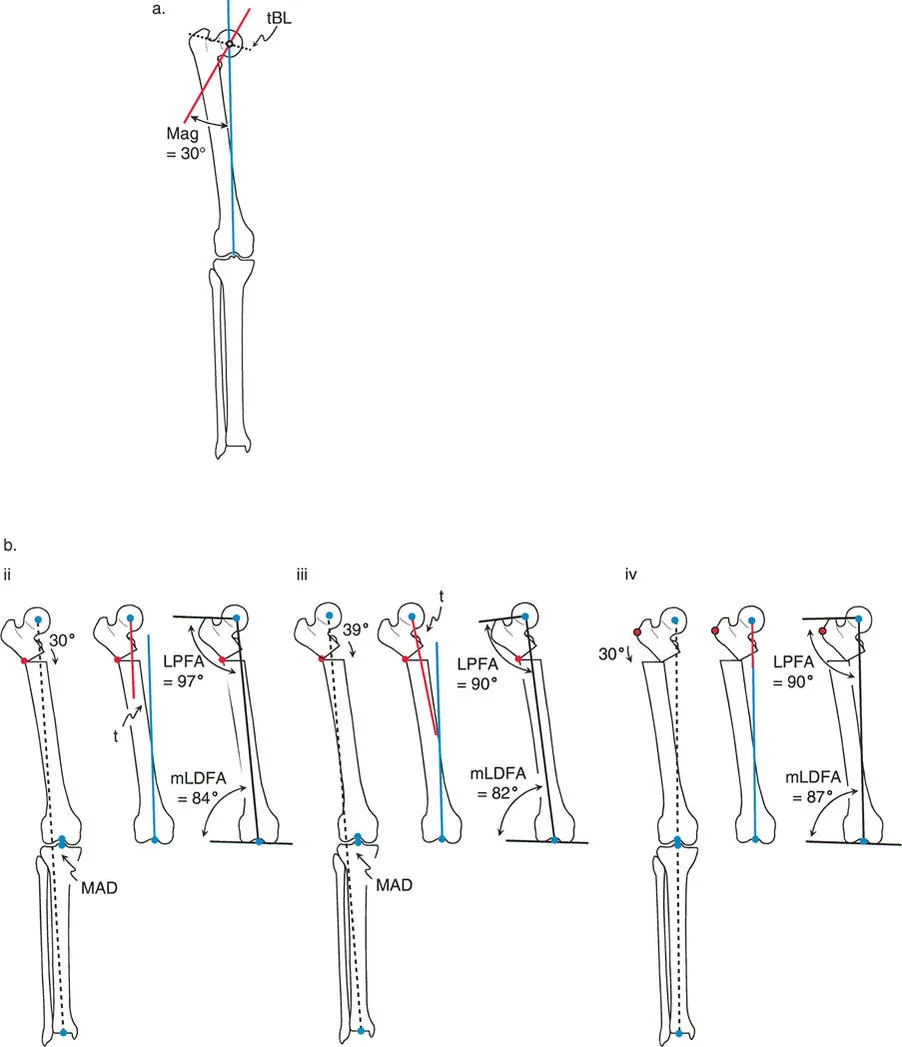
To fully illustrate these geometric concepts in a practical setting, let us analyze a specific clinical scenario involving a 30-degree proximal femoral varus deformity. The ultimate goal of the surgery is to restore normal joint orientation, specifically targeting a normal Mechanical Lateral Proximal Femoral Angle and a normal Mechanical Lateral Distal Femoral Angle.
The Opening Wedge Sequence and Potential Pitfalls
When executing an opening wedge osteotomy for a proximal femoral varus, the surgeon must carefully select both the Angulation Correction Axis and the osteotomy level to avoid the pitfalls of Rule Three.
If the surgeon places the osteotomy distal to the Center of Rotation of Angulation and sets the hinge (the Angulation Correction Axis) exactly at the osteotomy line, applying the required 30-degree angular correction will result in a severe lateral Mechanical Axis Deviation. The anatomic axis of the distal femur is forced to translate medially. While the bone looks straight locally, the hip-to-knee joint orientation is completely destroyed.
To compensate for this error intraoperatively, a surgeon might attempt to overcorrect the angle to force the hip joint orientation back to a 90-degree mLPFA. However, because the hinge is in the wrong location, fixing the hip requires a 39-degree angular correction (9 degrees of massive overcorrection). This overcorrection severely compromises the knee, pushing the distal femur into an abnormal valgus orientation, while creating a massive lateral Mechanical Axis Deviation and medial translation of the distal segment.

The correct approach relies on the strict application of Rule Two. If the osteotomy line is placed proximal to the Center of Rotation of Angulation (perhaps to utilize better metaphyseal bone), but the Angulation Correction Axis is maintained virtually through the Center of Rotation of Angulation, a precise 30-degree angular correction yields perfect results.
By hinging at the true apex while cutting proximally, there is no Mechanical Axis Deviation. Normal anatomic axis alignment is restored globally. A translational bump is present at the osteotomy site due to the differing levels of the cut and the hinge, but both the knee and hip joint orientations are perfectly normalized.
The Closing Wedge Sequence and Limb Length Considerations
Alternatively, the surgeon may elect to perform a closing wedge osteotomy. Closing wedge osteotomies are highly stable because they provide immediate bone-on-bone cortical contact, which accelerates healing and allows for earlier weight-bearing. However, closing wedge osteotomies inherently shorten the bone, which must be factored into the preoperative limb length discrepancy analysis.
The same Paley rules apply to the closing wedge sequence. If the closing wedge is performed exactly at the Center of Rotation of Angulation (Rule One), the bone straightens perfectly with no translation. The only consequence is the loss of length equal to the base of the bone wedge removed.
If the closing wedge is performed away from the deformity apex, the surgeon must carefully calculate the translation that will occur to ensure the mechanical axis remains collinear. Failure to align the closing wedge hinge with the true apex will result in the same parallel but non-collinear mechanical axes seen in opening wedge errors.
Step by Step Preoperative Planning for Frontal Plane Deformity
Mastering frontal plane realignment requires meticulous preoperative templating. Modern surgeons utilize digital templating software, but the geometric steps remain identical to traditional paper tracing.
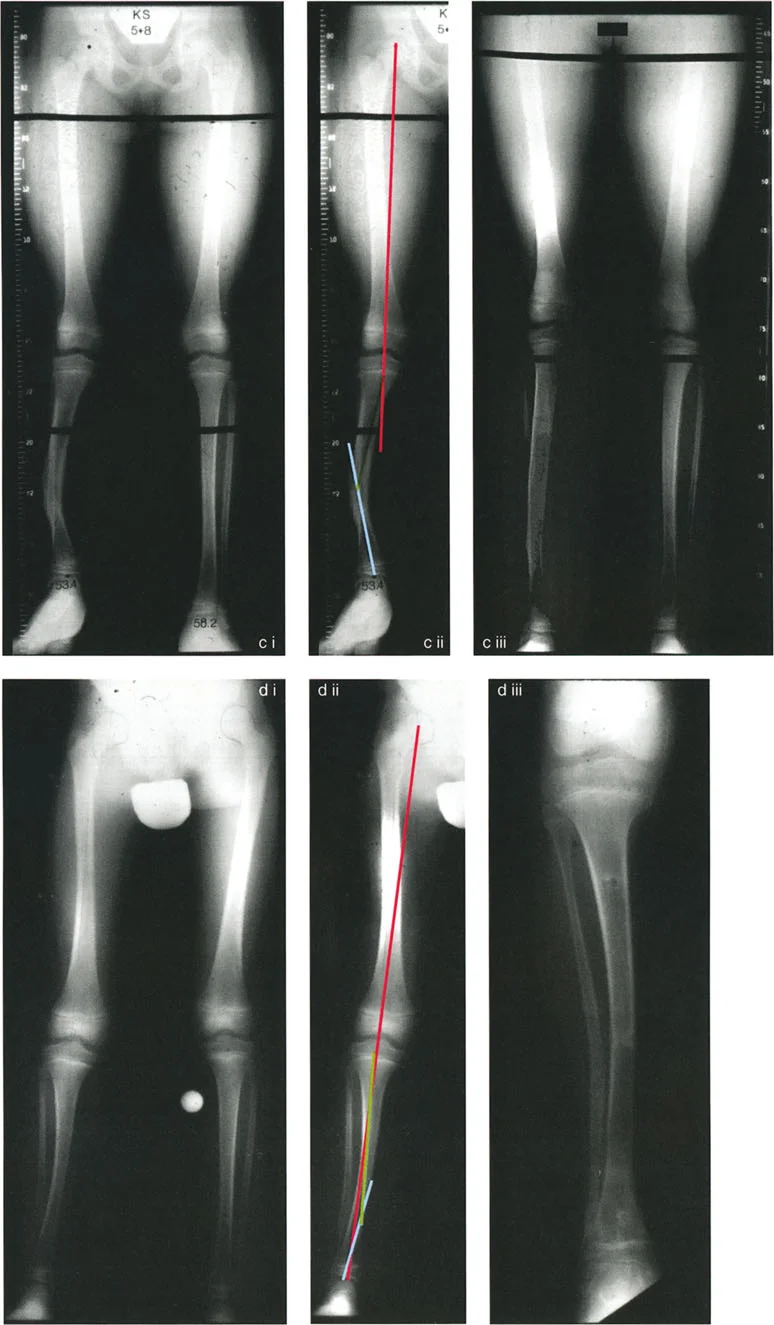
- Obtain High Quality Imaging: Obtain standing, full-length, weight-bearing anteroposterior radiographs of both lower extremities. The patellae must be facing strictly forward to eliminate rotational artifact.
- Execute the Malalignment Test: Draw the mechanical axis from the center of the femoral head to the center of the ankle plafond. Measure the Mechanical Axis Deviation in millimeters from the center of the knee joint.
- Measure Joint Orientation Angles: Calculate the mLDFA, MPTA, mLPFA, and LDTA. Compare these to normal population values to isolate which bone segment contains the deformity.
- Locate the Center of Rotation of Angulation: Draw the proximal mechanical axis and the distal mechanical axis of the deformed bone. Mark their intersection point. This is your True CORA.
- Determine the Magnitude of Deformity: Measure the angle formed by the intersection of the proximal and distal mechanical axes. This dictates the exact degrees of correction required.
- Select the Osteotomy Level: Evaluate bone quality, soft tissue envelope, and prior hardware to select a safe osteotomy site. Decide if you are applying Rule One (cut at apex) or Rule Two (cut away from apex).
- Simulate the Correction: Digitally cut the bone at your chosen osteotomy level. Rotate the distal segment around your chosen Angulation Correction Axis until the mechanical axes are collinear.
- Evaluate the Final Construct: Check for unintended translation. Verify that the final mLDFA and MPTA are within normal limits. Ensure limb length discrepancy has been accounted for.
Clinical Pearls for Mastering Deformity Correction
To elevate your surgical practice from competent to masterful, consider these high-yield clinical pearls when applying Paley osteotomy concepts.
- Translation is Not a Complication: When applying Rule Two, the resulting translation at the osteotomy site is a planned, necessary geometric event. Do not attempt to "fix" the bump intraoperatively by shifting the bone ends, as this will destroy your mechanical axis correction.
- Beware the Straight Intramedullary Nail: Inserting a straight intramedullary nail into a deformed bone often forces the bone to straighten via Rule Three mechanics. The nail acts as an osteotomy and hinge far from the CORA, straightening the bone locally but shifting the mechanical axis laterally or medially. Always plan your blocking screws (Poller screws) to control the hinge point.
- Soft Tissue Tension in Opening Wedges: Opening wedge osteotomies lengthen the limb and stretch the concavity of the deformity. Always assess the neurovascular structures on the concave side. For severe deformities, a gradual correction with a circular external fixator may be safer than an acute opening wedge plate fixation.
- The JLCA is Dynamic: The Joint Line Convergence Angle can change when the patient is weight-bearing versus supine. A widened JLCA on a standing film may indicate ligamentous laxity rather than a fixed bony deformity. Always examine the knee ligaments clinically before attributing all varus or valgus to the bone.
- Resolution CORA for Multiapical Deformities: When dealing with a long, sweeping bow of the femur or tibia, finding a single True CORA is impossible. By drawing the extreme proximal and extreme distal axes, you find the Resolution CORA. A single cut here will align the joints, but may create a massive translational shift. Often, it is biomechanically superior to perform two separate osteotomies at the two local apices rather than one massive correction at the Resolution CORA.
By internalizing the Center of Rotation of Angulation, mastering the placement of the Angulation Correction Axis, and strictly adhering to Paley Three Golden Rules of Osteotomy, the orthopedic surgeon can approach any frontal plane deformity with absolute confidence. The transition from intuitive guessing to geometric precision ensures that joint mechanics are restored, hardware failure is minimized, and patient outcomes are optimized for the long term.
!!! info "Academic Resource & Medical Review"
This academic resource was prepared and medically reviewed by Prof. Dr. Mohammed Hutaif, Consultant Orthopedic & Spine Surgeon. It is formulated specifically for medical students, orthopedic residents, and surgeons preparing for high-stakes board examinations (AAOS, FRCS Tr & Orth, Arab Board).
!!! warning "Disclaimer"
The surgical techniques, classifications, and clinical guidelines presented herein are for educational and academic review purposes only. They are not intended to replace institutional protocols or independent clinical judgment.
You Might Also Like