Paley Osteotomy Masterclass: Frontal Plane Realignment & Deformity Correction
Key Takeaway
Paley Osteotomy Concepts provide a geometric framework for precise limb deformity correction. They involve understanding mechanical axis deviation, joint orientation angles, the Center of Rotation of Angulation (CORA), and the Axis of Correction of Angulation (ACoA) to achieve perfect frontal plane realignment and restore mechanical axes without unwanted translation.
Paley Osteotomy Concepts and Frontal Plane Realignment Masterclass
In the realm of modern orthopedic surgery, the correction of complex limb deformities has evolved from an art form based on visual estimation into a precise mathematically driven science. At the forefront of this evolution are the deformity correction principles formulated by Dr Dror Paley. These principles provide a universal geometric language for understanding, planning, and executing deformity correction with unparalleled accuracy.
For orthopedic surgeons, residents, and fellows, mastering frontal plane realignment is the foundational step toward tackling complex multiplanar deformities. Frontal plane deformities encompassing varus and valgus malalignments are the most common structural pathologies encountered in clinical practice. These deviations profoundly affect load distribution across the knee, ankle, and hip joints. Failure to properly realign the mechanical axis alters the joint reaction forces, inevitably leading to premature articular cartilage degeneration, hardware failure, ligamentous attenuation, and poor functional outcomes.
This comprehensive masterclass expands upon the foundational biomechanics of osteotomy concepts. We will explore the critical geometric relationship between the Center of Rotation of Angulation and the Axis of Correction of Angulation, and the intricate behaviors of opening, closing, and neutral wedge osteotomies. By mastering this material, the reconstructive surgeon will possess a profound understanding of how to manipulate bone geometry to achieve perfect colinearity of the mechanical axes without inducing unwanted secondary translation or iatrogenic malalignment.
Lexicon of Geometric Deformity Correction
Before executing a structural osteotomy, the surgeon must fluently speak the language of geometric deformity correction. The Paley paradigm is built upon several core variables that must be meticulously identified on high quality preoperative weight bearing long leg radiographs. Understanding these variables is the prerequisite to the malalignment and malorientation tests.
Mechanical Axis Deviation and Load Distribution
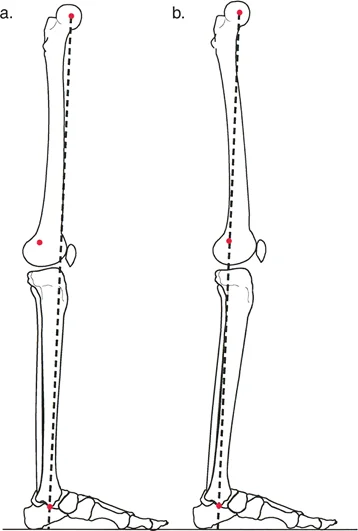
The mechanical axis of the lower extremity is defined by a line drawn from the center of the femoral head to the center of the ankle joint plafond. In a normally aligned limb, this line passes slightly medial to the center of the knee joint, typically 8 millimeters medial to the tibial spine midpoint.
The perpendicular distance from the center of the knee joint to this mechanical axis line is termed the Mechanical Axis Deviation. A medial Mechanical Axis Deviation indicates a varus deformity, which exponentially increases compressive forces on the medial compartment of the knee. Conversely, a lateral Mechanical Axis Deviation indicates a valgus deformity, overloading the lateral compartment and stretching the medial collateral ligament complex. Quantifying the Mechanical Axis Deviation is the first step in assessing the magnitude of the structural pathology.
Joint Orientation Angles and Deformity Localization
To determine whether the primary deformity lies in the femur, the tibia, or within the joint itself, the surgeon must measure specific joint orientation angles. These angles define the relationship between the mechanical axis of a bone segment and its respective articular surface.
The primary angles utilized in frontal plane lower extremity analysis include the mechanical Lateral Distal Femoral Angle and the Medial Proximal Tibial Angle. Deviations from normative values pinpoint the exact bone segment responsible for the frontal plane malalignment.
| Joint Orientation Angle | Abbreviation | Normal Value | Pathological Indication |
|---|---|---|---|
| Mechanical Lateral Distal Femoral Angle | mLDFA | 87.5 degrees | >90 indicates varus femur, <85 indicates valgus femur |
| Medial Proximal Tibial Angle | MPTA | 87.5 degrees | <85 indicates varus tibia, >90 indicates valgus tibia |
| Joint Line Congruency Angle | JLCA | 0 to 2 degrees | >2 indicates intraarticular deformity or ligamentous laxity |
| Mechanical Lateral Proximal Femoral Angle | mLPFA | 90 degrees | Altered in proximal femoral deformities |
| Mechanical Lateral Distal Tibial Angle | mLDTA | 89 degrees | Altered in distal tibial or supramalleolar deformities |
Center of Rotation of Angulation
The Center of Rotation of Angulation is the absolute crux of Paley osteotomy concepts. When you draw the mechanical or anatomical axis line of the proximal bone segment and the mechanical axis line of the distal bone segment, they will intersect at a specific geometric point.
This point of intersection is the Center of Rotation of Angulation. It represents the true apex of the deformity. A bone may have a single apex, known as a unifocal deformity, or multiple apices, known as a multifocal deformity. Identifying the Center of Rotation of Angulation dictates where the biological and geometric correction must occur to restore normal limb alignment.
Axis of Correction of Angulation
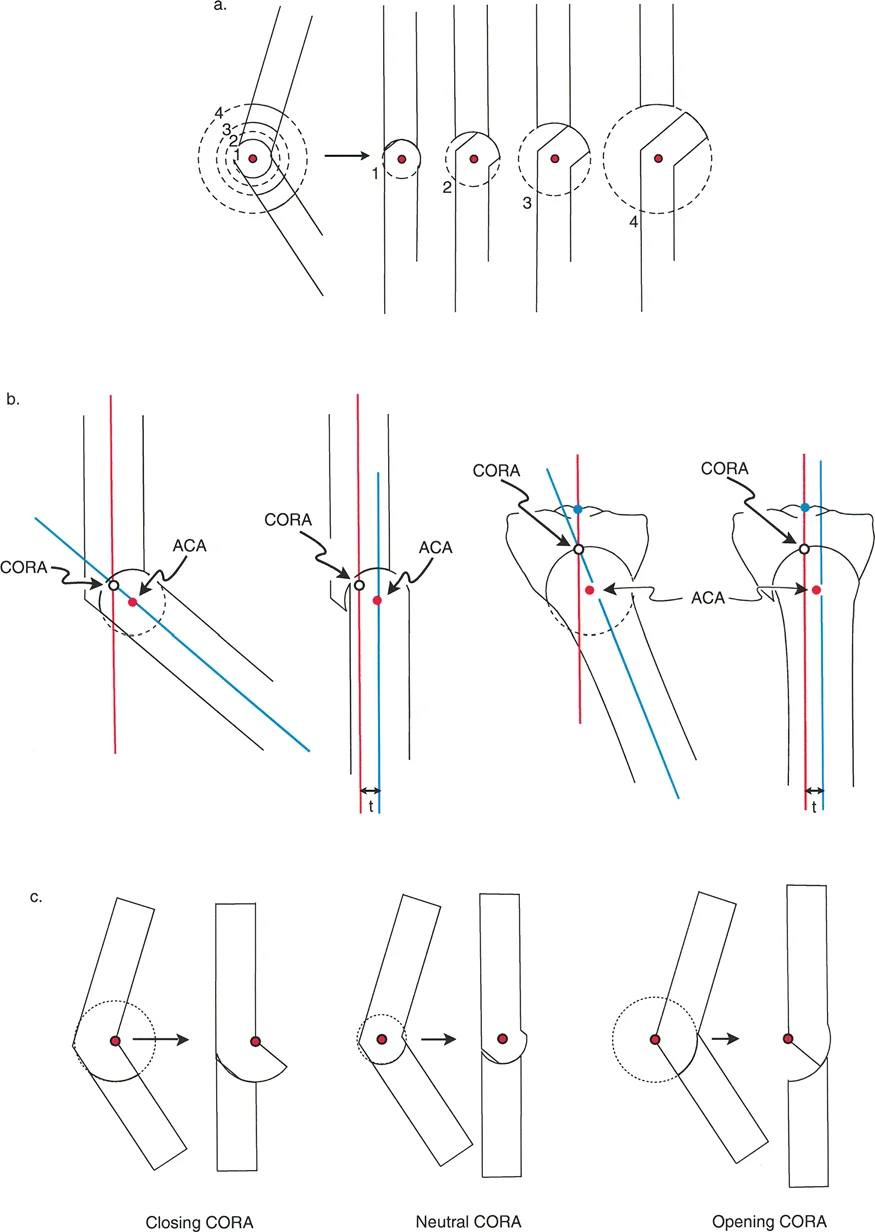
While the Center of Rotation of Angulation is a fixed anatomical and geometric point determined by the patient pathology, the Axis of Correction of Angulation is entirely a surgical choice.
The Axis of Correction of Angulation is the actual hinge point around which the surgeon rotates the distal bone segment to realign it with the proximal segment. The entire success of an osteotomy, including the resulting bone contact, limb length changes, and mechanical axis restoration, depends on where the surgeon places the Axis of Correction of Angulation relative to the Center of Rotation of Angulation.
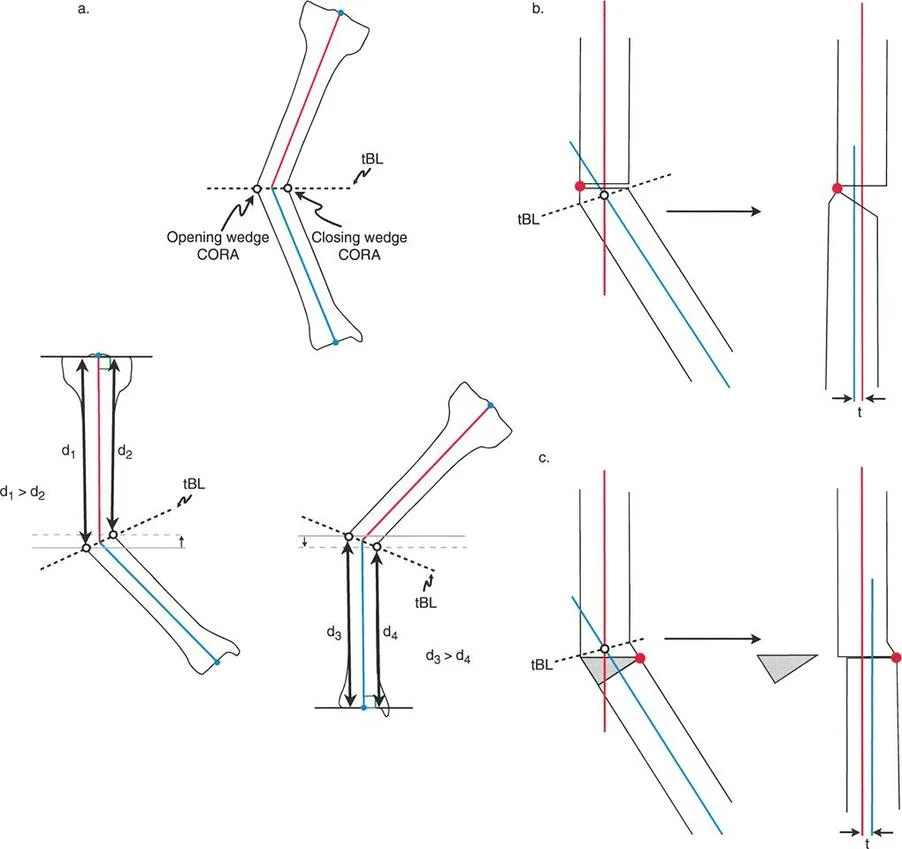
Transverse Bisector Line
When the proximal and distal axis lines intersect at the apex of deformity, they form an angle. The line that perfectly bisects this angle is the transverse Bisector Line.
Any point along the transverse Bisector Line can theoretically serve as a surgical hinge to achieve colinearity of the mechanical axes. However, the specific location chosen along this line will dictate the amount of bone translation that occurs, whether the osteotomy opens or closes, and the final length of the reconstructed limb segment.
The Three Rules of Osteotomy
The relationship between the physical osteotomy cut, the geometric apex of deformity, and the surgical hinge is governed by the Paley Rules of Osteotomy. Deep comprehension of these rules is nonnegotiable for any orthopedic surgeon performing limb realignment, whether using internal locking plates, intramedullary nails, or hexapod external fixators.
Osteotomy Rule One Pure Angulation
The first rule governs the most straightforward and geometrically perfect corrections, typically utilized in diaphyseal malunions or congenital bowing.
The Geometric Rule
When the osteotomy cut line and the Axis of Correction of Angulation both pass directly through the Center of Rotation of Angulation, the result is pure angular correction without any translation.
The Biomechanics
Because the surgical hinge is located exactly at the apex of the deformity, rotating the bone segments realigns the proximal and distal mechanical axes perfectly. Furthermore, because the physical bone cut itself is made at the apex, the bone ends hinge open or closed without any sliding or translation relative to one another. The mechanical axes become perfectly colinear.
Clinical Application
This is the ideal scenario for midshaft diaphyseal deformities. It results in a perfectly flush bone contour, maximizing cortical bone to bone contact. This excellent apposition facilitates rapid primary bone healing and allows for stable fixation with standard load sharing devices such as intramedullary nails.
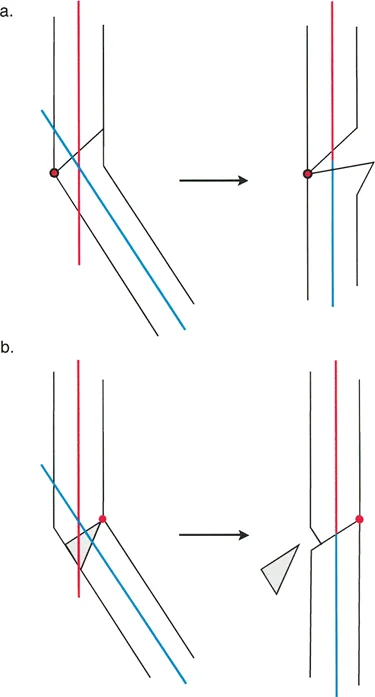
Osteotomy Rule Two Angulation with Expected Translation
The second rule addresses the clinical reality that we cannot always cut the bone at the exact apex of the deformity, particularly when the apex lies within or dangerously close to a joint space.
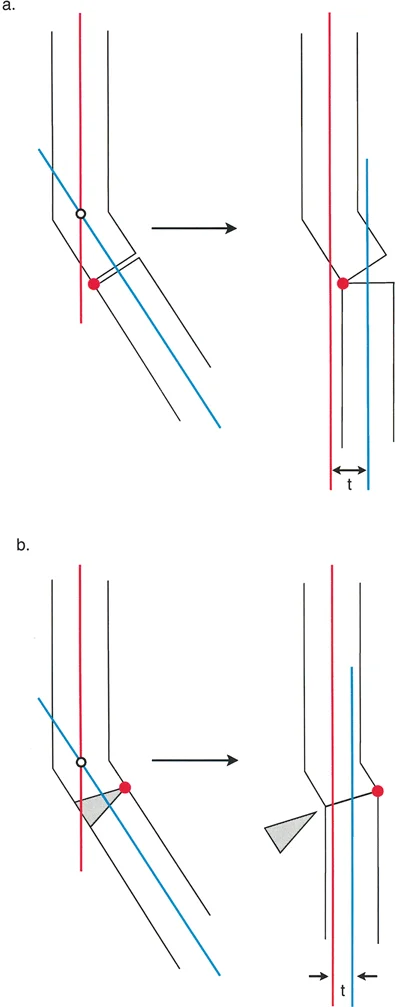
The Geometric Rule
When the Axis of Correction of Angulation passes through the Center of Rotation of Angulation, but the actual osteotomy bone cut is made at a different level either proximal or distal to the apex, the mechanical axes will fully realign, but the bone ends will translate relative to each other.
The Biomechanics
By keeping the surgical hinge on the true apex of deformity, you mathematically guarantee that the mechanical axes will become colinear upon correction. However, because the physical saw cut is distant from the hinge point, the distal bone segment must swing through a larger arc of motion. This swinging motion causes the cut ends of the bone to offset or translate. The magnitude of translation is directly proportional to the distance between the apex and the osteotomy cut, and the magnitude of the angular correction.
Clinical Application
This rule is frequently employed in periarticular deformities. For example, in a severe proximal tibial varus deformity where the apex is located inside the knee joint, the surgeon cannot cut through the articular cartilage. Instead, the surgeon places the virtual hinge at the joint space and makes the physical osteotomy further down the tibial metaphysis. The surgeon must accept, plan for, and execute the resulting translation to ensure the mechanical axis is perfectly restored.
Osteotomy Rule Three Unintended Translation and Angulation
The third rule serves as a warning and explains the geometric consequences of poor preoperative planning or execution errors.
The Geometric Rule
When the Axis of Correction of Angulation and the osteotomy cut are placed independently of the Center of Rotation of Angulation, a new deformity is created. The mechanical axes will not become colinear, resulting in residual translation and mechanical axis deviation.
The Biomechanics
If the hinge point is placed completely off the transverse Bisector Line, rotating the bone will correct the local angulation but will shift the distal mechanical axis parallel to the proximal axis. This leaves the limb with a persistent mechanical axis deviation. While the bone may look straight locally, the knee or ankle joint will still experience pathological asymmetric loading.
Clinical Application
Rule three is typically an iatrogenic error caused by failing to identify the true apex of deformity. However, advanced deformity surgeons occasionally use rule three intentionally. If a patient presents with a pre-existing translation deformity in addition to an angular deformity, the surgeon can intentionally place the hinge off the transverse Bisector Line to simultaneously correct both the angulation and the translation with a single rotation.
Preoperative Planning for Frontal Plane Realignment
Executing a flawless osteotomy begins long before the patient enters the operating room. The Paley method demands a rigorous, step by step radiographic analysis.
Step One Obtaining Quality Radiographs
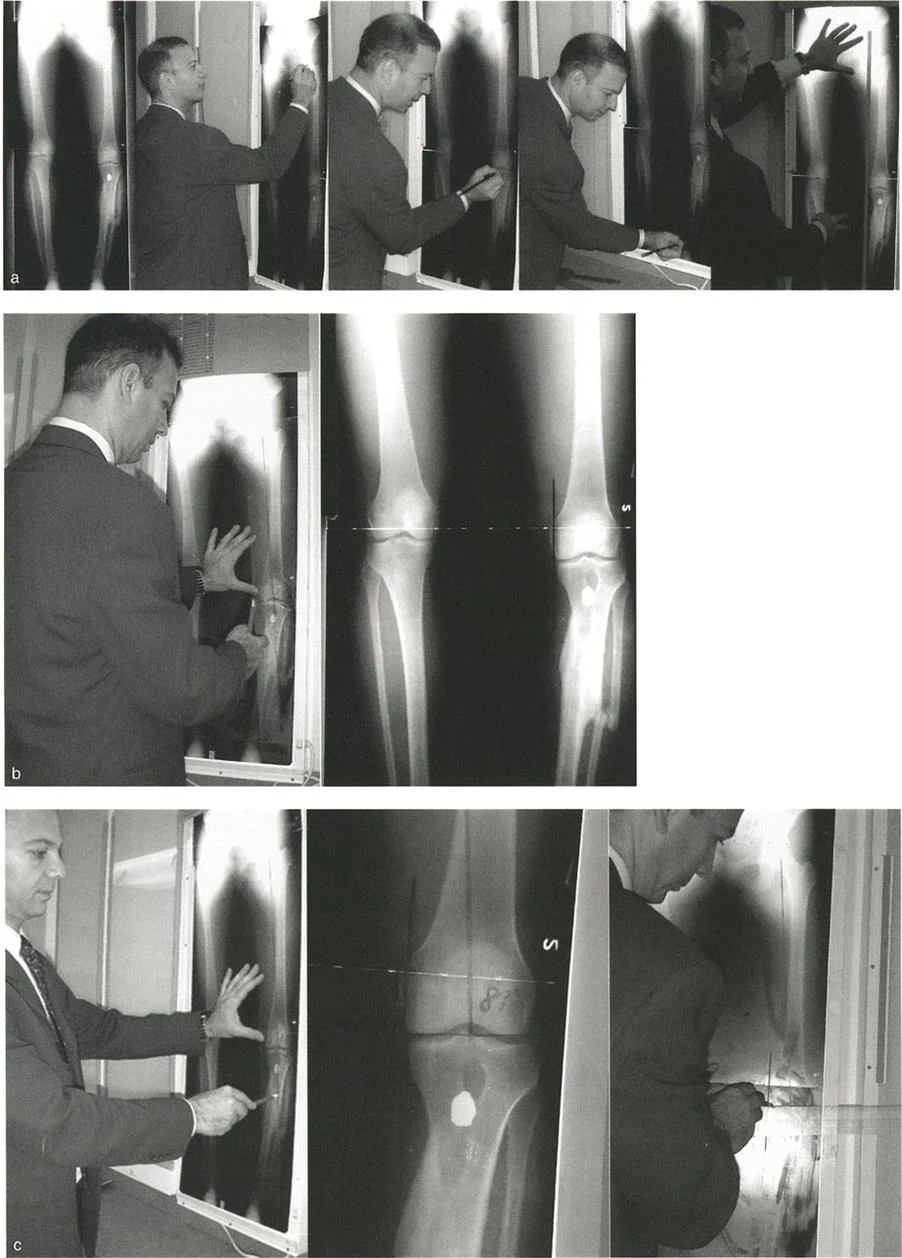
Standardizing the imaging is critical. The surgeon must obtain weight bearing, full length, standing anteroposterior radiographs of both lower extremities. The patellae must be oriented perfectly forward to eliminate rotational artifact, which can project a sagittal plane deformity into the frontal plane. A magnification marker must be placed at the level of the bone to allow for accurate digital templating and hardware sizing.
Step Two Drawing the Mechanical Axes
The Malalignment Test begins by drawing the mechanical axis of the entire limb. Draw a line from the center of the femoral head to the center of the superior articular surface of the talus. Measure the Mechanical Axis Deviation. If the deviation falls outside the normal physiological range, the surgeon proceeds to the Malorientation Test to isolate the source.
Step Three Identifying the Apex of Deformity
During the Malorientation Test, draw the mechanical axis of the normal femur and the normal tibia using the normative joint orientation angles.
1. Draw a line from the center of the femoral head at an 87.5 degree angle to the distal femoral articular surface.
2. Draw a line from the center of the ankle at an 87.5 degree angle to the proximal tibial articular surface.
3. Extend these lines until they intersect. This intersection is the Center of Rotation of Angulation.
Step Four Selecting the Osteotomy Level and Type
Once the apex is identified, the surgeon must decide where to make the physical bone cut and where to place the hinge. This decision dictates whether the osteotomy will be an opening wedge, a closing wedge, or a neutral wedge.
The surgeon must consider soft tissue coverage, bone healing potential at the metaphysis versus diaphysis, and the need to preserve or alter limb length.
Wedge Osteotomy Biomechanics and Hinge Placement
The position of the Axis of Correction of Angulation along the transverse Bisector Line determines the geometry of the resulting bone wedge. Understanding this relationship is vital for managing limb length discrepancies and soft tissue tension during deformity correction.
Opening Wedge Osteotomy Dynamics
When the surgical hinge is placed on the concave cortex of the deformed bone, the osteotomy will open on the convex side.
* Biomechanics: The bone segments rotate apart, creating a void that typically requires structural bone grafting or gradual distraction osteogenesis.
* Limb Length: Opening wedge osteotomies inherently lengthen the bone segment.
* Indications: Ideal for patients with a concomitant limb length discrepancy where lengthening is desired, or when the surgeon wishes to avoid shortening the limb.
* Drawbacks: Requires a longer period of biological consolidation due to the bone void. Increased risk of nonunion if the gap is large and inadequately grafted.
Closing Wedge Osteotomy Dynamics
When the surgical hinge is placed on the convex cortex of the deformed bone, a wedge of bone must be removed from the concave side to allow the segments to meet.
* Biomechanics: The bone segments are compressed together after the wedge is excised.
* Limb Length: Closing wedge osteotomies inherently shorten the bone segment.
* Indications: Excellent for patients who can tolerate slight shortening, or when rapid biological union is required. The bone on bone compression provides superior immediate mechanical stability.
* Drawbacks: Decreases overall limb length. Removing a wedge of bone can be technically demanding and requires precise saw cuts.
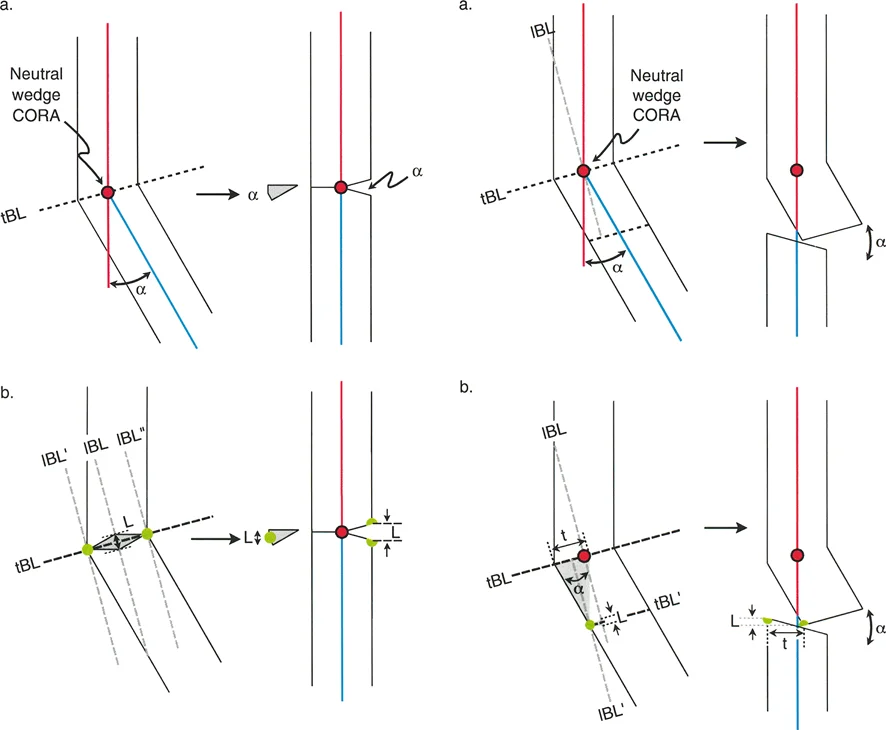
Neutral Wedge Osteotomy Dynamics
When the surgical hinge is placed centrally within the medullary canal, the osteotomy behaves as a hybrid.
* Biomechanics: The osteotomy opens on the concave side and closes on the convex side simultaneously. This is often referred to as a dome osteotomy or a focal hinge osteotomy.
* Limb Length: This technique results in minimal to no change in the overall length of the bone segment.
* Indications: Ideal when limb length must be strictly preserved, but the surgeon wants to maximize bone contact without a massive opening wedge void.
* Drawbacks: Can be technically challenging to execute without specialized targeting guides or external fixation systems.
Clinical Pearls for Surgical Execution
Translating geometric lines from a digital screen to a living patient requires meticulous surgical technique and an appreciation for the surrounding soft tissue envelope.
Avoiding Unwanted Sagittal Plane Deformity
A common pitfall in frontal plane realignment, particularly in proximal tibial osteotomies, is the inadvertent alteration of the sagittal plane. The proximal tibia has a natural posterior slope of approximately 9 degrees. When performing a medial opening wedge high tibial osteotomy for varus correction, the anterior gap must be significantly smaller than the posteromedial gap. Opening the osteotomy symmetrically will inadvertently increase the posterior tibial slope, which alters knee kinematics and increases strain on the anterior cruciate ligament.
Managing Soft Tissue Tension
Bone correction is fundamentally limited by the compliance of the surrounding soft tissues.
* Fibular Considerations: In proximal tibial corrections, the intact fibula acts as a lateral tether. For significant varus or valgus corrections, a concurrent fibular osteotomy or proximal tibiofibular joint release is mandatory to allow the tibia to mobilize freely.
* Neurological Risks: Valgus deformity correction of the proximal tibia or distal femur places the common peroneal nerve at significant risk. As the lateral side of the limb is lengthened, the nerve is stretched. Prophylactic peroneal nerve decompression at the fibular neck should be strongly considered for large corrections.
* Compartment Syndrome: Acute realignment of the tibia alters the volume of the fascial compartments. Prophylactic anterior compartment fasciotomy is a low morbidity adjunct that prevents catastrophic postoperative compartment syndrome.
Fixation Strategies Following Realignment
Once the mechanical axis is restored, rigid fixation is required to maintain the alignment until biological union occurs.
* Internal Locking Plates: Modern angle stable locking plates, such as the TomoFix system, provide excellent stability for metaphyseal osteotomies. They act as internal fixators and hold the bone segments rigidly, which is particularly useful for opening wedge osteotomies.
* Intramedullary Nailing: For diaphyseal corrections utilizing Rule One, intramedullary nails offer load sharing biomechanics and allow for early weight bearing. Blocking screws or Poller screws are often required to guide the nail and prevent the bone segments from shifting back into the deformed position.
* Hexapod External Fixators: For complex, multiplanar, or periarticular deformities where acute correction is unsafe due to soft tissue tension, circular external fixation utilizing the Taylor Spatial Frame or similar hexapod technology is the gold standard. These devices allow for gradual, computer assisted correction of the angulation and translation over several weeks, adhering perfectly to Paley principles through virtual hinge manipulation.
Conclusion to Frontal Plane Realignment
The Paley osteotomy concepts represent a monumental leap forward in the field of orthopedic reconstructive surgery. By transitioning from subjective visual alignment to objective mathematical planning, surgeons can achieve reproducible, perfect restoration of the mechanical axis.
Mastering the interplay between the Center of Rotation of Angulation, the Axis of Correction of Angulation, and the Three Rules of Osteotomy empowers the surgeon to tackle the most complex frontal plane deformities with confidence. Whether executing a simple closing wedge high tibial osteotomy or a complex multifocal deformity correction with a hexapod frame, adherence to these fundamental geometric principles is the absolute key to preventing joint degeneration, optimizing biomechanics, and restoring profound functional capacity to the patient.
!!! info "Academic Resource & Medical Review"
This academic resource was prepared and medically reviewed by Prof. Dr. Mohammed Hutaif, Consultant Orthopedic & Spine Surgeon. It is formulated specifically for medical students, orthopedic residents, and surgeons preparing for high-stakes board examinations (AAOS, FRCS Tr & Orth, Arab Board).
!!! warning "Disclaimer"
The surgical techniques, classifications, and clinical guidelines presented herein are for educational and academic review purposes only. They are not intended to replace institutional protocols or independent clinical judgment.
You Might Also Like