S-Rod Fixation to the Pelvis: A Masterclass in Neuromuscular Spinal Deformity Correction
Key Takeaway
Join us in the OR for a detailed masterclass on S-rod fixation to the pelvis. This procedure is critical for correcting neuromuscular spinal deformities, ensuring a stable base for upper spinal fusion. We'll cover comprehensive anatomy, meticulous intraoperative steps, neurovascular precautions, and essential postoperative management to achieve solid fusions and improved patient outcomes.
Alright fellows, gather around. Today, we're tackling a challenging but incredibly rewarding procedure: S-Rod Fixation to the Pelvis. This technique is paramount in the treatment of severe neuromuscular spinal deformities, particularly when we need to achieve a solid, stable foundation at the pelvis for subsequent spinal correction above. Think of patients with cerebral palsy, dystrophic muscle conditions, or myelomeningocele – these are the cases where a robust pelvic anchor becomes indispensable for managing pelvic obliquity, rotation, and ensuring a level sitting posture.
Preoperative Planning: Laying the Groundwork
Before we make any incision, meticulous planning is crucial. For these complex neuromuscular scoliosis cases, our preoperative assessment is comprehensive.
Imaging and Diagnostic Studies
While advanced imaging isn't always strictly "necessary" in every case, it's a critical tool when doubt exists regarding the exact anatomy, especially in dysplastic settings.
- Standard Radiographs: We always start with full-length standing or supine anteroposterior (AP) and lateral radiographs of the entire spine and pelvis. These give us an overall picture of the deformity.
- Lateral Films: Pay close attention to the supine lateral films; the sacral ala should be clearly visualized as a distinct horseshoe-shaped outline. This gives us an initial sense of its depth.
- Ferguson View: This is absolutely critical for our planning. We obtain a 45-degree angle Ferguson view in the frontal plane. This oblique projection provides the clearest, most accurate view of the width of the sacral ala. We need to understand the dimensions of this structure to select the appropriate S-rod or S-hook size.
- Computed Tomography (CT) Scan: If there's any ambiguity regarding the exact configuration, dysplastic changes, or the precise dimensions of the sacral ala, a thin-cut CT scan is invaluable. It offers a detailed, three-dimensional elucidation of the bony architecture, which is especially helpful in myelomeningocele patients where the anatomy can be significantly altered.
- Magnetic Resonance Imaging (MRI): While not directly for S-rod fixation, an MRI is often indicated in neuromuscular scoliosis to rule out any intraspinal anomalies, tethered cord, or syrinx, which could influence our surgical approach or neurological monitoring.
Templating and Hardware Selection
Based on our imaging, we'll template for rod length and estimate the appropriate S-rod or S-hook size. Remember, we have small and medium sizes available, and selecting the correct handedness (right or left) is vital to ensure the rod lies medial to the ala.
Surgical Anatomy: Navigating the Pelvis
Let's review the critical anatomy we'll encounter. This area is unforgiving, so precision is key.
The Sacral Ala
This is our primary anchor point. In children, the sacral ala typically measures 1.5 to 2 cm in depth (front-to-back) and 2 to 3 cm in width. It's a remarkably robust structure, even in conditions like myelomeningocele where other spinal elements might be dysplastic. The S-rods are specifically contoured to press-fit over this strong bony buttress.
The L5 Nerve Root
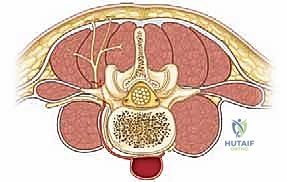
This is our most significant neurovascular concern in this region. The L5 nerve root traverses anterior to the sacral ala. Its trajectory is oblique, progressing from posterior to anterior and superior to inferior, originating from the neural foramen of L5. Crucially, immediately inferior to the L5 pedicle, the nerve passes anterior to the sacral ala, separated by a distance of approximately 1.5 cm. This means any instrument blindly inserted anterior to the ala is at high risk of injuring this root.
The Ileotransverse Ligament
This ligament connects the iliac wing to the L5 transverse process. It's a key structure we must identify and meticulously release to gain clear, unobstructed access to the sacral ala. If not adequately released, it can impede proper seating of our instrumentation.
Retroperitoneal Space
Immediately anterior to the sacral ala, beyond the L5 nerve root, lies the retroperitoneal fat. Plunging an instrument too far anteriorly risks entering this space, with potential for injury to major vessels (iliac vessels), ureters, or bowel.
Patient Positioning and Setup
The surgical management, in terms of preoperative planning, positioning, and approach, is largely the same as for any complex neuromuscular scoliosis case requiring a posterior approach.
- General Anesthesia: Administered, and neuromonitoring (SSEP, MEP) leads are applied.
- Prone Position: The patient is carefully positioned prone on a radiolucent spinal surgery frame (e.g., Jackson table, Wilson frame). We ensure adequate chest rolls or bolsters are placed longitudinally to allow free abdominal excursion, minimizing intra-abdominal pressure and consequently reducing epidural venous bleeding. The head is secured in a Mayfield clamp or horseshoe headrest, maintaining neutral alignment.
- Padding: All pressure points are meticulously padded to prevent nerve palsies or skin breakdown. Arms are tucked and padded.
- Fluoroscopy Setup: The C-arm is brought into the field and positioned to allow for clear AP and lateral views of the lumbosacral junction. We'll specifically utilize it for confirming L4 pedicle screw placement and later for evaluating rod contouring and pelvic obliquity correction. The ability to quickly obtain an oblique Ferguson view may also be helpful if there's any question about sacral ala anatomy intraoperatively.
Intraoperative Execution: The S-Rod Fixation Masterclass
Alright team, let's get scrubbed in. We've prepped and draped the patient in the usual sterile fashion, and our neuromonitoring is active and baseline signals are good.
Step 1: Incision and Exposure
"Scalpel, please. We'll make a standard posterior midline incision, extending from the upper thoracic spine down to the sacrum, exposing the spinous processes and lamina. We'll carry this down to the thoracolumbar fascia."
"Now, let's perform a meticulous subperiosteal dissection. Using electrocautery and Cobb elevators, elevate the paraspinal musculature bilaterally from the spinous processes, laminae, and transverse processes. Our goal is to expose the entire posterior elements from the desired upper instrumented vertebra down to the sacrum, including the posterior superior iliac spine (PSIS) and the posterior aspect of the iliac crest bilaterally. For this specific procedure, we need excellent visualization of the L5 transverse process, the sacral ala, and the superior aspect of the iliac wing."
Step 2: Identifying Key Landmarks and Releasing the Ileotransverse Ligament
"Alright, fellows, look closely. As we dissect laterally, we can clearly identify the L5 transverse process. Inferior to that, you'll see the superior aspect of the sacral ala, and more laterally, the iliac crest."
"Now, the ileotransverse ligament is our next target. It traverses between the L5 transverse process and the iliac wing. We need to release this ligament completely to ensure clear access to the sacral ala and prevent it from obstructing our S-rod placement."
"I'll use a Cobb elevator and electrocautery here, carefully sweeping along the superior border of the iliac wing and the inferior border of the L5 transverse process. We want to detach this ligament from its bony attachments. Complete release is paramount. If we don't release it adequately, the S-rod won't seat properly, leading to suboptimal fixation and potential hardware prominence."
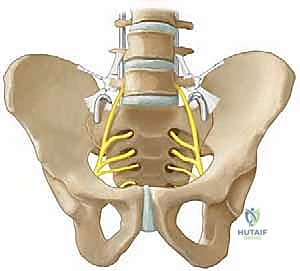
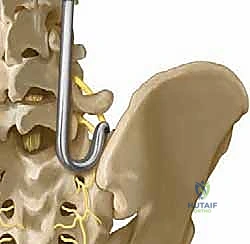
FIG 1 • Anterior view showing position of S-rod or S-hook with reference to L5 nerve root. Notice how the released ileotransverse ligament provides unhindered access.
Step 3: Meticulous Cleaning of the Sacral Ala
"Now that the ligament is released, we can better visualize the sacral ala. Our next step is to meticulously clean the soft tissues from the posterior aspect of the sacral ala. I'll use a small curette for this."
"Listen carefully, this is a critical safety point: The dissection of the soft tissues around the sacral ala must be done posteriorly with the curette. Under no circumstances should you insert tools anterior to the sacral ala blindly."
> SURGICAL WARNING: L5 Nerve Root and Retroperitoneal Space
> Never insert instruments anterior to the sacral ala blindly. The L5 nerve root traverses anterior to the ala, and immediately anterior to that is the retroperitoneal space with its vital structures. Blind anterior dissection risks severe neurological injury (L5 palsy resulting in foot drop) or a catastrophic retroperitoneal vascular injury. Use a curette posteriorly only.
"If I need to assess the anterior aspect, I will carefully sweep with my finger, only after posterior cleaning, to feel the anterior contour of the ala and confirm the absence of any obstructing tissue. My finger, never an instrument, can provide tactile feedback on the anterior surface and the relative position of the L5 nerve root. See how my finger can gently palpate the anterior surface of the ala here, confirming it's clean and feeling for the L5 nerve root, which is typically about 1.5 cm inferior to the L5 pedicle."
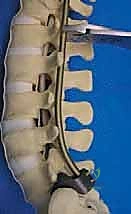
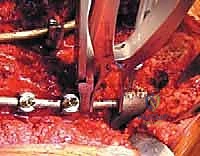
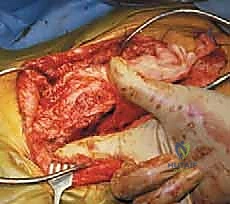
FIG 3 • The sacral ala clearly demonstrated during a myelokyphectomy with only the surgeon’s finger inserted anterior to the ala. This illustrates safe anterior palpation for assessment, not dissection.
Step 4: Sizing the S-Hook/S-Rod and L4 Pedicle Screw Placement
"With the ala clean, we can now size our S-hook or S-rod. We measure the sacral ala's front-to-back diameter directly at surgery to select the appropriate small or medium size. It's crucial to use the correct size and handedness (right or left) so the rod lies medial to the ala and achieves a snug fit."
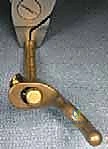
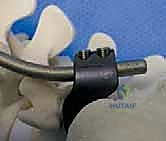
FIG 2 • A. Left-sided S-hook, anterior view. B. Left-sided S-hook, posterior view. C. With a rod clamp positioned to demonstrate the posterior plane, a right-sided S-hook is shown in its correct position. D. Right-sided S-rod, side view. Note the distinct morphology and handedness.
"Now, let's place our L4 polyaxial pedicle screws. Remember, for this technique, we avoid using an L5 pedicle screw. The L4 screw provides excellent proximal fixation and ensures proper pressure and distraction against the sacral ala, without impinging on the L5 nerve root which runs perilously close to the L5 pedicle."
"We'll use our standard technique for L4 pedicle screw placement: identify the entry point, awl, probe, tap, and then insert the polyaxial screw, confirming trajectory with fluoroscopy. We need a robust L4 screw on each side to serve as our superior anchor for the S-rod construct."
Step 5: S-Rod Placement and Initial Contouring
"Now for the S-rod itself. The S-rods are designed to press-fit precisely over the sacral ala. If we're using an S-hook with a separate rod, the sagittal contours can be made in the rod independently of the hook position."
"First, let's position the S-hook onto the rod. When initially placing the S-hook on the ala, it's best to leave approximately 1 cm of the rod protruding from the lower end of the hook."
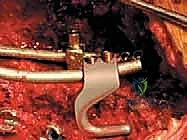
TECH FIG 1B • Initial position of the S-hook on the rod for placement purposes, with 1 cm of rod protruding.
"This initial positioning can be aided by temporarily securing a vise grip on the rod, ensuring it's aligned in the plane of the patient's natural lordosis once the S-portion of the rod is seated over the sacral ala. This helps us maintain our sagittal alignment."
TECH FIG 1A • Posterior view of a right-sided S-rod on the spine, demonstrating the initial sagittal contour and placement.
"Once the S-hook is provisionally seated over the sacral ala, we'll temporarily tighten one Allen set screw on the hook. This allows us to establish a temporary connection and apply some initial distraction between the L4 pedicle screw and the S-hook. This provisional tightening helps us assess the fit and contour."
TECH FIG 1C,D • The S-hook shown positioned over the sacral ala and up the spine, with the initial temporary tightening to the rod and L4 screw.
"Now, we'll remove the rod from the wound. With the rod out, we can apply our three-point bender to produce the proper, individualized sagittal contours. This is where we fine-tune the lordosis or kyphosis to best match the patient's desired spinal alignment and correct any remaining sagittal imbalance. We aim for a smooth, anatomical curve."
"Once contoured, we re-insert the rod, carefully seating the S-portion over the sacral ala and engaging it into the L4 pedicle screw head."
Step 6: Final Fixation and Deformity Correction
"With the contoured rods in place, we move to final fixation and the correction of the spinal deformity above this area. We'll start with the concave side first."
"Using our distraction instrument, we'll distract once again between the L4 pedicle screw and the S-hook on the concave side. This maneuver helps to further correct pelvic obliquity and ensure maximal purchase of the S-hook on the sacral ala. Once we've achieved the desired distraction and correction, we firmly tighten both Allen set screws on the S-hook to the rod."
"We then repeat this process on the convex side, distracting the S-hook to the end of the rod and securely tightening both Allen set screws."
"For enhanced stability, we'll now place a transverse rod connector above the S-hooks. This cross-link significantly increases the rigidity of our construct, preventing pistoning and rotation."
"With both rods firmly anchored, we can now address any remaining pelvic obliquity. By grasping the rods above the S-hooks, we can apply a strong cantilever force to pivot the pelvis, correcting the deformity in one controlled maneuver. This requires careful coordination and visual assessment of the pelvic alignment. Once corrected, ensure all set screws are firmly tightened, especially those on the S-hooks."
> SURGICAL WARNING: Inadequate Tightening
> All Allen set screws must be firmly tightened. Loose set screws are a primary cause of hardware failure, loss of correction, and potential rod migration. Double-check every screw.
Pearls and Pitfalls: Navigating Challenges
💡 Pearls and Pitfalls
- L5 Nerve Root Injury: As discussed, this is the most critical risk.
- Prevention: Always dissect posteriorly on the sacral ala. Never use instruments blindly anteriorly. If anterior palpation is absolutely necessary, use a gloved finger only after posterior dissection is complete.
- Intraoperative Salvage: If there's a concern for L5 nerve root impingement or injury (e.g., neuromonitoring changes, direct visualization of nerve proximity), immediately decompress the area. If hardware is impinging, it must be repositioned or removed.
- Retroperitoneal Plunge:
- Prevention: Strict adherence to posterior dissection. Understand the 1.5-2 cm depth of the sacral ala.
- Intraoperative Salvage: If a plunge is suspected, immediately assess for bleeding. If significant bleeding occurs or visceral injury is a concern, a general or vascular surgeon consult is immediately warranted, potentially requiring an anterior abdominal exploration.
- Ileotransverse Ligament:
- Pitfall: Incomplete release can prevent the S-rod from seating properly, leading to poor fixation, rod prominence, or persistent pelvic obliquity.
- Pearl: Take the time to ensure complete release, visualizing the entire superior aspect of the sacral ala.
- L5 Pedicle Screw:
- Pitfall: Using an L5 pedicle screw is generally discouraged with S-rod fixation due to the close proximity of the L5 nerve root. The S-hook itself occupies this precious space, and adding a pedicle screw risks direct impingement or compromise of the nerve.
- Pearl: An L4 polyaxial pedicle screw works exceptionally well, providing robust proximal fixation without endangering the L5 root.
- S-Hook Sizing and Contouring:
- Pitfall: Incorrect hook size or inadequate sagittal contouring can lead to poor purchase, early failure, or an unphysiological spinal alignment.
- Pearl: Measure the sacral ala carefully. Take the rod out and use the three-point bender to achieve the ideal sagittal contour. A good press-fit is essential.
- Rod Migration:
- Pitfall: Can occur if set screws are not firmly tightened, or if the initial fixation is inadequate. In a growth rod construct, migration into the pelvis is a known complication.
- Pearl: Ensure all set screws are maximally tightened. Use a transverse connector for added stability. Regular follow-up imaging for growth rod constructs is crucial to monitor for migration.
Postoperative Care and Outcomes
Once we've achieved solid fixation and closed the wound in layers, our attention turns to postoperative management.
Immediate Postoperative Period
- Pain Management: Aggressive multimodal pain management is crucial for these patients.
- Neurological Monitoring: Continue close neurological checks.
- DVT Prophylaxis: Given the extensive nature of the surgery and the patient population, mechanical (SCDs) and often chemical (e.g., LMWH) DVT prophylaxis is initiated according to institutional protocols.
- Wound Care: Standard wound care, monitoring for infection or dehiscence.
Rehabilitation and Activity Restrictions
This is a critical phase for ensuring the longevity of our construct and successful fusion.
- Hip Flexion Restriction: It is absolutely important to maintain hip flexion at 45 degrees or greater for the first 6 months.
- Rationale: This restriction is vital to avoid a levering effect on the pelvic fixation. Excessive hip flexion beyond this range can place undue stress on the S-rods and the sacral ala, potentially leading to hardware loosening, pullout, or pseudarthrosis.
- Physical Therapy: No physical therapy is done about the hips for the first 6 months. This includes passive or active range of motion exercises that could violate the hip flexion restriction. We want to allow the fusion to consolidate without any disruptive forces.
- Weight-Bearing Status: This will depend on the overall construct and the patient's individual circumstances. Many of these patients are non-ambulatory or have limited mobility. For those who are ambulatory, protected weight-bearing or bracing may be indicated initially, progressing as fusion matures.
- Sitting: The goal is to achieve a level pelvis for sitting, which greatly improves ease of caregiving and functional independence.
Outcomes
This technique, which has been successfully employed in hundreds of cases since 1984, generally yields excellent outcomes:
- Solid Fusions: The S-rod fixation provides a robust anchor, leading to high rates of solid lumbosacral fusion.
- Improved Pelvic Alignment: Effective correction of pelvic obliquity and rotation.
- Ease of Caregiving: A level pelvis significantly improves the ability of caregivers to position and manage the patient.
- Functional Improvement: For many, it leads to a more comfortable and functional sitting posture.
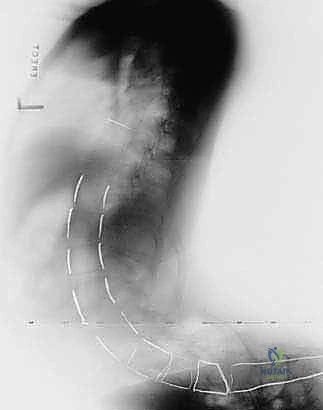
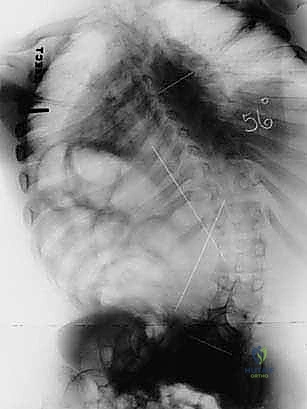


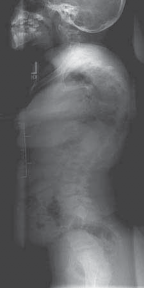
FIG 4 • Neuromuscular spinal deformity: spastic lordoscoliosis with S-hooks. These images demonstrate the long-term stability and correction achieved with S-rod fixation.
Potential Complications
While generally safe and effective when performed meticulously, like any major spinal surgery, complications can occur:
- Rod Migration: As mentioned, this can happen, particularly with growth rod constructs, potentially migrating into the pelvis. This typically necessitates revision surgery to reposition or replace the hardware and ensure secure fixation.
- Neurologic Impairment (L5 Root): While I personally have not experienced any neurologic impairment of the L5 root using this technique, it remains a theoretical risk if the surgical principles, especially regarding anterior dissection, are violated. Should a new foot drop or L5 radiculopathy develop postoperatively, immediate investigation (e.g., MRI) and potential surgical decompression would be warranted.
- Pseudarthrosis: Failure of the fusion to consolidate. This can be due to inadequate fixation, poor bone graft, or excessive motion. It may require revision surgery with additional bone grafting and/or hardware stabilization.
- Infection: Standard surgical site infection risks apply.
- Hardware Prominence: Can occur if the S-rod is not seated deeply enough or if the soft tissues are thin. May require revision for hardware removal if symptomatic.
Alright, fellows, that concludes our deep dive into S-Rod Fixation to the Pelvis. Remember the critical anatomical landmarks, the meticulous dissection, and the importance of precise hardware placement and contouring. This is a powerful technique to improve the lives of our patients with complex neuromuscular spinal deformities. Any questions?
REFERENCES
- McCarthy RE. Sacral pelvic fixation in neuromuscular deformities. Semin Spine Surg 2004;16:126–133.
You Might Also Like