Submuscular Bridge Plating of Pediatric Femoral Shaft Fractures: An Intraoperative Masterclass
Key Takeaway
This masterclass guides you through submuscular bridge plating for pediatric femoral shaft fractures. We cover meticulous preoperative planning, precise patient positioning, and a granular, real-time intraoperative execution. Learn critical anatomical considerations, instrument use, and advanced techniques like "perfect circle" screw placement. We also detail pearls, pitfalls, and comprehensive postoperative care, ensuring optimal outcomes for unstable comminuted or oblique femur fractures in pediatric patients.
Welcome, fellows, to the operating theater. Today, we're tackling a challenging yet rewarding procedure: submuscular bridge plating for pediatric femoral shaft fractures. This technique has truly revolutionized our approach to these injuries, offering stable fixation while minimizing the extensive soft tissue disruption traditionally associated with open plating. It's a testament to the evolution in our understanding of plate mechanics and biologic healing. This minimally invasive strategy preserves the delicate soft tissues, promoting rapid fracture healing and reducing complications. Our focus today will be on unstable, comminuted, or oblique femur fractures in patients typically aged 6 years to skeletal maturity.
Comprehensive Surgical Anatomy: Navigating the Femoral Shaft
Before we make any incisions, let's briefly review the critical anatomy of the lateral femur and surrounding structures. Understanding these relationships is paramount for safe and effective submuscular plating.
Osteology
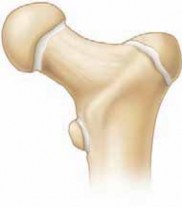
- Femoral Shaft: The long, cylindrical body of the femur, which is our primary target. We're aiming to span from the trochanteric apophysis proximally to the distal femoral metaphysis distally. This ensures adequate purchase and stability.
- Anterior Bow: The femur naturally has an anterior bow. While our plate needs to be contoured, it's important to remember that it doesn't need to perfectly replicate this anterior bow. The bone will often reduce to the plate contour, and in our experience, minor deviations haven't led to clinical issues.
Muscular Intervals and Soft Tissue Planes
- Tensor Fascia Lata: This thick, fibrous band forms the lateral boundary of the thigh. Our initial incision will traverse this fascia.
- Vastus Lateralis: A large, powerful muscle of the quadriceps femoris group. The key to our submuscular approach lies in identifying and dissecting deep to the distal, obliquely oriented fibers of the vastus lateralis. This allows us to access the lateral femoral periosteum without extensive muscle stripping.
- Iliotibial Band (IT Band): This is the distal extension of the tensor fascia lata and gluteus maximus. During percutaneous screw placement, our stab incisions will pass through the IT band and the vastus lateralis to reach the plate.
Neurovascular Risks
The beauty of the lateral approach for submuscular plating is that it generally lies in a safe zone regarding major neurovascular structures.
* Lateral Femoral Cutaneous Nerve (LFCN): While typically more anterior and medial, variations exist. Excessive anterior dissection or retraction proximally could theoretically put it at risk, though it's rarely encountered in this specific plane. We prioritize blunt dissection and staying tight to the bone.
* Perforating Arteries: These vessels arise from the profunda femoris artery and pierce the adductor magnus, vastus lateralis, and biceps femoris to supply the posterior and lateral compartments. While our dissection is lateral and superficial to the bone, aggressive or uncontrolled blunt dissection, especially in the mid-shaft, could theoretically injure smaller perforators. Maintaining a subperiosteal or very close-to-bone plane minimizes this risk.
* Femoral Artery/Vein/Nerve: These major structures are located in the anterior and medial thigh, far from our lateral approach, so the risk to them is negligible.
The crucial anatomical plane we exploit is between the lateral femoral periosteum and the vastus lateralis. This plane is typically avascular and easily defined with blunt dissection, minimizing soft tissue trauma and preserving the blood supply to the fracture fragments.
Preoperative Planning & Patient Positioning: Setting the Stage for Success
Meticulous planning is the bedrock of a successful outcome. Let's walk through our preoperative considerations and patient setup.
Patient Selection and Fracture Characteristics
We're targeting unstable comminuted or oblique femur fractures in pediatric patients, typically those aged 6 years up to skeletal maturity. These are the fractures where maintaining length and alignment can be challenging with other methods like elastic intramedullary nails or spica casting.
Implant Selection and Preparation
- Plate Type: For most patients, we'll opt for a 4.5-mm narrow low-contact dynamic compression plate (LC-DCP). This robust plate provides excellent stability. In specific scenarios, such as osteopenic patients or very proximal or distal fractures where screw purchase might be compromised, locking plates can be a valuable alternative, offering angular stability.
- Plate Length: This is critical. As a general rule, the plate should span from just below the greater trochanteric apophysis proximally to the distal femoral metaphysis distally. We aim for at least six screw holes proximal and six holes distal to the fracture site if possible, though some fracture locations may only allow for two or three holes. Typical plate lengths range from 10 to 16 holes, depending on the patient's size and fracture location.
- Plate Contouring: The femur has a natural anterior bow. While it's not strictly necessary to perfectly contour the plate to this anterior bow (the femur will often reduce to the plate contour), we do need to accommodate the overall shape. We use a table plate bender to achieve a subtle bend that matches the general curvature of both the proximal femur and the distal metaphysis.
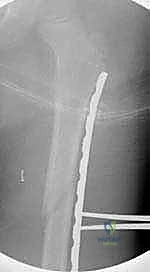
- Preoperative Templating: We'll place the chosen plate over the anterior thigh of the patient preoperatively and use fluoroscopy to confirm the appropriate length.
- Confirming Contour: After initial contouring, we'll again place the plate on the anterior thigh and use fluoroscopy to "shadow" the lateral aspect of the femur. This allows us to visually confirm the plate's contour and ensure it's suitable.

TECH FIG 2 • The plate on the anterior thigh shadowing the lateral femur with fluoroscopy to evaluate plate contour and length.
4. Screw Selection: Given the percutaneous nature of screw placement, self-tapping screws are our preference. They significantly facilitate insertion, especially through the soft tissues. No lag screws are used in this bridging technique; the fracture region is spanned.
Patient Positioning and OR Table Setup
- Fracture Table: This is our preferred setup. The patient is positioned supine on the fracture table.
- Traction: A boot traction system is applied to the injured leg. This provides continuous longitudinal traction, which is crucial for achieving provisional reduction of length and rotation.
- Well Leg Positioning: The well leg is typically extended and abducted if the fracture table allows, creating an anteroposterior (AP) scissored position with the fractured leg.
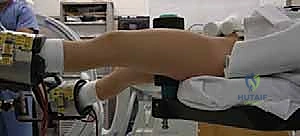
TECH FIG 1 • Patient positioning in boot traction with the legs scissored in the AP direction.
Alternatively, the well leg can be placed on a well-leg holder. This scissored or abducted position is critical as it allows us to aim the fluoroscopy unit perpendicular to the fractured leg, ensuring optimal lateral images for percutaneous screw placement.
2. Radiolucent Table: If a fracture table isn't available, a standard radiolucent table can be used, provided there is adequate assistance to maintain manual traction and support the limb throughout the procedure. This requires more personnel and careful coordination.
3. Fluoroscopy Setup: The C-arm must be positioned to allow for both true AP and true lateral views of the entire femoral shaft, from the trochanteric region to the distal metaphysis, without repositioning the patient. This often means placing the C-arm on the contralateral side, allowing it to swing freely.
Provisional Reduction
The immediate goal with traction is to restore length and rotation. While the final AP plane reduction can be refined with the plate and screws, getting the initial length and rotation correct is paramount to avoid malunion. We'll verify this with fluoroscopy before proceeding with the plate.
Surgical Warning: Always confirm rotational alignment using clinical assessment (patellar orientation, foot position) and fluoroscopy, comparing to the contralateral limb if necessary, before plate application. Once the plate is fixed, correcting rotation becomes extremely difficult.
CRITICAL: Step-by-Step Intraoperative Execution (The Operating Surgeon's Viewpoint)
Alright, fellows, let's scrub in. We've got our patient positioned, our plate contoured, and our C-arm ready. Let's begin.
1. Initial Incision and Distal Dissection
"Scalpel, please. We'll start with a small, approximately 4 to 7 cm transverse or longitudinal incision over the distal lateral femur. This is typically just proximal to the lateral epicondyle, aiming for the distal aspect of the vastus lateralis. We're keeping this as minimal as possible."
"Now, through the skin, subcutaneous tissue, and then we'll carefully incise the tensor fascia lata. Good. Retractors in, please. We want to expose the obliquely oriented distal fibers of the vastus lateralis."
"Here's where the magic of the submuscular technique begins. We'll perform blunt dissection deep to the distal aspect of the vastus lateralis. Use your finger or a blunt instrument, like a Cobb elevator, to define this plane. You should feel yourself entering a clear space, the plane between the lateral femoral periosteum and the vastus lateralis muscle belly. It's usually quite straightforward to define."
2. Plate Tunneling
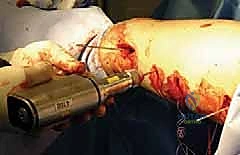
"Once we've entered that submuscular plane distally, we'll take our pre-contoured plate. We're going to use the plate itself as our tunneling instrument. Slowly advance the plate proximally along the lateral femoral periosteum. Feel the plate contact against the lateral femur as you advance it. This ensures we stay in the correct plane, tight to the bone, minimizing soft tissue stripping."
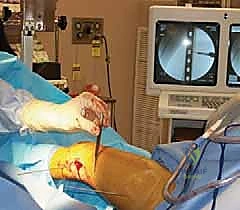
"Assistant, can you position the C-arm for an AP view, please? We'll use fluoroscopy to assist in guiding the plate past the fracture site and ensure it's tracking correctly along the femoral shaft."
TECH FIG 3 • A. The plate is tunneled proximally under the distal vastus lateralis.
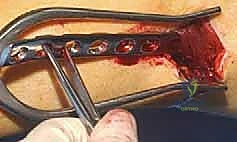
TECH FIG 3 • B. The plate is tunneled proximally under the distal vastus lateralis.
TECH FIG 3 • C. The plate is tunneled proximally under the distal vastus lateralis.
TECH FIG 3 • D. Fluoroscopic view of the plate being guided proximally.
"Keep advancing until the plate spans from the trochanteric apophysis to the distal femoral metaphysis, as planned. We want good coverage proximally and distally."
3. Confirming Plate Position and Provisional Fixation
"Alright, the plate is fully advanced. Now, let's get both AP and lateral fluoroscopic views to confirm its exact position. We need to ensure it's centered on the lateral aspect of the femur and that our contour is acceptable. Occasionally, you'll need to make subtle adjustments to the plate's rotation or position on the lateral view at this stage."
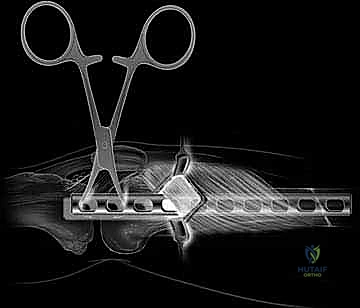
"Once we're satisfied with the plate's position, we'll secure it temporarily. Grab a Kirschner wire, please. We'll place one K-wire percutaneously through the most proximal plate hole and another through the most distal plate hole, using fluoroscopic guidance. This will hold the plate securely against the bone while we place our definitive screws."
TECH FIG 3 • E,F. Kirschner wires secure the plate in position before screw placement.
Surgical Warning: Ensure the K-wires are not too long and do not impinge on any soft tissues or neurovascular structures on the medial side. Confirm bicortical purchase with fluoroscopy.
4. Percutaneous Screw Placement: The "Perfect Circle" Technique
"Now for the definitive fixation. We'll use the principles of external fixation for screw placement, bridging the fracture zone. Remember, no lag screws here."
-
Fluoroscopic Guidance - Lateral View: "Assistant, let's get a perfect lateral fluoroscopic view. We need to visualize the plate holes as distinct, perfect circles. This ensures our drill bit is perfectly perpendicular to the plate and the bone."
-
First Screw Placement (Reduction Screw): "The decision of which screw to place first is crucial. We'll target a hole where the femur is furthest from the plate and closest to the fracture. This screw will act as a reduction screw, pulling the femur towards the pre-contoured plate and helping to restore alignment, particularly in the AP plane."
- "Identify your target hole. Now, with the C-arm in the lateral position, making sure your hole is a perfect circle, make a stab incision over that 'perfect circle.' Use a scalpel blade, directing it horizontally to the fluoroscopic beam. This will guide you through the iliotibial band and vastus lateralis directly down to the desired plate hole."
- "Identify your target hole. Now, with the C-arm in the lateral position, making sure your hole is a perfect circle, make a stab incision over that 'perfect circle.' Use a scalpel blade, directing it horizontally to the fluoroscopic beam. This will guide you through the iliotibial band and vastus lateralis directly down to the desired plate hole."
TECH FIG 4 • B. The scalpel localizing the position and forming a percutaneous incision to the desired screw hole.
* "Now, take the 3.2-mm drill bit. Place it into the desired hole and, under constant fluoroscopic guidance (maintaining that perfect circle view), drill through both cortices. You'll feel the characteristic 'pop' as you breach the far cortex."
TECH FIG 4 • C. Drilling a bicortical screw hole.
* "Once drilled, remove the drill bit. We need to determine the screw length. Place the depth gauge through the screw hole, ensuring it hooks the far cortex. Use fluoroscopic imaging with the depth gauge in place to confirm the appropriate screw length. We want bicortical purchase without excessive protrusion."
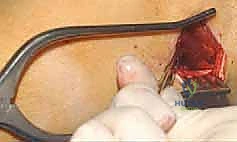
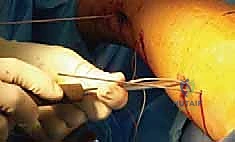
* "Select your self-tapping screw. Before insertion, a neat trick: tie an absorbable Vicryl suture around the head of the screw. This prevents losing the screw in the soft tissues during percutaneous placement if it disengages from your screwdriver."
TECH FIG 4 • D. An absorbable suture is tied around the screw head.
* "Insert the screw, again under fluoroscopic guidance. As you tighten this first screw, you'll observe the femur reducing to the pre-contoured plate. This is your primary reduction screw."
TECH FIG 4 • E. Percutaneous screw placement.
* "Let's get an AP view to confirm the screw length and position. See how that first screw is pulling the bone to the plate? That's the reduction we're looking for."
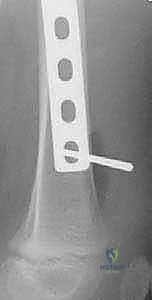
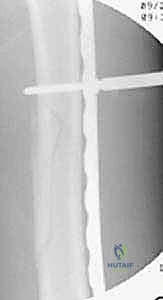
TECH FIG 4 • A. Fluoroscopic image of two screws bridging the fracture. These are commonly the first two screws placed. They are on the proximal and distal margin of the fracture.
-
Second Screw Placement: "Now, we'll place the second screw on the opposite side of the fracture, again choosing a hole where the femur is furthest from the plate. This creates a stable construct around the fracture. We'll follow the same 'perfect circle' technique for percutaneous access, drilling, measuring, and inserting the screw with the Vicryl tie."
-
Remaining Screws: "We need to place a total of three screws proximal and three screws distal to the fracture, if possible. In some cases, especially in very proximal or distal fractures, we might only have room for two screws on one side. The key is to space the screws as far apart as possible on each side of the fracture to achieve maximal stability and a long working length."
"Continue with the 'perfect circle' technique for each subsequent screw, ensuring bicortical purchase and appropriate length. After each screw, we'll cut the Vicryl tie."
- Fluoroscopy Rotation: Remember to rotate the fluoroscopic image to the AP view periodically to confirm screw length and ensure no medial cortex penetration, and then back to the lateral view for the "perfect circle" during drilling and insertion.
5. Final Assessment and Closure
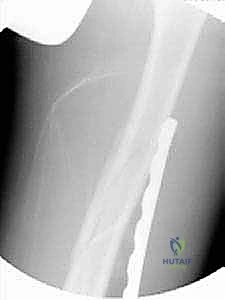
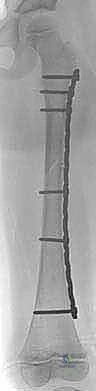
"Once all screws are placed and tightened, let's get our final AP and lateral radiographs of the entire femur. We need to ensure adequate alignment, length, and rotational stability. Check for any hardware prominence or potential issues."
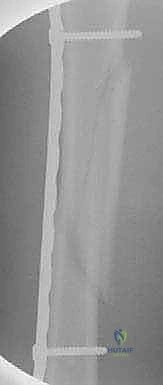
TECH FIG 4 • H,I. Postoperative AP radiographs of the long oblique proximal-third femur fracture managed with the submuscular plate.
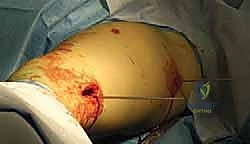
"Looks good. The Vicryl ties have been cut. Now, we'll irrigate the small incisions thoroughly and then close them in layers. Typically, we'll close the tensor fascia lata if it was significantly incised, then the subcutaneous tissue, and finally the skin."
💡 Pearls and Pitfalls
- Rotational Alignment is King: Before any plate fixation, confirm rotational alignment using fluoroscopy and fracture geometry. Compare clinically to the contralateral limb. Once the plate is secured, correcting rotation is exceedingly difficult.
- Optimal Plate Length: The plate must span from just below the greater trochanteric apophysis to the distal femoral metaphysis. This maximizes fixation points and minimizes stress risers.
- Temporary K-wire Fixation: Always temporarily secure the plate with Kirschner wires in the proximal and distal screw holes. This prevents plate migration during definitive screw placement and allows for final positional adjustments under fluoroscopy.
- Screw Count: Aim for three screws proximal and three screws distal to the fracture. This provides sufficient stability. If anatomical constraints limit this, two screws can be acceptable, especially with locking plates.
- Maximal Screw Spread: Maximize the distance between screws on each side of the fracture. This increases the working length of the plate and enhances construct stability.
- The First Reduction Screw: The initial screw placed, particularly where the femur is furthest from the plate but closest to the fracture, acts as a powerful reduction tool. It draws the bone to the pre-contoured plate, correcting alignment.
- Suture on Screw Head: The simple act of tying an absorbable suture around the screw head is a lifesaver. It prevents losing the screw in the soft tissues during percutaneous insertion, saving valuable OR time and frustration.
- "Perfect Circle" Technique: Master this fluoroscopic technique. It ensures your drill is perpendicular to the plate and bone, minimizing screw stripping and maximizing purchase.
- No Lag Screws: This is a bridging plate technique. Do not place lag screws across the fracture site, as this can lead to excessive compression and compromise biologic healing.
- Plate Contouring: While a perfect anterior bow isn't strictly necessary, careful contouring to accommodate the proximal and distal metaphyses is important. The femur will reduce to the plate.
- Minimizing Dissection: The essence of this technique is minimal soft tissue disruption. Stick to the submuscular plane between the vastus lateralis and the periosteum.
- Intraoperative Disaster: Malreduction: If you identify malreduction (e.g., malrotation or significant angular deformity) after placing a few screws, you must remove the screws, correct the alignment, and re-fix. Do not proceed with a known malreduction.
- Intraoperative Disaster: Screw Stripping: If a screw strips, remove it, consider upsizing the screw if possible, or move to an adjacent hole. If using locking plates, ensure the locking mechanism is engaged correctly.
- Intraoperative Disaster: Plate Bending: If the plate bends during reduction or screw placement, it indicates insufficient contouring or excessive force. Remove the plate, re-contour, or consider a stronger plate if appropriate.
Postoperative Rehabilitation & Complication Management
Our work doesn't end when the patient leaves the OR. Postoperative care is crucial for optimal healing and functional recovery.
Immediate Postoperative Care
- Dressing: A soft dressing is applied to the incision sites.
- Knee Immobilizer: For comfort during initial mobilization, especially in the first few days, a knee immobilizer can be used. This is not for fracture stability but for pain management and to protect the limb.
- No Bracing or Casting: One of the significant advantages of stable submuscular plating is that no bracing or casting is required in the postoperative period, unlike many other pediatric femur fracture treatments.
Rehabilitation Protocol
- Range of Motion (ROM): Patients are encouraged to perform hip and knee range of motion exercises as tolerated, starting almost immediately. Early motion helps prevent stiffness and promotes muscle recovery.
- Weight-Bearing: We typically recommend touch-down weight bearing (TDWB) until early fracture callus is evident on radiographs. This usually takes about 6 to 8 weeks. This protects the healing fracture while allowing for some physiological loading.
- Progression to Full Activity: Full activity, including sports, is allowed only when a bridging callus is present on at least three of the four cortices on follow-up radiographs. This signifies adequate fracture healing and stability.
Complication Management
While submuscular bridge plating has a very successful track record with minimal reported complications, it's essential to be aware of potential issues and how to manage them.
- Refracture After Early Plate Removal: This is a reported complication. It underscores the importance of waiting for complete fracture healing before considering plate removal. The plate should remain in place until a solid bridging callus is evident.
- Plate Bending: Another reported complication is a 3.5-mm plate bending. This highlights the importance of appropriate implant selection. We advocate for using a 4.5-mm plate in all but the smallest femurs to provide adequate strength and prevent hardware failure.
- Femoral Overgrowth: Since the fracture is secured to length, there is a potential for post-fracture femoral overgrowth in pediatric patients. In our experience, this potential overgrowth rarely becomes clinically relevant, meaning it doesn't typically cause limb length discrepancy requiring intervention.
- Loss of Anterior Bow or Recurvatum: After union, some fractures may exhibit a loss of the natural anterior bow or a few degrees of recurvatum. Again, this has not been proven to be clinically relevant in our experience, especially with good initial plate contouring. Appropriate plate bending can help mitigate this.
- Hardware Prominence/Irritation: While rare with this submuscular technique, some patients may experience irritation from prominent hardware, especially in very thin individuals.
Plate Removal
Plate removal is at the discretion of the surgeon and the family.
* Timing: If plate removal is chosen, it is generally recommended at 6 to 8 months post-fixation. This allows for sufficient bone healing while minimizing the difficulty of removal.
* Challenges of Late Removal: If the plate is removed at a later date (e.g., beyond 1 year), it will be more challenging to remove in a percutaneous manner due to significant tissue overgrowth and bone incorporation around the plate.
* Removal Technique: The plate can be removed through the same percutaneous incisions used for insertion.
* First, the screws are percutaneously removed using fluoroscopy.
* Then, a Cobb elevator is advanced proximally along the lateral aspect of the plate to free the soft tissue that has grown over it.
* Finally, a Cobb elevator is carefully placed between the plate and the bone to free the plate from any bony ingrowth, allowing for its removal through the distal incision.
This submuscular bridge plating technique is a reliable and predictable method for stabilizing complex pediatric femur fractures. It offers excellent outcomes with minimal complications, allowing our young patients to return to full activity efficiently. Understanding these nuances, from preoperative planning to postoperative care, is what makes the difference. Well done, fellows.
REFERENCES
-
Agus H, Kalenderer Ö, Eryanilmaz G, et al. Biological internal fixation of comminuted femur shaft fractures by bridge plating in children. J Pediatr Orthop 2003;23:184–189.
-
Caird MS, Mueller KA, Puyear A, et al. Compression plating of pediatric femoral shaft fractures. J Pediatr Orthop 2003;23:448–452.
-
Eren OT, Kucukkaya M, Kockesen C, et al. Open reduction and plate fixation of femoral shaft fractures in children aged 4 to
-
J Pediatr Orthop 2003;23:190–193.
-
Flynn JM, Hresko T, Reynolds RA, et al. Titanium elastic nails for pediatric femur fractures: a multicenter study of early results with analysis of complications. J Pediatr Orthop 2001;21:4–8.
-
Fyodorov I, Sturm PF, Robertson WW Jr. Compression-plate fixation of femoral shaft fractures in children aged 8 to 12 years. J Pediatr Orthop 1999;19:578–581.
-
Kanlic EM, Anglen JO, Smith DG, et al. Advantages of submuscular bridge plating for complex femur fractures. Clin Orthop 2004; 426:244–251.
-
The best predictor of success is the length of the plate. 9
-
In comminuted and long oblique fractures treated with submuscular plating, the longer plate results in less strain on the plate and screws as the working length of the plate increases.
-
Since the comminuted fracture is spanned with a long plate, the strain on the healing fracture is less.
-
With the soft tissues intact around the fracture, the more rapid callus formation results in earlier load-sharing of the bone with the plate.
-
This limits the period of the load carried by the plate and the potential for failure.
-
The longer plate also requires fewer screws for optimal plate fixation.
-
Kregor PJ, Song KM, Routt ML, et al. Plate fixation of femoral shaft fractures in multiply injured children. J Bone Joint Surg Am 1993; 75A:1774–1780.
-
Luhmann SJ, Schootman M, Schoenecker PL, et al. Complications of titanium elastic nails for pediatric femoral shaft fractures. J Pediatr Orthop 2003;23:443–447.
-
Rozbruch SR, Müller U, Gautier E, et al. The evolution of femoral shaft plating technique. Clin Orthop 1998;354:195–208.
-
Sink EL, Hedequist D, Morgan SJ, et al. Results and technique of unstable pediatric femoral fractures treated with submuscular bridge plating. J Pediatr Orthop 2006;26:26:177–181.
-
Sink EL, Gralla J, Repine M. Complications of pediatric femur fractures treated with titanium elastic nails. J Pediatr Orthop 2005; 25:577–580.
-
Ward WT, Levy J, Kayne A. Compression plating for child and adolescent femur fractures. J Pediatr Orthop 1992;12:626–632.
You Might Also Like