Tendon Graft Reconstruction for Chronic Mallet Finger and Extensor Deformities
Key Takeaway
Chronic mallet finger deformities often require complex surgical reconstruction when conservative measures fail. This guide details the tendon grafting technique, utilizing a spiraling tunnel from the distal phalanx to the proximal phalanx to restore the tenodesis effect. It covers precise graft tensioning, K-wire transfixion, and postoperative protocols, alongside the pathoanatomy and management of associated boutonniere deformities, providing orthopedic surgeons with an evidence-based approach to extensor mechanism reconstruction.
Introduction to Extensor Mechanism Reconstruction
The extensor mechanism of the digits is a highly complex, finely balanced system of intrinsic and extrinsic tendinous contributions. Disruption of this mechanism at the distal interphalangeal (DIP) joint results in a mallet finger deformity, while disruption at the proximal interphalangeal (PIP) joint results in a boutonniere (buttonhole) deformity.
While acute mallet fingers are typically managed successfully with strict immobilization, chronic or "old" mallet finger deformities present a significant reconstructive challenge. When the terminal extensor tendon is attenuated, scarred, or functionally absent, primary repair is often impossible. In these refractory cases, a tendon graft utilizing a spiral tenodesis technique is indicated to restore the critical balance between the PIP and DIP joints. This procedure effectively recreates the biomechanical function of the oblique retinacular ligament (ORL), coupling PIP extension with DIP extension.
Biomechanics and Pathoanatomy
To successfully reconstruct a chronic mallet finger or manage a boutonniere deformity, the surgeon must possess an intimate understanding of the extensor mechanism's functional anatomy.
The Normal Extensor Mechanism
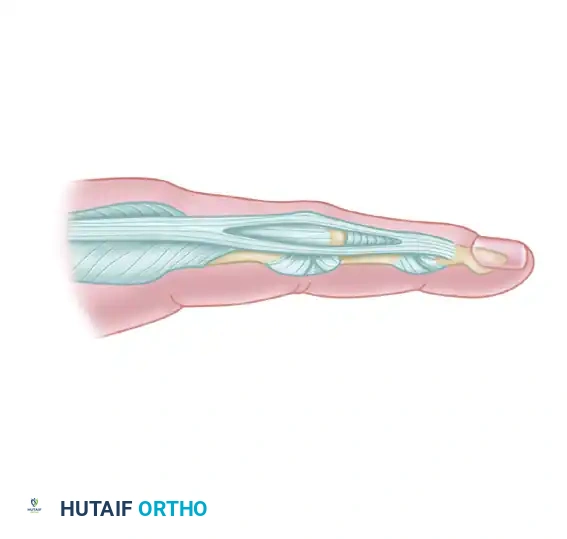
The extrinsic extensor tendon (extensor digitorum communis) trifurcates over the proximal phalanx. The central slip inserts into the dorsal base of the middle phalanx, responsible for PIP joint extension. The lateral slips join with the intrinsic contributions (lumbricals and interossei) to form the lateral bands. These lateral bands converge distally to form the terminal extensor tendon, which inserts into the dorsal base of the distal phalanx to extend the DIP joint.
Chronic Mallet Finger Pathomechanics
In a chronic mallet finger, the terminal extensor tendon is elongated or ruptured. The unopposed pull of the flexor digitorum profundus (FDP) forces the DIP joint into flexion. Over time, the extensor mechanism retracts proximally, concentrating all extensor force on the central slip at the PIP joint. This can lead to secondary PIP joint hyperextension, creating a swan-neck deformity. The spiral tendon graft technique addresses this by tethering the distal phalanx to the proximal phalanx, utilizing the natural motion of the digit to create a tenodesis effect that passively extends the DIP joint when the PIP joint is extended.
Preoperative Planning and Patient Positioning
Indications for Tendon Grafting
- Chronic mallet finger deformity (>12 weeks old) with significant functional impairment.
- Failure of conservative splinting.
- Absence of severe osteoarthritis in the DIP or PIP joints.
- Supple passive range of motion in both the PIP and DIP joints (fixed contractures must be addressed prior to or concurrent with grafting).
Positioning and Anesthesia
The procedure is performed under regional anesthesia (brachial plexus block) or general anesthesia, depending on patient preference and the need for graft harvest (e.g., plantaris tendon). The patient is positioned supine with the operative arm extended on a radiolucent hand table. A well-padded upper arm tourniquet is applied to ensure a bloodless surgical field. Loupe magnification (2.5x to 3.5x) is highly recommended for precise handling of the retinacular structures.
Surgical Technique: Tendon Graft for Old Mallet Finger
The goal of this procedure is to route a free tendon graft in a spiral fashion from the dorsal distal phalanx, volar to the PIP joint axis of rotation, and anchor it to the proximal phalanx.
Step 1: Incisions and Exposure
- Distal Incision: Make a dorsal angular (or lazy-S) incision over the distal phalanx to expose the insertion site of the terminal extensor tendon.
- Proximal Incisions: Make two short mid-axial incisions: one midradial incision to approach the radial side of the PIP joint, and one midulnar incision to approach the ulnar aspect of the proximal phalanx.
🔪 Surgical Pearl: When making the dorsal angular incision over the distal phalanx, preserve the dorsal sensory branches and the peritenon where possible to prevent postoperative skin necrosis and adhesions.
Step 2: Preparation of the Distal Phalanx
- Expose the dorsal base of the distal phalanx.
- Using a small, sharp gouge or a fine drill bit, create a vertical hole in the distal phalanx.
- This hole must be positioned precisely between the anatomical insertion of the extensor tendon and the germinal matrix of the nail.
🚨 Surgical Warning: Extreme care must be taken when creating the vertical hole in the distal phalanx. Penetration too far distally or dorsally will irreversibly damage the nail germinal matrix, leading to severe, permanent nail deformities.
Step 3: Creation of the Spiraling Tendon Tunnel
The creation of the tunnel is the most biomechanically critical step of the procedure. The graft must mimic the oblique retinacular ligament.
1. Introduce a fine hemostat through the distal incision.
2. Perform gentle blunt dissection proximally along the radial side of the middle phalanx, carefully following the path of the lateral band.
3. Pass the instrument dorsal to the Cleland ligament as you approach the PIP joint.
4. At the level of the PIP joint, direct the tunnel to spiral toward the palmar surface. The path must pass between the neurovascular bundles and the volar surface of the flexor tendon sheath.
5. Continue the tunnel proximally to exit through the ulnar incision at the base of the proximal phalanx.
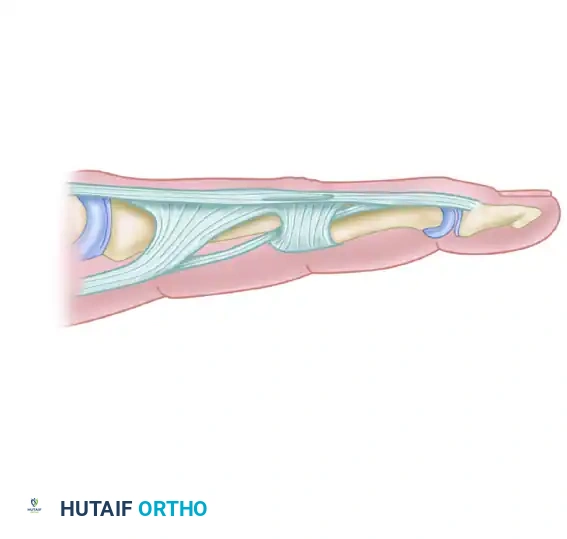
Step 4: Preparation of the Proximal Phalanx
- Expose the base of the proximal phalanx through the ulnar incision.
- Create a transverse hole through the base of the proximal phalanx.
- This hole must be positioned volar to the lateral band, passing directly from the ulnar side to the radial side of the bone.
Step 5: Graft Harvest and Passage
- Harvest a suitable tendon graft. The palmaris longus is the primary choice due to its accessibility and appropriate caliber. If absent, a plantaris tendon graft or a strip of the extensor carpi radialis longus (ECRL) may be utilized.
- Prepare the graft by stripping excess paratenon and placing a running locking suture (e.g., 4-0 non-absorbable) at both ends.
- Pass a 22-gauge (or smaller) stainless steel wire loop through the transverse hole in the proximal phalanx, along the spiraling tunnel (volar to the flexor sheath, radial to the middle phalanx), and out through the vertical hole in the distal phalanx.
- Use this wire loop as a shuttle to gently guide the tendon graft into its appropriate position within the tunnel.
Step 6: Tensioning and Fixation
Proper tensioning is the difference between a successful tenodesis and an iatrogenic deformity.
1. Apply longitudinal tension to the proximal end of the graft. Observe the digit; you must demonstrate that extending the PIP joint passively extends the DIP joint.
2. Distal Fixation: Secure the distal end of the tendon graft to the distal phalanx using an antegrade pull-out wire technique. Pass the wire through the vertical hole and secure it over a felt-and-button construct gently applied to the volar pulp of the distal phalanx.
3. Setting the Tension: Adjust the tension on the graft with both the PIP and DIP joints held in neutral extension.
4. Proximal Fixation: Secure the proximal free ends of the tendon graft with a button-over-felt construct applied to the radial side over the base of the proximal phalanx.
5. Tenodesis Verification: With the attachments secure, perform passive range of motion. Passive extension of the PIP joint should result in full passive extension of the DIP joint via the tenodesis effect.
🚨 Pitfall: Take immense care in adjusting the tension on the tendon graft. Excessive pull will over-constrain the system, causing iatrogenic PIP joint flexion and DIP joint hyperextension—effectively creating a buttonhole (boutonniere) posture.
Step 7: Joint Transfixion and Closure
- If the tenodesis feels tenuous or if the patient is deemed non-compliant, transfix the PIP joint in full extension using a 0.045-inch Kirschner wire (K-wire) to protect the graft during the initial healing phase.
- Close the incisions with 5-0 or 6-0 non-absorbable monofilament sutures.
- Immobilize the hand in a well-padded volar plaster splint. The wrist should be slightly extended, the metacarpophalangeal (MCP) joints flexed to 70 degrees, and the PIP and DIP joints fully extended.
Postoperative Rehabilitation Protocol
The postoperative protocol requires strict adherence to protect the graft while preventing debilitating adhesions.
- 10 to 14 Days: The initial bulky dressing is removed, and skin sutures are extracted. The volar plaster splint is replaced with a custom thermoplastic splint maintaining the same position.
- 3 Weeks: The distal and proximal pull-out wires (and their associated felt-and-button constructs) are carefully removed in the clinic.
- 4 Weeks: The transarticular 0.045-inch K-wire is removed. The affected digit is transitioned to a protective dorsal splint that holds the PIP joint in 20 degrees of flexion and the DIP joint at neutral. Active-assisted flexion exercises are initiated. Hyperextension beyond 20 degrees of flexion is strictly avoided.
- 6 to 10 Weeks: The protective dorsal splint is gradually extended by 5 to 10 degrees per week. Stretching of the PIP joint beyond 5 to 10 degrees of flexion should be avoided during this phase to prevent stretching the graft. Extension splinting should be maintained around the clock for the first 4 to 6 weeks post-K-wire removal, and continued nightly for several subsequent weeks.
Clinical Pearl: Excessive pressure from thermoplastic splints over the PIP joint area must be avoided. The dorsal skin over the PIP joint is exceptionally thin, and pressure can rapidly lead to full-thickness skin necrosis and exposure of the extensor mechanism.
Pathoanatomy and Management of the Boutonniere Deformity
While the spiral tendon graft addresses chronic mallet fingers, surgeons must also be adept at managing the opposite biomechanical collapse: the boutonniere (buttonhole) deformity.
Mechanism of Injury and Pathoanatomy
A boutonniere deformity arises from the disruption of the central slip of the extensor expansion at its insertion onto the base of the middle phalanx.
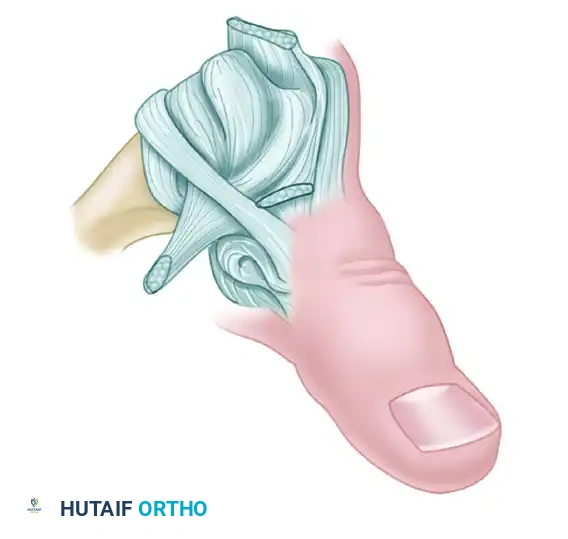
If left untreated, a predictable cascade of anatomical failures occurs:
1. Central Slip Failure: The loss of central slip integrity results in a loss of active PIP joint extension.
2. Ligamentous Contracture: The collateral ligaments and the volar plate of the PIP joint become contracted due to persistent flexion.
3. Lateral Band Subluxation: The lateral bands of the extensor expansion subluxate volarward. They drop below the transverse axis of rotation of the PIP joint.
4. Retinacular Contracture: The transverse retinacular ligaments contract, permanently tethering the lateral bands in their volar, subluxated position.
5. Biomechanical Reversal: Because the lateral bands now lie volar to the PIP joint's axis of rotation, they act as flexors of the PIP joint rather than extensors.
6. DIP Hyperextension: The contracted oblique retinacular ligaments and the displaced lateral bands concentrate all extensor force on the distal phalanx, forcing the DIP joint into severe hyperextension. Any attempt to passively extend the PIP joint only exacerbates the DIP hyperextension.
Traumatic Rotation and Condylar Herniation
Buttonholing can also be caused by traumatic rotation of a digit while the PIP joint is partially flexed. This rotational torque can cause a condyle of the proximal phalanx to herniate and protrude through the joint capsule, disrupting the triangular ligament area between the lateral band and the central tendon.
This condylar herniation forces a volar subluxation of the lateral band. While a rupture of the extensor mechanism occurs, the central tendon may not separate completely. This is often accompanied by partial disruption of the collateral ligament and anterior dislocation of the PIP joint. Following such an injury, hemorrhage and swelling prevent full PIP extension. The joint remains flexed, the subluxated lateral band contracts, and the transverse retinacular ligament tightens, locking the deformity in place.
Treatment Principles for Boutonniere Deformities
Conservative Management (Early/Closed Injuries):
Buttonhole deformities diagnosed early in closed wounds—before fixed capsular and retinacular contractures occur—can often be treated conservatively. If the patient demonstrates some active extension of the PIP joint, an incomplete rupture of the central slip is likely.
* Treatment consists of continuous static splinting of the PIP joint in absolute full extension for 6 weeks.
* Crucially, the DIP joint is left free to allow active flexion. Active DIP flexion pulls the lateral bands distally and dorsally, preventing transverse retinacular ligament contracture and centralizing the extensor mechanism.
Surgical Management (Traumatic/Open Injuries):
When a boutonniere deformity is the result of a traumatic open wound, and a diagnosis of complete rupture, transection, or laceration of the central slip is confirmed, conservative management is contraindicated. The central slip must be exposed surgically and repaired primarily using non-absorbable core sutures, often augmented with a K-wire transfixion of the PIP joint to protect the repair during the initial 4-week healing phase. Chronic, fixed boutonniere deformities require complex soft-tissue releases (extensor tenolysis, central slip reconstruction, and lateral band relocation) to restore digital kinematics.
You Might Also Like
