Comprehensive Surgical Management of Hand Synovitis and Finger Joint Arthrodesis
Key Takeaway
Synovectomy of the hand is a critical limb-salvaging procedure for severe inflammatory arthritis. This comprehensive guide details the surgical approaches for proximal interphalangeal (PIP) joint synovectomy and flexor tendon sheath clearance. It also outlines the indications, optimal positioning, and fixation techniques for finger joint arthrodesis when joint destruction precludes arthroplasty, ensuring optimal restoration of hand biomechanics and function.
INTRODUCTION TO INFLAMMATORY HAND RECONSTRUCTION
The surgical management of the rheumatoid or inflammatory hand requires a profound understanding of intricate biomechanics, soft tissue balancing, and the natural history of synovial disease. Synovectomy serves as a critical prophylactic and therapeutic intervention designed to eradicate aggressive pannus, thereby mitigating the enzymatic degradation of articular cartilage, attenuating capsuloligamentous stretching, and preventing spontaneous tendon ruptures. When joint destruction advances beyond the salvageable threshold of synovectomy or arthroplasty, precise finger joint arthrodesis becomes the definitive procedure to restore a stable, functional pinch and grasp.
This masterclass delineates the advanced surgical techniques for proximal interphalangeal (PIP) joint synovectomy, flexor tendon sheath synovectomy (tenosynovectomy), and the biomechanically optimized arthrodesis of the digital joints.
PROXIMAL INTERPHALANGEAL (PIP) JOINT SYNOVECTOMY
Synovial hypertrophy within the PIP joint inevitably leads to the attenuation of the extensor mechanism, specifically the central slip and the transverse retinacular ligaments. If left untreated, this dorsal expansion of pannus precipitates a classic boutonnière deformity. Early synovectomy is indicated when medical management (including disease-modifying antirheumatic drugs [DMARDs] and biologic therapies) fails to control localized synovitis after 6 months, provided that the articular cartilage remains largely intact (Larsen grades I and II).
Surgical Anatomy and Biomechanics
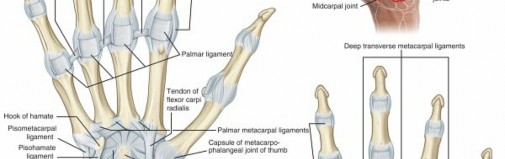
The PIP joint is a complex hinge joint stabilized by the collateral ligaments proper, the accessory collateral ligaments, and the volar plate. The extensor mechanism intimately surrounds the dorsal and lateral aspects of the joint. The central slip inserts on the dorsal base of the middle phalanx, while the lateral bands subluxate volarly if the transverse retinacular ligament is compromised or if the central slip is attenuated by underlying synovitis.
Surgical Approach: Midlateral vs. Dorsal
Historically, a midlateral incision was utilized. However, contemporary orthopedic consensus strongly favors a dorsal approach, particularly in the rheumatoid hand where extensor mechanism attenuation is ubiquitous.
- Midlateral Approach: Made on one side of the finger (occasionally on both sides), centered over the PIP joint. While it avoids a dorsal scar, it provides limited access to the contralateral joint compartment and makes central slip evaluation challenging.
- Curved Dorsal Approach (Preferred): A curved or lazy-S dorsal incision centered over the PIP joint provides a highly extensile approach. It is the gold standard, especially when extensor tendon rebalancing procedures (such as central slip imbrication or lateral band relocation) are anticipated.
💡 Clinical Pearl: Incision Planning
In patients with severe rheumatoid arthritis, the skin is often fragile and atrophic due to chronic corticosteroid use. Full-thickness skin flaps must be elevated meticulously, preserving the dorsal venous drainage to prevent postoperative skin necrosis.
Step-by-Step Surgical Technique
- Incision and Exposure: Utilize a curved dorsal incision centered over the PIP joint. Elevate full-thickness skin flaps to expose the extensor mechanism.
- Retinacular Release: Locate the transverse retinacular ligament. Sever its attachment longitudinally to mobilize the lateral bands and elevate the extensor hood.
- Joint Access: Under the elevated extensor hood, identify the collateral ligament. Enter the joint capsule dorsal to this ligament and lateral to the central tendon. Extreme care must be taken to avoid iatrogenic injury to the central slip insertion.
- Synovial Excision: Explore the joint systematically. Excise as much hypertrophic synovium (pannus) as possible from the dorsal pouch.
- Volar and Lateral Clearance: Remove the synovium from the critical recesses behind the volar plate and the area inferior to the collateral ligament. If access to the volar pouch is restricted, it may be necessary to divide the accessory collateral ligament; however, the proper collateral ligament must be preserved to maintain coronal plane stability.
- Tendon Relocation and Balancing: Once the synovectomy is complete, evaluate the central slip. If attenuated, perform a shortening imbrication. Relocate the lateral tendon and repair the transverse retinacular ligament to ensure the lateral bands remain dorsal to the axis of rotation during extension.
- Closure: Deflate the tourniquet, achieve meticulous hemostasis, and close the skin incisions with non-absorbable monofilament sutures.
- Immobilization: Apply a sterile, non-adherent dressing and a short-arm volar splint with the PIP joint in full extension to protect the central slip and extensor mechanism.
Postoperative Rehabilitation Protocol
The success of a PIP synovectomy is heavily reliant on structured, supervised hand therapy.
* Days 10 to 14: Sutures are removed. The volar splint is transitioned to a dynamic or static progressive splint depending on the stability of the extensor mechanism.
* Early Motion: Active and passive range-of-motion (ROM) exercises are initiated immediately upon suture removal under the strict supervision of a certified hand therapist.
* Long-term Care: Supervised physical therapy is continued until satisfactory motion has been achieved and the patient demonstrates sufficient understanding of the various exercises to perform them independently.
FLEXOR TENDON SHEATH SYNOVECTOMY (TENOSYNOVECTOMY)
Proliferative tenosynovitis within the flexor tendon sheath is a hallmark of rheumatoid hand disease. It presents as diffuse swelling on the volar aspect of the digit, crepitus, and triggering. Unlike idiopathic trigger finger, which is caused by a stenosing nodule at the A1 pulley, rheumatoid triggering is caused by diffuse synovial proliferation and intratendinous rheumatoid nodules.
🚨 Surgical Warning: The Danger of A1 Pulley Release in RA
In the rheumatoid patient, the A1 pulley provides critical resistance against the ulnar and volar subluxation forces acting on the flexor tendons. An isolated A1 annular pulley release should rarely be required and is generally contraindicated, as it will rapidly accelerate ulnar drift and volar subluxation of the metacarpophalangeal (MCP) joint.
Surgical Approach and Exposure
The approach must be extensile to allow complete visualization of the flexor sheath from the distal palmar crease to the distal interphalangeal (DIP) joint.
- Incision: Make a long, discontinuous zigzag (Bruner) incision on the palmar surface of each involved finger.
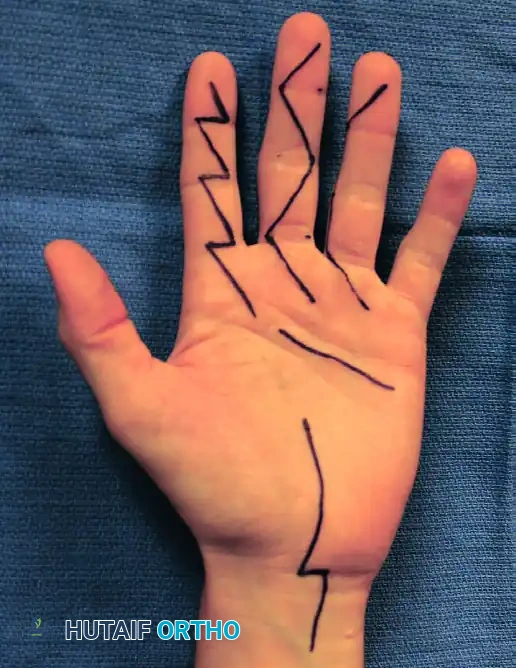
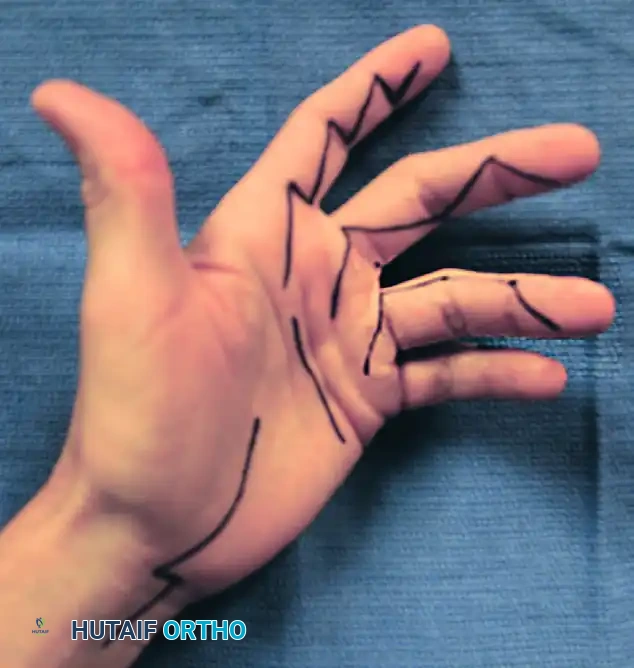
Figure: Discontinuous, extensile zigzag incisions used in the extended approach for flexor tenosynovectomy. Similar incisions for the ring and little fingers are made as dictated by the extent of the tenosynovitis.
- Flap Elevation: Expose the flexor tendon sheath by raising thick, full-thickness skin flaps. The apices of the zigzag flaps must be handled with skin hooks to prevent crush injury.
- Neurovascular Protection: Identify and meticulously protect the anterolaterally oriented neurovascular bundles throughout the length of the digit.
Step-by-Step Surgical Technique
- Sheath Excision: Excise the diseased portions of the flexor tendon sheath. It is absolutely critical to leave as much of the biomechanical pulley system intact as possible. You must preserve the A2 pulley (over the proximal aspect of the proximal phalanx) and the A4 pulley (over the middle of the middle phalanx) to prevent catastrophic flexor tendon bowstringing.
- Synovial Clearance: Excise as much tenosynovium as possible. Pay special attention to removing the invasive pannus from behind the slips of the flexor digitorum sublimis (FDS) and from the intricate space between the flexor digitorum profundus (FDP) and the FDS (Camper's chiasm).
- Dynamic Evaluation of Triggering: Apply traction to the tendons individually proximal to the A1 pulley (in the palm). This dynamic maneuver will assist in identifying the exact source of triggering or catching.
- Management of Persistent Triggering: If triggering persists after a careful, exhaustive synovectomy and débridement of intratendinous flexor tendon nodules, the mechanical impingement must be addressed. The preferred technique is to excise the ulnar slip of the flexor digitorum sublimis. This debulks the tendon mass passing through the preserved A1 pulley without sacrificing the pulley itself.
- Closure and Splinting: Close the incision with interrupted non-absorbable sutures. Apply a bulky compression dressing. Support the wrist and digits with a volar plaster splint in a functional position, and strictly elevate the hand to minimize postoperative edema.
Postoperative Care
- Immediate Phase: Motion of the fingers is started as soon as tolerated, often within the first 3 to 5 days, to prevent restrictive flexor tendon adhesions.
- Suture Removal: Sutures are removed at 10 to 14 days after surgery.
- Therapy: Active and passive ROM exercises are aggressively pursued under the supervision of a therapist. Supervised physical therapy is continued until satisfactory tendon glide has been achieved and the patient understands the home exercise program sufficiently to perform it independently.
FINGER JOINT ARTHRODESIS
While arthroplasty (such as silicone elastomer implants) is highly effective for low-demand patients with destroyed MCP or PIP joints, joint arthrodesis remains the gold standard when arthroplasty cannot reliably restore stability and motion.
Indications and Decision Making
Arthrodesis of a finger or thumb is specifically indicated in the presence of:
* Profound ligamentous instability.
* Severe angular and rotational deformities.
* Inadequate bone stock for implant arthroplasty.
* Irreparable extensor or flexor tendon loss (where the muscles that control the digit are not strong enough to stabilize and move all joints).
The Index Finger and Thumb: Deformities of the index finger and thumb are more reliably treated by arthrodesis. The biomechanical stress generated from key pinch and power grasp places immense shear forces on these digits. Arthroplasty in the index PIP or MCP joint frequently fails due to these lateral pinch forces, making arthrodesis the procedure of choice to provide a rigid, stable post against which the thumb can articulate.
MCP Joint Considerations: When the metacarpophalangeal joint is destroyed, if good intrinsic and extrinsic muscle strength is present, arthroplasty is indicated more often than arthrodesis, as MCP motion is critical for accommodating objects of varying sizes during grasp.
Optimal Positions for Arthrodesis
The functional success of an arthrodesis depends entirely on fusing the joint in the optimal biomechanical position. The hand must be positioned in a functional cascade to allow the fingertips to meet the thumb pulp seamlessly.
- Metacarpophalangeal (MCP) Joints: Should be fixed in 20 to 30 degrees of flexion.
- Proximal Interphalangeal (PIP) Joints: Must follow a progressive flexion cascade to allow the fingers to tuck into the palm during grasp. They should be fixed from 25 degrees of flexion in the index finger increasing progressively to almost 40 degrees in the small finger (i.e., less flexion in the radial fingers for pinch, more flexion in the ulnar fingers for power grip).
- Distal Interphalangeal (DIP) Joints: Are fixed in 15 to 20 degrees of flexion.
💡 Clinical Pearl: The Rotational Alignment
Flexion angles are important, but rotational alignment is paramount. During trial fixation, the surgeon must passively flex the MCP joints to ensure that all fingertips point toward the scaphoid tubercle. Malrotation will result in digital overlapping during grasp, severely compromising hand function.
Fixation Techniques
Techniques for arthrodesis with internal fixation include Kirschner wires (K-wires), intraosseous wiring (tension band wiring), headless compression screws, and bone grafting techniques (for bone loss).
- Tension Band Wiring: Has been reported to provide highly reliable, biomechanically superior fixation for PIP and MCP joint arthrodesis. It converts dorsal tensile forces into volar compressive forces at the arthrodesis site, promoting primary bone healing.
- Kirschner Wire (K-wire) Fixation: Remains the most versatile and widely utilized technique. It is rapid, simple, and allows precise intraoperative control of the fusion position in flexion, angulation, and rotation before final fixation is achieved.
Advantages of K-wire Fixation:
1. Preserves maximal bone length (minimal bone resection is required compared to cup-and-cone reaming techniques).
2. Allows for fine-tuning of the digital cascade.
3. Provides sufficient stability to allow early motion of the adjacent, non-fused joints.
4. Rapid union is reliably achieved when combined with meticulous joint surface preparation (exposing bleeding subchondral bone).
Surgical Technique for Arthrodesis (K-Wire/Tension Band)
- Approach: A dorsal longitudinal or V-shaped incision is made over the target joint. The extensor tendon is split longitudinally or mobilized laterally.
- Joint Preparation: The collateral ligaments are excised to allow complete joint exposure. The articular cartilage and sclerotic subchondral bone are resected using a microsaw or rongeur. Flat cuts or a cup-and-cone technique can be used; the goal is maximal cancellous bone contact.
- Positioning: The joint is placed in the predetermined degree of flexion (e.g., 25° for the index PIP). Rotational alignment is verified by checking the cascade toward the scaphoid.
- Fixation:
- For K-wires: Two 0.045-inch or 0.062-inch K-wires are driven across the joint in a crossed configuration, ensuring they engage the opposite cortices for maximum stability.
- For Tension Band: A single longitudinal K-wire is placed, followed by a dorsal intraosseous wire looped in a figure-of-eight fashion to provide dynamic compression.
- Closure: The extensor mechanism is repaired over the arthrodesis site, and the skin is closed.
- Postoperative Care: The digit is protected in a splint for 4 to 6 weeks until radiographic evidence of trabecular bridging is observed. Motion of the adjacent joints is encouraged immediately to prevent stiffness.
CONCLUSION
The surgical management of the inflammatory hand requires a meticulous, tissue-respecting approach. Whether performing a prophylactic PIP synovectomy, a limb-salvaging flexor tenosynovectomy, or a definitive joint arthrodesis, the surgeon must balance the eradication of disease with the preservation of delicate biomechanical structures. Strict adherence to pulley preservation, precise arthrodesis angulation, and aggressive, supervised postoperative rehabilitation are the cornerstones of restoring enduring function to the rheumatoid hand.
You Might Also Like