Thumb Web Space Z-Plasty: Surgical Techniques & Protocols

Key Takeaway
Thumb web space contractures severely limit hand function by restricting opposition and grasp. Surgical reconstruction using a simple Z-plasty or a modified Broadbent and Woolf four-flap Z-plasty effectively restores the first web space span. This guide details the precise geometric flap design, soft tissue handling, and muscular recession techniques required to optimize functional outcomes while minimizing the risk of flap necrosis and neurovascular compromise.
Introduction to First Web Space Contractures
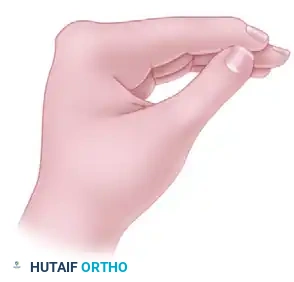
The evolutionary advantage of the human hand is heavily predicated on the opposable thumb, which accounts for approximately 40% to 50% of overall hand function. The integrity of the first web space is paramount to this function, allowing for wide abduction, extension, and complex opposition required for both power grasp and precision pinch. Contractures of the thumb web space can arise from a multitude of etiologies, including thermal burns, traumatic crush injuries, congenital syndactyly, spasticity (e.g., cerebral palsy), and severe ischemic contractures.
When conservative measures such as serial splinting and stretching fail, surgical intervention becomes necessary. The primary goal of surgical reconstruction is to restore the geometric span and depth of the first web space while providing durable, sensate skin coverage. Among the most reliable and biomechanically sound methods for addressing mild to moderate web space narrowing are the Simple Z-Plasty and the Four-Flap Z-Plasty (Broadbent and Woolf modification). For more severe adduction deformities, a Dorsal Sliding Flap augmented with skin grafting may be indicated.
This comprehensive guide details the surgical anatomy, preoperative evaluation, and step-by-step operative techniques for executing these fundamental reconstructive procedures.
Surgical Anatomy and Biomechanics
A profound understanding of the first web space anatomy is required to safely elevate local flaps and release underlying myofascial contractures without causing iatrogenic neurovascular injury.
The Cutaneous Architecture
The skin of the first web space is highly specialized. The dorsal skin is thin, pliable, and loosely attached to the underlying areolar tissue, allowing for significant redundancy during thumb adduction. Conversely, the palmar skin is thick, glabrous, and firmly anchored to the underlying palmar aponeurosis via vertical septa, providing stability during grasp.
Musculofascial Boundaries
The first web space is defined by a complex muscular sling:
* Adductor Pollicis: Comprising transverse and oblique heads, this muscle is the primary adductor of the thumb. In chronic contractures, the fascia overlying this muscle (and the muscle belly itself) often becomes fibrotic and shortened.
* First Dorsal Interosseous (FDI): Originating from the adjacent shafts of the first and second metacarpals, the FDI assists in index finger abduction and thumb adduction.
* Fascial Interconnections: The deep fascia of the first web space connects the adductor pollicis and the FDI. Severe contractures often require release or partial recession of these fascial and muscular structures to achieve adequate depth.
Neurovascular Considerations
- Arterial Supply: The radial artery passes dorsally through the anatomical snuffbox and dives between the two heads of the first dorsal interosseous muscle to form the deep palmar arch. The princeps pollicis artery and the radialis indicis artery are critical branches in this vicinity.
- Nerve Supply: The proper digital nerves to the ulnar aspect of the thumb and the radial aspect of the index finger course superficially in the palmar aspect of the web space. Extreme care must be taken during deep fascial release to avoid transecting these structures.
💡 Clinical Pearl: Vascular Arborization
The viability of Z-plasty flaps relies entirely on the random-pattern subdermal vascular plexus. Undermining must be performed strictly in the subcutaneous plane, preserving a healthy layer of adipose tissue attached to the dermis to prevent ischemic tip necrosis.
Preoperative Assessment and Indications
Proper patient selection and precise preoperative planning dictate the choice of flap. The surgeon must differentiate between an isolated cutaneous contracture and a complex contracture involving the underlying fascia, muscle, or carpometacarpal (CMC) joint capsule.
Evaluating the Contracture
- Passive Abduction Test: Assess the maximum passive radial and palmar abduction of the thumb. A normal web space should allow an angle of at least 45 to 50 degrees between the first and second metacarpals.
- Palpation of the Web Ridge: Identify the tightest band of tissue. If the contracture is purely linear and cutaneous, a simple Z-plasty is highly effective.
- Deep Tissue Assessment: If the thumb remains adducted despite skin tension relief, the contracture involves the adductor pollicis fascia or the CMC joint capsule, necessitating deeper surgical release.
Procedure Selection
- Simple Z-Plasty: Indicated for mild, linear cutaneous webs where the surrounding skin is supple and unscarred. A standard 60-degree Z-plasty provides a theoretical length increase of 73%.
- Four-Flap Z-Plasty: Indicated for moderate to severe contractures requiring a deeper, wider web space. It provides a broader deepening effect and breaks up the linear scar more effectively than a simple Z-plasty.
- Dorsal Sliding Flap / Skin Grafting: Indicated for severe, broad contractures (e.g., severe burns) where local tissue is insufficient or heavily scarred, requiring the importation of new tissue.
Surgical Technique: Simple Z-Plasty of the Thumb Web
The simple Z-plasty is a foundational technique in reconstructive hand surgery. It relies on the geometric transposition of two triangular flaps to lengthen a contracted scar and reorient the line of tension.
1. Preoperative Marking and Flap Design
Flap design is the most critical step and must be executed before exsanguination and tourniquet inflation, as tissue distortion occurs once the limb is exsanguinated.
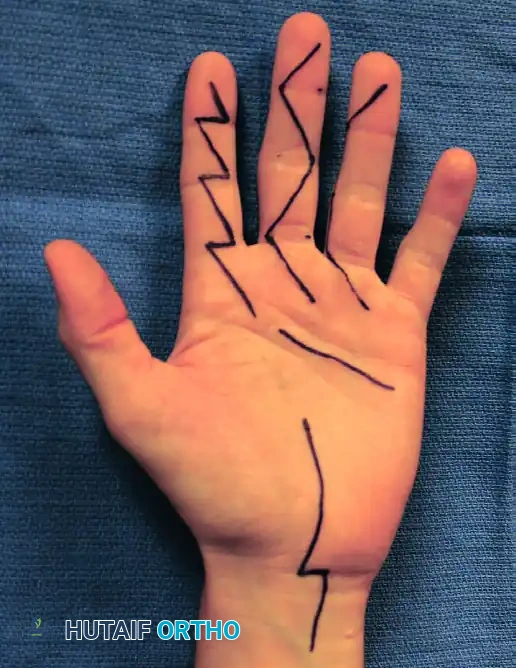
- Longitudinal Axis: Draw the central limb of the Z-plasty along the crest of the distal ridge of the first web space. This incision should extend from the proximal thumb crease to approximately 1 cm proximal to the proximal digital crease of the index finger (corresponding to the radial confluence of the proximal and middle palmar creases).
- Transverse Limbs: Draw an oblique proximal palmar limb and a distal dorsal limb. These limbs should be oriented at an approximately 60-degree angle to the central longitudinal axis.
- Geometric Rule: The fundamental principle of a successful Z-plasty dictates that all three limbs (the central axis and the two transverse limbs) must be of strictly equal length.
2. Incision and Flap Elevation
- Inflate the pneumatic tourniquet to the standard upper extremity pressure (typically 250 mm Hg or 100 mm Hg above systolic pressure).
- Make the incisions exactly as outlined using a #15 blade.
- Elevate the two triangular flaps sharply. Use skin hooks rather than forceps to handle the apices of the flaps to minimize crush injury to the delicate microvasculature.
- Undermine the flaps carefully, ensuring that a robust layer of subcutaneous fat remains attached to the dermis to preserve the subdermal plexus.
3. Deep Tissue Release (If Indicated)
- Once the skin flaps are elevated, assess the underlying web space.
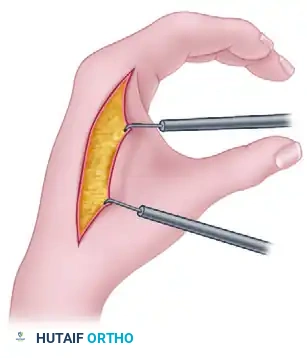
- If additional depth is required, sharply dissect the distal edge of the web space musculature (the fascia overlying the adductor pollicis and first dorsal interosseous).
- Perform a partial recession of the musculature if necessary, taking meticulous care to identify and protect the radialis indicis artery and the digital nerves.
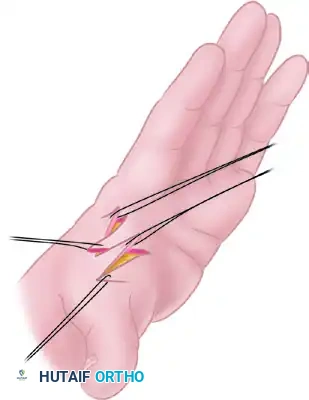
4. Flap Transposition and Closure
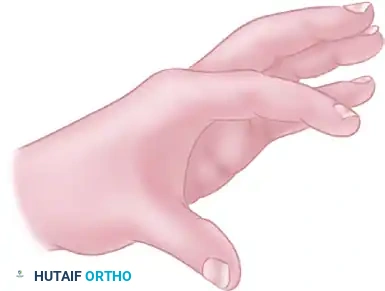
- Transpose (reverse) the flaps. The palmar flap will rotate dorsally, and the dorsal flap will rotate palmarly, effectively deepening the web and lengthening the contracture line.
- Suture the flaps in their new positions using interrupted 6-0 monofilament nylon or absorbable skin sutures.
🚨 Surgical Warning: Tip Necrosis
The apices of the transposed flaps are highly susceptible to ischemia. Always use half-buried mattress sutures (corner stitches) at the tips to minimize tension on the dermal edges and prevent vascular strangulation.
5. Tourniquet Deflation and Hemostasis
- Deflate the tourniquet prior to applying the final dressing.
- Observe the flaps for capillary refill and adequate perfusion. If a flap appears pale or congested, remove the nearest suture to relieve tension.
- Apply a sterile, non-adherent dressing.
Surgical Technique: Four-Flap Z-Plasty (Broadbent and Woolf, Modified)
For contractures that are too broad or deep for a simple Z-plasty, the four-flap Z-plasty (a modification of the Broadbent and Woolf technique) is the procedure of choice. This technique creates a wider, more natural U-shaped web space rather than a V-shaped cleft.
1. Flap Design and Marking
- Before inflating the tourniquet, outline the longitudinal axis along the distal edge of the thumb web ridge. This extends from the ulnar margin of the proximal thumb crease to an area approximately 1 cm proximal to the proximal digital crease of the index finger.
- Draw the proximal palmar and distal dorsal limbs at 90-degree angles to the longitudinal axis. The lengths of these limbs must equal the length of the central longitudinal incision.
- Bisection: Bisect each 90-degree angle with an additional oblique limb. This creates four distinct flaps, each with an apex of 45 degrees. Ensure the length of these bisecting limbs corresponds exactly to the length of the other flap margins.
2. Incision and Elevation
- Inflate the tourniquet and make the appropriate incisions.
- Sharply elevate the four flaps. As with the simple Z-plasty, include a small amount of subcutaneous tissue to ensure viability.
3. Muscular Recession
- For further deepening of the web space, perform a small recession of the thumb web musculature in its midsubstance.
- Crucial Pitfall: Do not perform a complete myotomy of the adductor pollicis or first dorsal interosseous, as this will result in profound weakness of pinch strength. Release only the fibrotic fascial bands and the superficial epimysium.
4. Interdigitation and Closure
- The complexity of the four-flap Z-plasty lies in the transposition sequence. It is highly recommended to label the flaps with a surgical marker before making the incisions.
- Label the flaps 1, 2, 3, and 4, beginning from the radial-most flap and ending at the ulnar-most flap.
- Transpose the flaps. The correct sequence after interdigitation should be 3, 1, 4, 2.
- Flap 1 transposes with Flap 3.
- Flap 2 transposes with Flap 4.
- Suture the flaps meticulously with 6-0 monofilament nylon, utilizing corner mattress sutures at all four apices.
Surgical Technique: Dorsal Sliding Flap
In cases of severe adduction deformity where local tissue compliance is exceptionally poor, a dorsal sliding flap combined with a split-thickness skin graft (STSG) or full-thickness skin graft (FTSG) may be required.
1. Incision and Flap Mobilization
- Design a broad, proximally based dorsal flap over the first web space.
- Make the incision along the contracted web ridge, extending dorsally to allow for mobilization.
2. Undermining and Defect Creation
- Undermine the radial flap extensively to release the cutaneous tethering.
- Release the underlying adductor fascia as needed to allow the thumb to fall into full palmar and radial abduction.
- As the thumb is abducted, a large secondary defect will open on the dorsal aspect of the web space.
3. Grafting the Defect
- Harvest a split-thickness or full-thickness skin graft (often from the hypothenar eminence, groin, or medial arm).
- Inset the graft into the dorsal defect and secure it with a tie-over bolster dressing to prevent hematoma formation and shear forces, ensuring optimal graft take.
Postoperative Care and Rehabilitation Protocol
The success of a thumb web space reconstruction is as dependent on rigorous postoperative management as it is on surgical execution. Without proper splinting, the web space will rapidly re-contract due to myofibroblast activity during the proliferative phase of wound healing.
Phase I: Immobilization (Weeks 0 - 2)
- Dressing: Apply a bulky, non-compressive soft dressing immediately postoperatively.
- Splinting: Fabricate a custom thermoplastic thumb spica splint or a dedicated web-spacer splint. The thumb must be immobilized in a position of maximum safe abducted and opposed posture. Avoid extreme tension that could compromise flap perfusion.
- Elevation: Instruct the patient to keep the hand elevated strictly above heart level for the first 48-72 hours to minimize edema.
Phase II: Suture Removal and Early Mobilization (Weeks 2 - 4)
- Wound Check: At 10 to 14 days postoperatively, remove the splint and inspect the flaps for complete epithelialization.
- Suture Removal: Remove all nylon sutures at 2 weeks.
- Splint Modification: Transition to a removable C-bar or web-spacer splint. The splint should be worn continuously, removed only for hygiene and structured therapy sessions.
- Therapy: Initiate gentle active range of motion (AROM) exercises focusing on thumb opposition, palmar abduction, and radial abduction.
Phase III: Strengthening and Scar Management (Weeks 4 - 8+)
- Scar Management: Once the incisions are fully healed and robust, begin scar massage with silicone gel or elastomer putty to soften the surgical site and prevent deep tissue tethering.
- Weaning: Gradually wean the patient from daytime splinting, but continue nighttime web-spacer splinting for an additional 2 to 4 months, especially in pediatric patients or those with burn contractures, as "web creep" (re-contracture) is a common late complication.
- Return to Function: Free use of the hand for activities of daily living (ADLs) is generally permitted by week 6, provided healing has progressed adequately and pinch strength is recovering.
Complications and Pitfalls
Even in experienced hands, Z-plasty of the thumb web space carries inherent risks. Anticipation and prevention are key.
- Flap Necrosis: The most common complication. Usually caused by designing flaps with angles less than 45 degrees, dissecting too superficially (destroying the subdermal plexus), or suturing under excessive tension. Management includes local wound care; minor tip necrosis often heals by secondary intention, while major loss requires skin grafting.
- Inadequate Release: Occurs when the surgeon fails to address the underlying myofascial contracture. The skin flaps will heal, but the functional span of the thumb will remain limited.
- Neurovascular Injury: Transection of the radialis indicis artery or digital nerves during deep adductor release. Meticulous blunt dissection and loupe magnification are mandatory when operating deep to the superficial fascia.
- Web Creep: A gradual recurrence of the contracture over months to years. This is highly prevalent in burn patients and requires aggressive, prolonged nighttime splinting to prevent.
By adhering strictly to the geometric principles of flap design, respecting the delicate vascular anatomy, and enforcing a rigid postoperative splinting protocol, orthopedic surgeons can reliably restore the critical dimensions of the first web space, thereby salvaging the functional capacity of the hand.
You Might Also Like