Moberg Key Grip Tenodesis: Surgical Technique & Biomechanics
Key Takeaway
The Moberg key grip tenodesis is a foundational reconstructive procedure designed to restore lateral pinch in patients with tetraplegia. By harnessing the tenodesis effect, this technique couples passive wrist extension with thumb flexion against the index finger. This guide details the precise surgical steps, biomechanical principles, and postoperative protocols required to achieve optimal pinch force and functional independence in the cervical spinal cord injury patient.
Introduction to Tetraplegic Hand Reconstruction
The restoration of upper extremity function in the tetraplegic patient represents one of the most profound interventions in reconstructive orthopedic surgery. For patients with mid-cervical spinal cord injuries (typically C5-C6), the loss of digital flexion and pinch severely compromises independence. The Moberg Key Grip Tenodesis is a cornerstone procedure designed to restore lateral (key) pinch by harnessing the biomechanical phenomenon of the tenodesis effect.
By surgically anchoring the flexor pollicis longus (FPL) to the distal radius, passive or active wrist extension drives the thumb into flexion against the lateral aspect of the index finger. This textbook-level guide provides an exhaustive, step-by-step analysis of the Moberg key grip tenodesis, the associated House two-stage technique, biomechanical rationales, and rigorous postoperative protocols.
Biomechanical Principles and Indications
The Tenodesis Effect
In the normal hand, wrist extension naturally increases tension on the volar flexor tendons, causing passive digital flexion, while wrist flexion increases tension on the dorsal extensors, causing passive digital extension. In the tetraplegic patient with retained active wrist extension (typically via the extensor carpi radialis longus [ECRL] and brevis [ECRB] innervated by C6), this tenodesis effect can be surgically optimized.
The Moberg procedure converts the FPL into a static tether. When the patient actively extends the wrist, the distance between the FPL origin (now the distal radius) and its insertion (the distal phalanx of the thumb) increases, forcing the thumb into a powerful lateral pinch.
Patient Selection and Indications
Careful patient selection is paramount for a successful outcome. The ideal candidate presents with the following clinical profile:
* Neurological Level: Group 2 or higher (International Classification for Surgery of the Hand in Tetraplegia), possessing strong, active wrist extension (Grade 4 or 5 strength in ECRL/ECRB).
* Joint Suppleness: Full passive range of motion in the thumb carpometacarpal (CMC), metacarpophalangeal (MCP), and interphalangeal (IP) joints. Contractures must be addressed preoperatively.
* Sensory Status: Adequate proprioception and visual feedback to utilize the reconstructed pinch.
* Psychological Readiness: High motivation and compliance for the rigorous postoperative rehabilitation phase.
Clinical Pearl:
A successful key pinch requires a stable post. The index finger must be sufficiently stable to resist the force of the thumb. If the index finger is flail, concurrent procedures (such as stabilization of the index MCP and PIP joints) may be required to prevent the finger from collapsing under the pressure of the reconstructed thumb.
Preoperative Preparation and Positioning
- Anesthesia: General anesthesia or regional brachial plexus block is utilized, depending on patient respiratory status and anesthesiologist preference.
- Positioning: The patient is placed supine with the operative arm extended on a radiolucent hand table.
- Tourniquet: A well-padded pneumatic tourniquet is applied to the proximal arm. Exsanguination is performed using an Esmarch bandage, and the tourniquet is inflated to 250 mm Hg (or 100 mm Hg above systolic pressure).
- Preparation: Standard orthopedic skin preparation and draping are performed, ensuring the entire forearm and hand are exposed for intraoperative tensioning.
Surgical Technique 71-21: Moberg Key Grip Tenodesis
The Moberg technique requires meticulous soft tissue handling and precise tensioning to ensure a durable, functional pinch.
Step 1: FPL Harvest and Distal Radius Preparation
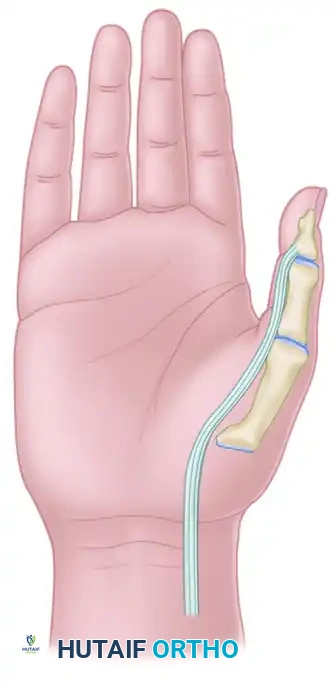
- Incision and Exposure: Expose the musculotendinous junction of the flexor pollicis longus (FPL) through a standard volar Henry approach to the mid-to-distal forearm. Identify the FPL tendon and divide it at the musculotendinous junction.
- Pronator Quadratus Elevation: Expose the flat volar cortex of the distal radius by performing a subperiosteal dissection of the pronator quadratus, elevating it in a radial-to-ulnar direction.
- Drill Hole Placement: Drill two holes in the volar cortex of the distal radius, oriented transverse to its longitudinal axis. These holes must be of sufficient diameter to allow the smooth passage of the free FPL tendon.
- Cortical Preparation: Connect the drill holes using a curved curet or a high-speed power burr to create a continuous tunnel.
Surgical Warning:
Carefully and aggressively round the edges of the cortical bone tunnel. Sharp cortical edges are the primary cause of late tendon attrition and catastrophic rupture of the tenodesis.
Step 2: Pulley Release and IP Joint Stabilization
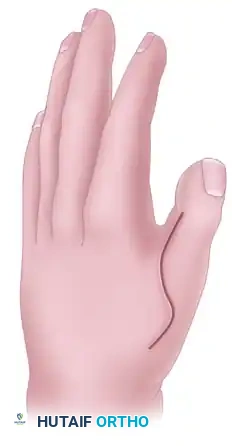
- A1 Pulley Release: Make a 2-cm longitudinal or oblique incision over the A1 pulley of the thumb. Carefully identify and protect the digital neurovascular bundles. Release the A1 pulley completely. This alters the biomechanical vector of the FPL, increasing its moment arm and allowing the thumb to sweep more effectively into lateral pinch.
- Tendon Delivery: Deliver the distal stump of the FPL tendon into the proximal forearm wound.
- IP Joint Arthrodesis/Stabilization: To prevent hyperflexion of the thumb tip during pinch (which weakens the grip and causes the thumb to roll off the index finger), stabilize the thumb interphalangeal (IP) joint in a neutral position (0 degrees of flexion) using a retrograde Kirschner wire.
Step 3: MCP Joint Stabilization and Dorsal Hood Tenodesis
- Dorsal Exposure: Make a 6-cm dorsal longitudinal incision centered over the thumb metacarpophalangeal (MCP) joint.
- Hood Incision: Open the hood of the dorsal apparatus longitudinally, directly in line with the skin incision.
- Metacarpal Preparation: Perform a subperiosteal exposure of the dorsal thumb metacarpal neck. Drill several pairs of small holes into the dorsal cortex of the metacarpal.
- Tenodesis Execution: Tenodese the dorsal hood to the metacarpal using heavy nonabsorbable sutures passed through the drill holes. This must be performed with the MCP joint held in approximately 20 degrees of flexion. This step prevents MCP joint hyperextension during the forceful pinch maneuver.
Step 4: FPL Tenodesis and Final Tensioning
- Tendon Routing: Pass the free proximal end of the FPL tendon through the prepared cortical tunnel in the distal radius.
- Setting the Tension: This is the most critical step of the procedure. Adjust the tension on the FPL tendon so that during full passive wrist extension, the pulp of the thumb firmly and squarely contacts the lateral aspect of the index finger middle phalanx.
- Fixation: Once the optimal tension is achieved, secure the FPL tendon to itself and the surrounding periosteum using multiple interrupted, heavy nonabsorbable sutures (e.g., 2-0 or 3-0 braided polyester).
Active Tendon Transfers: Enhancing the Moberg Grip
While the static Moberg tenodesis relies purely on passive wrist extension, outcomes can be significantly enhanced by adding an active muscle transfer to the FPL.
Brachioradialis (BR) to FPL Transfer
When available, the brachioradialis (BR) or extensor carpi radialis longus (ECRL) can be mobilized in the proximal forearm and transferred directly to the FPL.
- Biomechanical Advantage: Retained active wrist extension provides the potential for active thumb flexion and grasp. Studies have reported an increased pinch force of approximately 4 pounds following this transfer, which is roughly equivalent to the pinch force obtained with a standard Dorrance prosthetic hook.
- Electromyographic (EMG) Adaptation: Postoperative EMG studies demonstrate a remarkable neuroplasticity: the transferred brachioradialis muscle assumes the electrical synchrony of the paralyzed FPL. In normal subjects, the BR is electrically silent during lateral pinch; however, after transfer, it fires synergistically to provide voluntary activation and excellent excursion.
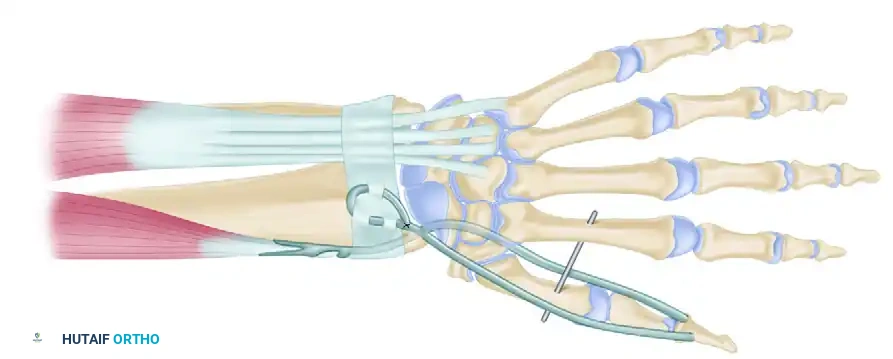
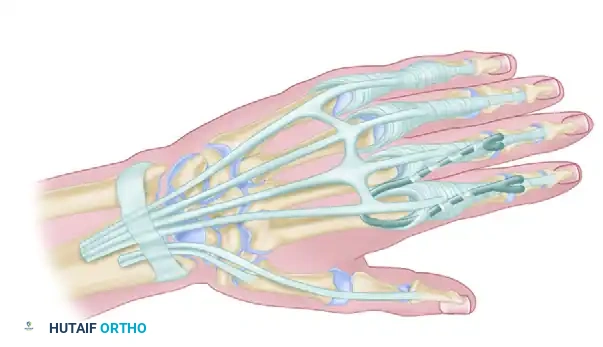
Figure 71-39: One-stage key pinch and release procedure. The thumb is prepositioned for lateral pinch by arthrodesis of the trapezium–first metacarpal joint in 20 to 25 degrees of extension, 40 to 45 degrees of abduction, and slight pronation. The Extensor pollicis longus (EPL) is fixed to the Lister tubercle by tenodesis. The Brachioradialis (BR) or extensor carpi radialis longus (ECRL) is transferred to the flexor pollicis longus.
Surgical Technique 71-22: House Two-Stage Technique
For patients requiring comprehensive reconstruction of both digital flexion (pinch/grasp) and digital extension (release), the House two-stage technique is employed. Stage 1 focuses on the extensor phase to provide reciprocal hand opening during wrist flexion.
Stage 1: Extensor Phase
- Incision: Make an 8-cm incision along the dorsal aspect of the distal forearm, beginning just distal to the Lister tubercle. If an active transfer is planned, gently curve the incision to the radial side of the forearm; otherwise, a straight incision suffices for static tenodesis.
- Nerve Protection: Carefully identify and protect the dorsal sensory branch of the radial nerve, which emerges from beneath the brachioradialis in the radial aspect of the wound.
- Tendon Identification: Identify the extensor pollicis longus (EPL) tendon (located ulnar and distal to the Lister tubercle) and the tendons of the extensor digitorum communis (EDC) within the fourth dorsal compartment.
- Radius Preparation: Create two well-rounded cortical holes in the dorsum of the distal radius. The holes for the EDC should be placed several centimeters proximal to the radiocarpal joint, while the holes for the abductor pollicis longus (APL) and EPL should be approximately 2 cm proximal to the joint. Use a curet to create tunnels accommodating the tendon ends.
- Tendon Transposition: Make two suture holes proximal to the prepared tunnels using a 0.035-inch Kirschner wire. Release the APL and EPL tendons from the first dorsal compartment and transpose them ulnarward.
- EDC Synchronization: Suture the EDC tendons together under tension. This ensures that retraction of the single sutured tendon unit permits synchronous, uniform extension of all fingers.
- Thumb Extensor Synchronization: Suture the APL and EPL tendons together to form a single functional unit.
- Tensioning the Extensor Tenodesis: With the wrist held in approximately 40 degrees of flexion, place tension on the proximal ends of the divided extensor tendons and secure them to the radius. This tension ensures that when the patient flexes their wrist, the fingers and thumb automatically extend, allowing the hand to open and release objects.
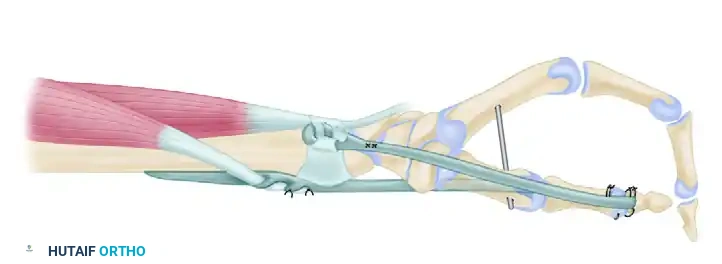
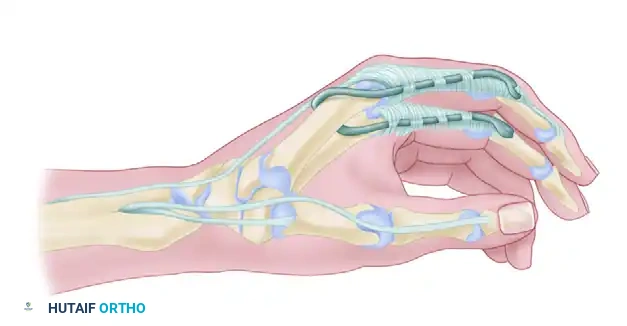
Figure 71-40: House two-stage technique for reconstruction of digital flexion and key pinch. A, Stage 1 (extensor phase). B, Stage 2 (flexor phase).
Postoperative Care and Rehabilitation Protocol
The success of a tenodesis or tendon transfer relies as much on the postoperative rehabilitation as it does on surgical execution. The reconstructed tissues must be protected while they heal, followed by a structured program to retrain the brain and strengthen the new biomechanical pathways.
Phase 1: Immobilization (Weeks 0–4)
- Splinting: Immediately postoperatively, the upper extremity is immobilized in a rigid, custom-fabricated orthosis.
- Positioning: The wrist is maintained in a neutral position. The thumb is carefully positioned with the tip resting securely under the middle phalanx of the index finger to maintain the exact tension set in the operating room.
- Combined Transfers: If a transfer of the brachioradialis to the extensor carpi radialis brevis was performed concurrently, the wrist must be kept in slight extension to lessen tension on the active transfer.
- Activity: Absolute protection of the surgical site. No active or passive motion of the reconstructed joints is permitted.
Phase 2: Protected Mobilization (Weeks 4–12)
- Splint Modification: At 4 weeks, the rigid cast is transitioned to a removable thermoplastic splint. Splint protection is strictly continued for an additional 8 weeks (totaling 12 weeks of protection).
- Therapy Initiation: Under the direct supervision of a specialized hand therapist, gentle active-assisted range of motion (AAROM) is initiated.
- Tenodesis Training: The patient is taught to utilize the tenodesis effect. They practice actively extending the wrist to achieve thumb pinch, and flexing the wrist to achieve release.
- Biofeedback: For patients with active BR to FPL transfers, electromyographic biofeedback can be highly effective in training the BR to fire during pinch maneuvers.
Pitfall:
Premature discontinuation of the splint or overly aggressive passive stretching by the patient or therapist will irreversibly stretch the tenodesis, resulting in a weak, non-functional pinch. Strict adherence to the 12-week protection timeline is non-negotiable.
Phase 3: Strengthening and Integration (Weeks 12+)
- Weaning: The splint is gradually weaned during daytime activities but may be worn at night or during high-risk activities for several more weeks.
- Resistance Training: Progressive resistance exercises are introduced to maximize the strength of the wrist extensors and any transferred muscles.
- ADL Integration: Occupational therapy focuses on integrating the new key pinch into activities of daily living (ADLs), such as holding a pen, manipulating utensils, managing zippers, and performing self-catheterization.
Conclusion
The Moberg key grip tenodesis, whether performed as an isolated static procedure or augmented with active tendon transfers like the House two-stage technique, remains a highly reliable method for restoring lateral pinch in the tetraplegic patient. By meticulously adhering to the biomechanical principles of the tenodesis effect, ensuring precise intraoperative tensioning, and enforcing a strict postoperative rehabilitation protocol, orthopedic surgeons can provide these patients with a profound improvement in functional independence and quality of life.
You Might Also Like