Flexor-to-Extensor Transfer: Comprehensive Surgical Guide
Key Takeaway
The flexor-to-extensor transfer, or Girdlestone-Taylor procedure, is a highly effective surgical intervention for correcting flexible hammer toe deformities. By rerouting the flexor digitorum longus (FDL) tendon to the dorsal extensor expansion, this procedure dynamically stabilizes the metatarsophalangeal joint in plantar flexion while extending the proximal interphalangeal joint. This guide details the precise biomechanical principles, step-by-step surgical technique, and postoperative protocols required for optimal functional outcomes.
Introduction to the Flexor-to-Extensor Transfer
The flexor-to-extensor transfer, historically rooted in the Girdlestone-Taylor procedure, remains a cornerstone in the operative management of flexible lesser toe deformities, particularly the flexible hammer toe. This dynamic tendon transfer aims to correct the sagittal plane imbalance that drives the deformity by converting a deforming force (the flexor digitorum longus) into a corrective force.
By rerouting the flexor digitorum longus (FDL) tendon from its plantar insertion at the distal phalanx to the dorsal extensor hood of the proximal phalanx, the surgeon effectively replicates the function of the intrinsic lumbrical muscles. This transfer provides dynamic plantar flexion at the metatarsophalangeal (MTP) joint and extension at the proximal interphalangeal (PIP) and distal interphalangeal (DIP) joints, restoring the normal parabolic cascade of the lesser digits.
This comprehensive guide details the pathoanatomy, preoperative evaluation, and step-by-step surgical execution required for a successful flexor-to-extensor transfer, tailored for the practicing orthopedic surgeon and advanced surgical trainee.
Pathoanatomy and Biomechanics
To master the flexor-to-extensor transfer, the surgeon must possess a profound understanding of lesser toe biomechanics. The stability of the lesser toes relies on a delicate equilibrium between the extrinsic musculature (extensor digitorum longus [EDL], flexor digitorum longus [FDL], flexor digitorum brevis [FDB]) and the intrinsic musculature (lumbricals and interossei).
A hammer toe deformity is characterized by MTP joint hyperextension, PIP joint flexion, and DIP joint extension or slight flexion. This typically arises from one of three distinct biomechanical etiologies:
1. Flexor Stabilization: The most common cause, seen in flexible flatfeet. The flexors fire earlier and longer to stabilize the hypermobile forefoot, overpowering the interossei.
2. Extensor Substitution: Occurs in cavus feet or neuromuscular conditions where the EDL overpowers the lumbricals during the swing phase to clear the toes.
3. Flexor Substitution: The least common, occurring when the deep posterior compartment muscles attempt to compensate for a weak triceps surae.
Biomechanical Principle: The flexor-to-extensor transfer addresses the intrinsic-minus state. By passing the FDL slips plantar to the deep transverse intermetatarsal ligament and attaching them dorsally, the transferred tendon acts as a plantar flexor of the MTP joint (due to its position relative to the joint's axis of rotation) and an extensor of the PIP joint, directly counteracting the deforming forces.
Indications and Contraindications
Indications
- Flexible Hammer Toe Deformity: The primary indication. The deformity must be fully correctable passively (demonstrated by a positive Kelikian push-up test).
- Dynamic Crossover Toe: Early stages of crossover toe deformity where dynamic stabilization of the MTP joint is required.
- Neuromuscular Claw Toes: In select cases where dynamic correction is preferred over arthrodesis, provided the deformity remains flexible.
Contraindications
- Rigid Deformities: If the PIP or MTP joints are fixed, a soft tissue transfer alone will fail. Osseous procedures (e.g., PIP joint arthrodesis, Weil osteotomy) are required.
- Severe Spasticity: Unpredictable muscle tone can lead to overcorrection or recurrent deformity.
- Inadequate Vascularity: Peripheral arterial disease must be evaluated; compromised perfusion is an absolute contraindication to elective forefoot surgery.
Preoperative Preparation and Positioning
- Anesthesia: The procedure can be performed under general anesthesia, regional block (popliteal or ankle block), or local anesthesia with monitored anesthesia care (MAC).
- Positioning: The patient is placed in the supine position. A bump may be placed under the ipsilateral hip to internally rotate the leg to a neutral position, ensuring the foot points directly upward.
- Tourniquet: A calf or thigh tourniquet is highly recommended to provide a bloodless surgical field, which is critical for identifying the delicate neurovascular bundles and tendon slips. Exsanguination is achieved with an Esmarch bandage prior to inflation.
Surgical Technique: Step-by-Step
The flexor-to-extensor transfer requires meticulous soft tissue handling. The use of surgical magnification loupes (2.5x to 3.5x) is strongly advised to prevent iatrogenic injury to the digital neurovascular structures.
Phase 1: Plantar Exposure and Tendon Identification
- Proximal Plantar Incision: On each toe to be corrected, make a transverse plantar incision at the proximal flexion crease of the toe. Careful superficial dissection is paramount to preserve the digital arteries and nerves, which lie immediately adjacent to the flexor sheath.
- Sheath Exposure: Retract the skin and subcutaneous tissue using small hooked retractors (e.g., Senn or Ragnell retractors) to expose the underlying flexor tendons and their fibrous sheaths.
- Pulley Release: Open the proximal 3 to 4 mm of the flexor pulley to expose the flexor digitorum longus (FDL) immediately beneath it.
- Technique Tip: This is best accomplished by opening the pulley to one side and dissecting over the underlying tendons, removing a small segment of the pulley. A small round-end knife (e.g., a Beaver blade) is ideal for this step. Topographically, this dissection is located at about the middle third of the proximal phalanx.

FIGURE 83-7A: Transverse plantar incision at the proximal flexion crease exposing the flexor tendon sheath.
- Tendon Verification: The central tendon should be the FDL. To confirm, perform gentle, passive flexion and extension of the distal interphalangeal (DIP) joint while holding the proximal interphalangeal (PIP) joint straight. Only the FDL will actuate the DIP joint.
- Vinculum Release: While lifting the FDL tendon, the vinculum longum (if present) will appear under tension. This vascular tether should be carefully severed following electrocautery to prevent postoperative bleeding.
Phase 2: Distal Tenotomy and Tendon Delivery
- Distal Plantar Incision: Make a second transverse plantar incision at the level of the distal interphalangeal (DIP) joint.
- FDL Tenotomy: Perform a sharp tenotomy of the FDL just proximal to its insertion on the distal phalanx.
Surgical Warning: Exercise extreme caution during the distal tenotomy to avoid violating the plantar plate of the DIP joint or the underlying articular cartilage.

FIGURE 83-7B: Distal tenotomy of the flexor digitorum longus at the DIP joint.
- Tendon Delivery: Return to the proximal incision. Hook (but do not clamp) the FDL with a small hemostat and deliver the distal segment into the proximal wound. If the vincula between the two incisions are tenacious, this step might require steady, controlled force.
- FDB Inspection: Once the FDL is delivered from the proximal incision, inspect the wound bed again to ensure that the two lateral slips of the flexor digitorum brevis (FDB) remain intact and undisturbed.
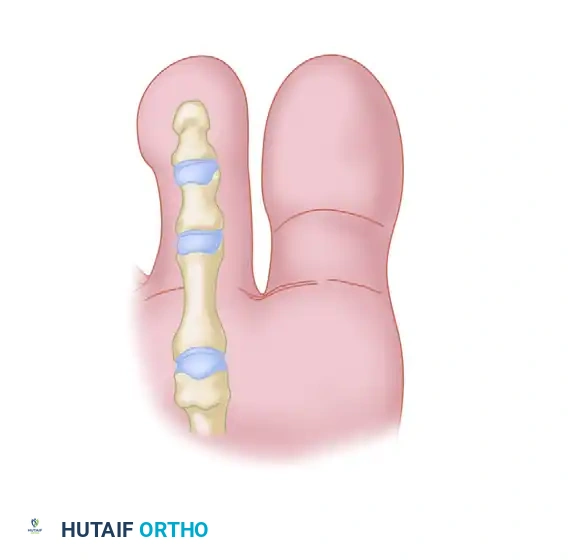
FIGURE 83-7C: Delivery of the FDL tendon through the proximal plantar incision, ensuring FDB slips are intact.
Phase 3: Tendon Splitting
- Identifying the Cleavage Plane: Careful inspection of the delivered FDL tendon will reveal a shallow, linear furrow running longitudinally along its plantar surface. This represents the natural anatomical cleavage plane.
- Longitudinal Split: Using small forceps, hold one side of the delivered tendon at its free end while an assistant holds the other. Split the tendon longitudinally along this natural cleavage plane for a distance of 1.5 to 2.5 cm.
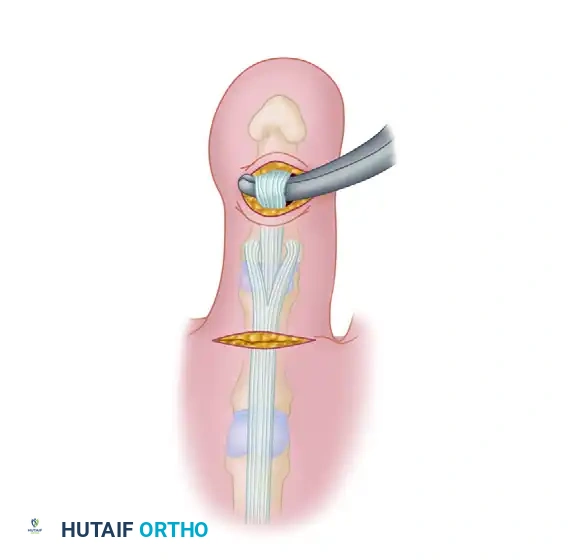
FIGURE 83-7D: Splitting the FDL tendon longitudinally along its natural cleavage plane.
Surgical Pearl: Pull the tendon distally while the ankle is held in plantar flexion. This allows clear visualization of both sides of the tendon, preventing the inadvertent sectioning or amputation of one half of the tendon slip. Hold the two segments apart only enough to fit a small pair of straight tenotomy scissors in the axilla of the dissection, using only the tips of the scissors to advance the split.
Phase 4: Dorsal Approach and Extensor Preparation
- Dorsal Incision: Moisten the split tendon with saline to prevent desiccation. Make a second skin incision longitudinally in the midline on the dorsum of the proximal phalanx, measuring 1.5 to 2.0 cm in length.
- Note: The dorsal digital veins usually lie to each side of this incision. If they cross the incision line, they should be meticulously cauterized.
- Extensor Mechanism Exposure: By sharp dissection, identify the trailing edge of each lateral band of the extensor mechanism. Retract the skin, including the superficial veins and nerves to either side, using two-pronged skin hooks.
- Extensor Incisions: Make 3- to 4-mm longitudinal incisions into the extensor mechanism halfway between the midline dorsally and the trailing edge of the lateral band plantarward on each side. These receiving incisions should be precisely at the level of the middiaphysis of the proximal phalanx.
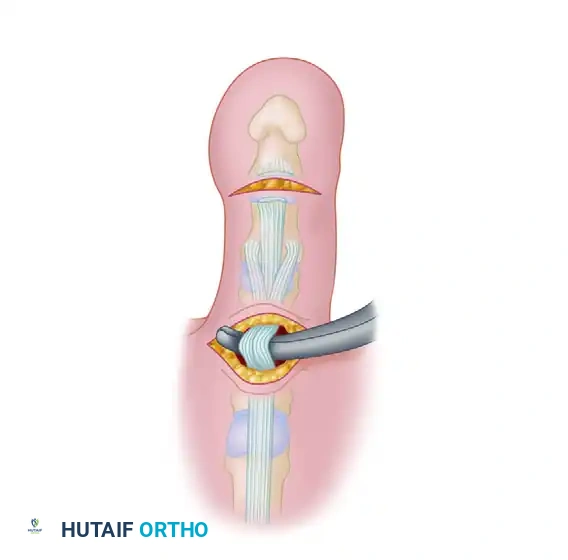
FIGURE 83-7E: Dorsal longitudinal incision and preparation of the extensor mechanism.
Phase 5: Tendon Routing and Fixation
- Creating the Passage: Pass a small curved hemostat through one of the incisions in the extensor mechanism, directing it plantarward to emerge into the proximal plantar incision.
- Critical Anatomy: The hemostat must stay intimately close to the bone of the proximal phalanx. This trajectory ensures the instrument passes medial/lateral to the bone but safely avoids the digital neurovascular bundles. Furthermore, the passage must remain plantar to the deep transverse intermetatarsal ligament to maintain the correct biomechanical moment arm for MTP joint plantar flexion.
- Tendon Retrieval: Grasp the tip of one slip of the split FDL with the hemostat and gently pull it dorsally into the dorsal wound through the extensor mechanism.
- Contralateral Routing: Repeat the identical procedure on the opposite side of the phalanx for the second tendon slip.
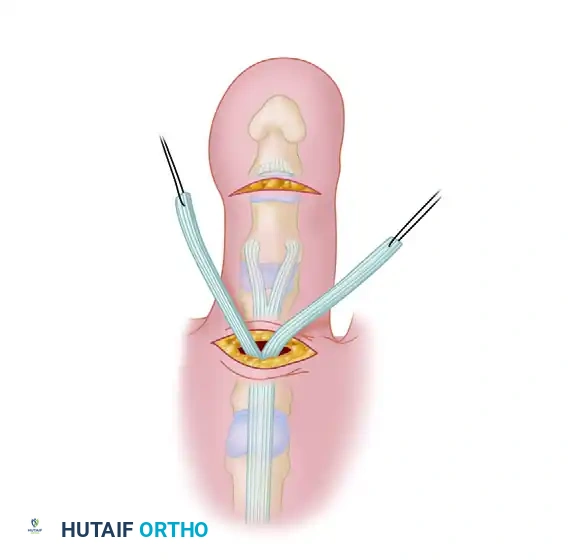
FIGURE 83-7F: Passing the split FDL slips dorsally through the extensor mechanism.
- Tensioning (The Most Critical Step): Have an assistant hold the ankle joint strictly at 90 degrees (neutral dorsiflexion and plantar flexion). Tighten the tendon slips simultaneously. The tension should be sufficient to hold the metatarsophalangeal (MTP) joint at neutral to 5 degrees of plantar flexion.
- Alternative Routing: An alternative technique is to overlap the tendon slips dorsally over the extensor tendon rather than passing them through it. If the FDL needs to be split further linearly to achieve this, the tendon slips must be returned to the plantar incision first to avoid accidentally severing one half during the extension of the split.
- Suturing: With the tendon slips held securely at the desired tension, use 3-0 or 4-0 nonabsorbable sutures (e.g., Ethibond or Prolene) to fasten each slip of the FDL to the extensor mechanism. Place multiple interrupted sutures to ensure a robust tenodesis.
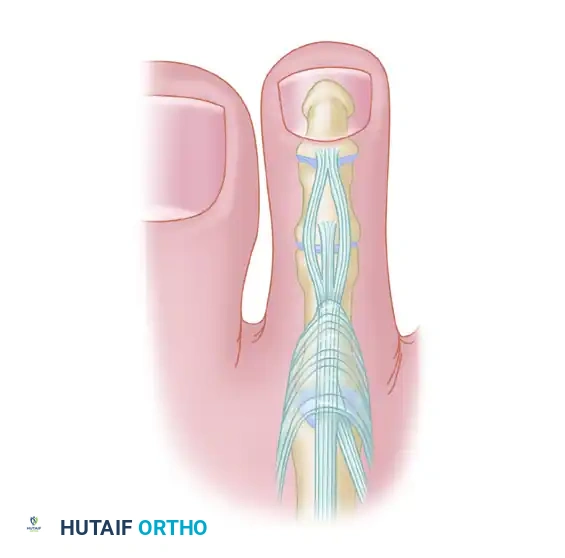
FIGURE 83-7G: Final tensioning and suturing of the FDL slips to the dorsal extensor mechanism.
Clinical Application
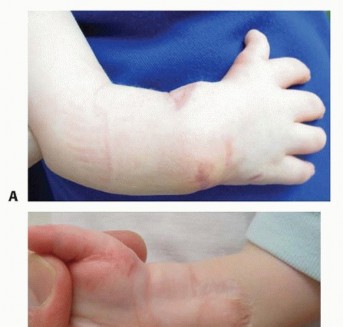
The immediate intraoperative result should demonstrate a correction of the flexible deformity, with the toe resting in a neutral, rectus alignment without manual pressure.
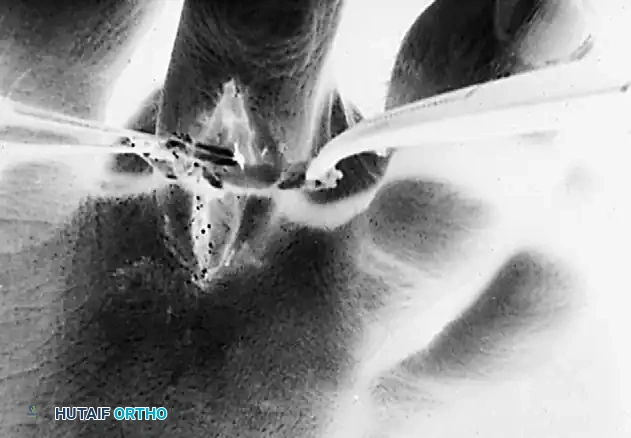
FIGURE 83-8A: Clinical presentation of a flexible hammer toe during the transfer of the flexor to the extensor tendon.
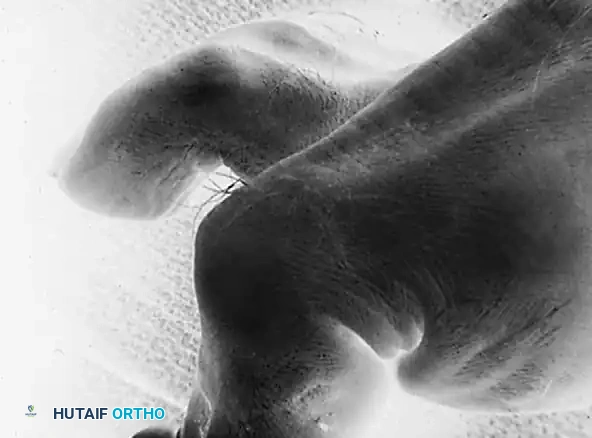
FIGURE 83-8B: Immediate postoperative clinical appearance. Note the correction of the deformity and the small knot beneath the skin.
Postoperative Protocol
The success of a flexor-to-extensor transfer relies heavily on meticulous postoperative care to protect the tendon transfer while it heals.
- Immediate Postoperative Phase (Weeks 0-2):
- The foot is placed in a bulky, soft compressive dressing.
- The corrected toes are splinted in a neutral position using buddy taping or a dedicated toe alignment splint.
- The patient is allowed heel-weight-bearing or flat-foot weight-bearing in a rigid postoperative shoe.
- Strict elevation is encouraged to minimize edema, which can compromise wound healing.
- Intermediate Phase (Weeks 2-6):
- Sutures are removed at 14 to 21 days, depending on wound healing.
- Buddy taping is continued to maintain alignment and protect the transfer.
- Passive range of motion (ROM) exercises of the MTP and PIP joints are initiated to prevent debilitating stiffness.
- Late Phase (Weeks 6-12):
- Transition to wide-toe-box, supportive footwear.
- Active ROM exercises are commenced. The patient is instructed on "toe-grasping" exercises (e.g., picking up marbles or scrunching a towel) to re-educate the transferred tendon.
- Full unrestricted activity is typically permitted by 10 to 12 weeks, guided by clinical progress.
Complications and Pitfalls
While highly effective, the flexor-to-extensor transfer carries specific risks that the surgeon must actively mitigate:
- Over-tightening (Swan Neck Deformity): If the tendon is tensioned while the ankle is in plantar flexion, the transfer will be excessively tight when the patient stands (ankle dorsiflexion). This leads to a rigid, plantarflexed MTP joint and a hyperextended PIP joint (swan neck deformity). Prevention: Always tension with the ankle strictly at 90 degrees.
- Under-correction: Failure to adequately release the dorsal contractures (e.g., MTP joint capsulotomy or EDL lengthening) prior to the transfer in a long-standing deformity will result in residual dorsal elevation of the toe.
- Neurovascular Injury: The digital nerves and arteries are highly vulnerable during the plantar exposure and when passing the hemostat from dorsal to plantar. Prevention: Stay intimately on the bone during passage and use loupe magnification.
- Toe Stiffness: Some degree of PIP joint stiffness is expected and often desirable to maintain the rectus alignment. However, severe MTP joint stiffness can cause metatarsalgia. Early, controlled passive ROM is essential.
- "Floating Toe" Deformity: If the FDL slips are passed dorsal to the deep transverse intermetatarsal ligament rather than plantar to it, the transfer will act as an MTP joint extensor rather than a flexor, exacerbating the deformity.
Conclusion
The flexor-to-extensor transfer is a powerful, dynamic surgical tool for the correction of flexible hammer toes and early crossover toe deformities. By meticulously adhering to the biomechanical principles of the intrinsic-minus foot, preserving the neurovascular bundles, and executing precise tendon routing and tensioning, the orthopedic surgeon can reliably restore the functional anatomy and aesthetic cascade of the lesser digits. Rigorous adherence to postoperative splinting and rehabilitation further ensures the longevity and success of this classic orthopedic procedure.
You Might Also Like