Comprehensive Surgical Management of Congenital Upper Extremity Anomalies: Triceps Transfer and Central Hand Deficiencies
Key Takeaway
The Menelaus triceps transfer is a critical salvage procedure to restore active elbow flexion in pediatric patients with congenital flexor aplasia, typically performed following wrist centralization. Success relies on meticulous mobilization of the triceps and ulnar nerve, combined with secure routing through the coronoid process. Concurrently, managing central hand deficiencies requires a staged, individualized approach prioritizing functional pinch, grasp, and syndactyly release over purely cosmetic outcomes.
TRICEPS TRANSFER TO RESTORE ELBOW FLEXION
The restoration of active elbow flexion is a paramount functional goal in the pediatric upper extremity, particularly in the setting of congenital anomalies such as arthrogryposis multiplex congenita or severe radial longitudinal deficiency. An elbow that is rigidly stiff in extension represents an absolute contraindication to wrist centralization procedures, as the patient relies on wrist flexion to bring the hand to the mouth. However, in rare instances, a child may possess passive elbow flexion but exhibit minimal to no active flexion due to the complete congenital absence or severe hypoplasia of the primary elbow flexors (biceps brachii and brachialis).
In these highly selected cases, the Menelaus triceps transfer serves as a powerful reconstructive option. This procedure is typically staged and performed 2 to 3 months following a successful wrist centralization. By converting the triceps from an elbow extensor to an elbow flexor, the surgeon can dramatically improve the patient's ability to perform activities of daily living, particularly feeding and facial hygiene.
Indications and Preoperative Planning
Careful patient selection is the cornerstone of a successful triceps transfer. The primary indication is the absence of active elbow flexion in the presence of full, supple passive flexion.
Surgical Warning:
Never perform a triceps transfer in a patient who lacks passive elbow flexion or relies on triceps extension for weight-bearing (e.g., crutch ambulation or wheelchair transfers). Transferring the triceps in a patient who requires active extension for mobility will result in a devastating loss of independence.
Preoperative clinical evaluation must confirm a minimum of Grade 4/5 strength in the triceps muscle. Radiographic evaluation of the elbow joint is necessary to rule out osseous synostosis or severe joint incongruity that would mechanically block flexion post-transfer.
Biomechanics of the Triceps Transfer
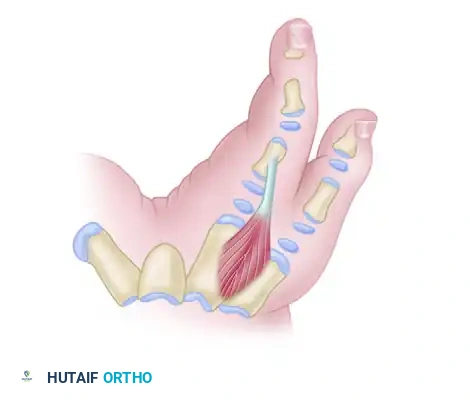
The biomechanical objective of the Menelaus procedure is to reroute the triceps tendon anterior to the axis of elbow rotation, thereby converting its moment arm from extension to flexion. By securing the transfer to the coronoid process of the ulna, the surgeon recreates a near-anatomic insertion site for the brachialis, optimizing the mechanical advantage and excursion of the transferred muscle-tendon unit.
Surgical Technique: The Menelaus Procedure
The procedure requires meticulous soft tissue handling, extensive mobilization of the triceps muscle belly, and careful protection of the ulnar nerve.
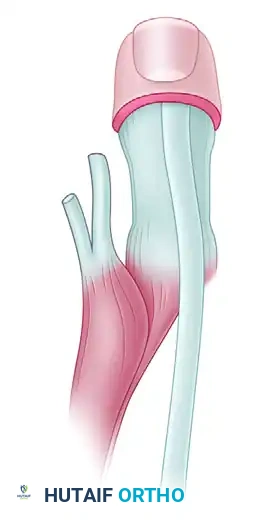
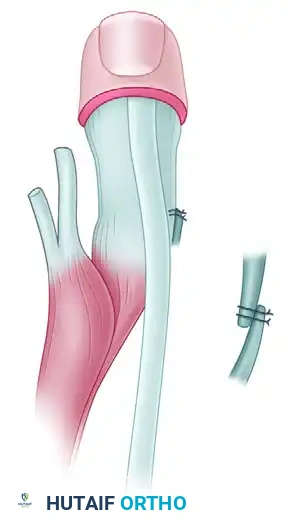
Step 1: Exposure and Tendon Harvest
* Position the patient in the lateral decubitus or supine position with the arm draped free over a sterile bolster. Use a sterile tourniquet to optimize the surgical field.
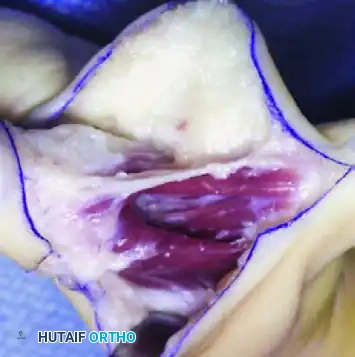
* Make an extensile lateral incision to expose the distal aspect of the triceps muscle, continuing distally to expose the anterior, lateral, and posterior aspects of the proximal ulna.
* Identify the broad triceps insertion on the olecranon.
* Dissect a robust, V-shaped "tongue" of periosteum from the proximal end of the ulna, maintaining its continuity with the distal triceps tendon. This periosteal extension is critical for providing adequate length and a durable tissue interface for the subsequent osseous fixation.
Step 2: Muscle Mobilization and Nerve Protection
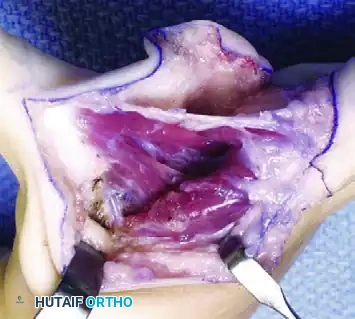
* Proceed with proximal dissection of the triceps muscle belly up to the midarm level. Free the muscle from its fascial attachments to the intermuscular septa to ensure maximum excursion.
* Identify, neurolyse, and mobilize the ulnar nerve. The nerve must be protected throughout the procedure, as the proximal mobilization of the triceps can place it under significant traction.
* Perform a posterior capsulotomy of the elbow joint to facilitate unimpeded flexion and to allow the transferred tendon to glide smoothly anteriorly.
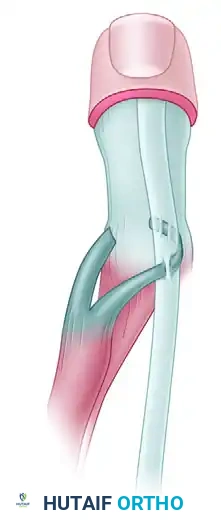
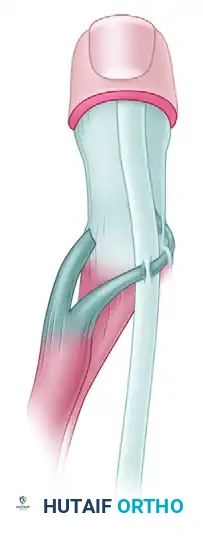
Step 3: Tendon Routing and Fixation
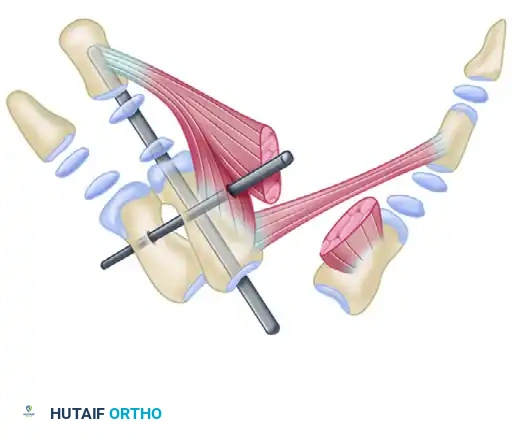
* Tubularize (roll) the periosteal tongue and the distal triceps tendon using a running locking suture (e.g., #1 or #2 nonabsorbable braided suture) to create a strong, cylindrical graft.
* Identify the coronoid process of the ulna anteriorly. Using a drill and curettes, create a transosseous tunnel through the coronoid process.
* Pass the tubularized triceps tendon through the coronoid tunnel from anterior to posterior.
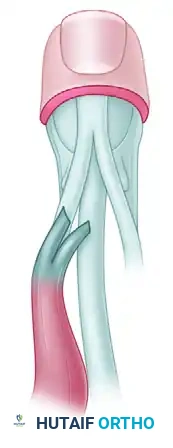
Step 4: Tensioning and Closure
* With the elbow held in 120 degrees of flexion and the forearm in neutral rotation, apply maximum physiological tension to the transferred tendon.
* Secure the transfer to the ulna using heavy nonabsorbable sutures, tying them over a bony bridge or utilizing a biotenodesis screw if bone stock permits.
* Deflate the tourniquet, achieve meticulous hemostasis, and close the wound in layers.
Postoperative Rehabilitation Protocol
The success of a tendon transfer is heavily dependent on the postoperative rehabilitation phase.
* Immobilization (Weeks 0-4/6): Immediately postoperatively, the arm is immobilized in a long-arm cast with the elbow positioned in 120 degrees of flexion. This removes all tension from the repair site. Sutures are removed at the 2-week mark through a cast window or during a cast change. The transfer is protected in this cast for a total of 4 to 6 weeks.
* Early Mobilization (Weeks 6-12): Following cast removal, a custom long-arm posterior splint is fabricated, holding the elbow at 90 degrees of flexion. Gentle, active-assisted flexion exercises are initiated. The patient is instructed to attempt active elbow flexion (often conceptualized initially as "trying to straighten the arm" to fire the triceps, which now flexes the elbow).
* Protection: The 90-degree splint must be worn at all times between exercise periods and during sleep to prevent attenuation of the transfer. Passive stretching into extension is strictly prohibited during the first 12 weeks.
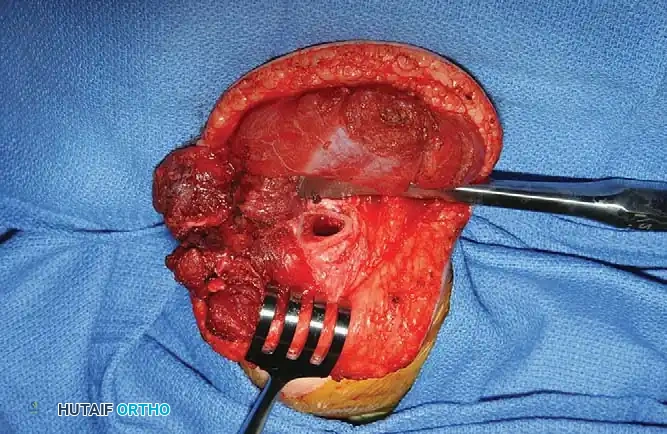
CONGENITAL CENTRAL HAND DEFICIENCIES (CLEFT HAND)
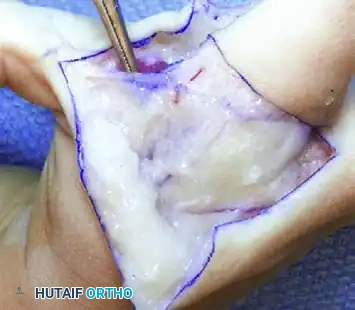
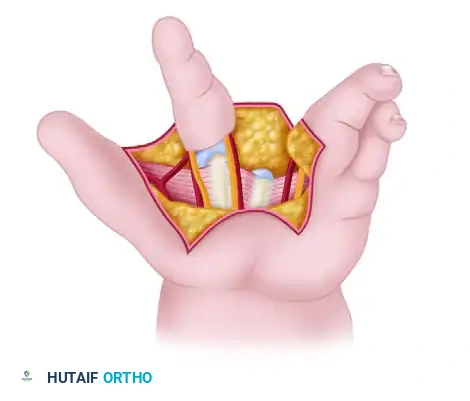
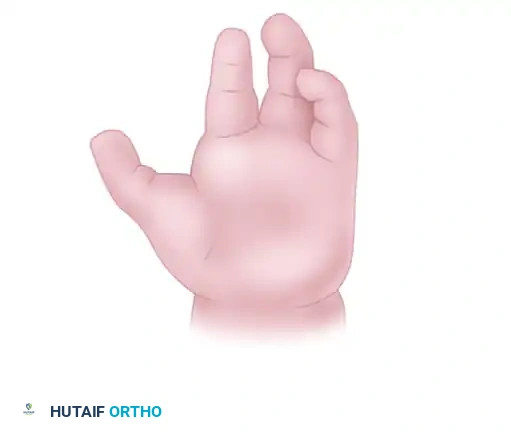
Central longitudinal deficiencies of the hand, historically termed "cleft hand" or "ectrodactyly," represent a complex spectrum of congenital anomalies characterized by the suppression or absence of the central rays (typically the long finger and third metacarpal). These deformities present significant functional and aesthetic challenges, requiring a nuanced, highly individualized surgical approach.
Pathoanatomy and Embryology
The embryological insult leading to a cleft hand occurs between the 4th and 7th weeks of gestation. Müller emphasized the etiological distinction between true cleft hand and symbrachydactyly. A true cleft hand is believed to result from a primary insufficiency or wedge-shaped defect of the apical ectodermal ridge (AER). Conversely, symbrachydactyly likely stems from a primary failure of formation of the underlying mesodermal bone. This embryological divergence explains the absence of terminal digital remnants (nubbins) in pure central longitudinal deficiencies, which are frequently seen in symbrachydactyly.
Maisels’ suppression theory illustrates that milder deformities present as a simple cleft without significant tissue loss. As the severity of suppression increases, the absence of the central ray is noted first, followed by the progressive loss of the radial rays, and eventually the loss of all rays.
Classification Systems
Understanding the morphological pattern is critical for surgical planning. The deformity is broadly categorized into typical and atypical patterns.
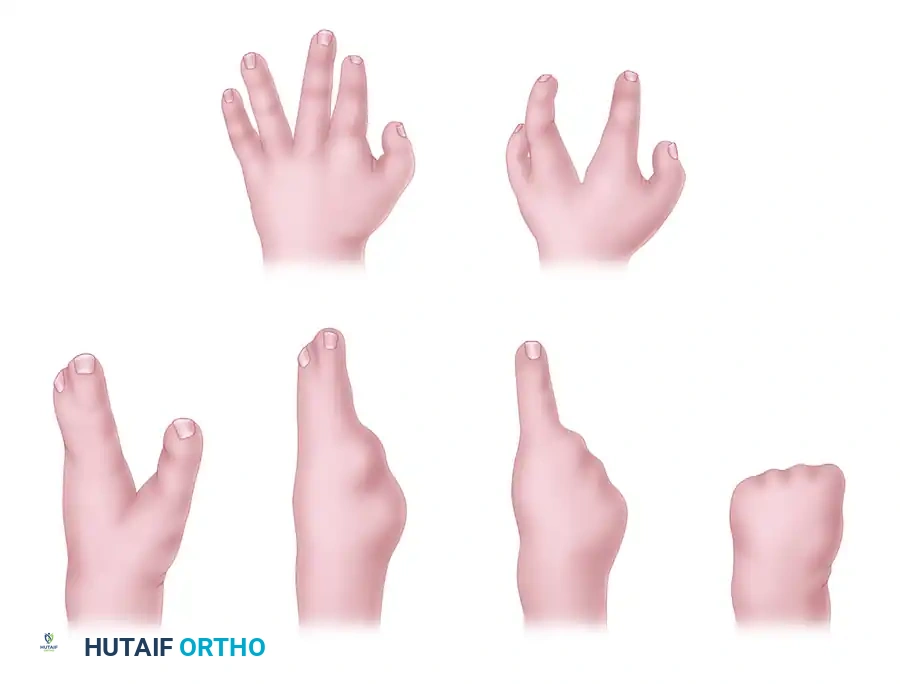
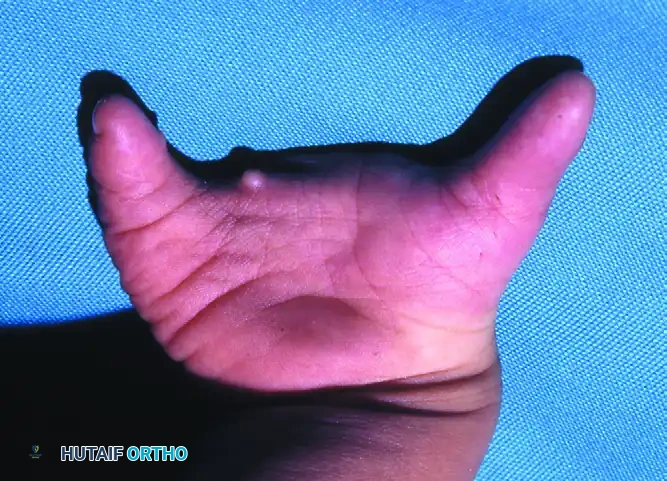
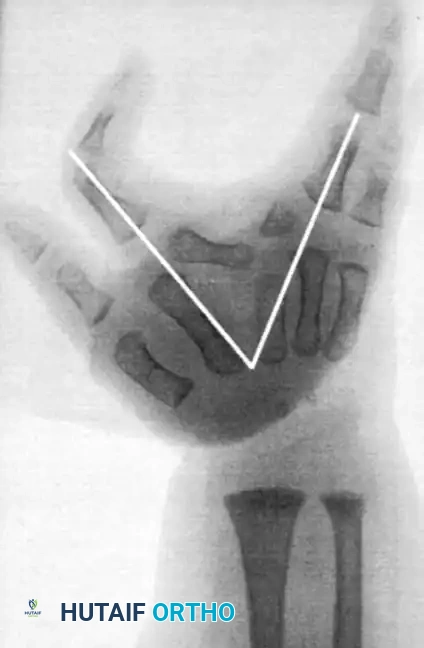
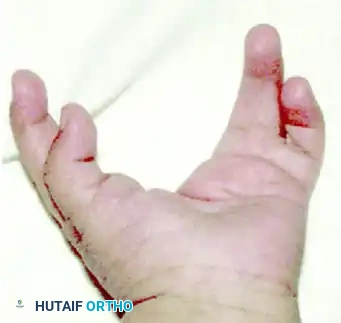
1. The Typical Pattern (True Cleft Hand)
Present at birth, this pattern features a central V-shaped defect in the palm. The long finger is usually entirely absent. The remaining digits bordering the cleft (index and ring fingers) frequently exhibit varying degrees of syndactyly and a deficient, narrowed first web space. The deformity is often bilateral and inherited in an autosomal dominant pattern with variable penetrance. Foot deformities (cleft foot) are frequently associated.
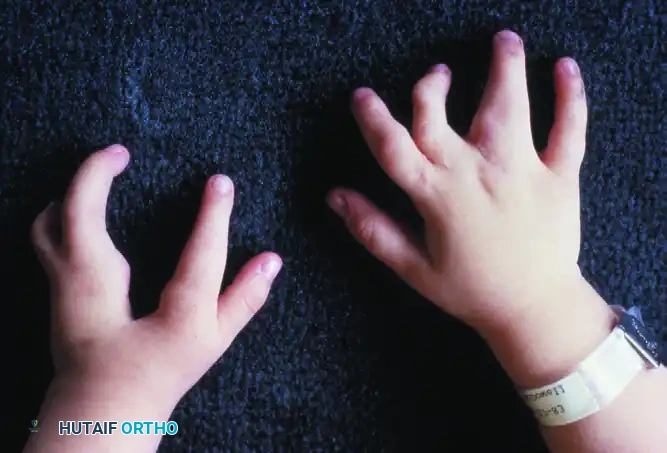
2. The Atypical Pattern (Symbrachydactyly Variant)
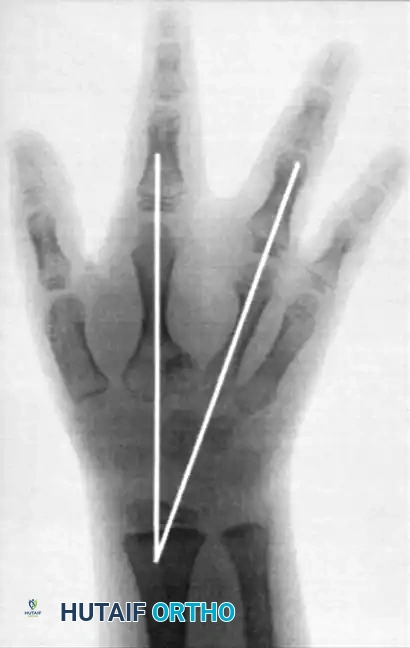
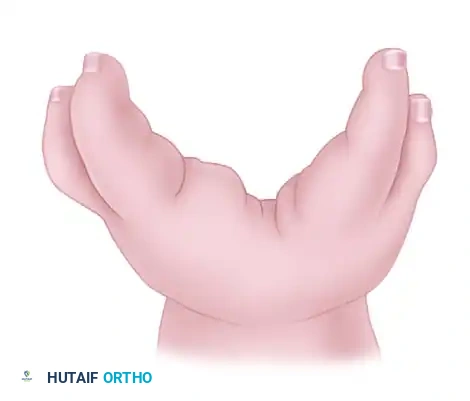
In the atypical pattern, the hand typically presents with only two digits: one on the radial border (thumb) and one on the ulnar border (small finger). A shallow U-shaped defect intervenes along the distal palm. The deformity is usually unilateral, sporadic, and lacks associated foot anomalies. In severe forms, all digits except the small finger may be absent.
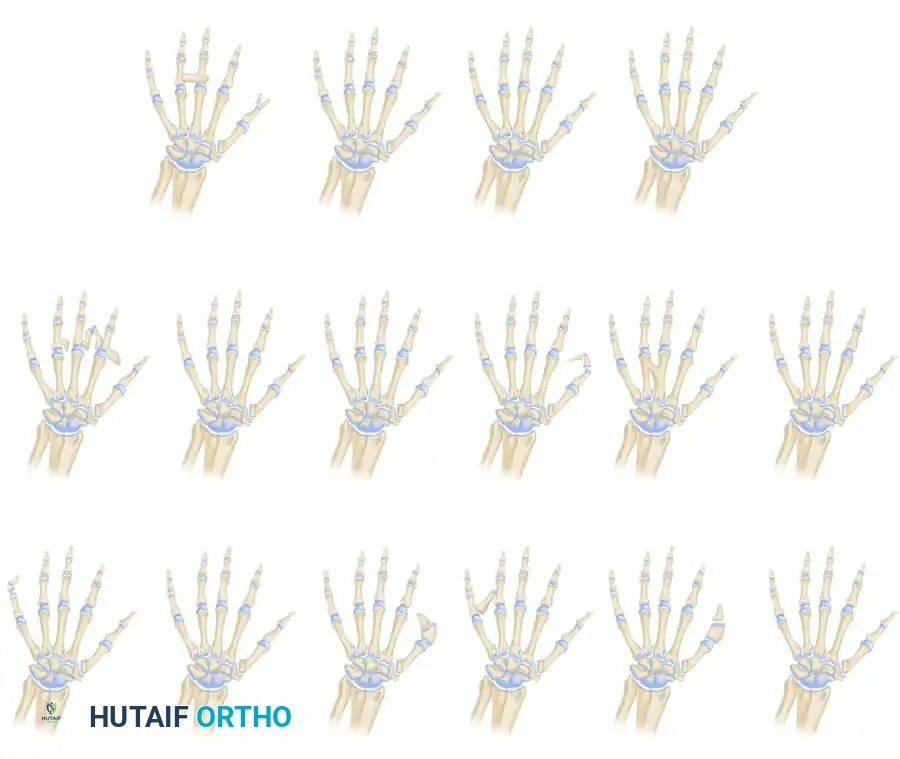
Flatt’s classification of central deficiencies: Group 0, all bones present; Group 1, one ray involved; Group 2, two rays involved; and Group 3, three rays involved.
Clinical Presentation and Associated Anomalies
Children with central hand deficiencies often develop remarkable compensatory dexterity. However, the psychological impact of the "clawlike" appearance becomes pronounced as the child enters grade school.
Clinical Pearl:
Never rush to operate on a cleft hand solely for cosmetic reasons if the hand is highly functional. The primary goals of surgery must always be the restoration of functional pinch, broad grasp, and the release of progressive syndactyly.
Associated anomalies are common and must be screened for. These include cleft foot, cleft lip/palate, congenital heart disease, imperforate anus, deafness, and cataracts. Musculoskeletal anomalies may include clavicular hypoplasia, absent pectoralis major, radioulnar synostosis, and lower extremity deficiencies.
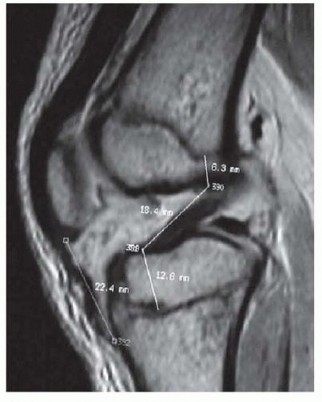
Radiographic Evaluation
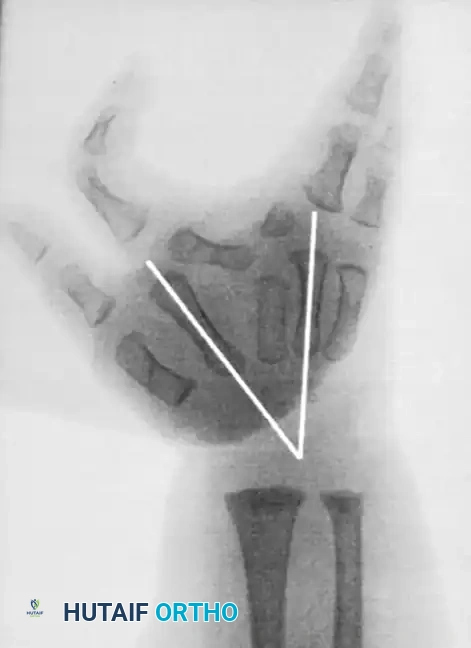
Radiographs are essential to identify transverse bones, delta phalanges, and carpal coalitions (which become apparent in older children). Goldfarb et al. introduced the measurement of metacarpal and phalangeal divergence angles to assist in preoperative planning and to objectively assess postoperative reconstruction success.
Principles of Surgical Reconstruction
Nonoperative treatment and prostheses have largely been abandoned, except in rare cases where a cosmetic prosthesis is specifically requested by an older patient. Operative management is highly individualized.
Surgical Goals:
1. Establish a functional pinch mechanism.
2. Create a broad, stable palm for grasp.
3. Release syndactyly to maximize independent digital motion.
4. Correct deforming bony elements (e.g., transverse bones, delta phalanges).
5. Improve cosmesis by closing the central cleft.
Surgical Timing and Staged Interventions
Following Flatt's recommendations, surgical interventions should be carefully staged:
* 6 Months: Release of border digit syndactyly.
* 18 Months: Release of central digit syndactyly.
* 24 Months (After a 6-month recovery): Closure of the cleft, often combined with correction of the thumb adduction contracture.
* 3 Years: Correction of delta phalanges (via opening wedge osteotomies or physiolysis) and tendon transfers for severe hypoplasia.
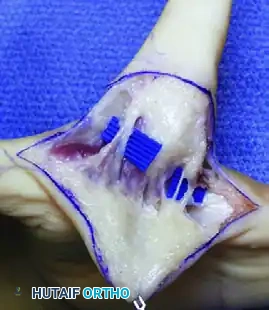
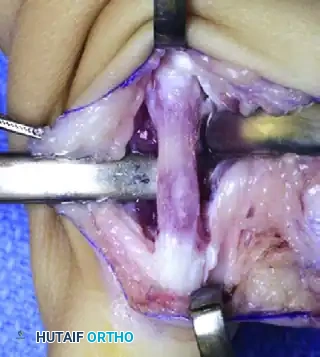
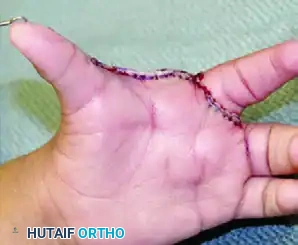
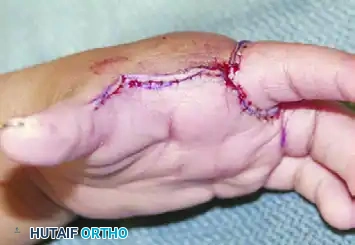
Techniques for Cleft Closure and Web Space Deepening
Closing the cleft requires careful management of the metacarpals. Bony elements that block closure should be excised sparingly; excessive removal of the central metacarpal base can weaken the transverse carpal arch and lead to recurrent clefting.
When cleft closure is combined with first web space deepening, the index ray is often transposed ulnarly to the long metacarpal position.
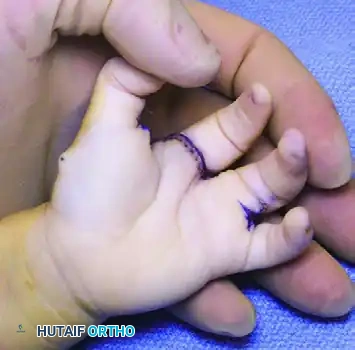
* Snow and Littler Technique: Involves a complex palmar flap to reconstruct the first web space while transposing the index ray.
* Miura and Komada Technique: A technically less demanding alternative that produces comparable functional results with a significantly lower risk of flap necrosis.
* Upton and Taghinia Technique: Advocates for avoiding complicated dorsal and volar flaps entirely due to the high risk of tip necrosis. Instead, they utilize a simple incision separating the glabrous from the dorsal skin surfaces.

Upton and Taghinia technique: Incisions within the cleft are placed precisely at the juncture of the glabrous and dorsal skin. A small trap-door flap is utilized for commissure lining between the ring and transposed index finger, ensuring robust vascularity.
Management of the Thumb-Index Web Space
Manske and Halikis developed a comprehensive classification system based on the condition of the thumb-index web, which directly guides surgical decision-making.
- Type 1: Normal web.
- Type 2: Narrowed web.
- Type 3: Syndactylized web.
- Type 4: Merged web.
- Type 5: Absent web.
Management of the Atypical Pattern and Severe Hypoplasia
In the atypical pattern, the thumb and/or little finger are frequently hypoplastic, rendering pinch impossible.
* **Ages 2 to 3
📚 Medical References
- to restore elbow fl exion: a study of fi fteen patients with paralytic lesions and arthrogryposis, J Bone Joint Surg 52A:239, 1970.
- Castro-Sierra A, Lopez-Pita A: A new surgical technique to correct triceps paralysis, Hand 15:42, 1983.
- Clark JMP: Reconstruction of biceps brachii by pectoral muscle transplantation, Br J Surg 34:180, 1946.
- duToit GT, Levy SJ: Transposition of latissimus dorsi for paralysis of triceps brachii: report of a case, J Bone Joint Surg 49B:135, 1967.
- Dutton RO, Dawson EB: Elbow fl exorplasty: an analysis of longterm results, J Bone Joint Surg 63A:1064, 1981.
- Green WT, Banks HH: Flexor carpi ulnaris transplant in cerebral palsy, J Bone Joint Surg 44A:1343, 1962.
- Harmon PH: Muscle transplantation for triceps palsy: the technique of utilizing the latissimus dorsi, J Bone Joint Surg 31A:409, 1949.
- Hovnanian AP: Latissimus dorsi transplantation for loss of fl exion or extension at the elbow: a preliminary report on technic, Ann Surg 143:493, 1956.
- Mayer L, Green W: Experiences with the Steindler fl exorplasty at the elbow, J Bone Joint Surg 36A:775, 1954.
- Moberg E: Surgical treatment for absent single hand grip and elbow extension in quadriplegia, J Bone Joint Surg 57A:196, 1975.
- Ober FR, Barr JS: Brachioradialis muscle transposition for triceps weakness, Surg Gynecol Obstet 67:105, 1938.
- Owings R, Wickstrom J, Perry J, et al: Biceps brachii rerouting in treatment of paralytic supination contracture of the forearm, J Bone Joint Surg 53A:137, 1971.
- Raczka R, Braun R, Waters RL: Posterior
You Might Also Like