Congenital Constriction Bands of the Leg: A Comprehensive Surgical Guide
Key Takeaway
Congenital constriction bands, or Streeter dysplasia, present as circumferential soft-tissue depressions that can obstruct lymphatic and vascular flow, leading to distal edema or auto-amputation. Management requires meticulous surgical excision of the fibrotic bands and Z-plasty reconstruction. Modern orthopedic consensus favors a one-stage circumferential release, which effectively restores limb contour, resolves distal edema, and facilitates the prompt healing of any associated tibial fractures without the need for staged interventions.
Introduction and Pathophysiology
Congenital circumferential constriction of the leg, historically referred to as "Streeter dysplasia" or amniotic band syndrome, is a rare but clinically significant pediatric orthopedic condition. It presents at birth as a distinct, fibrotic depression in the soft tissues that completely encircles the limb. The exact etiology remains a subject of debate, with theories divided between intrinsic germ plasm defects (Streeter's dysplasia) and extrinsic compression from early rupture of the amnion leading to the formation of mesodermic bands that entangle the developing fetus.
Regardless of the embryological origin, the pathophysiological consequences of these bands are profound. The constriction acts as a rigid, unyielding tourniquet. While superficial bands may only cause cosmetic deformity, deeper bands routinely affect the deep fascia and partially or completely obstruct lymphatic vessels and superficial venous circulation.
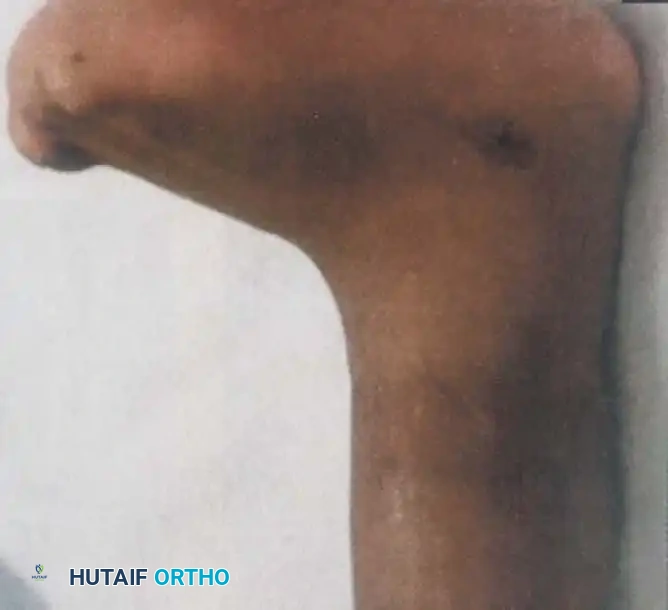
Fig. 26-59 A, Congenital constriction of leg and congenital vertical talus.
Distal to the constriction, patients typically develop a persistent, indurated pitting edema. This hemodynamic and lymphatic compromise can only be cured by the complete surgical excision of the constricting band and, in most instances, the meticulous debulking of the edematous tissues distal to it. Left untreated, severe bands can lead to progressive vascular compromise, ischemic necrosis, and eventual auto-amputation of the distal extremity.
Clinical Presentation and Associated Anomalies
Congenital constriction bands of the leg rarely present in isolation. They are frequently associated with a spectrum of distal limb deformities, most notably complex foot deformities such as congenital vertical talus and resistant talipes equinovarus (clubfoot).
Furthermore, the mechanical tethering effect of the band can lead to osseous pathology. Fractures of the tibia and fibula at the exact level of the constriction have been well-documented.
💡 Clinical Pearl: Differentiating from Congenital Pseudarthrosis
It is critical to differentiate a tibial fracture secondary to a constriction band from true congenital pseudarthrosis of the tibia (CPT). In marked contrast to CPT—which is characterized by poor osteogenic potential and a high rate of nonunion—fractures associated with constriction bands heal promptly and predictably without the need for complex biological augmentation, provided the constricting band is successfully and completely released.
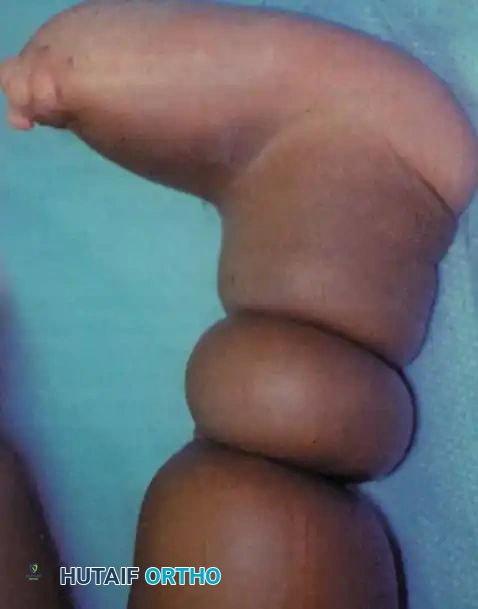
Fig. 26-59 B, Appearance after excision of constricting bands. (From Gabos PG: Modifi ed technique for the surgical treatment of congenital constriction bands of the arms and legs of infants and children, Orthopedics 29:401, 2006.)
The Association with Clubfoot
The association between congenital constricting bands and clubfoot is highly prevalent, with literature from Cowell and Hensinger, Allington et al., and Gomez reporting a prevalence ranging from 12% to 56%. The presence of a constriction band complicates the management of the clubfoot, often rendering it highly resistant to standard conservative measures such as the Ponseti method.
Prolonged bracing is universally required to prevent recurrence, and early complete soft-tissue release, combined with consideration for tendon transfers, is often necessary. Ultimately, bony surgical interventions may become unavoidable in these complex, syndromic clubfeet.
Classification of Constriction Bands
To standardize the evaluation and treatment of this condition, Hennigan and Kuo developed a comprehensive classification system based on an analysis of 135 constriction bands in 73 patients. They divided the lower extremity into four distinct anatomical zones and graded the severity of the bands.
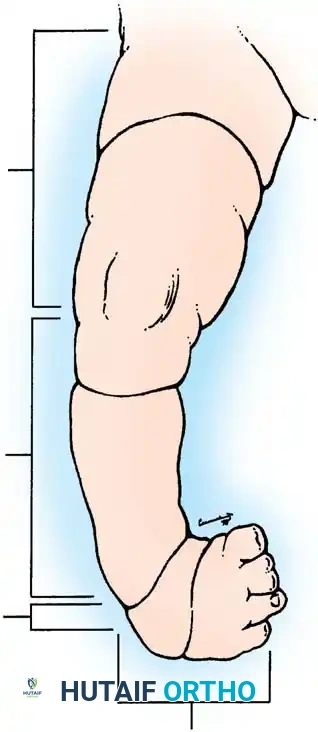
Fig. 26-60 Zones of constricting bands described by Hennigan and Kuo. (From Hennigan SP, Kuo KN: Resistant talipes equinovarus associated with congenital constriction band syndrome, J Pediatr Orthop 20:240, 2000.)
Anatomical Zones (Hennigan and Kuo)
- Zone 1: Proximal to the knee joint.
- Zone 2: Between the knee and the ankle (The most common location, accounting for 50% of all bands).
- Zone 3: At the level of the ankle and hindfoot.
- Zone 4: The forefoot and toes.
Severity Grading
- Grade 1: Mild bands involving only the superficial subcutaneous tissue.
- Grade 2: Moderate bands extending down to, but not breaching, the deep fascia.
- Grade 3: Severe bands extending through the fascia, causing significant compression that mandates surgical release.
- Grade 4: Complete congenital amputations.
In the Hennigan and Kuo series, the distribution of severity was heavily skewed toward severe pathology: 45% were Grade 4, 33% were Grade 3, 19% were Grade 2, and only 3% were Grade 1.
🚨 Surgical Warning: Neurological Deficits
Hennigan and Kuo noted that 11 of the clubfeet in their series were associated with a documented neurological deficit. Crucially, all neurological deficits occurred in children with Grade 3 bands located in Zone 2. Clubfeet in these specific children required far more numerous and extensive surgical interventions and historically yielded poorer functional outcomes compared to children without neurological impairment. Meticulous preoperative neurological assessment is mandatory.
Evolution of Surgical Management
The fundamental goal of surgery is the complete excision of the fibrotic band to restore normal lymphatic and venous drainage, relieve neurological compression, and correct the cosmetic deformity.
Traditionally, orthopedic dogma dictated that constriction bands must be released in two or three separate stages (e.g., releasing 50% of the circumference per surgery, spaced several months apart). This staged approach was driven by the fear that a simultaneous, 360-degree circumferential release would disrupt the already tenuous superficial vasculature, precipitating catastrophic vascular compromise and ischemic necrosis of the distal extremity.
However, modern pediatric orthopedic consensus has shifted dramatically. Extensive clinical experience and numerous peer-reviewed studies have demonstrated excellent results with a one-stage circumferential release. Greene, among other contemporary authors, strongly recommends a one-stage operation for all circumferential constriction bands, regardless of whether they are superficial (Grade 1) or deep (Grade 3).
Advantages of a One-Stage Release:
* Eliminates the need for multiple surgical interventions.
* Significantly reduces the cumulative risk of repeated general anesthesia in infants.
* Provides immediate, complete relief of lymphatic and venous engorgement.
* Dramatically simplifies postoperative care and cast management.
Surgical Techniques for Soft-Tissue Release
The surgical correction of a constriction band relies heavily on the principles of plastic reconstruction, specifically the utilization of Z-plasties. A Z-plasty serves two critical biomechanical functions: it lengthens the contracted surgical scar (preventing a secondary iatrogenic tourniquet effect) and it reorients the direction of the scar tension lines to break up the circumferential ring.
One-Stage Release of Circumferential Constricting Band (Greene Technique)
This technique is the modern gold standard for the definitive, single-stage management of Streeter bands.
Step-by-Step Procedure:
1. Incision and Excision: Begin by excising the entire constriction band. It is critical to excise a 1- to 2-mm margin of normal, healthy skin and subcutaneous tissue on both the proximal and distal borders of the band. This ensures complete removal of the fibrotic tissue and minimizes the risk of recurrence.
2. Deep Resection: Resect all constricted deep fascia and any underlying muscle tissue that has been converted into dense, non-functional fibrous connective tissue.
3. Neurovascular Dissection: As the skin and subcutaneous tissues are undermined, proceed with extreme caution. Identify and protect the major vascular and neurological structures (e.g., the common peroneal nerve laterally, and the posterior tibial neurovascular bundle posteromedially) both proximal and distal to the band. The anatomy is often distorted by the severe tethering.
4. Debulking: If the subcutaneous tissue distal to the band is excessively hypertrophied or edematous (a common finding due to chronic lymphatic obstruction), perform careful debulking to restore a normal limb contour.
5. Closure via Z-Plasties: Do not close the wound in a simple linear, circumferential fashion, as this will result in a constricting scar. Instead, close the skin utilizing multiple Z-plasties around the circumference of the limb. Fashion fairly large flaps with angles of exactly 60 degrees. A 60-degree Z-plasty theoretically provides a 73% increase in length along the central axis, effectively eliminating any residual circumferential tension.
Excision and Z-Plasty Reconstruction (Peet Technique)
For surgeons who prefer a slightly modified approach to the skin closure, the Peet technique offers an alternative method of breaking up the circumferential scar.
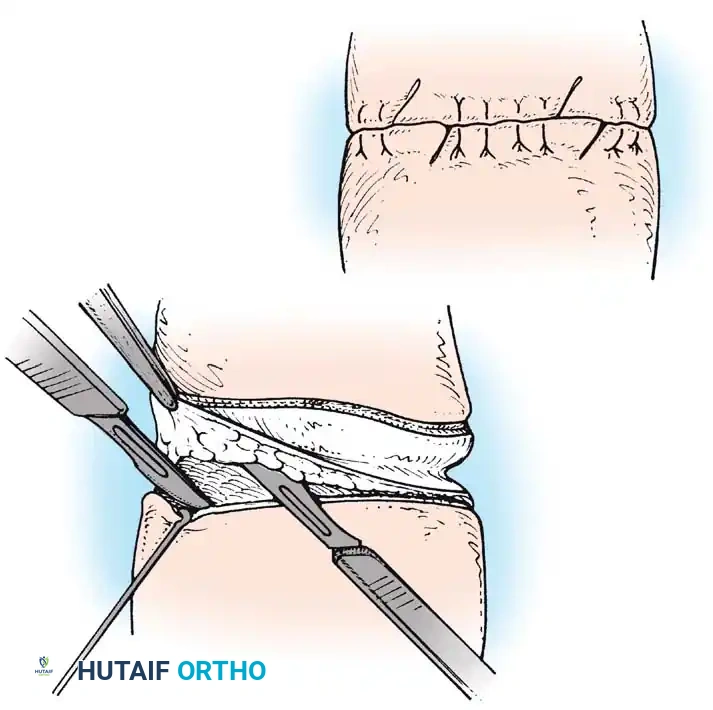
Fig. 26-61 Congenital constriction. A, Excision of constricture and undermining of skin edges. B, Skin edges have been sutured except in two areas in which Z-plasty incisions have been made. (Redrawn from Peet EW: Congenital constriction bands. In Rob C, Smith R, eds: Operative surgery, part 10, London, 1959, Butterworth.)
Step-by-Step Procedure:
1. Circumferential Excision: Remove the entire constriction by performing a circumferential excision of the skin and subcutaneous tissue down to the level of the deep fascia.
2. Incision Modification for Tapering Limbs: If the limb tapers significantly distal to the band, curve the distal incision in a serpentine or wavy line. This ensures that the total length of the distal incision matches the length of the proximal incision, preventing "dog-ear" deformities during closure.
3. Undermining: Extensively undermine the skin and subcutaneous tissue on both the proximal and distal sides of the excised area to mobilize the skin edges and reduce tension.
4. Deep Closure: Approximate the deep tissues (fascia and subcutaneous fat) with interrupted absorbable sutures to eliminate dead space.
5. Skin Approximation: Approximate the skin edges with interrupted mattress sutures around the majority of the circumference, except in one or two designated areas.
6. Z-Plasty Incorporation: In the reserved areas, lengthen the edges of the skin by designing one or more Z-plasties. The limbs of these Z-plasties should be approximately 2 cm long.
7. Flap Transposition: Raise the triangular flaps, transpose them, and suture them meticulously into position using small, interrupted non-absorbable sutures or fine absorbable sutures in young infants.
Intramedullary Stabilization of Associated Tibial Fractures and Deformities
In severe Grade 3 or Grade 4 bands, the mechanical constriction can lead to in utero fractures of the tibia and fibula, or severe anterolateral bowing. While these fractures possess excellent healing potential once the band is released, the resulting angular deformities—specifically anterolateral bowing of the tibia, valgus deformity of the ankle, and dorsiflexion deformity of the foot—must be surgically corrected to allow for normal weight-bearing.
When an osteotomy or fracture stabilization is required concurrently with the band release, intramedullary rodding is the treatment of choice.
Surgical Technique for Tibial Stabilization:
1. Distal Rod Insertion: Following the necessary corrective osteotomy at the apex of the deformity, drive the coupled intramedullary rods into the distal part of the tibia at the site of the osteotomy.
2. Joint Transfixion: Advance the rod distally across the ankle joint and the subtalar joint, driving it out through the sole of the foot via the heel pad.
* Critical Step: When the rod is placed across the ankle joint, the surgeon must manually correct the valgus deformity of the ankle and the dorsiflexion deformity of the foot. These deformities are the inevitable biomechanical consequences of weight-bearing on an anterolaterally bowed tibia. Continuous fluoroscopy is highly recommended during this step to ensure perfect alignment.
3. Retrograde Proximal Insertion: Approximate the proximal and distal tibial fragments. Drive the rod retrograde into the region of the proximal tibial metaphysis. Advance the rod nearly to the proximal tibial physis, taking extreme care not to encroach upon or violate the growth plate.
4. Rod Disengagement: Unscrew the insertion rod a single full turn. Verify the junction of the rod and the alignment of the osteotomy on a lateral fluoroscopic radiograph.
5. Final Seating: Fully disassemble (unscrew) the insertion rod and remove it, leaving the distal end of the implanted intramedullary rod securely seated in the calcaneus.
6. Bone Grafting: Pack autologous corticocancellous bone strips (harvested from the iliac crest) circumferentially around the osteotomy site. Secure these grafts with circumferential sutures of fine stainless steel or, as is preferred in modern practice, heavy absorbable sutures.
7. Closure: Close the subcutaneous tissue and skin meticulously, ensuring no tension over the bone graft site.
Postoperative Protocol and Rehabilitation
The postoperative management following the release of a constriction band, with or without concurrent tibial stabilization, requires strict immobilization and vigilant wound care.
- Immediate Postoperative Care: A sterile, mildly compressive pressure bandage is applied from proximal to the surgical site down to the distal end of the limb to control edema and prevent hematoma formation.
- Immobilization: In young children and infants, a single-hip spica cast or a robust long-leg plaster cast is applied immediately in the operating room. If intramedullary rodding was performed, the cast must adequately protect the osteotomy site and maintain the corrected alignment of the foot and ankle.
- Duration: The cast is typically worn for 2 to 3 weeks until the primary incisions and Z-plasties have fully healed. If a tibial osteotomy was performed, cast immobilization is extended until radiographic evidence of bony union is observed (usually 6 to 8 weeks).
- Long-Term Management: Following cast removal, patients with associated clubfoot deformities will require prolonged, strict adherence to a bracing protocol (e.g., Denis Browne bar and boots) to prevent the recurrence of the equinovarus deformity. Regular follow-up is mandated to monitor for any recurrence of the constriction band, though this is exceedingly rare following a properly executed Z-plasty reconstruction.
📚 Medical References
You Might Also Like