Intraoperative Fluoroscopy in Orthopedic Trauma Surgery: Precision, Principles, and Practice
Key Takeaway
Intraoperative fluoroscopy is indispensable in orthopedic trauma surgery, providing real-time imaging for precise fracture reduction and implant positioning. It minimizes malreduction risks, optimizes outcomes, and enhances surgical accuracy. Mastery of fluoroscopic principles, including anatomy and C-arm positioning, is crucial for improving functional results and reducing reoperation rates in complex orthopedic procedures.
Achieve Precision: When the Intensifier is Brought for Quality Images
Introduction & Epidemiology
Intraoperative fluoroscopy is an indispensable tool in modern orthopedic trauma surgery, enabling real-time assessment of fracture reduction, implant positioning, and overall joint congruity. The judicious application of image intensification directly correlates with optimized surgical outcomes, minimizing the risks of malreduction, hardware failure, and subsequent revision procedures. Its widespread adoption stems from its ability to provide immediate feedback, thereby enhancing the precision of complex reconstructive procedures.
Fractures constitute a significant global health burden, with an estimated incidence exceeding 180 million cases annually worldwide. The epidemiological profile varies considerably by age group and fracture type, ranging from high-energy poly-trauma in younger individuals to fragility fractures in the elderly. While non-operative management remains appropriate for a subset of fractures, a substantial proportion requires surgical intervention, where the quality of reduction and stabilization is paramount. The effective utilization of fluoroscopy contributes to improved functional outcomes, reduced operative time, and decreased rates of reoperation, which collectively impact healthcare costs and patient morbidity. Mastery of fluoroscopic principles, including patient and C-arm positioning, image interpretation, and radiation safety, is therefore a fundamental competency for all orthopedic surgeons.
Surgical Anatomy & Biomechanics
A thorough understanding of surgical anatomy and biomechanics is foundational to achieving successful fracture repair, regardless of the intraoperative imaging modality. For optimal fluoroscopic interpretation, surgeons must possess an intimate knowledge of bony landmarks, joint axes, and the expected appearance of normal and fractured anatomy in various projections.
The shoulder girdle, comprising the scapula, clavicle, and proximal humerus, exemplifies a complex region often requiring precise intraoperative imaging.
*
Proximal Humerus:
Characterized by its unique anatomy – head, anatomical neck, surgical neck, greater tuberosity, and lesser tuberosity – it forms the ball-and-socket glenohumeral joint. Fractures in this region often involve displacement of these segments, impacting rotator cuff function and joint kinematics. Biomechanically, restoration of humeral head-shaft angle, tuberosity position, and articular congruity is critical for preserving shoulder function.
*
Clavicle:
A superficial bone acting as a strut connecting the upper extremity to the axial skeleton. Its S-shape provides flexibility and protection to neurovascular structures. Fractures commonly occur in the middle third, often due to direct trauma or falls. Biomechanical considerations include maintaining clavicular length, rotation, and appropriate superior-inferior displacement to prevent shoulder impingement or neurological symptoms.
*
Glenoid:
The shallow articular surface of the scapula that articulates with the humeral head. Fractures here, often associated with high-energy trauma, demand exacting reduction to prevent post-traumatic arthritis and instability.
Beyond specific bones, general biomechanical principles guide fracture fixation. Load sharing between bone and implant, stability (absolute vs. relative), and the biology of bone healing all influence surgical strategy. Fluoroscopy aids in confirming that implants are placed in areas of optimal bone stock, avoiding neurovascular structures, and achieving the desired mechanical environment for healing. For articular fractures, precision in reduction to within 1-2 mm is often critical to minimize the risk of post-traumatic arthrosis, a precision heavily reliant on quality intraoperative imaging.
Indications & Contraindications
The decision for operative versus non-operative management of fractures is multifactorial, considering fracture morphology, patient factors, and functional demands. Fluoroscopy is an integral component of nearly all operatively treated fractures, particularly those requiring reduction and internal or external fixation.
Indications for Operative Management (Fluoroscopy Essential)
- Displaced Intra-articular Fractures: Critical for restoration of joint congruity.
- Significantly Displaced or Unstable Fractures: Unable to be maintained with non-operative methods.
- Open Fractures: Requires debridement and often urgent stabilization.
- Fractures with Neurovascular Compromise: May necessitate reduction and stabilization to decompress structures.
- Pathologic Fractures: Often require stabilization and biopsy.
- Polytrauma Patients: Expedited fixation to facilitate nursing and rehabilitation.
- Fractures in Patients with Multiple Comorbidities: May benefit from early mobilization facilitated by stable fixation.
- Nonunion or Malunion: Revision surgery often requires fluoroscopic guidance.
- Minimally Invasive Approaches: Rely heavily on fluoroscopy for indirect reduction and precise implant insertion.
Contraindications to Operative Management
Absolute contraindications are rare and typically relate to the patient's physiological status, where the risks of anesthesia and surgery outweigh the benefits of fracture fixation. Relative contraindications may influence timing or choice of surgical technique.
*
Severe Comorbidities:
Unstable medical conditions precluding safe anesthesia (e.g., acute myocardial infarction, severe uncontrolled sepsis).
*
Severe Soft Tissue Compromise:
Extensive avulsion or necrosis may necessitate delayed surgery or external fixation prior to definitive internal fixation.
*
Active Infection:
Unless directly related to an open fracture requiring debridement, active infection may delay elective fixation.
*
Non-displaced, Stable Fractures:
Often managed non-operatively.
The following table summarizes common operative versus non-operative indications:
| Indication Type | Operative Management (Fluoroscopy Utilized) | Non-Operative Management (Fluoroscopy Less Critical, if used) |
|---|---|---|
| Fracture Pattern | Displaced articular fractures, significantly displaced diaphyseal/metaphyseal fractures, unstable fracture patterns (e.g., spiral, comminuted) | Non-displaced or minimally displaced stable fractures, stress fractures (initial diagnosis often non-fluoroscopic) |
| Associated Injury | Open fractures, neurovascular compromise, compartment syndrome risk | Isolated stable fractures without soft tissue compromise |
| Patient Factors | Young, active patients requiring rapid return to function; polytrauma; inability to manage pain/immobilization | Frail elderly with low functional demands (depending on fracture); patients refusing surgery |
| Specific Scenarios | Failed non-operative treatment, impending pathologic fracture, nonunion/malunion | Certain distal radius fractures, stable ankle fractures, stable vertebral compression fractures |
Pre-Operative Planning & Patient Positioning
Optimal pre-operative planning is the cornerstone of efficient and successful fracture surgery. This involves a meticulous review of imaging (radiographs, CT scans with 3D reconstructions), templating, and anticipating potential challenges, particularly regarding intraoperative fluoroscopy. The goal is to maximize fluoroscopic access while minimizing surgical site obstruction and ensuring patient safety.
Pre-Operative Planning
- Image Review: Beyond standard AP/lateral radiographs, CT scans with 3D reconstructions are invaluable for complex articular fractures (e.g., pilon, plafond, acetabular, proximal humerus). These help visualize fracture lines, displacement, and articular involvement.
- Templating: Utilize digital templating tools to plan implant size, length, and trajectory. This mentally prepares the surgeon for fluoroscopic checks at critical junctures.
- C-arm Access Planning: Visualize the C-arm's trajectory for necessary views. Consider potential conflicts with the operating table, anesthesia equipment, and other personnel. For example, for distal femur fractures, C-arm access from the contralateral side is often optimal for lateral views.
- Team Communication: Discuss the planned positioning, necessary fluoroscopic views, and anticipated challenges with the anesthesia team, surgical technicians, and nurses.
Patient Positioning and Fluoroscopy Principles
Optimal patient position and placement of the image intensifier aids the surgeon in obtaining accurate, real-time radiographs during surgery. When radiographic images are easily accessible, total operating room (OR) time is decreased and more accurate assessment of reduction and implant placement can be achieved. Regardless of operative site, the position of the patient and image intensifier should allow maximum access to the operative field, minimize surgical site obstruction, and allow for easy duplication of necessary intraoperative biplanar imaging.
Crucial elements for optimal fluoroscopic imaging include:
*
Patient Stability:
Ensure the patient is securely positioned to prevent movement, which can compromise image quality or patient safety.
*
Table Setup:
Utilize radiolucent tables or table extensions where necessary to allow unrestricted C-arm movement.
*
C-arm Orientation:
Position the image intensifier such that the X-ray tube is below the patient and the detector is above. This minimizes scatter radiation to the surgeon's hands and eyes.
*
Maximizing Field of View:
Collimate the beam to the area of interest to reduce radiation exposure and enhance image quality.
*
Biplanar Imaging:
Plan for two orthogonal views (e.g., AP and lateral) to fully assess reduction and implant placement. This often requires careful C-arm maneuvering or strategic patient positioning to allow for easy duplication of these views without repeatedly repositioning the patient.
Upper Extremity
Fractures about the Shoulder (Proximal Humerus/Clavicle)
-
Proximal Humerus
- Patient placed in modified beach chair position.
- A bump can be placed underneath the medial border of the scapula to turn the patient slightly to the contralateral side.
- The head is secured in a position in neutral rotation and flexion and the patient’s airway tube is secured, facing the noninjured side.
-
The image intensifier is most easily brought into the field from above the patient in order to obtain necessary anteroposterior (AP) and axillary views of the surgical site.


Illustration of beach chair positioning and C-arm access for proximal humerus fractures.
-
Clavicle
- Patient typically placed supine with a bump between the scapulae to bring the clavicle into a more prominent position.
- The head is turned slightly to the contralateral side.
-
C-arm typically brought in perpendicularly to the clavicle for AP and caudal tilt views, which helps differentiate superior from inferior displacement.

Illustration of supine positioning for clavicle fracture and C-arm trajectory for AP view.
Fractures about the Elbow (Distal Humerus/Olecranon/Radial Head)
-
Distal Humerus
- Patient positioned supine, often with the arm draped free and supported on a hand table or by an assistant, allowing for gravity-assisted reduction and full range of motion.
- Alternatively, the lateral decubitus position can be used, particularly for medial or lateral column approaches.
-
The C-arm can be brought in from the contralateral side of the table for AP and lateral views, allowing unimpeded access to the elbow.

Illustration of patient and C-arm setup for distal humerus fracture.
-
Olecranon/Radial Head
- Similar to distal humerus, supine position with arm on hand table is common.
- For radial head, pronation and supination maneuvers under fluoroscopy are crucial for assessing fragment mobility and implant clearance.
- C-arm access from the ipsilateral or contralateral side, with care to maintain sterility and avoid obstruction.
Fractures about the Wrist (Distal Radius/Scaphoid)
-
Distal Radius
- Patient supine with the affected arm on a hand table.
- Finger traps with traction are often utilized for ligamentotaxis and indirect reduction.
-
The C-arm is positioned to obtain AP, lateral, and oblique views. For lateral views, the C-arm typically comes in from the axial direction, perpendicular to the forearm. For AP views, it comes from the long axis of the patient.


Illustrations of distal radius fracture setup, including C-arm for AP and lateral views.
-
Scaphoid
- Supine, arm on hand table.
- Specific scaphoid views (e.g., 45-degree pronated oblique, clenched fist) are critical to assess reduction and screw placement.
- Maintaining an axial view for screw placement is crucial to avoid hardware prominence.
Lower Extremity
Fractures about the Hip (Femoral Neck/Intertrochanteric/Subtrochanteric)
-
Femoral Neck/Intertrochanteric Fractures
- Patient supine on a fracture table, often requiring traction.
- Contralateral leg abducted to allow C-arm access.
-
The C-arm is typically brought from the perineum for AP view and from the contralateral side for the lateral (cross-table) view. Ensuring the contralateral leg is adequately abducted is vital for the lateral view.

Illustrative positioning on a fracture table for hip fractures, showing C-arm trajectory for AP view.

C-arm for lateral view for hip fractures.

Another view of C-arm for lateral hip fluoroscopy.
-
Subtrochanteric Fractures
- Similar positioning to hip fractures, often with a fracture table.
- Care must be taken to ensure the entire fracture pattern, including the distal extent of the nail, is visualized in both planes. This may require "sweeping" the C-arm along the femur.
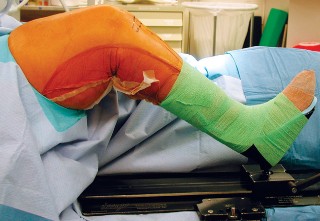
Fractures about the Knee (Distal Femur/Tibial Plateau/Patella)
-
Distal Femur
- Patient supine on a radiolucent table.
- For intramedullary nailing, a fracture table may be used. For plate fixation, a standard table with bolsters can suffice.
-
C-arm access from the contralateral side for AP and lateral views. For nailing, the starting point and distal locking screws are critical fluoroscopic checks.

Patient and C-arm setup for distal femur fracture.
-
Tibial Plateau
- Patient supine, with the knee often flexed over a bolster to open the joint and allow for gravity reduction of depressed fragments.
-
AP, lateral, and oblique views (e.g., 10-20 degrees caudal tilt) are critical to assess articular reduction, screw length, and screw trajectory.

C-arm positioning for tibial plateau fracture.
-
Patella
- Supine position, leg flat.
- AP and lateral views are sufficient. Lateral view is essential to ensure adequate compression and contouring of tension band wiring.
Fractures about the Ankle (Pilon/Plafond/Malleolar)
-
Pilon/Plafond Fractures
- Patient supine with the foot often suspended in traction or supported on a radiolucent bolster.
-
AP, lateral, and various oblique views (e.g., mortise view) are paramount for articular reduction and implant placement. The plafond view (15-20 degrees internal rotation with 10 degrees caudal tilt) is critical for assessing anterior plafond.

Illustration for pilon fracture setup.
-
Malleolar Fractures
- Supine position, leg flat.
-
AP, lateral, and mortise views. The mortise view is essential to assess syndesmotic integrity and talar shift.

C-arm for ankle fracture views.
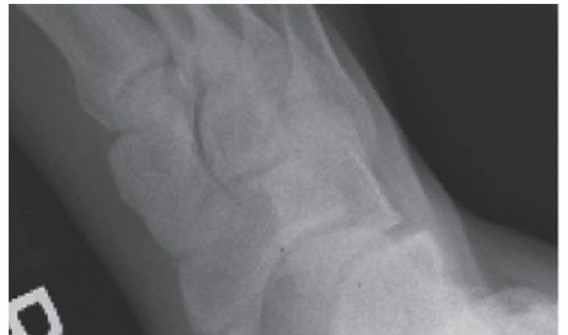
Foot Fractures (Calcaneus/Talus/Midfoot)
-
Calcaneus
- Patient lateral decubitus for many approaches (e.g., lateral approach). Supine for others.
-
Broden's view (various degrees of oblique, internal rotation with dorsiflexion) and axial views are essential for assessing posterior facet and tuberosity reduction.

C-arm positioning for calcaneus fracture.
-
Talus
- Supine.
-
AP, lateral, and Canale views are critical for neck and body fractures.

C-arm positioning for talus fracture.
Pelvis & Acetabulum
-
Pelvis
- Patient supine.
-
Inlet and outlet views (AP with caudal and cranial tilt, respectively) are crucial for assessing anterior-posterior and vertical displacement.

C-arm for inlet view of the pelvis.

C-arm for outlet view of the pelvis.
-
Acetabulum
- Patient lateral decubitus for posterior approaches, supine for ilioinguinal.
-
AP, Judet (obturator and iliac oblique) views are indispensable. 3D fluoroscopy can also be highly beneficial.


C-arm for Judet views for acetabular fractures.
Spine
-
Thoracolumbar Spine
- Patient prone on a radiolucent frame (e.g., Jackson table) or supine for anterior approaches.
-
AP and lateral views are essential for pedicle screw placement and assessing sagittal and coronal alignment.

C-arm for AP view of the thoracolumbar spine.

C-arm for lateral view of the thoracolumbar spine.
Detailed Surgical Approach / Technique
The "Detailed Surgical Approach / Technique" for fracture surgery is highly dependent on the specific fracture, its location, morphology, and patient factors. However, the overarching principles of exposure, reduction, and fixation are universally applied, with fluoroscopy serving as the constant real-time guide. We will elaborate using principles applicable across various fracture types and briefly revisit the proximal humerus as a specific example.
General Principles of Fracture Surgery with Fluoroscopic Guidance
-
Incision and Exposure:
- Careful planning of the incision is critical to avoid vital neurovascular structures, provide adequate access to the fracture, and ensure viable soft tissue coverage for healing.
- Internervous planes are often utilized to minimize muscle disruption and facilitate exposure.
-
Fluoroscopy can be used to confirm anatomical location prior to incision, especially in percutaneous approaches or for identifying superficial landmarks.

Depicts a surgical field, likely requiring fluoroscopic confirmation of depth and trajectory.
-
Reduction Techniques:
- Direct Reduction: Involves direct manipulation of fracture fragments using reduction clamps, bone hooks, or elevators. Fluoroscopy is used to confirm the anatomical alignment achieved.
- Indirect Reduction (Ligamentotaxis): Utilizes traction (e.g., on a fracture table or via finger traps) to restore length and alignment through tension on surrounding soft tissues. Fluoroscopy is indispensable here for monitoring reduction progress without direct visualization.
-
Percutaneous Reduction:
Using instruments (e.g., Kirschner wires, small manipulators) inserted through small stab incisions to reduce fragments, guided entirely by fluoroscopy. This minimizes soft tissue stripping.

Illustrates a reduction maneuver, where fluoroscopy would confirm alignment.
-
Provisional Fixation:
- Once reduction is achieved, it is often held with provisional fixation such as Kirschner wires, provisional clamps, or external fixators.
- Fluoroscopy confirms the provisional reduction and the appropriate placement of temporary hardware, ensuring it does not impede definitive fixation or compromise neurovascular structures.
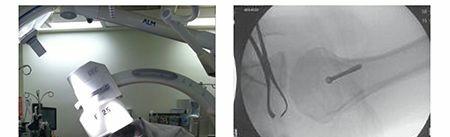
-
Definitive Fixation:
- The choice of implant (plates, screws, intramedullary nails, external fixators) depends on the fracture pattern, bone quality, and biomechanical requirements.
-
Fluoroscopy guides the insertion of all definitive hardware, confirming appropriate length, trajectory, and position relative to the fracture and articular surfaces. For example, ensuring screws are bicortical without joint penetration, or that an intramedullary nail is centered and locked correctly.


These images likely depict implant insertion or checking screw length/position under fluoroscopy.
-
Intraoperative Fluoroscopic Checks:
- Pre-incision: Confirm anatomical landmarks and fracture configuration.
- Post-reduction: Verify anatomical reduction in multiple planes (AP, lateral, oblique).
- Post-provisional Fixation: Ensure reduction is maintained and temporary implants are correctly placed.
- During Definitive Fixation: Confirm screw lengths, trajectories, and plate/nail position. Crucial for avoiding joint penetration or neurovascular impingement.
-
Post-fixation:
Final assessment of reduction quality, hardware placement, and range of motion (if applicable to assess impingement).

Likely a post-fixation fluoroscopic image demonstrating the final construct.
Example: Proximal Humerus Fracture ORIF (Modified Beach Chair Position)
Utilizing the modified beach chair position as previously detailed:
- Exposure: A deltopectoral approach is commonly used. The cephalic vein is identified and typically retracted laterally. The deltoid and pectoralis major muscles are identified. The fracture site is exposed, carefully dissecting through the periosteum and any hematoma.
-
Reduction:
- Often, initial traction and external rotation of the arm can aid in indirect reduction via ligamentotaxis.
- For displaced tuberosities, k-wires or sutures may be used to manipulate them into anatomical position.
- A joystick technique with a K-wire in the humeral head can facilitate reduction of impacted or severely displaced fragments.
- Fluoroscopic Check: Obtain AP and axillary views to confirm preliminary reduction. The axillary view is critical for assessing head-shaft angle and medial calcar support.
-
Provisional Fixation:
K-wires are placed to hold the head fragment to the shaft and secure tuberosity fragments.
- Fluoroscopic Check: Re-check AP and axillary views to ensure provisional stability and maintain reduction.
-
Definitive Fixation (e.g., Locking Plate):
- A locking plate is contoured and applied to the lateral aspect of the proximal humerus, respecting the deltoid insertion. The plate is typically positioned 5-8 mm distal to the superior aspect of the greater tuberosity.
- Fluoroscopic Check: Confirm plate position relative to the articular surface. Ensure screws in the humeral head are adequately long without penetrating the joint, and diverge to capture multiple fragments. This often requires careful manipulation of the C-arm to obtain multiple oblique views to rule out intra-articular screw penetration, especially in the setting of osteoporotic bone.
- Distal screws are then inserted through the plate into the humeral shaft.
- Fluoroscopic Check: Confirm distal screw length and position.
-
Final Assessment:
- Once all screws are inserted, perform a final set of AP and axillary fluoroscopic images to ensure satisfactory reduction, hardware position, and absence of intra-articular screw penetration.
- Assess passive range of motion to ensure no impingement of hardware.
Complications & Management
Despite meticulous surgical technique and optimal fluoroscopic guidance, complications can occur in fracture surgery. Prompt recognition and appropriate management are crucial for salvage and optimizing patient outcomes.
General Complications
-
Infection:
- Incidence: Varies by fracture type, location, and patient comorbidities (e.g., 1-5% for closed fractures, up to 30% for severe open fractures).
- Management: Prompt debridement, appropriate antibiotic therapy, wound irrigation, and potentially hardware removal if infection persists or bone healing is not progressing. Negative pressure wound therapy can be beneficial.
-
Nonunion/Delayed Union:
- Incidence: 5-10% in long bone fractures, higher in specific anatomical locations (e.g., scaphoid, tibial diaphysis) or in patients with risk factors (smoking, NSAIDs, malnutrition).
- Management: Revision surgery with bone grafting (autograft or allograft), exchange nailing, or plate revision with biological augmentation. Addressing mechanical instability is paramount.
-
Malunion:
- Incidence: Highly variable, dependent on fracture location and acceptable alignment thresholds. More common with non-operative treatment or inadequate reduction.
- Management: Corrective osteotomy and fixation if symptomatic (pain, functional limitation, joint degeneration). Asymptomatic malunions may be observed.
-
Neurovascular Injury:
- Incidence: Rare (typically <1-2%), but devastating. Can occur intraoperatively from direct trauma during dissection, reduction maneuvers, or screw penetration.
- Management: Immediate recognition, intraoperative consultation with vascular/neurosurgery, repair/ligation of vessels, nerve grafting/neurolysis as indicated. Prevention through careful dissection and fluoroscopic confirmation of implant trajectory is key.
-
Hardware Failure:
- Incidence: Varies by implant type, fracture stability, and patient compliance, 2-10%. Can manifest as screw pullout, plate breakage, or nail bending/fracture.
- Management: Revision surgery with stronger constructs, bone grafting, or alternative fixation methods. Often indicative of underlying nonunion or excessive stress on the implant.
Complications Related to Fluoroscopy
-
Radiation Exposure:
- Incidence: Universal. While often minimal per case, cumulative exposure over a surgeon's career can be significant. Patient exposure also a concern.
-
Management:
Adherence to ALARA (As Low As Reasonably Achievable) principles:
- Minimize fluoroscopy time.
- Maximize distance from the X-ray source.
- Use lead protection (aprons, thyroid shields, glasses).
- Optimize C-arm positioning (X-ray tube below patient).
- Collimation to the area of interest.
-
Poor Image Quality:
- Incidence: Common, especially in obese patients or with suboptimal C-arm setup.
- Management: Adjust C-arm settings (kVp, mA), ensure proper positioning, use pulsed fluoroscopy, remove obstructive drapes or equipment. Consider digital subtraction angiography or 3D fluoroscopy for complex cases.
-
C-arm Malfunction/Obstruction:
- Incidence: Infrequent but disruptive.
- Management: Pre-operative check of C-arm functionality. Ensure OR layout minimizes obstruction. Troubleshoot with radiology technician.
The following table summarizes common complications, their incidence, and salvage strategies:
| Complication | Incidence (Approx.) | Salvage Strategies |
|---|---|---|
| Infection | 1-30% | Debridement, targeted antibiotics, irrigation, hardware removal (if persistent/non-healing), negative pressure wound therapy. |
| Nonunion/Delayed Union | 5-10% | Revision surgery with bone grafting (autograft/allograft), exchange nailing, plate revision, biological augmentation, correct mechanical instability. |
| Malunion | Variable | Corrective osteotomy and fixation if symptomatic; observation if asymptomatic. |
| Neurovascular Injury | <1-2% | Immediate repair/ligation (vascular), nerve grafting/neurolysis, decompression. Prevention through careful technique and fluoroscopic confirmation. |
| Hardware Failure | 2-10% | Revision surgery with stronger construct, bone grafting, alternative fixation; addressing underlying nonunion. |
| Radiation Exposure | Universal | Adherence to ALARA principles: minimize time, maximize distance, lead protection, optimal C-arm orientation (tube below). |
| Poor Image Quality | Common | Optimize C-arm settings, proper positioning, pulsed fluoroscopy, collimation, remove obstructions, consider 3D imaging. |
Post-Operative Rehabilitation Protocols
Post-operative rehabilitation is as critical as the surgery itself in achieving optimal patient outcomes. Protocols are tailored to the specific fracture, method of fixation, stability of the construct, and individual patient factors. The primary goals include pain management, preventing stiffness, restoring range of motion, and regaining strength and function.
General Principles
- Pain Management: Adequate analgesia is essential to facilitate early motion and participation in therapy.
-
Immobilization vs. Early Motion:
- Stable Fixation: Allows for early protected range of motion (ROM) to prevent stiffness, particularly important for articular fractures (e.g., elbow, ankle).
- Less Stable Fixation/Comminuted Fractures: May require a period of immobilization (splint, brace) before initiating controlled ROM exercises.
-
Weight-Bearing Status:
- Non-Weight Bearing (NWB): For lower extremity fractures with less stable fixation or extensive articular involvement.
- Touch-Down Weight Bearing (TDWB) / Partial Weight Bearing (PWB): Gradual progression for constructs that can tolerate some load.
- Weight Bearing As Tolerated (WBAT): For stable constructs, typically after initial pain subsides.
- Progressive Strengthening: Once adequate healing and ROM are achieved, strengthening exercises are initiated, progressing from isometric to isotonic and functional activities.
- Proprioception and Balance Training: Crucial for lower extremity injuries to restore neuromuscular control.
Specific Examples (Protocols are guidelines and often surgeon-specific)
Proximal Humerus Fractures (ORIF)
-
Phase I (0-6 weeks): Protection and Early Motion
- Sling immobilization for comfort and protection (often removed for hygiene and exercises).
- Pendulum exercises, passive ROM (forward flexion, external rotation) limited to 90 degrees or less initially, avoiding active elevation or internal rotation against resistance.
- Focus on scapular stabilization.
-
Phase II (6-12 weeks): Controlled Active Motion and Early Strengthening
- Gradual progression to active-assisted ROM, then active ROM.
- Isometric strengthening exercises for rotator cuff and deltoid.
- Initiate light strengthening with resistance bands.
-
Phase III (12+ weeks): Advanced Strengthening and Return to Activity
- Progressive resistive exercises.
- Sport-specific or work-specific rehabilitation.
- Gradual return to full activities, often taking 6-12 months.
Distal Radius Fractures (ORIF)
-
Phase I (0-2 weeks): Immobilization and Edema Control
- Removable volar splint for comfort and protection.
- Finger ROM exercises, elbow and shoulder ROM.
- Edema management (elevation, compression).
-
Phase II (2-6 weeks): Early ROM and Gentle Strengthening
- Initiate active and passive wrist ROM (flexion, extension, pronation, supination).
- Light grip strengthening.
- Scar massage.
-
Phase III (6+ weeks): Progressive Strengthening and Return to Function
- Progressive resistive exercises for grip, wrist flexion/extension, forearm rotation.
- Return to light functional activities, progressing as tolerated.
- Full recovery may take several months to a year.
Tibial Plateau Fractures (ORIF)
-
Phase I (0-6/8 weeks): Non-Weight Bearing and Protected Motion
- Brace locked in extension or limited ROM.
- Non-weight bearing (NWB) with crutches.
- Passive/active-assisted knee ROM (usually 0-90 degrees initially).
- Quadriceps setting, straight leg raises.
-
Phase II (6/8-12 weeks): Gradual Weight Bearing and Increased ROM
- Progressive weight bearing (TDWB to PWB) as radiographic healing permits.
- Gradual increase in knee ROM.
- Initiate gentle strengthening exercises.
-
Phase III (12+ weeks): Full Weight Bearing and Advanced Strengthening
- Full weight bearing (FWB) as tolerated.
- Progressive strengthening, balance, and proprioceptive training.
- Return to high-impact activities typically deferred until 6-12 months.
Radiographic evidence of healing is a critical determinant in advancing rehabilitation protocols, with follow-up fluoroscopy or plain radiographs often confirming callus formation and stability before increasing load or activity.
Summary of Key Literature / Guidelines
The principles and techniques of fracture management, including the optimal use of intraoperative fluoroscopy, are continuously refined through research and clinical experience. Several key bodies and literature sources provide foundational and evolving guidance for orthopedic trauma surgeons.
-
AO Foundation (Arbeitsgemeinschaft für Osteosynthesefragen): The AO Principles of Fracture Management are universally recognized. Their comprehensive educational resources, textbooks, and courses emphasize stable fixation, preservation of blood supply, anatomical reduction (especially for articular fractures), and early, safe mobilization. The AO philosophy underpins many of the fluoroscopic techniques described, focusing on the precision required for stable constructs and optimal healing.
- Key publication: AO Principles of Fracture Management (Rüedi, Buckley, Moran).
- Emphasis on indirect reduction techniques for preserving soft tissue, which rely heavily on fluoroscopic guidance.
-
American Academy of Orthopaedic Surgeons (AAOS): The AAOS publishes clinical practice guidelines and appropriate use criteria for a wide range of orthopedic conditions, including fractures. These guidelines are evidence-based and provide recommendations for diagnosis, treatment, and rehabilitation. While not always focused solely on fluoroscopy, they indirectly endorse its use by recommending precise reduction and fixation techniques.
-
Journal of Orthopaedic Trauma (JOT): The premier journal for orthopedic trauma surgeons, JOT consistently publishes original research, review articles, and case reports on fracture management. Articles often detail novel surgical techniques, outcome studies for different fixation methods, and strategies for minimizing complications, frequently highlighting the role of intraoperative imaging.
-
Major Orthopedic Trauma Textbooks: Comprehensive texts such as Skeletal Trauma: Basic Science, Management, and Reconstruction (Browner, Jupiter, Levine, Trafton) and Rockwood and Green's Fractures in Adults (Bucholz, Heckman, Court-Brown, Tornetta) serve as definitive references. These books dedicate significant sections to surgical approaches, reduction techniques, and detailed discussions on the use of fluoroscopy for specific fracture types, often including step-by-step guides and illustrative images.
-
Radiation Safety Guidelines: Organizations such as the American College of Radiology (ACR) and the International Atomic Energy Agency (IAEA) provide guidelines on radiation protection. Orthopedic surgeons are expected to be proficient in these guidelines, implementing ALARA principles to minimize exposure for both patients and the surgical team. Regular training and monitoring of radiation dosimetry are essential components of safe practice.
-
Advances in Imaging Technology: Ongoing research and development in fluoroscopic technology (e.g., 3D C-arms, low-dose fluoroscopy, image fusion with pre-operative CT) continue to enhance precision and reduce radiation. Surgeons must stay abreast of these advancements to integrate them judiciously into practice.
In conclusion, optimal intraoperative imaging is not merely an adjunct but a central tenet of successful fracture surgery. The principles of meticulous patient positioning, strategic C-arm placement, and diligent image interpretation, as described, are paramount to achieving precision in fracture reduction and fixation, ultimately leading to superior patient outcomes.
Clinical & Radiographic Imaging


You Might Also Like