Mastering Double-Tunnel PCL Reconstruction and Patellofemoral Pathology
Key Takeaway
Double-tunnel posterior cruciate ligament (PCL) reconstruction restores native knee kinematics by recreating both the anterolateral and posteromedial bundles. This advanced technique utilizes dual femoral tunnels and a single tibial tunnel or inlay to optimize graft tensioning across the flexion arc. Concurrently, addressing patellofemoral pathology, such as chondromalacia and lateral compression syndrome, requires precise clinical evaluation, including patellar tilt and glide tests, to determine appropriate conservative or surgical interventions.
Introduction to Posterior Cruciate Ligament Biomechanics and Reconstruction
The posterior cruciate ligament (PCL) is the primary restraint to posterior tibial translation, bearing the brunt of posterior shear forces across the knee joint. Anatomically, the PCL is composed of two distinct functional bundles: the larger, stiffer anterolateral (AL) bundle, which is maximally tensioned in knee flexion, and the smaller posteromedial (PM) bundle, which becomes taut in extension. Traditional single-bundle PCL reconstructions primarily recreate the AL bundle, which can leave residual laxity in extension.
To achieve superior kinematic restoration, the double-tunnel PCL reconstruction technique (as championed by Clancy and Bisson) was developed. By utilizing two distinct femoral tunnels, the surgeon can independently tension the AL and PM grafts at their respective optimal flexion angles, thereby recreating the native biomechanical profile of the knee joint.
Double-Tunnel PCL Reconstruction: Surgical Technique
Graft Selection and Harvest
The success of a double-bundle reconstruction relies heavily on robust graft material capable of withstanding the high tensile loads experienced by the PCL.
- Patellar Tendon Autograft: Harvest a central bone-patellar tendon-bone (BTB) plug measuring 10 mm in width and 10 to 20 mm in length from the patella and tibial tubercle.
- Quadriceps Tendon Autograft: Alternatively, a quadriceps tendon graft can be harvested through a separate small incision superior to the patella, yielding a graft 8 mm wide by 10 to 20 mm long.
- Hamstring Autograft: The semitendinosus tendon can be harvested through an inferior incision and doubled over itself to form a robust, double-strength graft.
Once harvested, prepare the grafts on the back table. Place three No. 5 Ethibond whipstitches in each end of the tendinous portions of the grafts to facilitate later passage and fixation.
Patient Positioning and Diagnostic Arthroscopy
Place the patient supine on the operating table with a lateral post and foot positioner to allow dynamic manipulation of the knee past 90 degrees of flexion. A tourniquet is applied to the proximal thigh. Standard anterolateral and anteromedial portals are established.
🔪 Surgical Pearl: The Posteromedial Portal
Establishing a posteromedial safety portal is mandatory during PCL reconstruction. This allows direct visualization of the posterior tibial facet, ensuring that the guide pin and reamers do not inadvertently advance into the popliteal fossa, which houses the critical popliteal neurovascular bundle.
Thoroughly débride the PCL remnant from the medial femoral condyle and the tibial insertion site using an arthroscopic shaver and radiofrequency ablation wand.
Tibial Tunnel Preparation
The creation of the tibial tunnel is one of the most technically demanding aspects of PCL reconstruction. The goal is to create a vertical tunnel that minimizes the acute angle (the "killer turn") at the proximal tibial exit, which can cause premature graft abrasion and failure.
- Identify the anatomical footprint of the PCL insertion on the posterior tibial facet.
- Introduce a tibial guide through the anteromedial portal and position its tip at the center of the PCL footprint.
- Drive a guide pin from the anterior tibia—starting approximately 12 to 15 mm distal to the site of the tibial tubercle graft harvest—aiming for the center of the PCL insertion.
- Trajectory Warning: The entry point is critical. It must create a vertical trajectory. Drilling a hole that enters too far medial or lateral to the tibial tubercle will create an oblique exit hole in the tibial fovea, resulting in eccentric graft placement.
- With the arthroscope in the posteromedial portal to monitor the posterior capsule, over-ream the guide pin first with a 10-mm reamer, followed by a 12-mm reamer.
- Débride the foveal site of any remaining osseous debris or soft tissue.
- Pass a No. 5 Ethibond passing suture through the tibial tunnel and retrieve it out of the central fat pad portal for later graft passage.
Femoral Tunnel Preparation
The double-tunnel technique requires the creation of two distinct femoral tunnels within the anatomical footprint of the PCL on the medial femoral condyle. The remaining native PCL fibers serve as an excellent anatomical landmark.
- Anterior Proximal Tunnel (AL Bundle): Use a small (00) curette to mark the site. The guide pin should enter the intracondylar notch at the 10:30-o’clock position in a left knee (1:30-o’clock in a right knee), approximately 6 mm posterior to the articular cartilage margin of the medial femoral condyle. Over-ream with a 10-mm reamer.
- Posterior Distal Tunnel (PM Bundle): Place this tunnel approximately 5 mm posterior and 5 mm distal to the anterior proximal tunnel. Ensure both tunnels remain entirely anterior to the medial condylar ridge. Over-ream with an 8-mm reamer.
- Bony Bridge Integrity: It is imperative to maintain a 3- to 4-mm intact bony bridge between the two tunnels to prevent confluence and subsequent loss of fixation.
- Alternative Positioning (Noyes): Noyes advocates for the 1-o’clock and 3-o’clock positions, placed 6 mm and 8 mm off the articular surface, respectively, utilizing a two-limb quadriceps graft.
Endoscopic vs. Open Reaming:
- Open Technique: Make an incision over the vastus medialis at the adductor tubercle. Elevate the vastus medialis anteriorly and use an outside-in vector guide to drill the tunnels.
- Endoscopic Technique: Utilize specialized flexible guide pins and reamers to drill the tunnels from the inside out (transportal). Ream each tunnel to a depth of 25 to 30 mm, then use a 4.5-mm drill to breach the medial femoral cortex for EndoButton deployment.
Pass two No. 5 Ethibond sutures through these femoral tunnels and retrieve them through the central portal.
Graft Passage and Differential Tensioning
- Femoral Fixation: Pass the grafts into the femoral tunnels using the previously placed passing sutures. Introduce the quadriceps or semitendinosus graft (PM bundle) first, fixing it to the medial femoral condyle using an EndoButton (endoscopic) or simple button (open). Subsequently, pass and fix the patellar tendon graft (AL bundle).
- Tibial Passage: Once secured proximally, pass both grafts through the central fat pad portal and down into the tibial tunnel.
- Turning the Corner: Applying a strong anterior drawer maneuver to the tibia during downward graft passage helps the grafts navigate the acute angle at the proximal tibial tunnel aperture. A specialized smooth graft passer can also facilitate this step.
- Tibial Fixation and Tensioning:
- Fix the patellar tendon graft (AL bundle) first. Tension it while the knee is held at 90 degrees of flexion with a concurrent anterior drawer force applied to restore the normal tibial step-off. Tie the sutures over a screw and washer.
- Next, tension the quadriceps or hamstring graft (PM bundle) with the knee at 30 degrees of flexion. Tie these sutures over the same tibial screw and washer assembly.
- Thoroughly irrigate the joint and close the wounds in a standard layered fashion.
The Tibial Inlay Technique
To completely circumvent the biomechanical disadvantage of the "killer turn" associated with transtibial tunnels, the Tibial Inlay Technique was developed (originally described by Verdonk, and popularized by Burks and Schaffer).
💡 Biomechanical Rationale
The inlay technique allows for direct bone-to-bone fixation of a tibial bone plug into a surgically created trough at the anatomical PCL insertion site on the posterior tibia. This eliminates acute graft angle changes, reduces graft abrasion, and creates a shorter, stiffer, and more biomechanically sound construct.
Surgical Approach:
This technique requires access to both the anterior and posterior compartments of the knee.
- Positioning: Miller et al. described placing the patient in the lateral decubitus position (injured side up). The hip is externally rotated for the arthroscopic anterior work, then the knee is extended and supported on a Mayo stand for the posterior open approach.
- Figure-of-Four Alternative: A highly effective alternative is placing a bump under the contralateral hip and positioning the operative leg in a figure-of-four position. The surgeon operates from the contralateral side of the table, utilizing table tilt for optimal visualization.
- The posterior approach utilizes the interval between the medial head of the gastrocnemius and the semimembranosus to expose the posterior capsule and tibial facet, allowing for precise creation of the bony trough and direct screw fixation of the graft.
Postoperative Rehabilitation Protocol
Rehabilitation following PCL reconstruction must be meticulously phased to protect the healing graft from posterior tibial sag while restoring range of motion (ROM) and strength.
- Phase I (Immediate Postoperative, Days 1-14): Begin on postoperative day 1. The patient is allowed 50% weight-bearing as tolerated with bilateral crutches. The knee is braced in full extension. Exercises include ankle pumps, hip strengthening, and passive knee extensions from 60 to 0 degrees. Avoid active hamstring contraction.
- Phase II (Weeks 2-6): Progress to full weight-bearing. Initiate multiangle quadriceps and isometric exercises at 60, 40, and 20 degrees. Introduce shallow leg presses and squats (0 to 60 degrees) and well-leg bicycling. By week 4, ROM should reach 90 degrees of flexion. Pool therapy can commence at week 5.
- Phase III (Weeks 6-12): Begin swimming, closed kinetic chain rehabilitation, and a structured stretching program to maximize quadriceps strength.
- Phase IV (Weeks 12-16): Introduce lateral step-ups, endurance cycling (30+ minutes), and light hamstring curls (0 to 60 degrees).
- Phase V (Months 5-6+): Advance to plyometric exercises, agility, and balance drills. Return to competitive sports is permitted only when KT-2000 arthrometer testing, isokinetic strength testing, and functional hop tests yield symmetrical and satisfactory results.
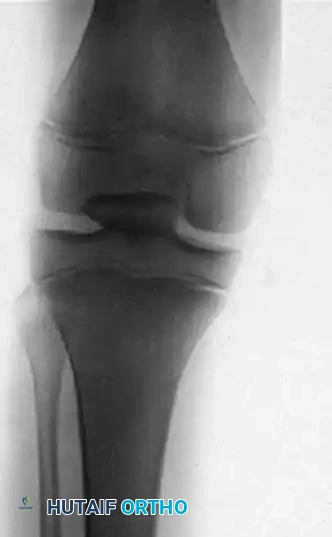
Chondromalacia of the Patella and Patellofemoral Syndromes
Patellofemoral pathology frequently coexists with ligamentous instability or presents as an isolated source of anterior knee pain. "Chondromalacia" refers specifically to the pathological softening, fibrillation, and degradation of the articular cartilage of the patella.
Modified Outerbridge (Insall) Classification
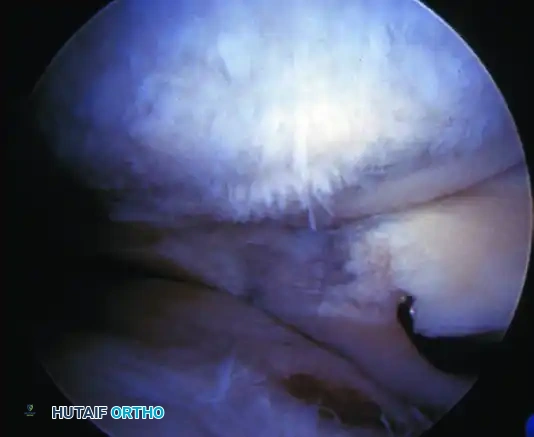
Arthroscopic evaluation of chondromalacia is graded to guide treatment:
- Grade I: Softening and swelling (blistering) of the articular cartilage.
- Grade II: Fragmentation and fissuring confined to an area ≤ 0.5 inches in diameter.
- Grade III: Severe fragmentation and fissuring involving an area > 0.5 inches in diameter (often described as a "crabmeat" appearance).
- Grade IV: Full-thickness erosion of cartilage down to exposed subchondral bone.
Conservative Management
The cornerstone of treating patellofemoral pain syndrome and early chondromalacia is non-operative. Emphasis is placed on:
1. Maximizing lower extremity flexibility (hamstrings, IT band, gastrocnemius).
2. Targeted strengthening of the vastus medialis obliquus (VMO) to improve dynamic medial patellar tracking.
3. Utilizing closed kinetic chain exercises to minimize patellofemoral joint reactive forces.
4. Patellar taping (McConnell) or dynamic bracing.
5. Correcting hyperpronation of the foot with custom orthotics to reduce compensatory internal tibial rotation and subsequent increased Q-angle.
Surgical Intervention and Lateral Retinacular Release
If prolonged, exhaustive conservative management fails, surgical intervention may be warranted. Patient selection is paramount; the surgeon must evaluate lower extremity alignment, ligamentous laxity, and patient goals.
For isolated Grade II or early Grade III chondromalacia without significant malalignment, arthroscopic mechanical débridement (chondroplasty) to stabilize unstable cartilage flaps is often sufficient.
Indications for Lateral Release:
Lateral retinacular release is strictly indicated for excessive lateral pressure syndrome that is unresponsive to therapy, or for lateral facet arthritis combined with the excision of a painful lateral osteophyte.
🚨 Surgical Warning: Isolated Lateral Release
Isolated lateral release is not an effective treatment for episodic patellar instability. Performing a lateral release in a hypermobile patella can compound the instability and exacerbate quadriceps weakness. Kolowich et al. demonstrated that success is highly predictable only in patients with a true preoperative diagnosis of lateral patellar compression syndrome.
Clinical Evaluation of Patellar Tracking
To determine the appropriateness of a lateral release, three critical clinical tests must be performed:
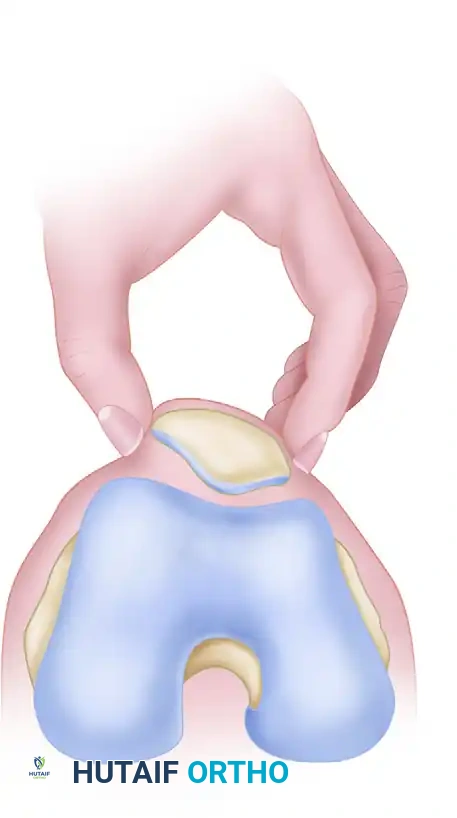
1. Passive Patellar Tilt Test
This test evaluates the tightness of the lateral retinaculum.
- Technique: The patient lies supine with the knee fully extended and the quadriceps relaxed. The examiner attempts to lift the lateral edge of the patella away from the lateral femoral condyle.
- Interpretation: The patella should remain seated in the trochlea. An excessively tight lateral restraint is diagnosed when the patella cannot be lifted past the horizontal plane, demonstrating a neutral or negative angle.
2. Patellar Glide Test
This test assesses the integrity and tension of both the medial and lateral restraints.
- Technique: The knee is flexed to 20 to 30 degrees (often supported by a small pillow) to engage the patella in the trochlear groove. The quadriceps must be completely relaxed. The patella is conceptually divided into four longitudinal quadrants. The examiner applies medial and lateral displacing forces.
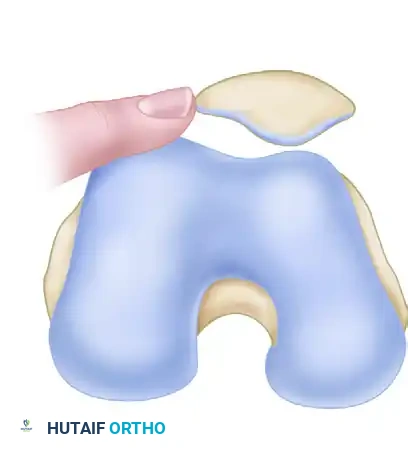
- Interpretation:
- A lateral glide of ≥ 3 quadrants indicates an incompetent medial restraint (e.g., torn MPFL).
- A medial glide of ≤ 1 quadrant indicates a pathologically tight lateral retinaculum.
- A medial glide of ≥ 3 quadrants suggests a globally hypermobile patella.
- Ideal candidate for lateral release: Medial and lateral glide of 2 quadrants or less, combined with a negative tilt test.
3. Tuberosity-Sulcus Angle and Radiographic Evaluation
- Tuberosity-Sulcus Angle: Measured with the knee at 90 degrees of flexion. It is the angle formed by a line from the center of the patella to the center of the tibial tuberosity, intersecting a line drawn perpendicular to the transepicondylar axis. A normal angle is 0 degrees; an angle > 10 degrees is distinctly abnormal and indicates lateralization of the tibial tubercle.
- Traditional Q-Angle: Measured in extension from the ASIS to the center of the patella, extending to the tibial tubercle.
- Radiography: Standard evaluation must include weight-bearing AP, 45-degree lateral, and 45-degree Merchant axial views to assess patellar tilt, subluxation, and the Insall-Salvati ratio for patella alta or baja.
When performing a lateral release, the surgeon must ensure the release extends through the lateral retinaculum up to, but strictly excluding, the muscular fibers of the vastus lateralis to preserve dynamic extensor function.
📚 Medical References
- PCL reconstruction, Arthroscopy 13:325, 1997.
- Noyes FR: Anatomic reconstruction of the posterior cruciate ligament after multiligament knee injuries. A combination of the tibial-inlay and two-femoral-tunnel techniques, Am J Sports Med 31:812, 2003.
- Noyes FR, Barber-Westin SD: Posterior cruciate ligament allograft reconstruction with and without a ligament augmentation device, Arthroscopy 10:371, 1994.
- Nyland J, Hester P, Caborn DN: Double-bundle posterior cruciate ligament reconstruction with allograft tissue: 2-year postoperative outcomes, Knee Surg Sports Traumatol Arthrosc 10:274, 2002.
- Ogata K, McCarthy JA, Dunlap J, et al: Pathomechanics of posterior sag of the tibia in posterior cruciate–defi cient knees: an experimental study, Am J Sports Med 16:630, 1988.
- Park SE, Stamos BD, DeFrate LE, et al: The effect of posterior
You Might Also Like