Proximal Realignment: Masterclass in Medial Patellofemoral Ligament Repair
Key Takeaway
This masterclass provides an exhaustive, real-time walkthrough of Medial Patellofemoral Ligament (MPFL) repair. We cover comprehensive surgical anatomy, meticulous preoperative planning, and granular, step-by-step intraoperative execution from a surgeon's perspective. Learn critical pearls, pitfalls, and post-operative management for patellar instability, ensuring optimal outcomes for your patients.
Alright, team, gather 'round. Welcome to the operating theater. Today, we're addressing a common yet often debilitating issue: patellar instability. Specifically, we're performing a primary repair of the Medial Patellofemoral Ligament (MPFL) at its patellar insertion. This is a crucial procedure for patients experiencing recurrent patellar dislocations, especially when an acute injury with an amenable tear pattern is identified.
Understanding Patellar Instability: The Foundation
Before we even touch the skin, let's quickly review the core principles. In most cases, patellar dislocation stems from an injury to the medial retinacular ligaments, predominantly the MPFL. This ligament is the primary ligamentous restraint against lateral patellar displacement. When it's compromised, lateral patellar mobility increases beyond normal physiological limits. Our goal today is to restore its functional competency.
The natural history is clear: a first-time dislocator has about a 17% chance of redislocation, but for those with recurrent instability, that risk can soar to 50% or more. This is why we intervene surgically in selected cases.
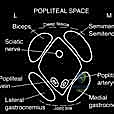
Comprehensive Surgical Anatomy: Knowing Your Territory
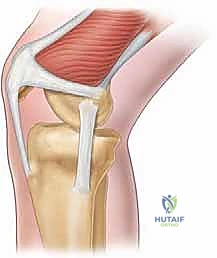
The main stabilizer of the patella in a normal knee is the bony congruence between the patella and the trochlear groove. However, in many of our patients with instability, trochlear dysplasia plays a significant role, shifting a greater burden onto the medial retinacular ligaments, particularly the MPFL. Even with a normal trochlea, MPFL deficiency alone can cause symptomatic instability.
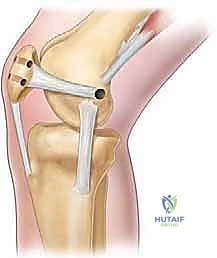
The MPFL is an extra-articular ligament, residing in Layer 2 of the medial knee, nestled between the superficial medial retinaculum and the deeper joint capsule. The distal fibers of the vastus medialis obliquus (VMO) tendon lie superficially and anteriorly, inserting onto the anterior third of the MPFL.
- Dimensions: The MPFL is approximately 58 mm long, with an average width of 12 mm and a thickness of 0.44 mm at its midpoint. It fans out anteriorly, inserting onto the proximal two-thirds of the patella's medial margin.
- Femoral Attachment: This is critical. The femoral attachment of the MPFL is posterosuperior to the medial femoral epicondyle and just distal to the adductor tubercle when the knee is fully extended. Specifically, the center of its anterior edge is located approximately 9.5 mm proximal and 5.0 mm posterior to the center of the medial femoral epicondyle. This precise anatomical landmark is crucial for both reconstruction and understanding the biomechanics of repair.
FIG 1 • Schematic diagram of the medial knee. The medial patellofemoral ligament (MPFL) arises between the adductor tubercle and medial epicondyle, then runs forward just deep to the distal vastus medialis obliquus (VMO) to attach to the superior two thirds of the medial patellar margin.
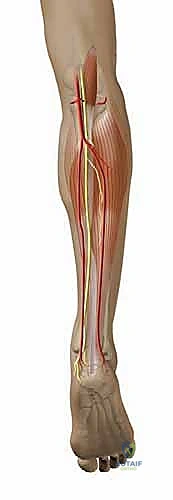
- Neurovascular Structures: Fellows, always be mindful of the neurovascular structures in this region.
- The saphenous nerve and its infrapatellar branch are superficial structures that cross the medial knee, particularly vulnerable during skin incision and superficial dissection. Careful blunt dissection and protection are paramount to prevent iatrogenic neuralgia.
- The descending genicular artery and its branches are also in the vicinity, requiring meticulous hemostasis.
- Muscular Intervals: For our current procedure, we'll be working through the subcutaneous tissue and then carefully dissecting through the retinaculum to expose the MPFL. If we were performing a reconstruction requiring graft harvest, we'd consider intervals related to hamstring tendons (gracilis/semitendinosus) or quadriceps tendon.
Preoperative Planning: The Roadmap to Success
Our patient today presents with recurrent lateral patellar dislocations and an MRI confirming a discrete avulsion of the MPFL from its patellar insertion, without significant comminution or chronic attenuation, making them an excellent candidate for primary repair.
-
Imaging Review:
- Plain Radiographs: We've thoroughly reviewed the standing AP, true lateral (at 30 degrees flexion), and axial patellar views (at 30 or 45 degrees flexion). We're looking for:
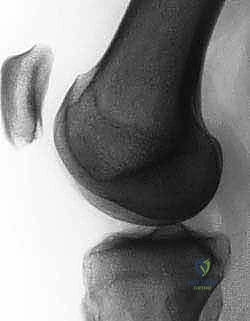
- Trochlear Dysplasia: Remember the "crossing sign" on the true lateral radiograph, where the floor of the trochlea crosses the anterior borders of both femoral condyles. Also, we assess trochlear prominence; a prominence of 3 mm or more indicates dysplasia.
- Patella Alta: Measured by the Caton-Deschamps ratio. A ratio of 1.2 or greater predisposes to instability due to late engagement of the patella. If significant, a tibial tubercle osteotomy and distalization might be considered in conjunction, though not for today's case.
- Avulsion Fractures/Loose Bodies: These are critical to identify preoperatively. Our patient has none requiring separate fixation.
- MRI Scans: These are invaluable. They confirm the location and degree of medial soft tissue injury. In our patient, we clearly see an avulsion from the patellar insertion. We've also ruled out significant osteochondral injuries or loose bodies.
- MPFL injuries commonly occur near the femoral attachment or as avulsions off the femur, but also as midsubstance tears or avulsions off the patella. MRI helps us localize the precise injury pattern.
- Plain Radiographs: We've thoroughly reviewed the standing AP, true lateral (at 30 degrees flexion), and axial patellar views (at 30 or 45 degrees flexion). We're looking for:
FIG 2A. On a true lateral radiograph, trochlear dysplasia is evident when the floor of the trochlea crosses the anterior borders of both femoral condyles (ie, the “crossing” sign).
<figure class="operative-step-slider my-4 text-center p-3 border rounded shadow-sm bg-light">
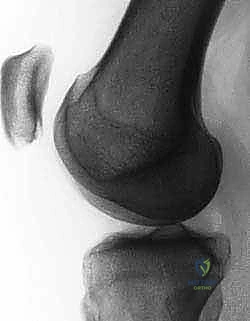
FIG 2B. Measurement of the trochlear prominence on the lateral view according to Dejour et al. X and Y are lines tangential to the anterior and posterior cortices of the distal femoral metaphysis, respectively. Line Z crosses the most prominent point of the line of the trochlear groove (point B ) and the upper aspect of the posterior border of the condyles. Line Z crosses the anterior aspect of the lateral condyle (point A ) and line X (point C ). The distance BC (in mm) is the trochlear prominence.
<figure class="operative-step-slider my-4 text-center p-3 border rounded shadow-sm bg-light">

FIG 2C. Lateral radiograph demonstrating a knee with positive trochlear prominence. Note that the floor of the trochlea lies anterior to the line tangential to the anterior cortex of the distal femur.
<figure class="operative-step-slider my-4 text-center p-3 border rounded shadow-sm bg-light">
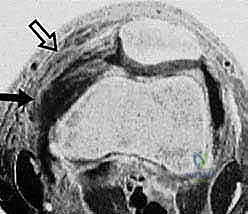
FIG 2D. Measurement of the tibial tuberosity–trochlear groove (TT-TG) offset, the transverse distance between the apex of the anterior tibial tuberosity and the center of the trochlear groove. Measurements are made on superimposed axial CT or MRI images.
<figure class="operative-step-slider my-4 text-center p-3 border rounded shadow-sm bg-light">
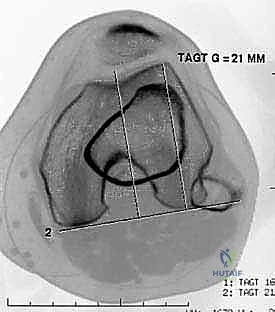
FIG 2E. Transverse gradient-echo image of the knee obtained at the level of the insertion of the adductor magnus tendon 3 weeks after lateral patellar dislocation demonstrates a complete tear of the femoral origin of the MPFL, with MPFL fibers retracted anteriorly ( solid arrow ). Partial injury, with surrounding edema, to the midsubstance of the patellar retinaculum ( open arrow ) also is seen.
<figure class="operative-step-slider my-4 text-center p-3 border rounded shadow-sm bg-light">
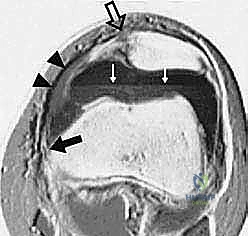
FIG 2F. Transverse gradient-echo image of the knee in a different patient 2 days after lateral patellar dislocation showing partial injury to the femoral origin of the MPFL. The MPFL fibers ( solid white arrow ) are wavy and show longitudinal split, and there is extensive surrounding edema. A complete tear ( open arrow ) is seen in the patellar insertion of the medial patellar retinaculum. A large joint effusion with layering ( black arrows ) is present, consistent with hemarthrosis. Note also the inferior fibers of the VMO ( arrowheads ).
- Examination Under Anesthesia (EUA): This is a non-negotiable step. We'll perform a thorough physical exam once the patient is anesthetized and muscles are relaxed. This will confirm the excessive lateral patellar mobility we observed in clinic and allow us to assess the degree of laxity without patient guarding. We'll check the apprehension sign, J-sign, and the check-rein sign (an analogous Lachman test for the MPFL). We'll also re-evaluate for any palpable defects in the retinaculum.
Patient Positioning and Setup
Alright, let's get our patient positioned.
- Supine Position: The patient is positioned supine on the operating table. Ensure adequate padding at all pressure points.
- Leg Holder (Optional but Recommended): For this open repair, we won't be using an adjustable leg holder for arthroscopy, but if we were performing a diagnostic arthroscopy first, it would be crucial to allow for precise knee flexion adjustments. Today, we need the leg free to move through a full range of motion.
- Tourniquet: A thigh tourniquet is applied high on the thigh. We'll inflate this after exsanguination to ensure a bloodless field, which is paramount for visualizing delicate structures like the MPFL.
- Fluoroscopy: While not strictly mandatory for a primary patellar-sided MPFL repair, having fluoroscopy available is always a good practice, especially if there's any uncertainty about patellar tracking or if we needed to place fixation into bone. We'll have a C-arm draped and ready to go.
- Prep and Drape: Standard sterile prep and drape of the entire lower extremity, from the mid-thigh to the foot, ensuring the knee can be freely manipulated through its full arc of motion.
Intraoperative Execution: Primary MPFL Repair at the Patellar Insertion
Now, let's begin the surgery. Fellows, observe closely. We're aiming for meticulous technique and anatomical restoration.
Step 1: Skin Incision and Superficial Dissection
"Scalpel, please."
- Incision Planning: We're making a midline skin incision over the medial aspect of the patella. It extends from the superior pole of the patella distally to approximately the mid-aspect of the patellar tendon. This provides ample exposure to the medial patellar border and the entire course of the MPFL at its patellar insertion.
- Pearl: Mark your incision carefully with a sterile pen before cutting. Consider the patient's skin creases and potential for future procedures.
- Skin Incision: Make a sharp incision through the skin.
- Subcutaneous Dissection: Using electrocautery, we'll carefully dissect through the subcutaneous fat. Maintain a shallow plane initially.
- Surgical Warning:
> Be extremely vigilant for the infrapatellar branch of the saphenous nerve. It typically crosses the surgical field obliquely. Identify it, gently mobilize it, and protect it with vessel loops or retractors. Injury to this nerve can lead to significant and debilitating neuropathic pain postoperatively.
- Surgical Warning:
- Deepening the Incision: Continue dissection down to the deep fascia.
- Pearl: Use careful hemostasis with electrocautery as you proceed. A dry field is a clean field, allowing for optimal visualization of the delicate retinacular structures.
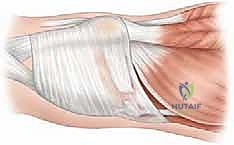
Step 2: Exposing the Medial Retinaculum and MPFL
- Fascial Incision: We'll now incise the deep fascia, exposing the medial retinaculum.
- Retinacular Dissection: Using sharp and blunt dissection, carefully elevate the superficial layers of the medial retinaculum.
- Surgical Warning:
> The VMO tendon lies superficially and anteriorly, inserting into the MPFL. Be careful not to inadvertently damage the VMO fibers, as this muscle is crucial for patellar tracking and stability.
- Surgical Warning:
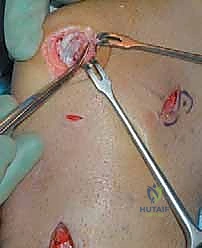
- MPFL Inspection: Now, we'll meticulously inspect the MPFL itself, both visually and digitally, along its entire length. We need to identify all sites of injury.
- In our patient, we clearly see the avulsed MPFL fibers from the medial border of the patella. The tissue appears healthy and amenable to direct repair.
- Pearl: Look for the characteristic wavy appearance of torn ligament fibers, hematoma, or a clear discontinuity. Palpate for defects.
- Pitfall: Don't assume a single site of injury. Multiple sites, including proximal or distal avulsions, midsubstance tears, or femoral origin tears, can coexist. A thorough inspection is paramount.
Intraoperative view showing the medial patellar border with the avulsed MPFL fibers identified.
Step 3: Preparing the Patellar Insertion Site
"Alright, let's prepare our bed for the repair."
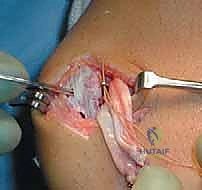
- Debridement: Using a small rongeur or curette, we will gently debride any non-viable or frayed tissue from the avulsed end of the MPFL. The goal is to present healthy, bleeding tissue for repair.
- Patellar Decortication: On the medial border of the patella, at the site of the avulsion, we will use a small osteotome or burr to gently decorticate the bone. This creates a fresh, bleeding surface for optimal ligament healing. Avoid excessive bone removal.
- Pearl: A light decortication is sufficient. We're aiming for a raw, cancellous bone surface, not a deep trough.
- Microfracture (Optional): If the bone bed appears sclerotic or less vascular, a few small microfracture holes with a K-wire or awl can be considered to promote bleeding and healing factors.
Intraoperative image demonstrating preparation of the patellar insertion site, with gentle decortication to promote healing.
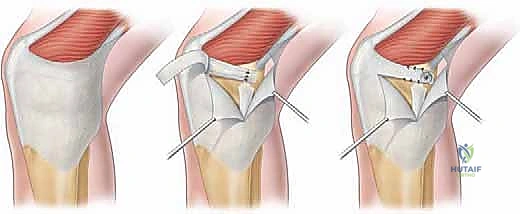
Step 4: Suture Placement into the MPFL and Patellar Fixation
"Now for the repair itself. We'll use robust, non-absorbable sutures to secure this."
- Suture Placement into MPFL: Using a strong, non-absorbable suture (e.g., 2-0 FiberWire or similar), we will place multiple locking-loop or Krackow sutures into the substance of the avulsed MPFL tissue.
- Pearl: Ensure you capture a good amount of healthy ligamentous tissue with each stitch to prevent pull-out. Typically, 2-3 strong sutures are sufficient, spaced evenly across the avulsed edge.
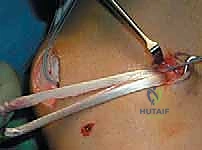
- Anchor Placement: We will now place two small, fully threaded suture anchors into the medial border of the patella.
- Drill Hole Preparation: Using a drill guide, create pilot holes for the anchors. Aim for the superior and inferior aspects of the MPFL footprint on the patella.
- Surgical Warning:
> Drill under constant direct visualization. Ensure the drill bit does not penetrate the articular surface of the patella. The patella is a relatively thin bone, and intra-articular penetration can cause significant chondral damage. - Anchor Insertion: Insert the suture anchors securely into the drilled holes, ensuring they are flush with the bone surface.
- Pearl: Predrill the anchor holes carefully. Test the security of the anchors after insertion with a gentle tug. They should be absolutely rock-solid.
Intraoperative view illustrating the placement of suture anchors into the medial patellar facet, preparing for MPFL reattachment.
Close-up view of the suture anchors securely placed into the patella, with sutures ready for passage through the avulsed MPFL.
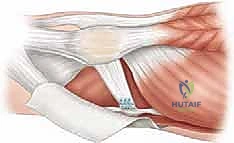
Step 5: Suture Passage and Tensioning
"This is where we restore the tension. Precision is key."
- Suture Passage: Pass the sutures from the MPFL through the eyelets of the respective anchors. Ensure the sutures are organized to avoid tangling.
- Tensioning and Knot Tying:
- Knee Flexion: Bring the knee to approximately 30 degrees of flexion. This is the critical angle for tensioning the MPFL, as it's the point where the patella typically engages the trochlear groove and the MPFL is under physiological tension.
- Patellar Tracking Assessment: While holding the knee at 30 degrees, gently translate the patella laterally. The goal is to achieve a stable patella with a firm endpoint, but without overtensioning.
- Surgical Warning:
> Overtensioning is a significant pitfall! If the MPFL is overtensioned, it can lead to medial patellar subluxation, increased patellofemoral contact pressures, and anterior knee pain. The patella should still be able to translate laterally by approximately 1-2 quadrants, but with a definite, firm endpoint. If it feels too tight, release and retension. - Knot Tying: Once the appropriate tension is achieved, tie the sutures securely using multiple throws. Cut the excess suture tails.
Demonstration of suture passage and initial knot tying, carefully reapproximating the MPFL to its patellar insertion.
Final intraoperative view of the MPFL reattached to the patella with suture anchors, demonstrating anatomical restoration.
Step 6: Dynamic Assessment of Patellar Tracking
"Now, let's see how it tracks."
- Full Range of Motion: Move the knee through a full range of motion, from full extension to deep flexion. Observe the patella's tracking within the trochlear groove.
- It should track smoothly, without any signs of medial subluxation or excessive lateral excursion.
- Re-evaluate the lateral patellar translation at 30 degrees of flexion. We should have a firm endpoint, allowing approximately 1-2 quadrants of lateral translation.
- Pearl: If there's persistent instability or overtensioning, consider revising the repair. This is your last chance to get it right.
Step 7: Layered Closure
"Excellent. The repair looks solid. Let's close."
- Retinacular Closure: Close the medial retinaculum over the repaired MPFL using absorbable sutures (e.g., 2-0 Vicryl). This provides an additional layer of support and helps to reinforce the repair.
- Subcutaneous Closure: Close the subcutaneous layer with absorbable sutures (e.g., 3-0 Vicryl).
- Skin Closure: Close the skin with non-absorbable sutures or staples.
- Dressing: Apply a sterile dressing, followed by a knee immobilizer or hinged knee brace, locked in extension.
Postoperative Rehabilitation & Complication Management
Our job isn't done until the patient is back to their functional best. Rehabilitation is key.
- Immobilization: The patient will be placed in a knee immobilizer or hinged brace, locked in full extension, for approximately 2-4 weeks to protect the healing repair.
- Weight-Bearing:
- Partial Weight-Bearing (PWB): Initially, PWB with crutches for the first 2-4 weeks, as tolerated.
- Full Weight-Bearing (FWB): Progress to FWB as comfort allows and with good quadriceps control.
- Range of Motion (ROM):
- Weeks 0-2: Gentle passive ROM from 0-30 degrees initially, gradually increasing to 0-60 degrees by week 2, as tolerated. Avoid active flexion against gravity initially.
- Weeks 2-4: Progress ROM to 0-90 degrees. Begin gentle active-assisted ROM.
- Weeks 4-6+: Gradually increase ROM to full, with emphasis on quadriceps strengthening (closed-chain exercises initially, then open-chain).
- Physical Therapy: A structured physical therapy program is crucial, focusing on:
- Quadriceps strengthening (VMO emphasis).
- Hamstring and gluteal strengthening.
- Core stability.
- Proprioception and balance training.
- Gait training.
- Return to Activity:
- Light Activities: Typically 3-4 months post-op.
- Pivoting Sports: Not before 6 months, and only after achieving full ROM, adequate strength (at least 80% of the contralateral limb), and satisfactory dynamic patellar tracking.
- DVT Prophylaxis: Standard DVT prophylaxis protocols will be followed, typically with chemical prophylaxis (e.g., low molecular weight heparin) for high-risk patients or extended periods of immobilization.
- Complication Management:
- Wound Dehiscence/Infection: Meticulous wound care, appropriate antibiotics, and surgical debridement if necessary.
- Hardware Failure: Rare in MPFL repair, but if an anchor pulls out, revision surgery may be necessary.
- Persistent Instability: If the patient continues to experience instability despite appropriate rehabilitation, further imaging and evaluation are warranted. This could indicate inadequate tensioning, graft failure (in reconstruction), or unaddressed underlying bony morphology (e.g., severe trochlear dysplasia, patella alta, or TT-TG offset requiring an osteotomy).
- Overtensioning/Medial Patellar Subluxation: This is a major concern. If symptoms of medial patellar pain or stiffness develop, or if imaging reveals medial subluxation, a revision might be required to release the repair and retension it appropriately.
- Neurovascular Injury: If an iatrogenic nerve injury is suspected, early referral to a nerve specialist for evaluation and potential intervention is critical.
Alright, team, that concludes our masterclass on primary MPFL repair at the patellar insertion. Remember, attention to detail, thorough anatomical knowledge, and meticulous execution are paramount for achieving excellent outcomes for our patients. Any questions?
Additional Intraoperative Imaging & Surgical Steps
REFERENCES
- Andrade A, Thomas N. Randomized comparison of operative vs. nonoperative treatment following first time patellar dislocation. Presented at the European Society for Sports, Knee and Arthroscopy, Rome, 2002.
You Might Also Like