Principles and Techniques of Orthopaedic Microsurgery
Key Takeaway
Microsurgery is an essential orthopaedic discipline requiring specialized instrumentation and optical magnification to repair structures under 2 mm in diameter. Mastery demands rigorous laboratory training, strict ergonomic discipline, and profound anatomical knowledge. This guide details the foundational principles of microvascular anastomosis, peripheral nerve repair, replantation sequence, and free tissue transfer, providing surgeons with evidence-based protocols for managing complex upper and lower extremity trauma.
Introduction to Orthopaedic Microsurgery
Microsurgery has fundamentally transformed the landscape of orthopaedic surgery, evolving from an experimental pursuit into an indispensable clinical discipline. It encompasses surgical procedures performed on structures so minute—typically less than 2 mm in diameter—that optical magnification via an operating microscope is an absolute prerequisite.
The application of microvascular and microneural techniques extends across a broad spectrum of orthopaedic challenges. These include the replantation of amputated digits and limbs, the revascularization of ischemic extremities, the repair of complex peripheral nerve injuries, and the transfer of composite free tissue grafts (soft tissue, muscle, and vascularized bone) for the reconstruction of massive traumatic or oncologic defects.
Mastery of microsurgery cannot be acquired spontaneously or solely through clinical observation. It demands a rigorous, dedicated commitment to laboratory training. Surgeons typically require 6 to 8 hours of daily practice in an animal or simulation laboratory over a period of 2 to 3 weeks to develop the baseline psychomotor skills necessary for clinical application. Furthermore, regular clinical or laboratory practice is essential to maintain this highly perishable skill set.
Ergonomics and Surgeon Preparation
The success of a microsurgical procedure is inextricably linked to the physiological and ergonomic state of the surgeon. Because these procedures frequently span many hours, optimizing efficiency and minimizing fatigue are paramount. Extraneous movements and physiological tremors, which are imperceptible to the naked eye, are massively amplified under 16× to 40× magnification.
Clinical Pearl: Physiological tremor occurs at a frequency of 8 to 12 Hz. To minimize tremor amplitude, the surgeon must avoid sympathomimetic stimulants (such as caffeine) prior to surgery, ensure adequate rest, and maintain a comfortable, neutral core posture.
The Microsurgical Posture
- Stable Platform: The surgeon’s elbows and the ulnar borders of the hands must be firmly braced on a stable, unyielding platform.
- Visual Discipline: Surgeons must discipline themselves to maintain constant visual contact with the operating field through the microscope. Looking away from the eyepieces to retrieve instruments breaks concentration and requires visual re-accommodation.
- Proprioceptive Awareness: The surgeon must develop a practiced, proprioceptive awareness of the location of their unseen hands, relying on tactile feedback and spatial memory to navigate the surgical field and interact with the surgical assistant.
Optical Magnification Systems
While standard surgical loupes providing 3.5× to 5× magnification are sufficient for the macroscopic dissection of pedicles and larger neurovascular bundles, the operating microscope is mandatory for true microsurgical repair.
- Dissection and Exposure: Magnification of 6× to 10× is optimal for the delicate dissection of small nerves and vessels, allowing for a wider field of view and greater depth of field.
- Anastomosis and Coaptation: Magnification of 16× to 25× is required for the precise placement of sutures during microvascular anastomosis and perineurial nerve repair.
- Microscope Configuration: A double binocular (diploscope) microscope is essential, allowing the primary surgeon and the assistant to view the identical surgical field simultaneously. Triploscopes are available for a second assistant or observer. Modern microscopes are equipped with electrical foot controls for X-Y axis translation, focus, and zoom, ensuring the surgeon's hands remain sterile and engaged in the operative field.
Microsurgical Instrumentation and Suture Materials
A simplified, highly specialized approach to instrumentation is preferred to reduce clutter and cognitive load. Instruments must be meticulously maintained, as microscopic burrs or misalignments in forceps tips will crush delicate intimal tissues.
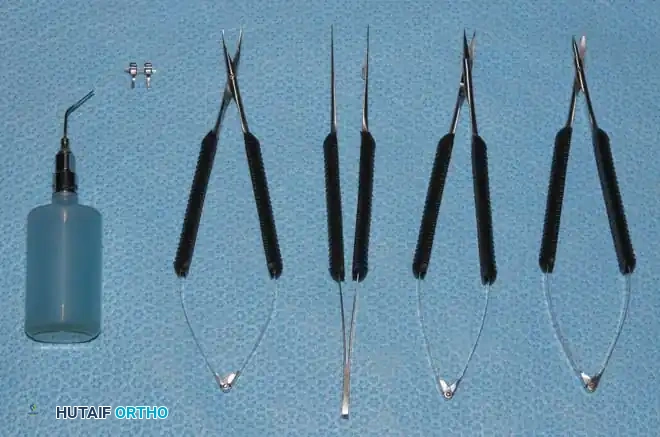
Essential Instrumentation
- Jeweler’s Forceps: A set of two or three straight and curved jeweler’s forceps (e.g., Dumont #3, #4, #5) are the workhorses of microsurgery. They are used for tissue handling, suture tying, and vessel dilation. Modified jeweler’s forceps are also utilized as bipolar coagulation forceps for the precise, low-thermal-spread coagulation of small side branches.
- Microscissors: Spring-loaded microscissors are required for adventitial stripping and precise vessel transection. Adventitial scissors have sharp, fine tips, while vessel-cutting scissors often have slightly serrated or angled blades to prevent the vessel from slipping during transection.
- Microvascular Clamps: Approximator clamps (e.g., Acland clamps) are used to secure vessel ends without causing crush injury to the endothelium. Clamps with a closing pressure of less than 30 g/mm² are mandatory; exceeding this pressure induces intimal damage, exposing subendothelial collagen and precipitating catastrophic thrombosis.
- Ancillary Tools: Microirrigating cannulas (for heparinized saline irrigation) and dilating probes (for gentle mechanical dilation of vessel lumens) are critical for vessel preparation.
Suture Materials
Microsurgical sutures are composed of monofilament nylon, ranging in diameter from 18 to 35 µm, swaged onto atraumatic, taper-point or cutting microneedles with diameters of 50 to 139 µm.
* 9-0 Nylon: Used for larger vessels (2–3 mm) and epineurial nerve repairs.
* 10-0 Nylon: The standard for digital artery and vein anastomoses (1–2 mm).
* 11-0 and 12-0 Nylon: Reserved for sub-millimeter vessels, pediatric replantations, and distal fingertip (zone I) replantations.
Principles of Microvascular Anastomosis
The primary objective of microvascular surgery is to achieve a patent, tension-free anastomosis with precise intimal coaptation. Technical errors are the leading cause of anastomotic failure.
Step-by-Step Anastomosis Technique
- Preparation and Mobilization: The vessel must be mobilized sufficiently to allow for a tension-free repair. All damaged tissue (zone of injury) must be resected back to healthy intima, which appears smooth, white, and glistening under high magnification.
- Adventitial Stripping: The adventitia contains highly thrombogenic factors. It must be meticulously stripped back 1 to 2 mm from the cut ends of the vessel. Failure to do so may result in adventitia being dragged into the lumen by the suture, leading to immediate platelet aggregation and thrombosis.
- Dilation: The vessel ends are gently dilated using jeweler's forceps or a specialized vessel dilator to overcome vasospasm and expand the lumen.
- Suture Placement (Triangulation Technique):
- The first two sutures are placed 120 degrees apart (e.g., at the 10 o'clock and 2 o'clock positions).
- Traction on these sutures causes the anterior wall to drop away from the posterior wall, preventing inadvertent suturing of the back wall (the most common technical error).
- The anterior wall is completed with interrupted sutures.
- The approximator clamp is then flipped 180 degrees to expose the posterior wall, which is subsequently sutured.
- Release and Assessment: The downstream clamp is released first to check for back-bleeding and retrograde filling, followed by the upstream clamp. A patent anastomosis will demonstrate a rapid, expansile pulsation and a positive "empty-and-refill" (Acland) test.
Surgical Warning: Never accept a suboptimal anastomosis. If there is persistent leaking, lack of expansile pulsation, or visible thrombus formation, the anastomosis must be excised and completely redone. "Hoping" a poor anastomosis will stay patent inevitably leads to flap loss or replant failure.
Microsurgical Treatment of Peripheral Nerve Injuries
The goal of microneural surgery is to direct regenerating axonal sprouts across the zone of injury into the distal endoneurial tubes with minimal scar tissue interposition.
Primary Neurorrhaphy
Primary repair is indicated for sharp, clean lacerations where the nerve ends can be approximated without tension.
* Epineurial Repair: The standard technique involves placing 8-0 or 9-0 nylon sutures through the epineurium. Alignment is guided by surface vascular landmarks and fascicular topography.
* Group Fascicular (Perineurial) Repair: In nerves with distinct motor and sensory fascicular groups (e.g., the ulnar nerve at the wrist), matching corresponding fascicles using 10-0 sutures through the perineurium can improve functional outcomes.
Interfascicular Grafting
When a nerve defect exists such that primary repair would induce tension, an autologous nerve graft is mandatory. Tension causes ischemia at the repair site, leading to dense scarring and blocked axonal regeneration.
* The sural nerve is the most common donor, providing up to 30–40 cm of graft material.
* The graft is reversed to minimize axonal dispersion through branching side-boughs.
* Multiple cables are used to match the cross-sectional area of the injured nerve.
Principles of Replantation and Revascularization
Replantation is the reattachment of a completely amputated body part, whereas revascularization is the restoration of blood flow to an incompletely amputated part.
Indications and Contraindications
Indications:
* Thumb amputations (at any level).
* Multiple digit amputations.
* Any amputation in a child.
* Single digit amputations in zone I (distal to the FDS insertion) for aesthetic and functional preservation.
* Hand, forearm, or arm amputations (macro-replantation).
Contraindications:
* Absolute: Severe crush or avulsion injuries with extensive segmental damage; prolonged warm ischemia time (>12 hours for digits, >6 hours for major limbs containing muscle); life-threatening concomitant injuries.
* Relative: Single digit amputations in zone II (due to poor functional outcomes secondary to tendon adhesions); extreme age; severe psychiatric illness; heavy smoking.
Sequence of Repair in Replantation
Efficiency is critical to minimize ischemia time. The standard sequence of repair is:
1. Bone Fixation: Rapid, rigid fixation (often using longitudinal K-wires or intraosseous wiring) with deliberate bone shortening to allow tension-free neurovascular repair.
2. Extensor Tendon Repair: Provides immediate stability to the digit.
3. Flexor Tendon Repair: Performed before microvascular anastomosis to avoid disrupting delicate vessel repairs later.
4. Arterial Anastomosis: Restores inflow. Once the clamp is released, the part should "pink up."
5. Nerve Repair: Performed while the field is relatively bloodless.
6. Venous Anastomosis: Typically, two veins should be repaired for every one artery to ensure adequate outflow and prevent venous congestion.
7. Skin Closure: Must be loose and tension-free. Fasciotomies or skin grafts are frequently required.
Clinical Pearl: In major limb replantations (involving significant muscle mass), the sequence is altered. Arterial shunting or immediate arterial repair is performed before orthopedic fixation to minimize muscle ischemia and prevent life-threatening reperfusion injury (myoglobinuria, hyperkalemia).
Overview of Free Tissue Transfer (Flaps)
Single-stage composite tissue transfer (free flaps) allows for the reconstruction of massive defects that cannot be managed with local tissues.
Selection of Free Flaps
The choice of flap depends on the defect's requirements (coverage, volume, functional muscle, or structural bone).
- Fasciocutaneous Flaps:
- Anterolateral Thigh (ALT) Flap: Based on the descending branch of the lateral circumflex femoral artery. Highly versatile, provides large amounts of pliable skin with minimal donor site morbidity.
- Lateral Arm Flap: Based on the posterior radial collateral artery. Excellent for smaller, thin defects in the hand.
- Muscle and Musculocutaneous Flaps:
- Latissimus Dorsi: Based on the thoracodorsal artery. Provides massive surface area coverage and volume for large lower extremity defects. Can be innervated for functional muscle transfer (e.g., restoring elbow flexion).
- Gracilis: Based on the medial circumflex femoral artery. The workhorse for functioning free muscle transfer (e.g., facial reanimation, brachial plexus reconstruction).
- Vascularized Bone Transfers:
- Free Vascularized Fibula: Based on the peroneal artery. The gold standard for reconstructing long bone defects greater than 6 cm (e.g., post-tumor resection or infected non-unions). It hypertrophies over time in response to mechanical loading.
Postoperative Monitoring and Rehabilitation
The first 48 to 72 hours postoperatively are critical, as this is the window during which microvascular thrombosis is most likely to occur.
Monitoring Techniques
- Clinical Observation: The most reliable method. Assess color, capillary refill (normal is 1-2 seconds), and tissue turgor.
- Arterial Insufficiency: Pale, cool, empty capillary refill.
- Venous Congestion: Blue/purple, swollen, rapid capillary refill (<1 second), dark bleeding upon pinprick.
- Instrumental Monitoring: Surface temperature probes (a drop of >2°C compared to a control digit indicates compromise), implantable venous/arterial Doppler probes, and tissue oximetry.
Management of Circulatory Compromise
If vascular compromise is detected, immediate intervention is required.
1. Remove restrictive dressings and release tight skin sutures.
2. Ensure the patient is warm, hydrated, and adequately oxygenated.
3. Administer systemic anticoagulation (e.g., Heparin) or antispasmodics (e.g., Chlorpromazine).
4. If conservative measures fail within 30 minutes, immediate surgical re-exploration is mandatory to salvage the replant or flap.
Rehabilitation
Rehabilitation following microsurgery is a delicate balance between protecting the microvascular anastomoses and preventing joint stiffness and tendon adhesions. Early, controlled passive motion protocols are typically initiated within the first week, guided by a specialized hand therapist, progressing to active motion and strengthening over a period of 12 to 16 weeks. Strict avoidance of smoking and secondary smoke is mandatory for at least 6 weeks postoperatively to prevent vasospasm-induced failure.
You Might Also Like
